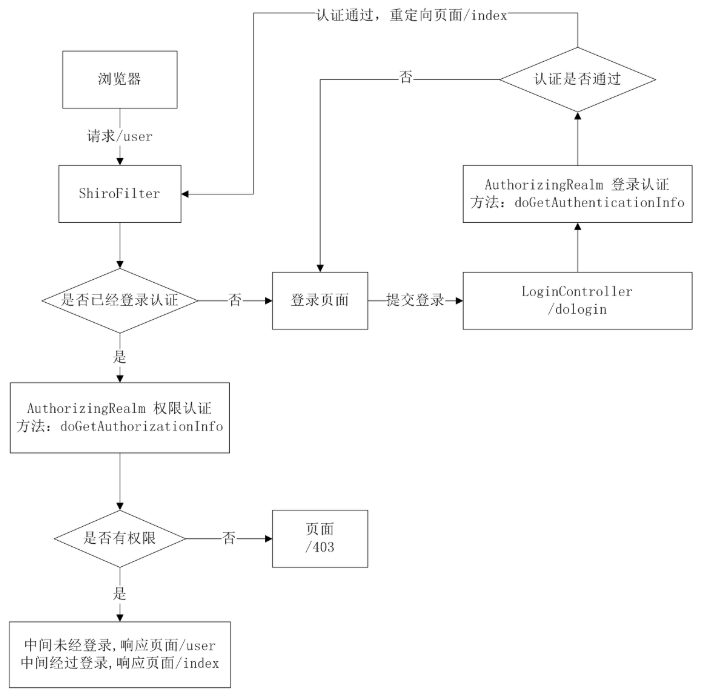
回目录 《无敌的登录认证和授权利器-shiro,还能搞成sso》
为什么要用shiro,我的理解这个轮子造的比较好,登录和权限授权是大部分应用最基本的功能,也是最容易出问题和重复性的工作, shiro将这部分模块化,采用依赖注入的模式,让用户可以比较容易自定义数据源、登录验证逻辑、权限逻辑等内容;
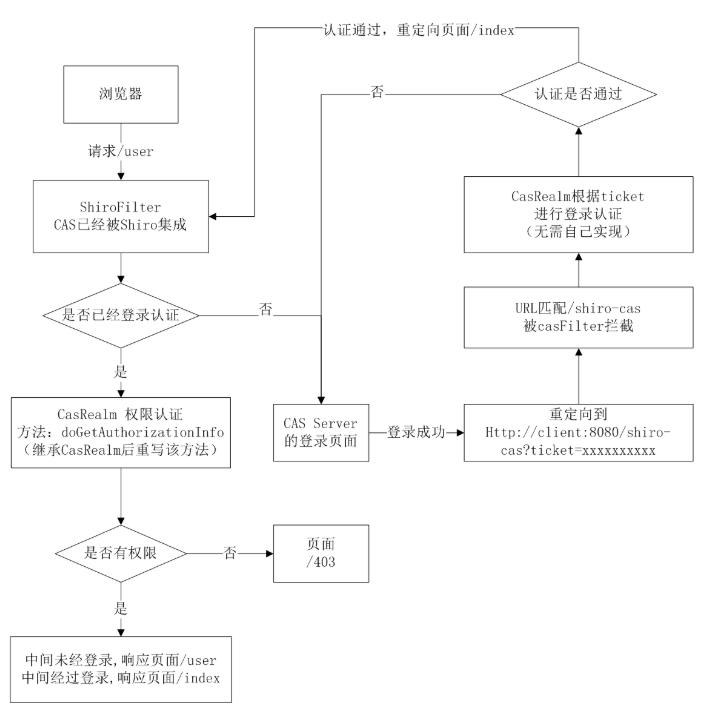
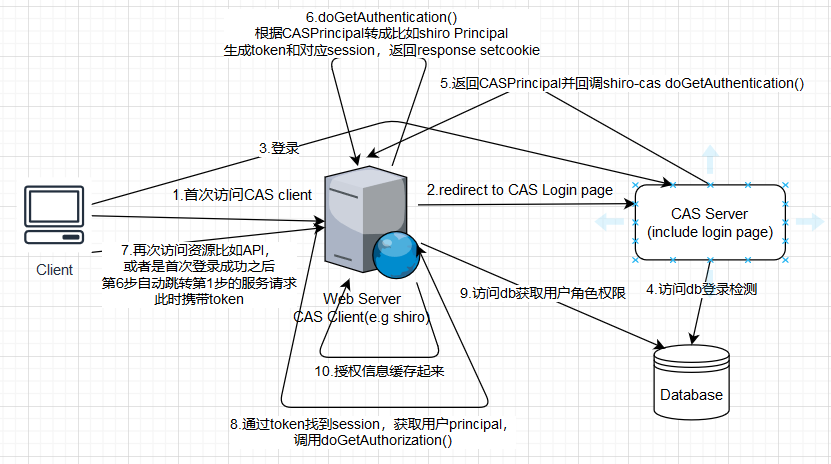
另外采用shiro也比较容易实现CAS-SSO(Central Authentication Service - Single signon (opens new window)), https://apereo.github.io/cas/development/ 当然shiro并没有out-of-box的SSO方案,之前是有shiro-cas集成支持 (opens new window),现在是已经迁移到pac4j security library for Shiro: OAuth, CAS, SAML, OpenID Connect, LDAP, JWT (opens new window)
为什么shiro不可以直接作为sso?
我猜测是这样,首先single sign on或central authentication service都是强调登录认证而非授权,不过经常用“授权”涵盖了登录认证,sso的方案需要原则上采用oauth2.0这种资源服务器和授权服务器分离的方式比如spring security,所有想要通过oauth2.0登录授权的客户端(比如网站服务器端),都需要通过client id secret方式认证,具体参考oauth2, ,或者采用像CAS这种client-server架构,server跟client通过ca证书来认证,又或者网站服务器本身就是资源服务器,然后剥离出一个授权服务器;
而shiro完全是个基于servlet filter组件,基本上是通过拦截traffic的方式来“插入”权限功能,可以使用默认拦截器或者自定义拦截器,基于拦截自然无法跟资源或者web服务器解耦开,这也决定了shiro本身无法直接作为sso授权服务器, 所以无法作为sso授权服务器跟更多的客户端(比如多个网站)交互,一般只是内嵌到网站服务端或者API服务器端作为其一部分使用,所以如果实现sso,shiro只能将其authenticate功能割让给CAS,然后自己只保留authorization功能;
简单来说,shiro本身不可以作为sso服务端,只能作为sso client端,跟CAS集成如此,跟oauth2集成也是一样是作为OAuthClient;
直观的看下shiro和CAS集成的流程图:
Apache Shiro is a powerful and flexible open-source security framework that cleanly handles
- authentication,
- authorization,
- enterprise session management [Use a Session API in any environment, even without web or EJB containers.]
- cryptography.
Apache shiro http://shiro.apache.org/
# 1.key concepts

# 1.1 关键模块
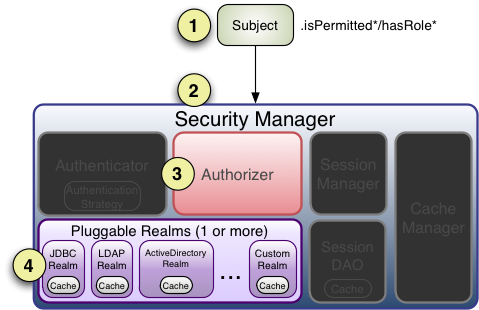
- Subject(org.apache.shiro.subject.Subject)): a security-specific ‘view’ of an application user, currently executing user -- a person/a 3rd-party service/daemon account/cron job; bond to SecurityManager
- SecurityManager(org.apache.shiro.mgt.SecurityManager): 'umbrella' object that coordinates its internal security components; behinde the scenes when you interact with a subject, does all the heavy lifting for any 'Subject' operation;
- Realms(org.apache.shiro.realm.Realm): a security-specific DAO bridge/connector between shiro(SecurityManager) and your application's security data; out-of-the-box Realms: directories(LDAP),relational databases(JDBC),text config(INI,properties)
- Authenticator (org.apache.shiro.authc.Authenticator): executing and reacting to authentication(login) attempts by users; coordinate the Realms;
- Authorizer(org.apache.shiro.authz.Authorizer) coordinate with multiple back-end data sources to access role and permission information;
- SessionManager (org.apache.shiro.session.mgt.SessionManager) SessionDAO allow any datasource to be used to persist sessions
- CacheManager (org.apache.shiro.cache.CacheManager) caching has always been a first-clss architectural feature to improve performance while using these data sources;
- Cryptography (org.apache.shiro.crypto.*)
To simplify configuration and enable flexible configuration/pluggability, Shiro’s implementations are all highly modular in design - so modular in fact, that the SecurityManager implementation (and its class-hierarchy) does not do much at all.
Instead, the SecurityManager implementations mostly act as a lightweight ‘container’ component, delegating almost all behavior to nested/wrapped components. This ‘wrapper’ design is reflected in the detailed architecture diagram above.
The SessionManager knows how to create and manage user Session lifecycles to provide a robust Session experience for users in all environments. Shiro has the ability to natively manage user Sessions in any environment, even if there is no Web/Servlet or EJB container available. By default, Shiro will use an existing session mechanism if available, (e.g. Servlet Container), but if there isn’t one, such as in a standalone application or non-web environment, it will use its built-in enterprise session management to offer the same programming experience. The SessionDAO exists to allow any datasource to be used to persist sessions.
https://shiro.apache.org/architecture.html
简言之,从Dependency Injection的角度来看,SecurityManager扮演的角色就是容器或者根节点或家长管家类;
另一些关键词:
Principal: any identifying attribute of an application user (Subject). An ‘identifying attribute’ can be anything that makes sense to your application - a username, a surname, a given name, a social security number, a user ID, etc.
Credential: a piece of information that verifies the identity of a user/Subject. One (or more) credentials are submitted along with Principal(s) during an authentication attempt to verify that the user/Subject submitting them is actually the associated user; Credentials are usually very secret things that only a particular user/Subject would know, such as: a password or a PGP key or biometric attribute or similar mechanism.
Role: In many applications it is a nebulous concept at best that people use to implicitly define security policies. Shiro prefers to interpret a Role as simply a named collection of Permissions.
Implicit Roles: Most people use roles as an implicit construct: where your application implies a set of behaviors (i.e. permissions) based on a role name only. With implicit roles, there is nothing at the software level that says “role X is allowed to perform behavior A, B and C”. Behavior is implied by a name alone.
Explicit Roles: An explicit role however is essentially a named collection of actual permission statements. In this form, the application (and Shiro) knows exactly what it means to have a particular role or not. Because it is known the exact behavior that can be performed or not, there is no guessing or implying what a particular role can or can not do.
Resources: 就是后端服务,比如/user/list, /user/create,总之是这些资源的crud
**Resource-based Access control:**Be sure to read Les Hazlewood's article, The New RBAC: Resource-Based Access Control (opens new window), which covers in-depth the benefits of using permissions and explicit roles (and their positive impact on source code) instead of the older implicit role approach.
Permissions: Permission statements reflect behavior (actions associated with resource types) only. They do not reflect who is able to perform such behavior.
# 1.2 authentication / login
关于subject.login也就是shiro这部分登录逻辑: https://shiro.apache.org/authentication.html#Authentication-sequence

Step 1: Application code invokes the Subject.login method, passing in the constructed AuthenticationToken instance representing the end-user’s principals and credentials.
Step 2: The Subject instance, typically a DelegatingSubject (or a subclass) delegates to the application’s SecurityManager by calling securityManager.login(token), where the actual authentication work begins.
Step 3: The SecurityManager, being a basic ‘umbrella’ component, receives the token and simply delegates to its internal Authenticator instance by calling authenticator.authenticate(token). This is almost always a ModularRealmAuthenticator instance, which supports coordinating one or more Realm instances during authentication. The ModularRealmAuthenticator essentially provides a PAM-style paradigm for Apache Shiro (where each Realm is a ‘module’ in PAM terminology).
Step 4:
a) If more than one Realm is configured for the application, the ModularRealmAuthenticator instance will initiate a multi-Realm authentication attempt utilizing its configured AuthenticationStrategy. Before, during and after the Realms are invoked for authentication, the AuthenticationStrategy will be called to allow it to react to each Realm’s results. We will cover AuthenticationStrategies soon.
b) If only a single Realm is configured, it is called directly - there is no need for an AuthenticationStrategy in a single-Realm application.
Step 5: Each configured Realm is consulted to see if it supports the submitted AuthenticationToken. If so, the supporting Realm’s getAuthenticationInfo method will be invoked with the submitted token. The getAuthenticationInfo method effectively represents a single authentication attempt for that particular Realm. We will cover the Realm authentication behavior shortly.
# 1.3 authoization / access control
https://shiro.apache.org/authorization.html
Step 1: Application or framework code invokes any of the Subject hasRole, checkRole, isPermitted*, or checkPermission* method** variants, passing in whatever permission or role representation is required.
Step 2: The Subject instance, typically a DelegatingSubject (or a subclass) delegates to the application’s SecurityManager by calling the securityManager’s nearly identical respective hasRole, checkRole, isPermitted*, or checkPermission* method** variants (the securityManager implements the org.apache.shiro.authz.Authorizer interface, which defines all Subject-specific authorization methods).
Step 3: The SecurityManager, being a basic ‘umbrella’ component, relays/delegates to its internal org.apache.shiro.authz.Authorizer instance by calling the authorizer’s respective hasRole, checkRole, isPermitted*, or checkPermission* method**. The authorizer instance is by default a ModularRealmAuthorizer instance, which supports coordinating one or more Realm instances during any authorization operation.
Step 4: Each configured Realm is checked to see if it implements the same Authorizer interface. If so, the Realm’s own respective hasRole, checkRole, isPermitted*, or checkPermission* method** is called.
上面流程是“标准”的授权方式,还有一种方式是继承扩展拦截器filter,直接在filter中做检查
授权方法:
- 基于角色 role-based security
- 基于权限 permission-based security
# 2.实例代码剖析
# 2.1 基于shiro-spring-boot-web-starter简单demo分析
<dependency>
	<groupId>org.apache.shiro</groupId>
	<artifactId>shiro-spring-boot-web-starter</artifactId>
	<version>${shiro.version}</version>
</dependency>
# 2.1.1 Realm注入
首先通过配置文件自动装配 shiro-core: org.apache.shiro.realm.text.TextConfigurationRealm
[users]
root = secret, admin
guest = guest, guest
lonestarr = vespa, goodguy, schwartz
[roles]
admin = *
schwartz = lightsaber:*
goodguy = winnebago:drive:eagle5
好了 我们从头看下这个Realm是如何注入的,刚开始我从jar里面找到了很多注入的地方加了断点, 但是报错“not eligible for getting processed by all BeanPostProcessors (for example: not eligible for auto-proxying)” 所以就只好具体分析,找到一些疑似调用到的方法再下断点拦截看调用栈;
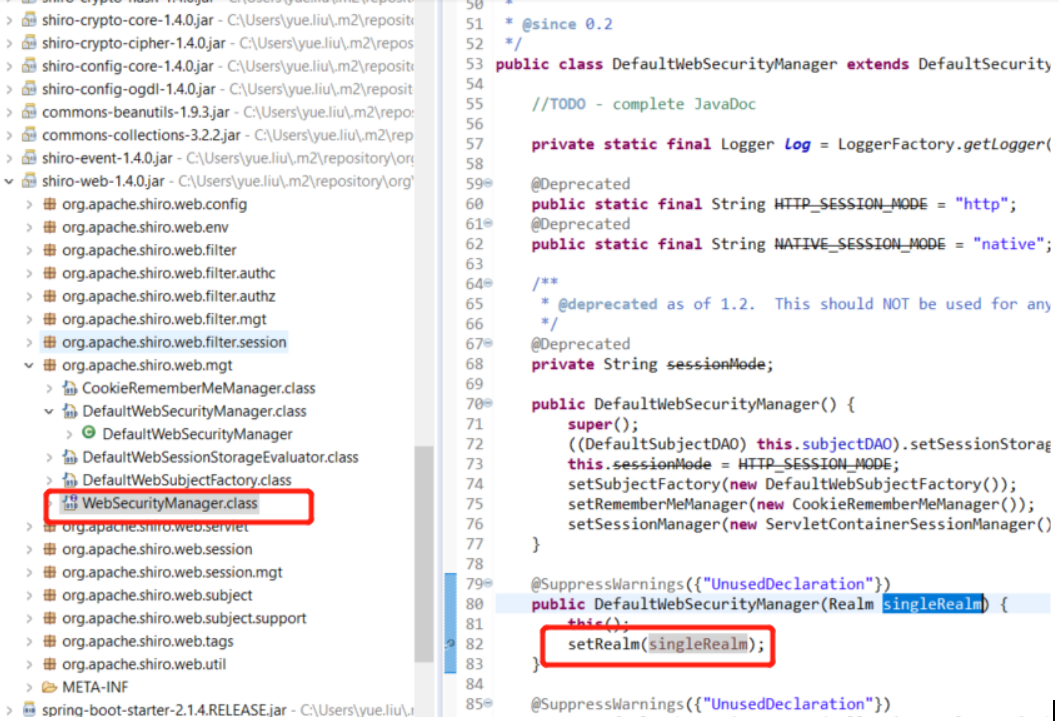
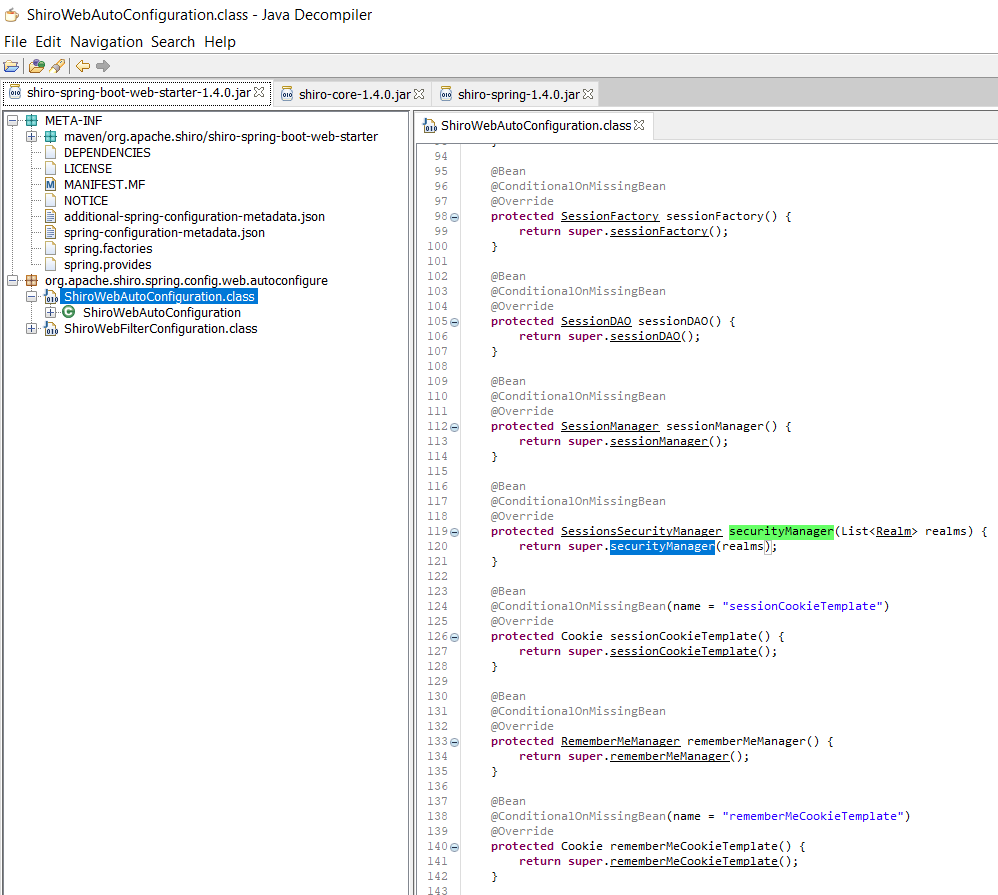
先是创建了Realm的bean,(刚开始我还以为是注入到图1中的DefaultWebSecurityManager),实际是注入到图2的ShiroWebAutoConfiguration:
 @Bean
    @ConditionalOnMissingBean
    @Override
    protected SessionsSecurityManager securityManager(List<Realm> realms) {
        return super.securityManager(realms);
    }
这里插入说明下原因,对spring bean装配或者injection不熟悉的人,可能不了解实际上spring可以将单个的bean自动装配到集合里面如List/Set/Map, The Spring container can injects the individual beans into one collection,并且可以加@Order(Value=1)注解来排序;
其实最简单的思路,因为pom是依赖shiro-spring-boot-web-starter,自然是找到这个ShiroWebAutoConfiguration,然后两层继承自 AbstractShiroConfiguration,
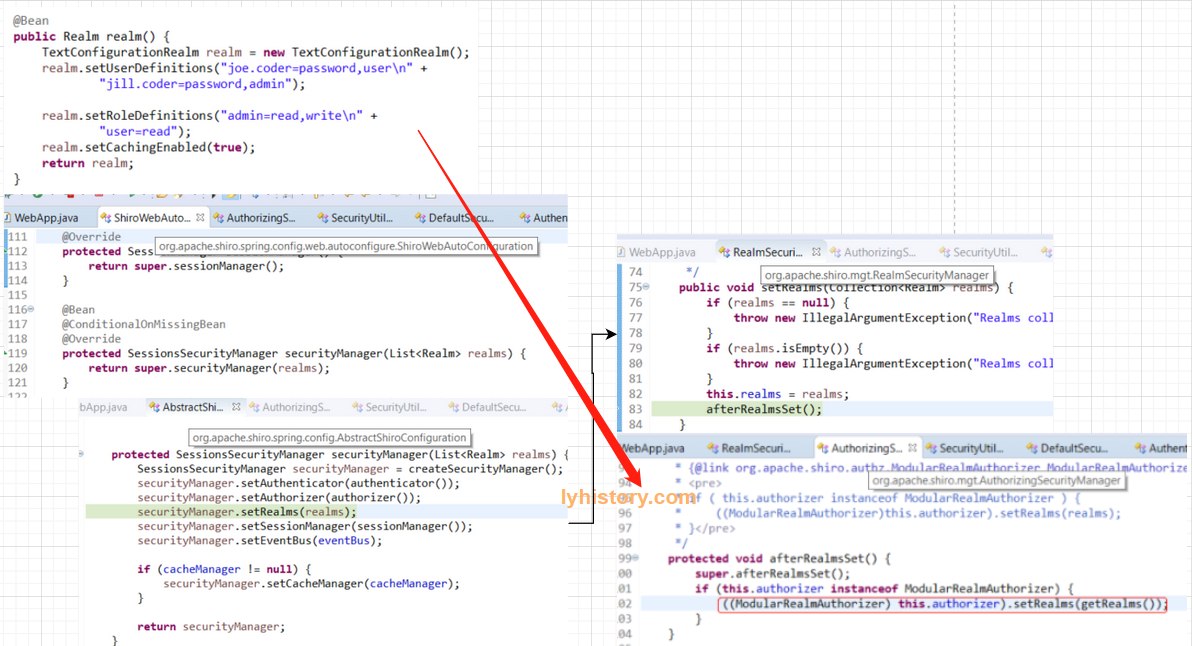 因为org.apache.shiro.mgt.SessionsSecurityManager终极是继承自AuthorizingSecurityManager,又继承自AuthenticatingSecurityManager ,
又继承自RealmSecurityManager,(有点意思,session内容依赖于权限,权限依赖于是否登录,是否登录依赖于数据源),
securityManager.setRealms(realms)之后会调用afterRealmsSet(),由于afterRealmsSet()是父类的继承方法,所以又是常见的template pattern,
AuthenticatingSecurityManager和AuthorizingSecurityManager内的afterRealmsSet()方法内部再调用其子类型的方法,
所以最终是将Realm通过AuthenticatingSecurityManager传递给了这个默认的认证器ModularRealmAuthenticator,
通过AuthorizingSecurityManager传递给了默认的授权器ModularRealmAuthorizer;
因为org.apache.shiro.mgt.SessionsSecurityManager终极是继承自AuthorizingSecurityManager,又继承自AuthenticatingSecurityManager ,
又继承自RealmSecurityManager,(有点意思,session内容依赖于权限,权限依赖于是否登录,是否登录依赖于数据源),
securityManager.setRealms(realms)之后会调用afterRealmsSet(),由于afterRealmsSet()是父类的继承方法,所以又是常见的template pattern,
AuthenticatingSecurityManager和AuthorizingSecurityManager内的afterRealmsSet()方法内部再调用其子类型的方法,
所以最终是将Realm通过AuthenticatingSecurityManager传递给了这个默认的认证器ModularRealmAuthenticator,
通过AuthorizingSecurityManager传递给了默认的授权器ModularRealmAuthorizer;
# 2.1.2 请求拦截和登录过程
Shiro使用了与Servlet一样的Filter接口进行扩展,默认拦截器:
| Filter Name | Class |
|---|---|
| anon | org.apache.shiro.web.filter.authc.AnonymousFilter |
| authc | org.apache.shiro.web.filter.authc.FormAuthenticationFilter |
| authcBasic | org.apache.shiro.web.filter.authc.BasicHttpAuthenticationFilter |
| authcBearer | org.apache.shiro.web.filter.authc.BearerHttpAuthenticationFilter |
| logout | org.apache.shiro.web.filter.authc.LogoutFilter |
| noSessionCreation | org.apache.shiro.web.filter.session.NoSessionCreationFilter |
| perms | org.apache.shiro.web.filter.authz.PermissionsAuthorizationFilter |
| port | org.apache.shiro.web.filter.authz.PortFilter |
| rest | org.apache.shiro.web.filter.authz.HttpMethodPermissionFilter |
| roles | org.apache.shiro.web.filter.authz.RolesAuthorizationFilter |
| ssl | org.apache.shiro.web.filter.authz.SslFilter |
| user | org.apache.shiro.web.filter.authc.UserFilter |
-- https://shiro.apache.org/web.html#default-filters
anon:: accessible by all 'anon'ymous users authc/authenticate authz/authorize
默认应该是开启authc,
先要注册一下拦截/login,这是我们自己提供的ShiroFilterChainDefinition:
@Bean
public ShiroFilterChainDefinition shiroFilterChainDefinition() {
	DefaultShiroFilterChainDefinition chainDefinition = new DefaultShiroFilterChainDefinition();
	chainDefinition.addPathDefinition("/login.html", "authc"); // need to accept POSTs from the login form
	chainDefinition.addPathDefinition("/logout", "logout");
	return chainDefinition;
}
刚开始我以为这个bean会覆盖shiro-spring下面的AbstractShiroWebConfiguration里面的:
/**
 * @since 1.4.0
 */
public class AbstractShiroWebConfiguration extends AbstractShiroConfiguration {
...
	protected ShiroFilterChainDefinition shiroFilterChainDefinition() {
		DefaultShiroFilterChainDefinition chainDefinition = new DefaultShiroFilterChainDefinition();
		chainDefinition.addPathDefinition("/**", "authc");
		return chainDefinition;
	}
实际上应该没有被覆盖,这里是默认全部需要authc,自定义的filter是被上面的 ShiroWebAutoConfiguration 使用
 @Bean
@ConditionalOnMissingBean
@Override
protected ShiroFilterChainDefinition shiroFilterChainDefinition() {
	return super.shiroFilterChainDefinition();
}
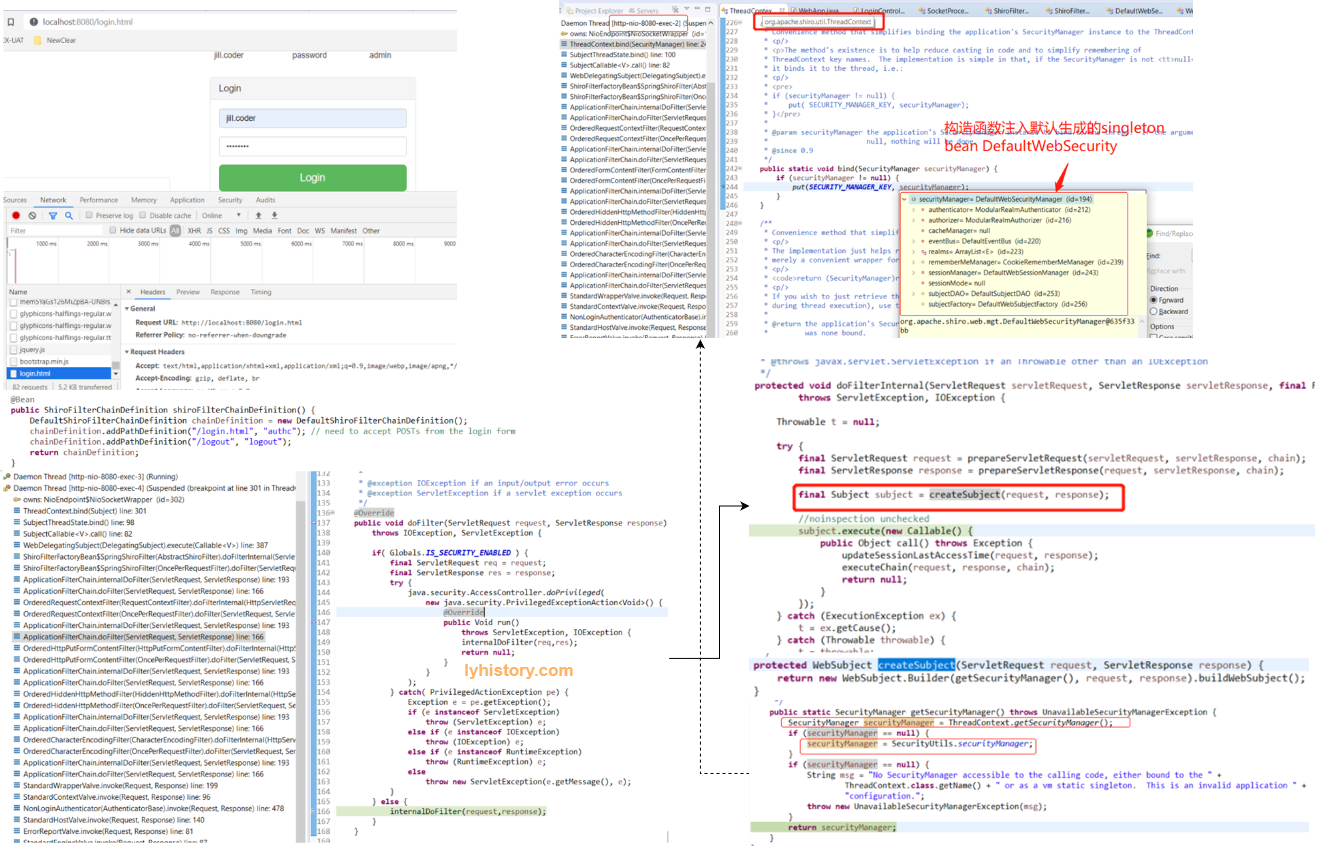
另外上图左下角实际上是tomcat-catalina的ApplicationFilterChain,应该是在前面注册filter的时候shiro会最终注册给内置的tomcat,然后tomcat抓取到之后,再回调给shiro, [此处理解是正确的,准确说是tomcat收到http请求,转交springmvc servlet过滤,过滤后再转交shiro处理,后面会介绍此处的一个坑,如果注册自定义filter不当,会引起问题]
可以看到右侧最终调用到了shiro-web的org.apache.shiro.web.servlet.AbstractShiroFilter, 然后可以看到这个doFilterInternal方法体内给每一个web请求的thread生成一个subject,并且绑定一个单例的SecurityManager(关于绑定bind,是将其放入当前所在thread的一个ThreadLocal Map里面,ThreadLocal是一个全局静态map变量,存放所有启动的http handler线程来响应http 请求,这个单例就是绑定给所有的线程共享);
至于这个securityManager的set过程,图中没有给出来,大致是ShiroFilter去setSecurityManager,然后从env.getWebSecurityManager():
public class ShiroFilter extends AbstractShiroFilter {

    /**
     * Configures this instance based on the existing {@link org.apache.shiro.web.env.WebEnvironment} instance
     * available to the currently accessible {@link #getServletContext() servletContext}.
     *
     * @see org.apache.shiro.web.env.EnvironmentLoaderListener
     * @since 1.2
     */
    @Override
    public void init() throws Exception {
        WebEnvironment env = WebUtils.getRequiredWebEnvironment(getServletContext());

        setSecurityManager(env.getWebSecurityManager());

        FilterChainResolver resolver = env.getFilterChainResolver();
        if (resolver != null) {
            setFilterChainResolver(resolver);
        }
    }
}
再往前找到
public class AbstractShiroWebFilterConfiguration {

    @Autowired
    protected SecurityManager securityManager;

    @Autowired
    protected ShiroFilterChainDefinition shiroFilterChainDefinition;

    @Value("#{ @environment['shiro.loginUrl'] ?: '/login.jsp' }")
    protected String loginUrl;

    @Value("#{ @environment['shiro.successUrl'] ?: '/' }")
    protected String successUrl;

    @Value("#{ @environment['shiro.unauthorizedUrl'] ?: null }")
    protected String unauthorizedUrl;

    protected ShiroFilterFactoryBean shiroFilterFactoryBean() {
        ShiroFilterFactoryBean filterFactoryBean = new ShiroFilterFactoryBean();

        filterFactoryBean.setLoginUrl(loginUrl);
        filterFactoryBean.setSuccessUrl(successUrl);
        filterFactoryBean.setUnauthorizedUrl(unauthorizedUrl);

        filterFactoryBean.setSecurityManager(securityManager);
        filterFactoryBean.setFilterChainDefinitionMap(shiroFilterChainDefinition.getFilterChainMap());

        return filterFactoryBean;
所以这里用autowired就是最前面的那个 ShiroWebAutoConfiguration 的 SessionsSecurityManager 这个bean;
所以上图右下角的截图是错误的,至于这个 getSecurityManager 何时调用我估计应该是非常规的用bean的方式注册的SecurityManager,具体等有时间再研究:
注意getSecurityManager的第三行是找开发者主动set的全局静态的SecurityManager,不推荐这种方式,具体参见文档或者vm static线程安全的文档,
第一行是去找下面那个Application级别的单例bean(说错了,不是bean,是第一步Realm注入里面提到的创建好的一个单例);
接着看下图,回到拦截的post请求,请求中的form是被层层委托到 DelegatingSubject :
看到没,这里是去找SecurityManager,然后跟进其命名空间找到默认的实现 login,这是一个线程安全的singleton实例,可以看到多线程调用这个login没有用到任何公共资源,资源都在传入的上下文参数中, SecurityManager被设计成一个dispatcher并不参与太多实现,都是交给其他的组件来处理,所以根据authenticate流程:
继续看下调用的这个authenticate(token)具体是如何工作的:
Authenticator是一个interface,其实就是找到前面注入提到的现ModularRealmAuthenticator,如果不知道也可以这样找:在同级package找到AbstractAuthenticator, authenticate(AuthenticationToken token) 标准的template pattern,然后找到其一个默认实现ModularRealmAuthenticator;
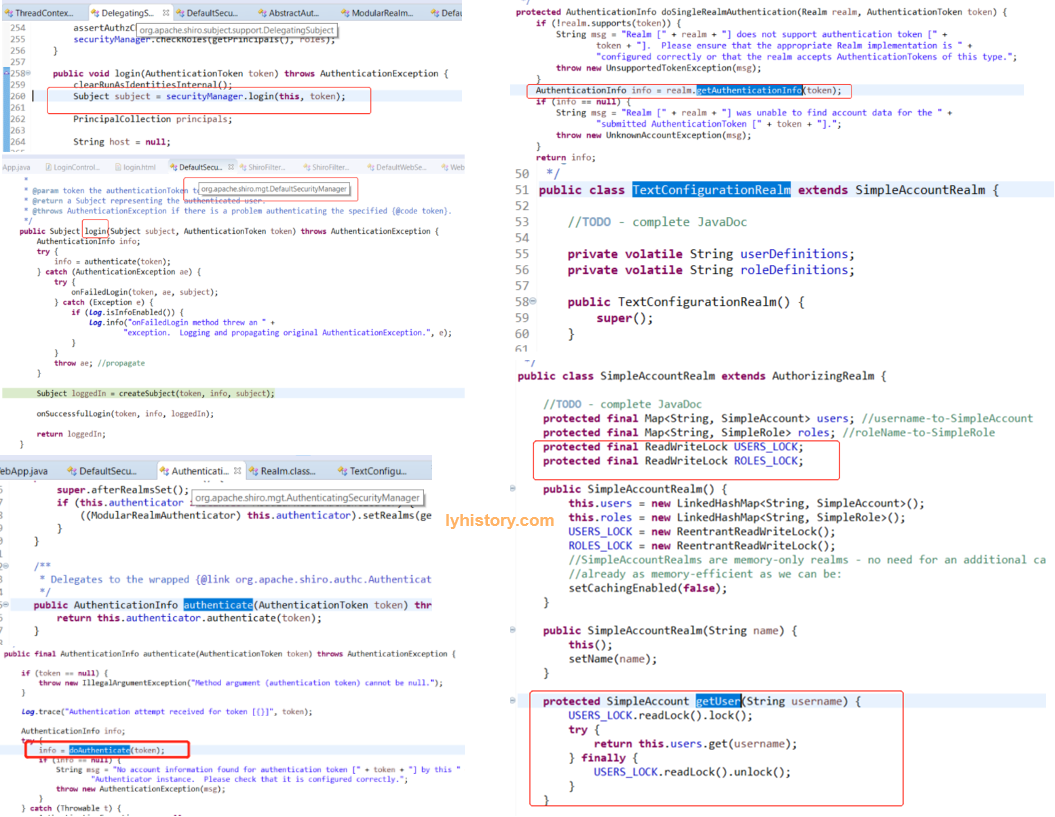
从我们自定义实例化的这个Realm里面找getAuthenticationInfo也是template pattern,一层层的,getAuthenticationInfo调doGetAuthenticationInfo直到调默认的简单DAO-SimpleAccountRealm的getUser;
补充一句,在定义Realm bean的时候我们用了
realm.setUserDefinitions("joe.coder=password,user\n" + "jill.coder=password,admin");
这就相当于初始化了”内存数据库”,具体代码很简单不再分析,应该也是自动装配了一个TextConfigurationRealm;
然后关于多线程安全的问题,这个简单的Realm自然是用了读写锁;
至此剖析完成
# 2.2 基于shiro-spring实例分析
# 2.2.1 config配置解析
# 2.2.2 注入自定义realm
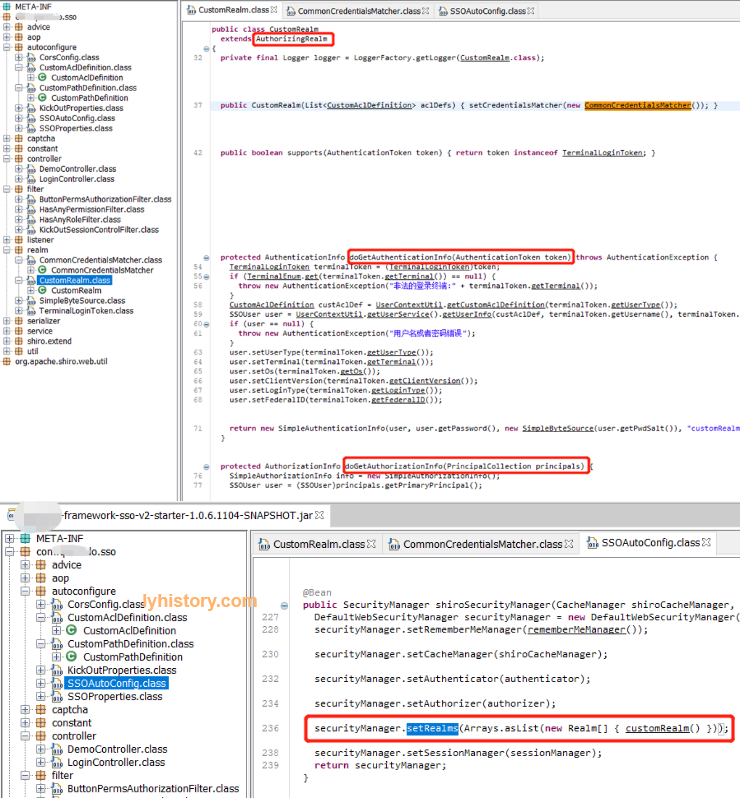
可以看到虽然这个CustomRealm extends AuthorizingRealm,但是实际上SecurityManager用来做authenticate和authorize,所以这里这个AuthorizingRealm让人误解, 当然看其具体实现的两个方法也会很清楚doGetAuthenticationInfo和doGetAuthorizationInfo
# 2.2.3 authenticate/login
跟前面显示声明拦截器不同
chainDefinition.addPathDefinition("/login.html", "authc");
这里没有显示声明需要authc的连接,默认应该是所有post都走authc,
然后通过extends org.apache.shiro.spring.web.ShiroFilterFactoryBean,定义了一堆可以不登录就可以访问的url(不然访问默认需要登录就会401无权限,不信可以实验默认的登录url http://localhost/login,返回一定是401未登录):
public class ReloadableShiroFilterFactoryBean extends ShiroFilterFactoryBean implements Reloadable {
private SSOProperties ssoProperties;
private JdbcTemplate jdbcTemplate;
private CacheManager cacheManager;
public ReloadableShiroFilterFactoryBean(SSOProperties ssoProperties, JdbcTemplate jdbcTemplate, CacheManager cacheManager) {
this.ssoProperties = ssoProperties;
this.jdbcTemplate = jdbcTemplate;
this.cacheManager = cacheManager;
load();
}
public void load() {
setFilterChainDefinitionMap(getFilterChainMap());
}
public void reload() {
synchronized (this) {
AbstractShiroFilter shiroFilter = null;
try {
shiroFilter = (AbstractShiroFilter)getObject();
} catch (Exception e) {
logger.error(e.getMessage());
}
PathMatchingFilterChainResolver filterChainResolver = (PathMatchingFilterChainResolver)shiroFilter.getFilterChainResolver();
DefaultFilterChainManager manager = (DefaultFilterChainManager)filterChainResolver.getFilterChainManager();
manager.getFilterChains().clear();
getFilterChainDefinitionMap().clear();
load();
Map<String, String> filterChainMap = getFilterChainDefinitionMap();
for (Map.Entry<String, String> entry : filterChainMap.entrySet()) {
String url = entry.getKey();
String chainDefinition = ((String)entry.getValue()).trim().replace(" ", "");
manager.createChain(url, chainDefinition);
}
logger.info(");
}
}
private Map<String, String> getFilterChainMap() {
Map<String, String> filterChainMap = new LinkedHashMap<>();
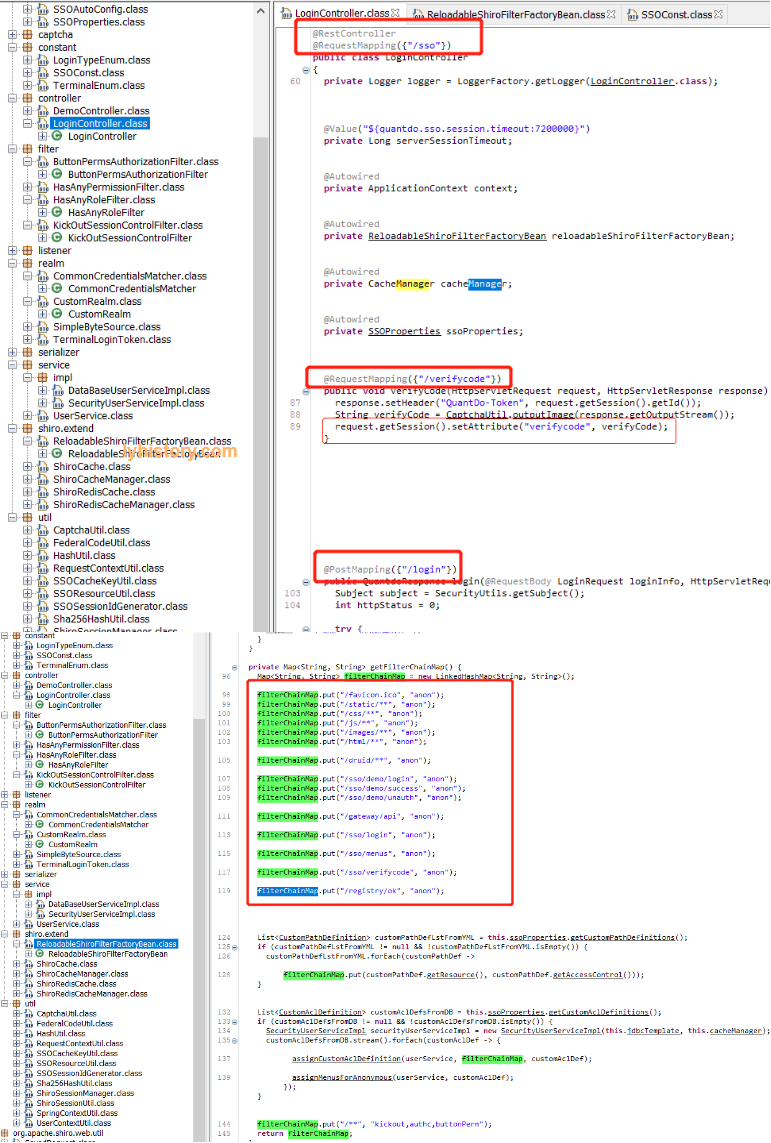
filterChainMap.put("/favicon.ico", "anon");
filterChainMap.put("/static/**", "anon");
filterChainMap.put("/css/**", "anon");
filterChainMap.put("/js/**", "anon");
filterChainMap.put("/images/**", "anon");
filterChainMap.put("/html/**", "anon");
filterChainMap.put("/druid/**", "anon");
filterChainMap.put("/sso/demo/login", "anon");
filterChainMap.put("/sso/demo/success", "anon");
filterChainMap.put("/sso/demo/unauth", "anon");
filterChainMap.put("/gateway/api", "anon");
filterChainMap.put("/sso/login", "anon");
filterChainMap.put("/sso/menus", "anon");
filterChainMap.put("/sso/verifycode", "anon");
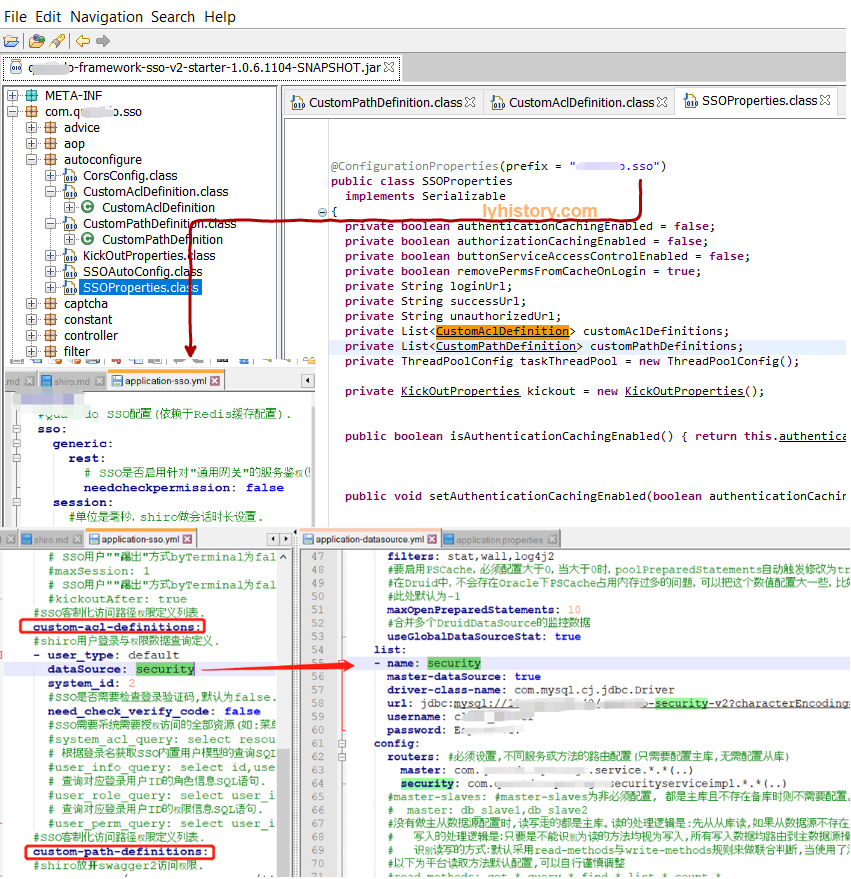
filterChainMap.put("/registry/ok", "anon");
List<CustomPathDefinition> customPathDefLstFromYML = this.ssoProperties.getCustomPathDefinitions();
if (customPathDefLstFromYML != null && !customPathDefLstFromYML.isEmpty())
customPathDefLstFromYML.forEach(customPathDef -> paramMap.put(customPathDef.getResource(), customPathDef.getAccessControl()));
List<CustomAclDefinition> customAclDefsFromDB = this.ssoProperties.getCustomAclDefinitions();
if (customAclDefsFromDB != null && !customAclDefsFromDB.isEmpty()) {
SecurityUserServiceImpl securityUserServiceImpl = new SecurityUserServiceImpl(this.jdbcTemplate, this.cacheManager);
customAclDefsFromDB.stream().forEach(customAclDef -> {
assignCustomAclDefinition(paramUserService, paramMap, customAclDef);
assignMenusForAnonymous(paramUserService, customAclDef);
});
}
filterChainMap.put("/**", "kickout,authc,buttonPerm,roleService");
return filterChainMap;
}
然后依赖spring-boot-starter-data-rest从而实现了一个简单的rest api, 自定义的LoginController就包含了验证码 登录等url map,定义了登录url为/sso/login
登录逻辑:
验证码就不说了,看/sso/login对应的login():
login(@RequestBody LoginRequest loginInfo, HttpServletRequest request, HttpServletResponse response) {
    Subject subject = SecurityUtils.getSubject();
    int httpStatus = 0;

    try {
      if (!StringUtils.hasText(loginInfo.getTerminal()))
      {
        loginInfo.setTerminal(TerminalEnum.WEB.getTerminalType());
      }
      if (!StringUtils.hasText(loginInfo.getUserType())) {
        loginInfo.setUserType("default");
      }
      if (!StringUtils.hasText(loginInfo.getLoginType())) {
        loginInfo.setLoginType(LoginTypeEnum.USERPASSWORD.getLoginType());
      }
      TerminalLoginToken token = new TerminalLoginToken(loginInfo.getUserName(), loginInfo.getPassword());
      token.setTerminal(loginInfo.getTerminal());
      token.setUserType(loginInfo.getUserType());
      token.setVerifyCode(loginInfo.getVerifyCode());
      token.setOs(loginInfo.getOs());
      token.setClientVersion(loginInfo.getClientVersion());
      token.setLoginType(loginInfo.getLoginType());
      token.setFederalID(loginInfo.getFederalID());
      token.setFederalCode(loginInfo.getFederalCode());
      subject.login(token);

      SSOUser ssoUser = (SSOUser)subject.getPrincipal();
      Session session = subject.getSession();
      TerminalEnum terminalType = TerminalEnum.get(loginInfo.getTerminal());
      if (TerminalEnum.ANDROID.equals(terminalType) || TerminalEnum.IOS.equals(terminalType)) {
        response.setHeader("CUSTOM-Token", (String)session.getId());
      }


      session.setAttribute("terminal", terminalType);
      session.setAttribute("LoginSessionUser", ssoUser);
      this.logger.debug("LOGIN SUCCESS:{}", Boolean.valueOf(SecurityUtils.getSubject().isAuthenticated()));
根据收到的postdata {"userName": "test", "password": "111", "verifyCode": "111"} 构造出LoginToken,然后调用subject.login,
这个subject就是shiro-core里面的org.apache.shiro.subject.support.DelegatingSubject,这里就继续走标准的shiro authentication流程, 继续调用Subject subject = securityManager.login(this, token); =>调用org.apache.shiro.mgt.DefaultWebSeurityManager的info = authenticate(token); =>org.apache.shiro.mgt.AuthenticatingSecurityManager this.authenticator.authenticate(token); =>ModularRealmAuthenticator=>org.apache.shiro.authc.AbstractAuthenticator的info = doAuthenticate(token);=>ModularRealmAuthenticator doAuthenticate
if (realms.size() == 1) {
	return doSingleRealmAuthentication(realms.iterator().next(), authenticationToken);
} else {
	return doMultiRealmAuthentication(realms, authenticationToken);
}
=>AuthenticationInfo info = realm.getAuthenticationInfo(token); =>CustomRealm=>org.apache.shiro.realm.AuthenticatingRealm getAuthenticationInfo
 AuthenticationInfo info = getCachedAuthenticationInfo(token);
        if (info == null) {
            //otherwise not cached, perform the lookup:
            info = doGetAuthenticationInfo(token);
            log.debug("Looked up AuthenticationInfo [{}] from doGetAuthenticationInfo", info);
            if (token != null && info != null) {
                cacheAuthenticationInfoIfPossible(token, info);
            }
        } else {
            log.debug("Using cached authentication info [{}] to perform credentials matching.", info);
        }

        if (info != null) {
            assertCredentialsMatch(token, info);
        } else {
            log.debug("No AuthenticationInfo found for submitted AuthenticationToken [{}].  Returning null.", token);
        }
其中
a. doGetAuthenticationInfo 最终是回到自定义的CustomRealm的doGetAuthenticationInfo
```
protected AuthenticationInfo doGetAuthenticationInfo(AuthenticationToken token) throws AuthenticationException {
	TerminalLoginToken terminalToken = (TerminalLoginToken) token;
	if (TerminalEnum.get(terminalToken.getTerminal()) == null) {
		throw new AuthenticationException("非法的登录终端:" + terminalToken.getTerminal());
	} else {
		CustomAclDefinition custAclDef = UserContextUtil.getCustomAclDefinition(terminalToken.getUserType());
		SSOUser user = UserContextUtil.getUserService().getUserInfo(custAclDef, terminalToken.getUsername(),
				terminalToken.getFederalID(), terminalToken.getLoginType());
		if (user == null) {
			throw new AuthenticationException("用户名或者密码错误");
		} else {
			user.setUserType(terminalToken.getUserType());
			user.setTerminal(terminalToken.getTerminal());
			user.setOs(terminalToken.getOs());
			user.setClientVersion(terminalToken.getClientVersion());
			user.setLoginType(terminalToken.getLoginType());
			user.setFederalID(terminalToken.getFederalID());
			return new SimpleAuthenticationInfo(user, user.getPassword(), new SimpleByteSource(user.getPwdSalt()),
					"customRealm");
		}
	}
}
```
UserContextUtil.getUserService().getUserInfo就是我们自定义的DAO,
这一步获取db保存的用户info(主要是encrypted password,一般数据库不会保存明文密码,都是通过md5或者是其他哈希算法算出一个哈希值,而且为了防止撞库或者彩虹表,还会加盐);

另外注意传入SimpleAuthenticationInfo的ssouser就是后面subject以及会写入session的principal
```
public SimpleAuthenticationInfo(Object principal, Object credentials, String realmName) {
    this.principals = new SimplePrincipalCollection(principal, realmName);
    this.credentials = credentials;
}
```
b. assertCredentialsMatch 最终调用回我们重写的
```
public class CommonCredentialsMatcher implements CredentialsMatcher {
	static {
	   credentialsMatcherMap.put(SSOAlgorithmType.SHA256, new HashedCredentialsMatcher("SHA-256"));
	   credentialsMatcherMap.put(SSOAlgorithmType.MD5, new HashedCredentialsMatcher("MD5"));
	}
	public boolean doCredentialsMatch(AuthenticationToken token, AuthenticationInfo info) {

		return credentialsMatcher.doCredentialsMatch(token, info);
	}
```
代码中是调用shiro提供的哈希值比较工具,从token根据密码明文+盐+哈希方法算出哈希值,然后数据库中取出的哈希值
createSubject:resolvePrincipals
# 2.2.3 授权
首先授权模型大概分几类:
- RBAC - role based access control, if(user.hasRole('admin')){doAdminStuff()}else....
- RBAC - resource based access control ,if(user.hasPerm('delete')){doAction()}...
实际一般采用user-role-resource的这种所谓ACL access control list方式,用户赋予角色,角色赋予权限resources, 然后将其存到db管理,访问到某个资源则检查session.user.hasRole2ResourceRelation();
首先授权一般还涉及到UI的渲染,比如有什么菜单的权限,什么按钮的权限,没有则不应显示,这个问题如何解决需要考虑到这个项目的具体实现,大概两类:
一类是前后端放一起,比如MVC模式,浏览器需要请求后端的Controller来获取view和model,这种情况可以在Controller中
另一类是前后端分离 这个很简单,只要登录后给前端返回一个权限列表即可,代理的问题是前端通过渲染或者js“挡住”非法请求是不可行的,用户仍然可以发起他没有权限的请求,所以后端也应该有相关验证;
后端验证有几种方式:
直接用shiro提供的基于角色和基于权限的授权方式; JDK annotations - You can attach an authorization annotation to your Java methods 就是通过annotation role或者perm或者通过主动check role,check perm来调用默认的ModularRealmAuthorizer
通过继承拦截器org.apache.shiro.web.filter.AccessControlFilter;,每次请求都校验权限
完全不依赖shiro,只是让shiro处理登录动作,权限完全自主控制,自行实现 Programmatically - You can perform authorization checks in your java code with structures like if and else blocks. JSP/GSP TagLibs - You can control JSP or GSP page output based on roles and permissions
第一种方式:
直接参考前面标准的authorization流程
第二种方式:
自定义一个filter,很显然AccessControlFilter跟权限有关

public class RoleServiceAuthorizationFilter extends AccessControlFilter {
  private ShiroFilterFactoryBean shiroFilterFactoryBean;

  public RoleServiceAuthorizationFilter(ShiroFilterFactoryBean shiroFilterFactoryBean) {
    this.shiroFilterFactoryBean = shiroFilterFactoryBean;
  }

  protected boolean isAccessAllowed(ServletRequest request, ServletResponse response, Object o) throws Exception {
    if (!UserContextUtil.isRoleServiceAccessControlEnabled())
      return true;
    Subject subject = getSubject(request, response);
    String requestURI = getPathWithinApplication(request);
    String userType = UserContextUtil.getRequestUserType();
    CustomAclDefinition aclDef = UserContextUtil.getCustomAclDefinition(userType);
    if (aclDef == null)
      return false;
    SSOUser ssoUser = (SSOUser)subject.getPrincipal();
    if (UserContextUtil.isSecuritySystemAdmin(aclDef, ssoUser.getLoginName()))
      return true;
    Long userId = ((SSOUser)subject.getPrincipal()).getUserId();
    return UserContextUtil.getUserService().checkUrlPermission(aclDef, userId, requestURI);
  }

  protected boolean onAccessDenied(ServletRequest request, ServletResponse response) throws Exception {
    SSOProperties ssoProperties = (SSOProperties)SpringContextUtil.getBean(SSOProperties.class);
    String unauthorizedUrl = ssoProperties.getUnauthorizedUrl();
    if (StringUtils.hasText(unauthorizedUrl)) {
      WebUtils.issueRedirect(request, response, unauthorizedUrl);
    } else {
      WebUtils.issueRedirect(request, response, String.valueOf(SSOConst.SSO_UNAUTHORIZED_CODE));
    }
    return false;
  }
}
定义完需要注册到shiro servlet的filter,注意下面这个ReloadableShiroFilterFactoryBean就是前面继承了ShiroFilterFactoryBean的扩展类, 然后通过其默认的DefaultFilterChainManager将拦截器注册进去,注册的时候有个坑需要注意,不可以用bean的方式,要用new的方式, filterMap.put("roleService", new RoleServiceAuthorizationFilter((ShiroFilterFactoryBean)factoryBean));
@ConditionalOnProperty(name = {"sso.session.timeout"}, matchIfMissing = false)
@AutoConfigureAfter({CacheAutoConfiguration.class})
@EnableConfigurationProperties({SSOProperties.class})
@Import({CorsConfig.class})
public class SSOAutoConfig {
  @Autowired
  private SSOProperties ssoProperties;
  @Autowired
  private JdbcTemplate jdbcTemplate;
  @Autowired
  private StringRedisTemplate redisTemplate;
  @Autowired
  private CacheManager cacheManager;
  @Autowired
  private ApplicationContext context;
  @Value("${sso.session.timeout:7200000}")
  private Long serverSessionTimeout;

  @Bean({"shiroFilter"})
  public ReloadableShiroFilterFactoryBean shiroFilter(SecurityManager shiroSecurityManager) {
    ReloadableShiroFilterFactoryBean factoryBean = new ReloadableShiroFilterFactoryBean(this.ssoProperties, this.jdbcTemplate, this.cacheManager);
    factoryBean.setSecurityManager(shiroSecurityManager);
    if (StringUtils.hasText(this.ssoProperties.getLoginUrl())) {
      factoryBean.setLoginUrl(this.ssoProperties.getLoginUrl());
      factoryBean.setSuccessUrl(this.ssoProperties.getSuccessUrl());
      factoryBean.setUnauthorizedUrl(this.ssoProperties.getUnauthorizedUrl());
    } else {
      factoryBean.setLoginUrl(String.valueOf(SSOConst.SSO_LOGIN_CODE));
      factoryBean.setSuccessUrl(String.valueOf(SSOConst.SSO_SUCCESS_CODE));
      factoryBean.setUnauthorizedUrl(String.valueOf(SSOConst.SSO_UNAUTHORIZED_CODE));
    }
    Map<String, Filter> filterMap = factoryBean.getFilters();
    KickOutSessionControlFilter kickOutSessionControlFilter = new KickOutSessionControlFilter();
    kickOutSessionControlFilter.setKickOutEnabled(this.ssoProperties.getKickout().isEnabled());
    if (StringUtils.hasText(this.ssoProperties.getLoginUrl())) {
      kickOutSessionControlFilter.setKickOutUrl(this.ssoProperties.getLoginUrl());
    } else {
      kickOutSessionControlFilter.setKickOutUrl(String.valueOf(SSOConst.SSO_LOGIN_CODE));
    }
    filterMap.put("kickout", kickOutSessionControlFilter);
    filterMap.put("hasAnyRole", new HasAnyRoleFilter());
    filterMap.put("hasAnyPerm", new HasAnyPermissionFilter());
    filterMap.put("buttonPerm", new ButtonPermsAuthorizationFilter((ShiroFilterFactoryBean)factoryBean));
    filterMap.put("roleService", new RoleServiceAuthorizationFilter((ShiroFilterFactoryBean)factoryBean));
    factoryBean.setFilters(filterMap);
    return factoryBean;
  }
由于shiro是对servlet的filter进行了扩展/继承,所以我们实现的shiro拦截器本身也是继承自servlet拦截器,web容器tomcat接收到http请求,
先转交给spring mvc servlet,servlet的拦截器生效(拦截器列表初始化是spring启动初始化servlet context时在context中注入实现了servlet拦截器接口的bean,然后注册到filterchain,具体阅读ServletContextInitializerBeans源码),
这里的servlet拦截器filter之后再通过internal dofilter放行给shiro;
 参照自定义 Filter 实现及其问题排查记录 (opens new window)
第三种方式:
login之后通过springFramework的ApplicationContext publish一个UserLogonEvent,
@Autowired
private ApplicationContext context;
public HttpResponse login(UserInfo user){
 .....
 login logic
 .....
 UserLogonEvent event = new UserLogonEvent();
 event.setUserId(userid)
 appliactionContext.publish(event)
}
登录后,缓存权限
@Autowired
CacheManager cacheManager;
@EventListener
@Async
public void cacheUserPermission(UserLogonEvent event) {
	Cache cache=.getCache("customRealm.authorizationCache");
	cache.put(event.getUserid(), getUserRolePermissionFromDB())
前端请求到后面统统去缓存查权限;
# 2.2.4 会话管理-Session维护和登出
所谓登录状态就是客户端传过来sessionid,在后端可以找到对应的session,shiro默认生成的DEFAULT_SESSION_ID_NAME是JSESSIONID,可以自定义名字和session过期时间, http是无状态短连接,但是可以通过客户端keepalive及服务端tcp的超时设置减少活动用户的每次http连接时间开销,然后服务端的session一般相对保存时间更长些,这样即使后面的http请求使得服务端重开线程处理,也可以从保存的session中获取登录用户信息,一般默认是内存session,shiro默认的EnterpriseCacheSessionDAO也是in-memory缓存;
@Bean
  public SessionManager sessionManager() {
    ShiroSessionManager shiroSessionManager = new ShiroSessionManager();
    shiroSessionManager.setGlobalSessionTimeout(7200000);
    shiroSessionManager.setSessionDAO((SessionDAO)new EnterpriseCacheSessionDAO());
    shiroSessionManager.setSessionIdCookie((Cookie)new SimpleCookie("Custom-SessionId-Name"));
    List<SessionListener> sessionListeners = new ArrayList<>(1);
    sessionListeners.add(new ShiroSessionListener(this.context));
    shiroSessionManager.setSessionListeners(sessionListeners);
    return (SessionManager)shiroSessionManager;
  }
关于session的读写,初始化就是在上面login Controller subject.login()之后读取getSubject,然后getPrincipal拿到ssouser,然后写入session,然后读取就是先getSubject然后getSession,这里的principal就是上面分析的login过程中写入到SimpleAuthenticationInfo的ssouser
Subject subject = SecurityUtils.getSubject();
SSOUser ssoUser = (SSOUser)subject.getPrincipal();
Session session = subject.getSession();
session.setAttribute("LoginSessionUser", ssoUser);
其实都不必写入session,shiro的subject本身就是session manager,从中就可以读取到principal了,这样做唯一的好处就是将shiro进一步封装,外部比如mvc程序只需要从session获取相应用户数据即可,不需要跟shiro交互,虽然这里的session是 org.apache.shiro.session.Session,从servlet中可以直接拿到,不需要用到shiro的任何方法
ServletRequestAttributes requestAttributes =(ServletRequestAttributes) RequestContextHolder.getRequestAttributes();
HttpSession session = requestAttributes..getSession(false);
SSOUser user = (SSOUser) session.getAttribute("LoginSessionUser");
至于logout登出操作,就是调用subject.logout(),内部会调用session的stop方法,从而触发上面注册的ShiroSessionListener,
public class ShiroSessionListener
  implements SessionListener
{
  private ApplicationContext context;

  public ShiroSessionListener(ApplicationContext context) { this.context = context; }

  public void onStart(Session session) {}
  public void onStop(Session session) {
    SSOUser ssoUser = (SSOUser)session.getAttribute("LoginSessionUser");

    SSOLoginOutEvent event = new SSOLoginOutEvent();
    event.setLoginUser(ssoUser);
    event.setSessionId((String)session.getId());
    event.setEventSource(getClass().getName());
    this.context.publishEvent(event);
  }

}
具体sessionManager源码分析,参见SessionMananger(操作session) (opens new window)
# 3.内核代码分析
关于subject
org.apache.shiro.subject.Subject
Note* that the returned {@code Subject} instance is not automatically bound to the application (thread) for further use. That is, {@link org.apache.shiro.SecurityUtils SecurityUtils}.{@link org.apache.shiro.SecurityUtils#getSubject() getSubject()} will not automatically return the same instance as what is returned by the builder. It is up to the framework developer to bind the built {@code Subject} for continued use if desired.
HTTP请求处理过程 1,每个http请求都被ShoriFilter拦截进行处理 2,将SecurityManager对象和包装后的Request和Response作为构造参数创建WebSubject.Builder实例,并调用 buildWebSubject 方法创建Subject
org.apache.catalina.core ApplicationFilterChain
private static final ThreadLocal<ServletRequest> lastServicedRequest;
private static final ThreadLocal<ServletResponse> lastServicedResponse;

private void internalDoFilter(ServletRequest request,
                                  ServletResponse response)
{
filter.doFilter(request, response, this);
}

org.apache.shiro.web.servlet
OncePerRequestFilter
public final void doFilter(ServletRequest request, ServletResponse response, FilterChain filterChain)
{
doFilterInternal(request, response, filterChain);
}
org.apache.shiro.web.servlet AbstractShiroFilter
protected void doFilterInternal(ServletRequest servletRequest, ServletResponse servletResponse, final FilterChain chain)
            throws ServletException, IOException {

        Throwable t = null;

        try {
            final ServletRequest request = prepareServletRequest(servletRequest, servletResponse, chain);
            final ServletResponse response = prepareServletResponse(request, servletResponse, chain);

            final Subject subject = createSubject(request, response);

            //noinspection unchecked
            subject.execute(new Callable() {
                public Object call() throws Exception {
                    updateSessionLastAccessTime(request, response);
                    executeChain(request, response, chain);
                    return null;
                }
            });
        } catch (ExecutionException ex) {
            t = ex.getCause();
        } catch (Throwable throwable) {
            t = throwable;
        }
step 1.subject创建 createSubject step 2.subject绑定 subject.execute(new Callable() {
step 1:subject创建过程
通过静态内部类Builder(静态内部类的作用https://blog.csdn.net/zero_and_one/article/details/53167372)创建SubjectContext并进而创建Subject org.apache.shiro.web.servlet AbstractShiroFilter>
protected WebSubject createSubject(ServletRequest request, ServletResponse response) {
        return new WebSubject.Builder(getSecurityManager(), request, response).buildWebSubject();
    }
首先创建WebSubject Builder,先找到WebSubject的静态内部类Builder: org.apache.shiro.web.subject public interface WebSubject extends Subject, RequestPairSource {
public Builder(SecurityManager securityManager, ServletRequest request, ServletResponse response) {
            super(securityManager);
            if (request == null) {
                throw new IllegalArgumentException("ServletRequest argument cannot be null.");
            }
            if (response == null) {
                throw new IllegalArgumentException("ServletResponse argument cannot be null.");
            }
            setRequest(request);
            setResponse(response);
        }
3,super(securityManager)调用Subject的静态内部类Builder方法,创建新的SubjectContext实例 DefaultSubjectContext ,并将SecurityManager保存到SubjectContext实例中 org.apache.shiro.subject Subject
public Builder(SecurityManager securityManager) {
            if (securityManager == null) {
                throw new NullPointerException("SecurityManager method argument cannot be null.");
            }
            this.securityManager = securityManager;
            this.subjectContext = newSubjectContextInstance();
            if (this.subjectContext == null) {
                throw new IllegalStateException("Subject instance returned from 'newSubjectContextInstance' " +
                        "cannot be null.");
            }
            this.subjectContext.setSecurityManager(securityManager);
        }
protected SubjectContext newSubjectContextInstance() {
            return new DefaultSubjectContext();
        }
4,将Request和Response也添加到SubjectContext中保存 org.apache.shiro.web.subject WebSubject
public Builder(SecurityManager securityManager, ServletRequest request, ServletResponse response) {
            super(securityManager);
            if (request == null) {
                throw new IllegalArgumentException("ServletRequest argument cannot be null.");
            }
            if (response == null) {
                throw new IllegalArgumentException("ServletResponse argument cannot be null.");
            }
            setRequest(request);
            setResponse(response);
        }
 protected Builder setRequest(ServletRequest request) {
            if (request != null) {
                ((WebSubjectContext) getSubjectContext()).setServletRequest(request);
            }
            return this;
        }
然后调用 buildWebSubject: org.apache.shiro.web.subject WebSubject.Builder
public WebSubject buildWebSubject() {
            Subject subject = super.buildSubject();
            if (!(subject instanceof WebSubject)) {
                String msg = "Subject implementation returned from the SecurityManager was not a " +
                        WebSubject.class.getName() + " implementation.  Please ensure a Web-enabled SecurityManager " +
                        "has been configured and made available to this builder.";
                throw new IllegalStateException(msg);
            }
            return (WebSubject) subject;
        }
调用父类Subject.Builder的buildSubject org.apache.shiro.subject; Subject.Builder
public Subject buildSubject() {
            return this.securityManager.createSubject(this.subjectContext);
        }
然后找到默认的 Securitymanager 创建 subject
5,将 subjectContext 作为参数,调用SecurityManager的createSubject方法创建Subject对象 org.apache.shiro.mgt DefaultSecurityManager
public Subject createSubject(SubjectContext subjectContext) {
//create a copy so we don't modify the argument's backing map:
SubjectContext context = copy(subjectContext);
//ensure that the context has a SecurityManager instance, and if not, add one:
context = ensureSecurityManager(context);
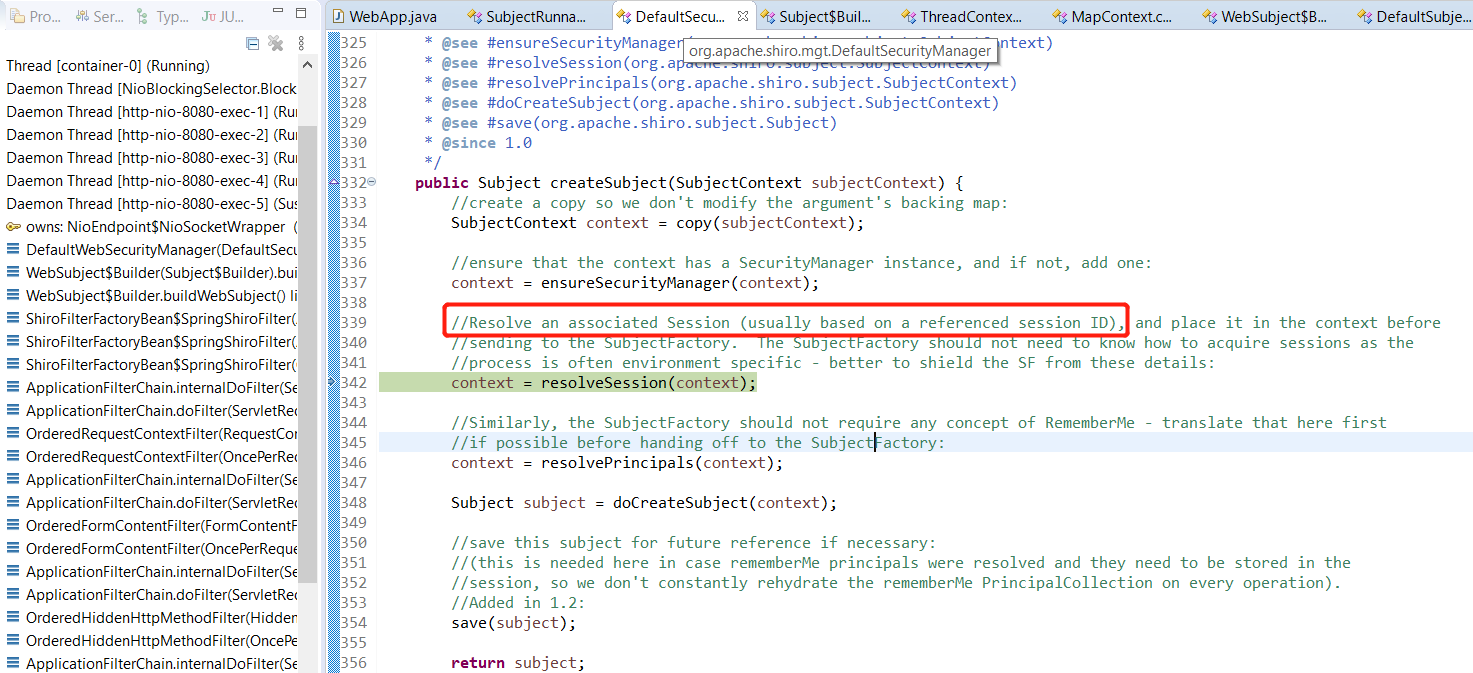
//Resolve an associated Session (usually based on a referenced session ID), and place it in the context before
//sending to the SubjectFactory. The SubjectFactory should not need to know how to acquire sessions as the
//process is often environment specific - better to shield the SF from these details:
context = resolveSession(context);
//Similarly, the SubjectFactory should not require any concept of RememberMe - translate that here first
//if possible before handing off to the SubjectFactory:
context = resolvePrincipals(context);
Subject subject = doCreateSubject(context);
//save this subject for future reference if necessary:
//(this is needed here in case rememberMe principals were resolved and they need to be stored in the
//session, so we don't constantly rehydrate the rememberMe PrincipalCollection on every operation).
//Added in 1.2:
save(subject);
return subject;
}
6,其中doCreateSubject将SubjectContext作为参数,调用SubjectFactory【DefaultSubjectFactory】的createSubject方法创建Subject
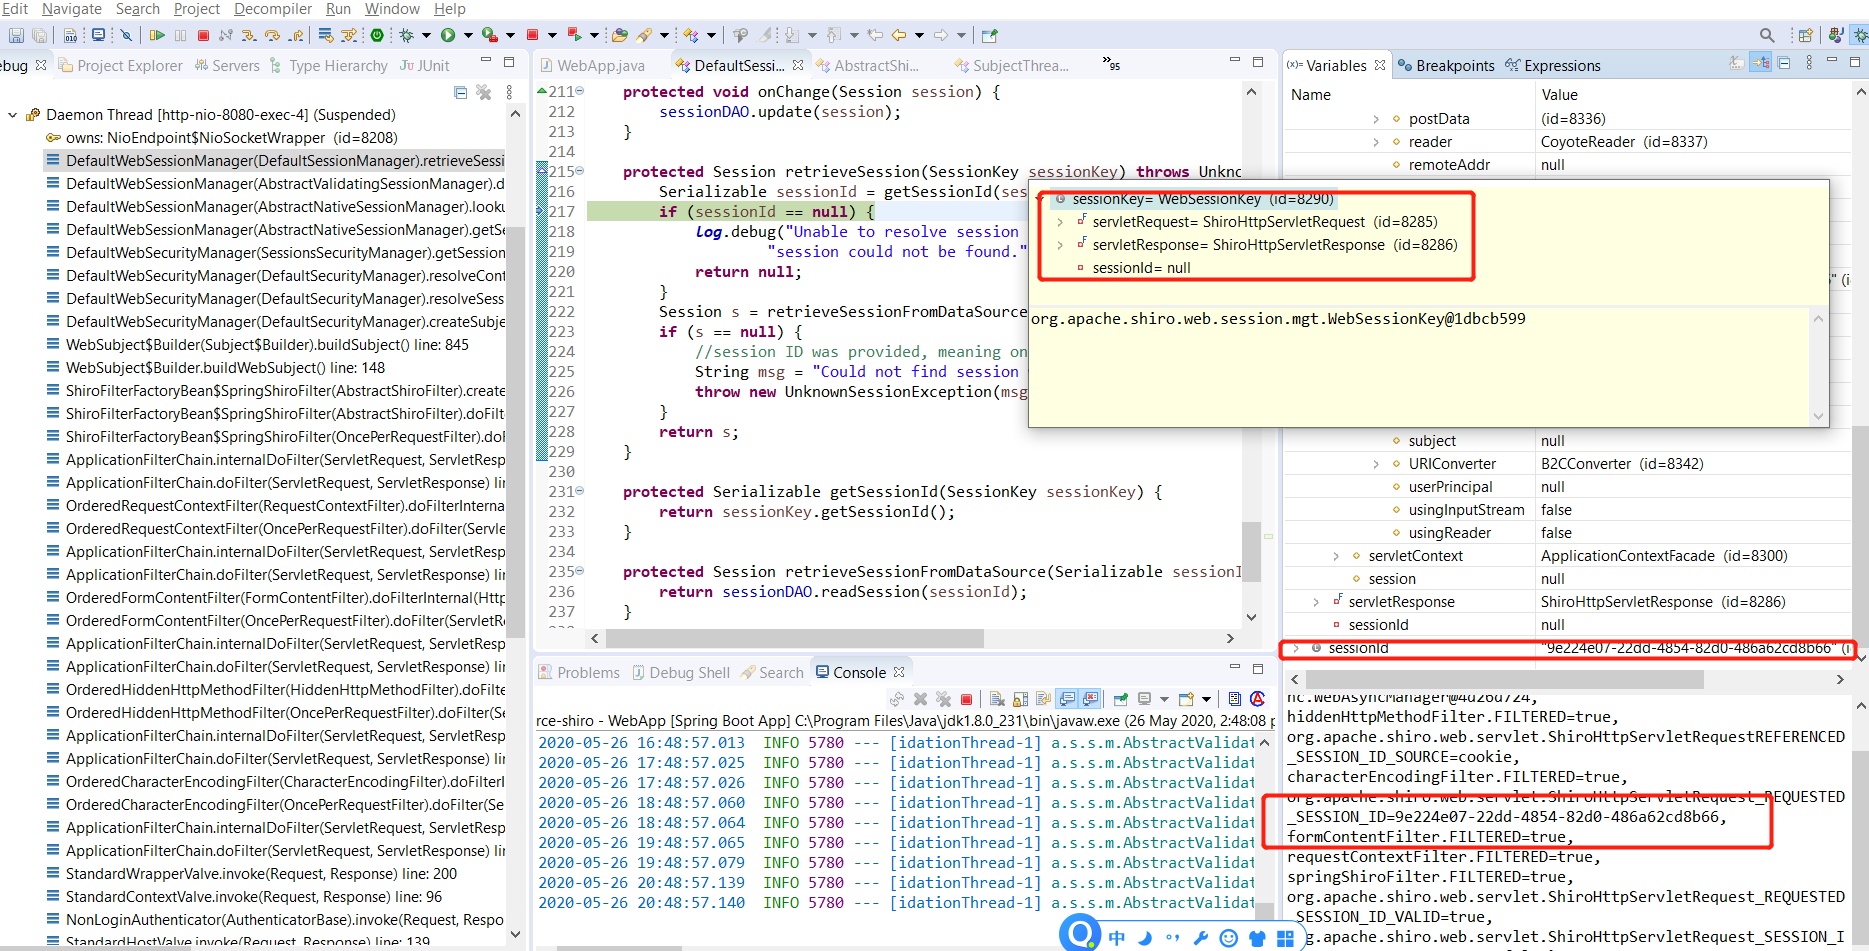
7,接着根据 sessionid 取出SubjectContext一路收集来的数据来构建 WebDelegatingSubject 对象并返回。 注意下面的wsc是通过SubjectContext取出的request reponse和sessionKey最终层层找到sessionManager, 然后从request中解析出sessionid,然后从sessionManager中找到session、principal等等信息;
org.apache.shiro.web.mgt DefaultWebSubjectFactory
public Subject createSubject(SubjectContext context) {
        if (!(context instanceof WebSubjectContext)) {
            return super.createSubject(context);
        }
        WebSubjectContext wsc = (WebSubjectContext) context;
        SecurityManager securityManager = wsc.resolveSecurityManager();
        Session session = wsc.resolveSession();
        boolean sessionEnabled = wsc.isSessionCreationEnabled();
        PrincipalCollection principals = wsc.resolvePrincipals();
        boolean authenticated = wsc.resolveAuthenticated();
        String host = wsc.resolveHost();
        ServletRequest request = wsc.resolveServletRequest();
        ServletResponse response = wsc.resolveServletResponse();

        return new WebDelegatingSubject(principals, authenticated, host, session, sessionEnabled,
                request, response, securityManager);
    }
另外上面的save(subject)应该就是为了后面的请求过来resolve session principal,所以需要保存到session中, 这个应该是对developer不可见的,属于shiro内部操作,developer应该只可以拿到httpSession,这里的是shiro进一步扩展的Session /** * Saves the subject's state (it's principals and authentication state) to its * {@link org.apache.shiro.subject.Subject#getSession() session}. The session can be retrieved at a later time * (typically from a {@link org.apache.shiro.session.mgt.SessionManager SessionManager} to be used to recreate * the {@code Subject} instance. * * @param subject the subject for which state will be persisted to its session. */ protected void saveToSession(Subject subject) { //performs merge logic, only updating the Subject's session if it does not match the current state: mergePrincipals(subject); mergeAuthenticationState(subject); }
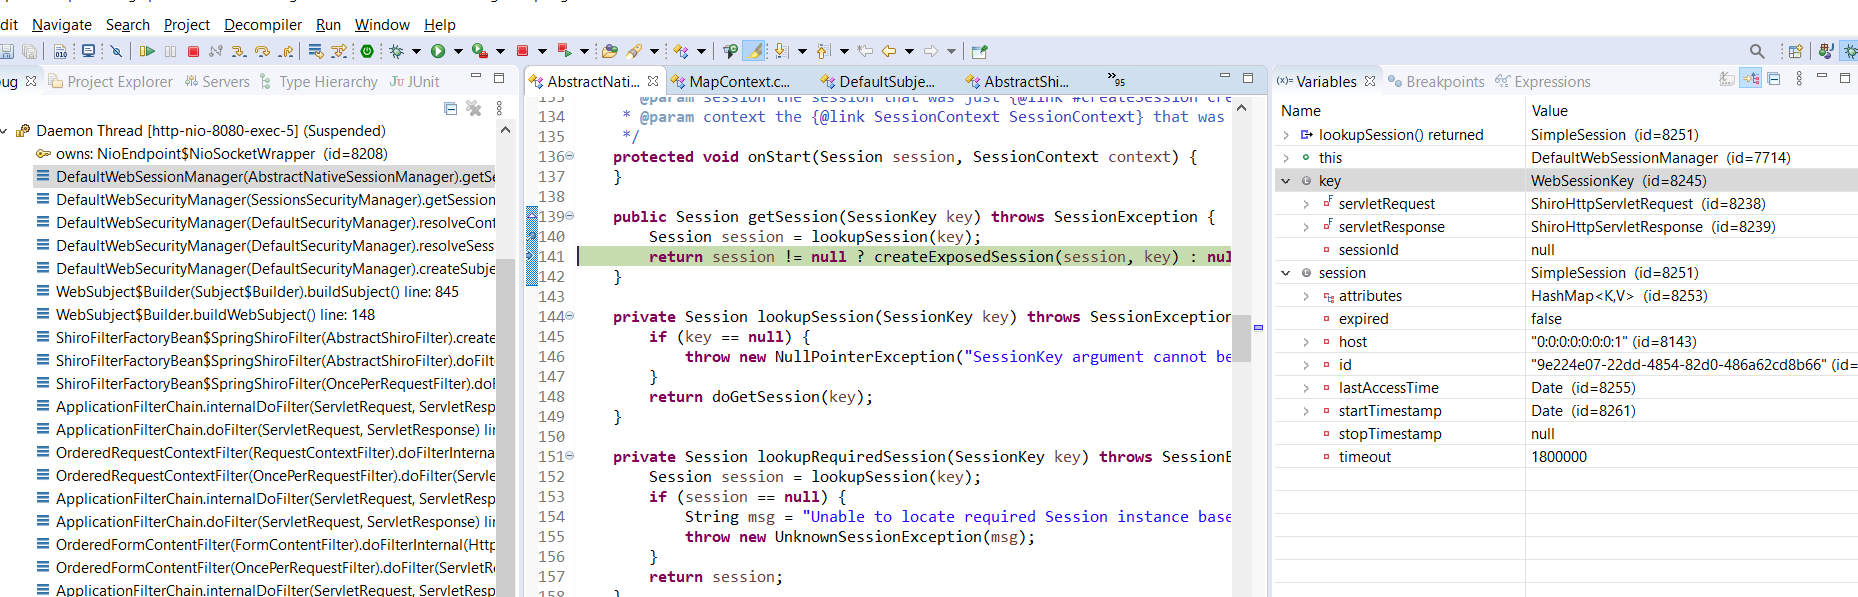
8,当调用Subject的getSession方法的时候,如果Session不存在,则首先创建一个新的DefaultSessionContext实例并设置host值【可能是空】 9,将sessionContext对象作为参数调用securityManager的start方法来创建Session 10,从SessionContext中取出HttpServletRequest,并调用HttpServletRequest的getSession方法来获取HttpSession,同时从SessionContext中取出host,使用这两个值作为构造函数的参数实例化HttpServletSession类。 11,到此,Session的创建过程结束,此时的HttpServletSession纯粹只是HttpSession的代理一样。
上面的第7步截图:

step 2:绑定subject到当前的线程上下文,接着上面的AbstractShiroFilter》subject.execute(new Callable() {
org.apache.shiro.subject.support SubjectCallable
public SubjectCallable(Subject subject, Callable<V> delegate) {
        this(new SubjectThreadState(subject), delegate);
    }
public V call() throws Exception {
        try {
            threadState.bind();
            return doCall(this.callable);
        } finally {
            threadState.restore();
        }
    }
org.apache.shiro.subject.support SubjectThreadState
public SubjectThreadState(Subject subject) {
        if (subject == null) {
            throw new IllegalArgumentException("Subject argument cannot be null.");
        }
        this.subject = subject;

        SecurityManager securityManager = null;
        if ( subject instanceof DelegatingSubject) {
            securityManager = ((DelegatingSubject)subject).getSecurityManager();
        }
        if ( securityManager == null) {
            securityManager = ThreadContext.getSecurityManager();
        }
        this.securityManager = securityManager;
    }
  public void bind() {
        SecurityManager securityManager = this.securityManager;
        if ( securityManager == null ) {
            //try just in case the constructor didn't find one at the time:
            securityManager = ThreadContext.getSecurityManager();
        }
        this.originalResources = ThreadContext.getResources();
        ThreadContext.remove();

        ThreadContext.bind(this.subject);
        if (securityManager != null) {
            ThreadContext.bind(securityManager);
        }
    }
SecurityUtils.getSubject();
org.apache.shiro SecurityUtils
 public static Subject getSubject() {
        Subject subject = ThreadContext.getSubject();
        if (subject == null) {
            subject = (new Subject.Builder()).buildSubject();
            ThreadContext.bind(subject);
        }
        return subject;
    }
# 其他鉴权技术对比
SpringSecurity原理剖析与权限系统设计 https://www.cnblogs.com/fanzhidongyzby/p/11610334.html
ref: 推荐:极客学院-跟我学 Shiro (opens new window) Shiro 免密登录 (opens new window) JAVA安全框架Apache Shiro浅析 (opens new window) SpringBoot系列 - 集成Shiro权限管理 (opens new window)
https://juejin.im/post/5c539be16fb9a049e702896c https://blog.51cto.com/dengshuangfu/2361227