回目录 《mysql实用基础》
# 0. Knowledge Base
default storage engine: InnoDB
https://dev.mysql.com/doc/refman/5.6/en/innodb-introduction.html
other engine:
MyISAM: https://kinsta.com/knowledgebase/convert-myisam-to-innodb/
ndb
mysqlshow -uroot -pP@ssw0rd -i DBNAME;
# 1.Setup
# 1.1 Install on centos
Installing MySQL on Linux Using RPM Packages from Oracle (opens new window)
Method 1: Using rpm
Method 2: Using tar
tar -xvf mysql-5.7.26-1.el7.x86_64.rpm-bundle.tar
• mysql-community-client-5.7.32-1.el7.x86_64.rpm
• mysql-community-common-5.7.32-1.el7.x86_64.rpm
• mysql-community-libs-5.7.32-1.el7.x86_64.rpm
• mysql-community-libs-compat-5.7.32-1.el7.x86_64.rpm
• mysql-community-server-5.7.32-1.el7.x86_64.rpm
yum localinstall mysql-community-{server,client,common,libs}-* mysql-5.*
?#Install error
https://princetonits.com/centos7-mysql-install-fails-due-conflict-libmysqlclient/
yum list installed mariadb\*
yum remove mariadb-libs.x86_64
vim /etc/my.cnf
Bind-address:0.0.0.0
service mysqld stop/start
Mysql默认密码: /var/log/mysqld.log A temporary password https://www.techietown.info/2017/08/mysql-default-root-password-on-centos7/
password policy:
mysql -uroot -p
SET PASSWORD = PASSWORD(‘1qaz#EDC’);
SHOW VARIABLES LIKE 'validate_password%';
SET GLOBAL validate_password_length = 6;
SET GLOBAL validate_password_number_count = 0;
SET PASSWORD = PASSWORD(‘123456’);
create database:
CREATE USER 'newuser'@'%' IDENTIFIED BY 'password';
GRANT ALL PRIVILEGES ON dbname.* TO 'newuser'@'%' identified by 'password';
#GRANT ALL PRIVILEGES ON *.* TO 'newuser'@'localhost';
FLUSH PRIVILEGES;

SHOW GRANTS FOR 'root'@'localhost';
SELECT user, host FROM mysql.user;
DROP USER ''@'localhost';

create database dbname;
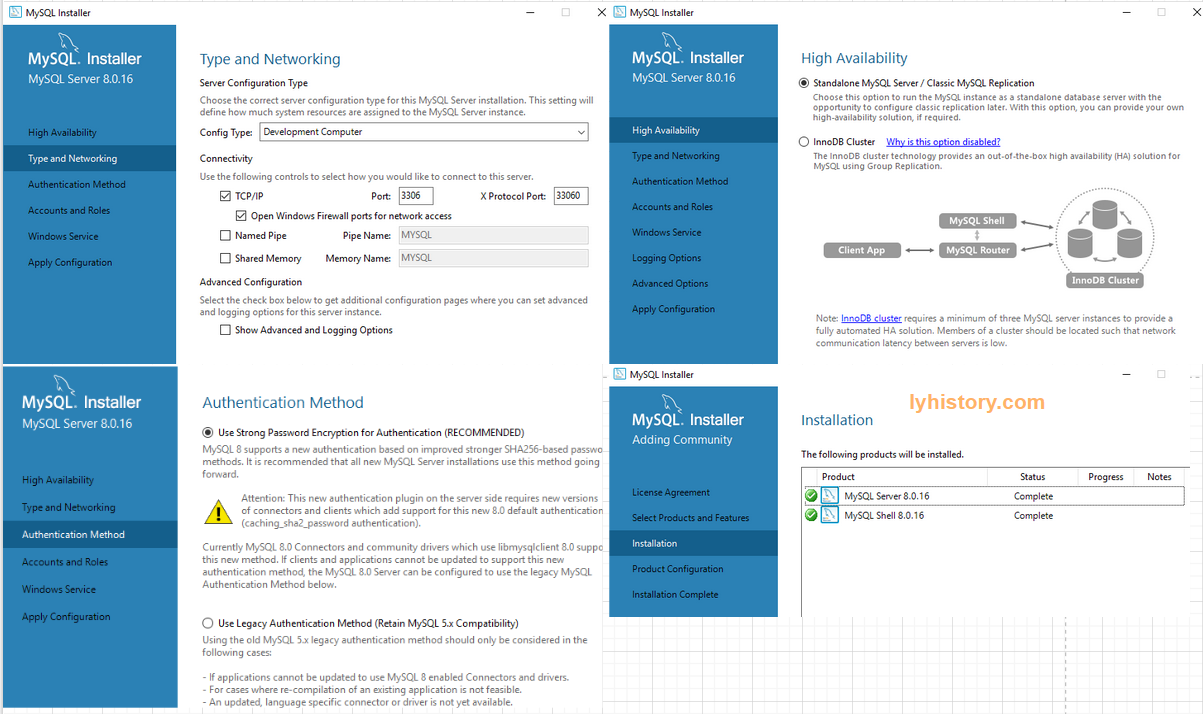
# 1.2 Install on windows
Setup replication https://lyhistory.com/mysql_replication/#
# 1.3 Client Tools
mysql built-in tools:
mysql
mysqldump
mysqladmin
验证配置:mysqld --verbose --help | grep skip-slave-start
mysqlbinlog:
mysqlbinlog命令详解 (opens new window)
--verbose --base64-output=DECODE-ROWS
https://dev.mysql.com/doc/refman/8.0/en/mysqlbinlog.html
https://www.zhihu.com/tardis/sogou/art/66501464
sudo mysqlbinlog --verbose --start-position=653218764 --stop-position=653263629 /var/lib/mysql/mysql-bin.000007 > check-mysql-bin.000007-14

--verbose 在BINLOG '之后打印sql语句
3rd party:
http://sqlfiddle.com/
Dbeaver export mysql Export without data https://github.com/dbeaver/dbeaver/issues/2176
mysql workbench
- DBeaver offline install settings: class name: com.mysql.cj.jdbc.Driver template: jdbc:mysql://{host}:{port}/{database} libraries: add postgres drivers (opens new window)
# 2. DB Management
# 2.1 mysql-cli
vertical format:
mysql> select * from table limit 1 \G;
千万不要用双引号,尤其是password,所有的-u -p -e等等后面不要加空格!
mysql -uroot -p123456
mysql --login-path=XXXX


mysql_config_editor/login-path
mysql_config_editor print --all
mysql_config_editor set --login-path=host-rpl --host=localhost --port=3306 --user=replicator --password

找回密码:
my_print_defaults -s client (需要安装mysql-server)
或者可以
decrypt ~/.mylogin.cnf
https://github.com/PyMySQL/myloginpath
grep:
pager grep ***
\n
https://stackoverflow.com/questions/10177465/grep-in-mysql-cli-interpretter
# 2.2 database management
# house keeping disk space /var/lib/mysql/
[ERROR] Disk is full writing './mysql-bin.000099' (Errcode: 16062400 - No space left on device). Waiting for someone to free space...
expire_logs_days The number of days for automatic binary log file removal. The default is 0, which means “no automatic removal.” Possible removals happen at startup and when the binary log is flushed. Log flushing occurs as indicated in Section 5.4, “MySQL Server Logs”.
To remove binary log files manually, use the PURGE BINARY LOGS statement. See Section 13.4.1.1, “PURGE BINARY LOGS Statement”.
mysql> show variables like 'expire_logs_days';
+------------------+-------+
| Variable_name    | Value |
+------------------+-------+
| expire_logs_days | 0     |
+------------------+-------+
1 row in set (0.00 sec)

mysql> show variables like 'max_binlog_size';
+-----------------+------------+
| Variable_name   | Value      |
+-----------------+------------+
| max_binlog_size | 1073741824 |
+-----------------+------------+
1 row in set (0.01 sec)

For the binary log, you can set the expire_logs_days system variable to expire binary log files automatically after a given number of days (see Section 5.1.7, “Server System Variables”). If you are using replication, you should set the variable no lower than the maximum number of days your replicas might lag behind the source. To remove binary logs on demand, use the PURGE BINARY LOGS statement (see Section 13.4.1.1, “PURGE BINARY LOGS Statement”).

To force MySQL to start using new log files, flush the logs. Log flushing occurs when you execute a FLUSH LOGS statement or a mysqladmin flush-logs, mysqladmin refresh, mysqldump --flush-logs, or mysqldump --master-data command. See Section 13.7.6.3, “FLUSH Statement”, Section 4.5.2, “mysqladmin — A MySQL Server Administration Program”, and Section 4.5.4, “mysqldump — A Database Backup Program”. In addition, the server flushes the binary log automatically when current binary log file size reaches the value of the max_binlog_size system variable.


自动清除:
[mysqld]
expire_logs_days=7

> flush logs

手动清除:
Manually prune bin log:
mysql>purge binary logs to 'bin.XXX';

mysql>purge binary logs before '2022-01-01 23:59:59';
# Users & Permissions
https://dev.mysql.com/doc/refman/5.7/en/privileges-provided.html
'User'@'%' and 'User'@'localhost' (opens new window)
SELECT user,host FROM mysql.user;

SHOW GRANTS FOR 'test'@'localhost';
GRANT ALL PRIVILEGES ON *.* TO 'test'@'localhost' WITH GRANT OPTION;
REVOKE ALL ON *.* FROM 'test'@'localhost';
flush privileges;

DROP USER 'test'@'localhost';
# Global Status
show global variables like '%timeout';
show variables like '%engine%';
SHOW VARIABLES LIKE "max_connections";
select @@wait_timeout;
show variables like '%error%';

show global status like '%connection%';
show global status like '%errors%';
show global status like '%thread%';
show processlist;

select * from mysql.user;

show variables like "%time_zone%";
show processlist;
select substring_index(host,':' ,1) as client_ip,Command,Time from information_schema.processlist;
show variables like 'max_connections';
SHOW GLOBAL STATUS LIKE "Threads_connected";
show variables like 'log_error';

use mysql;
SHOW CREATE TABLE innodb_index_stats;
# Security hardening
disable remote Access
DELETE FROM mysql.user WHERE User='root' AND Host NOT IN ('localhost', '127.0.0.1', '::1');
FLUSH PRIVILEGES;

my.ini:
[mysqld]
.....
skip-networking

vim /etc/my.cnf
Bind-address:127.0.0.1
service mysqld stop/start
turn off local_infile
https://dev.mysql.com/doc/refman/5.7/en/server-system-variables.html#sysvar_local_infile https://dev.mysql.com/doc/refman/8.0/en/load-data-local-security.html
SHOW VARIABLES WHERE Variable_name = 'local_infile';
SET GLOBAL local_infile = 'OFF';
应该主要是禁用 select into lcoalfile, loaddata from localfile
disable log-raw 比如一些敏感的 statement 如果 log-raw=ON 则会日志记下original statement,否则会进行一定的修改掩盖
https://dev.mysql.com/doc/refman/5.7/en/server-options.html#option_mysqld_log-raw
# backup&restore
backup https://dev.mysql.com/doc/refman/5.7/en/mysqldump-sql-format.html
基本用法
--------------------------------------------------------------
--- all db
--------------------------------------------------------------
mysqldump -uroot -p123456 --all-databases > mysqldump_20190524.sql

mysqldump -uroot -p123456 <dbname> > mysqldump_20190524.sql

--------------------------------------------------------------
--- schema only
--------------------------------------------------------------
mysqldump -uXXX -pXXX --no-tablespaces --routines --events --no-data --set-gtid-purged=OFF DBName > schema.sql

mysql -uXXX -pXXX  DBName < schema.sql

--------------------------------------------------------------
--- options
--------------------------------------------------------------
If you used the **–set-gtid-purged=ON** option, you would see the value of the [Global Transaction Identifier’s](http://dev.mysql.com/doc/refman/5.6/en/replication-gtids-concepts.html) (GTID’s):
--
--GTID state at the beginning of the backup
--

SET @@GLOBAL.GTID_PURGED='';

-routines
Include stored routines (procedures and functions)
脚本:
-----------------------------------------------------------------
--- db_backup.sh
-----------------------------------------------------------------
#!/bin/bash
# Shell script to backup MySQL database

# Set variables
V_USER="root"	# DB_USERNAME
V_PASS="123456"	# DB_PASSWORD

V_DBS="db1
db2"

V_DEST="/opt/backup/" # Backup Dest directory
V_DAYS=365 # How many days old files must be to be removed

# Linux bin paths
MYSQL="$(which mysql)"
MYSQLDUMP="$(which mysqldump)"
GZIP="$(which gzip)"

# Create Backup sub-directories
NOW="$(date +"%Y%m%d")"
MBD="$V_DEST/$NOW/mysql"
install -d $MBD


# Archive database dumps
for db in $V_DBS
do
    FILE="$MBD/$db.sql"
    echo "Start to backup $db ...."
    $MYSQLDUMP -u$V_USER -p$V_PASS $db > $FILE
    echo "Done!"
done

# Archive the directory, send mail and cleanup
cd $V_DEST
tar -cf $NOW.tar $NOW
$GZIP -9 $NOW.tar

echo "MySQL backup is completed! Backup name is $NOW.tar.gz"
#echo "MySQL backup is completed! Backup name is $NOW.tar.gz" | mail -s "MySQL backup" $EMAIL
rm -rf $NOW

# Remove old files
find $V_DEST -mtime +$V_DAYS -exec rm -f {} \;

-----------------------------------------------------------------
--- db_restore.sh
-----------------------------------------------------------------
#!/bin/bash -
# Shell script to restore MySQL database

# Set Variables
V_USER="root"
V_SOURCE="/opt/backup/"

MYSQL="$(which mysql)"
MYSQLADMIN="$(which mysqladmin)"

pushd ${V_SOURCE} &> /dev/null

if [ $# -eq 0 ]
  then
    echo "Please speicifed the date, USAGE:./db_restore 20200101"
    exit 0
fi

# Look for sql.gz files:
if [ "$(ls -A $1.tar.gz 2> /dev/null)" ]  ; then
  echo "sql.gz files found extracting..."
  tar -zxvf $1.tar.gz
else
  echo "target file $1.tar.gz not found in ${V_SOURCE}"
  exit 0
fi
pushd ${V_SOURCE}/$1/mysql &> /dev/null
# Exit when folder doesn't have .sql files:
if [ "$(ls -A *.sql 2> /dev/null | wc -l)" == 0 ]; then
  echo "No *.sql files found in $(pwd)"
  exit 0
fi

# Read mysql root password:
echo -n "Type mysql $V_USER password: "
read -s V_PASS
echo ""


# Get all database list first
DBS="$($MYSQL -u$V_USER -p$V_PASS -Bse 'show databases')"

# Ignore list, won't restore the following list of DB:
SKIP="db2"


# Restore DBs:
for filename in *.sql
do
  dbname=${filename%.sql}

  skipdb=-1
  if [ "$SKIP" != "" ]; then
    for ignore in $SKIP
    do
        [ "$dbname" == "$ignore" ] && skipdb=1 || :

    done
  fi

  # If not in ignore list, restore:
  if [ "$skipdb" == "-1" ] ; then

    skip_create=-1
    for existing in $DBS
    do
      [ "$dbname" == "$existing" ] && skip_create=1 || :
    done

    if [ "$skip_create" ==  "1" ] ; then
      echo "Database: $dbname already exist, skiping create"
    else
      echo "Creating DB: $dbname"
      #mysqladmin create $dbname -u $V_USER -p$V_PASS
    fi

    echo "Importing DB: $dbname from $filename"
    #mysql $dbname < $filename -u $V_USER -p$V_PASS
  fi
done
# upgrade
EXAMPLE: from 5.7.18 to 5.7.26
SHOW VARIABLES WHERE Variable_name LIKE "version";

https://dev.mysql.com/doc/refman/5.7/en/upgrading.html
yum list installed | grep "^mysql"

$ yum list installed | grep "^mysql"
Repodata is over 2 weeks old. Install yum-cron? Or run: yum makecache fast
mysql-community-client.x86_64         5.7.18-1.el7                @/mysql-community-client-5.7.18-1.el7.x86_64
mysql-community-common.x86_64         5.7.18-1.el7                @/mysql-community-common-5.7.18-1.el7.x86_64
mysql-community-libs.x86_64           5.7.18-1.el7                @/mysql-community-libs-5.7.18-1.el7.x86_64
mysql-community-server.x86_64         5.7.18-1.el7                @/mysql-community-server-5.7.18-1.el7.x86_64

$ find / -name "mysql" -o -name "mysqld" -type f -print 2>/dev/null
/usr/sbin/mysqld
$ find / -name "mysql" -type d -print 2>/dev/null
/var/lib/mysql
/usr/lib64/mysql
/usr/share/mysql
Upgrading MySQL with Directly-Downloaded RPM Packages https://dev.mysql.com/doc/refman/5.7/en/updating-direct-rpms.html https://dev.mysql.com/doc/refman/5.7/en/linux-installation-rpm.html
https://dev.mysql.com/downloads/mysql/
??rpm -qpl mysql-community-server-5.7.26-1.el7.x86_64.rpm For Red Hat Enterprise Linux/Oracle Linux/CentOS systems: yum install mysql-community-{server,client,common,libs}-* mysql-5.*
For Red Hat Enterprise Linux, Oracle Linux, CentOS, and Fedora systems, use the following command to start MySQL:
service mysqld start
mysql-upgrade -uroot -pPassword //[Warning] InnoDB: Table mysql/innodb_table_stats has length mismatch in the column name table_name.  Please run mysql_upgrade
Once the server restarts, run mysql_upgrade to check and possibly resolve any incompatibilities between the old data and the upgraded software. mysql_upgrade also performs other functions; see Section 4.4.7, “mysql_upgrade — Check and Upgrade MySQL Tables” for details. If you use replication, review Section 16.4.3, “Upgrading a Replication Setup”. warning Table mysql/innodb_table_stats has length mismatch in the column name table_name. Please run mysql_upgrade https://dev.mysql.com/doc/relnotes/mysql/5.7/en/news-5-7-23.html
Installation of previous versions of MySQL using older packages might have created a configuration file named /usr/my.cnf. It is highly recommended that you examine the contents of the file and migrate the desired settings inside to the file /etc/my.cnf file, then remove /usr/my.cnf.
# plugins
https://dev.mysql.com/doc/refman/5.7/en/server-plugins.html https://dev.mysql.com/doc/refman/5.7/en/plugin-loading.html#server-plugin-installing
SHOW VARIABLES WHERE Variable_name = 'plugin_dir';
	/usr/lib64/mysql/plugin/
SELECT * FROM INFORMATION_SCHEMA.PLUGINS\G
SELECT * FROM mysql.plugin;
INSTALL PLUGIN myplugin SONAME 'validate_password.so';

SELECT PLUGIN_NAME, PLUGIN_STATUS
       FROM INFORMATION_SCHEMA.PLUGINS
       WHERE PLUGIN_NAME LIKE 'validate%';

The following lines should be present in the global configuration:
plugin-load=validate_password.so
validate-password=FORCE_PLUS_PERMANENT
https://dev.mysql.com/doc/refman/5.7/en/validate-password-installation.html

vim /etc/my.cnf
[mysqld]
plugin-load-add=validate_password.so
validate-password=FORCE_PLUS_PERMANENT
If it is desired to prevent the server from running without the password-validation plugin, use --validate-password with a value of FORCE or FORCE_PLUS_PERMANENT to force server startup to fail if the plugin does not initialize successfully.
service mysqld start --validate-password=FORCE_PLUS_PERMANENT
# 4. SQL
# Basic
a mysql db can have many schema,like a building have many rooms, and users can get access to different room, so schema can have more than one user.
SELECT DATE_FORMAT(date_add(date_column,INTERVAL 8 HOUR),'%b %d %Y %h %p'),COUNT(distinct(count_column))
FROM db.table
where date_add(date_column,INTERVAL 8 HOUR) between '2015-02-01 00:00:00' and '2015-03-01 00:00:00'
GROUP BY DATE_FORMAT(date_column,'%b %d %Y %h %p')
order by DATE_FORMAT(date_add(date_column,INTERVAL 8 HOUR),'%b %d %Y %h %p');
CRUD
insert into phoenix.`program-slot`(duration,dateOfProgram,startTime,`weekly-schedule_id`,presenter_id,producer_id,program_id)
select duration,date_add(dateOfProgram,INTERVAL 2 DAY), IFNULL(date_add(startTime,INTERVAL 2 DAY),null) ,100,presenter_id,producer_id,program_id from phoenix.`program-slot` where `weekly-schedule_id` =3;
# Advance
批量生成truncate
mysql -h'HOST' -u'USERNAME' -p'PASSWORD' -e'SELECT CONCAT("TRUNCATE TABLE ",TABLE_NAME,";") FROM information_schema.TABLES WHERE TABLE_SCHEMA="db01" into outfile "/var/lib/mysql-files/truncate_db01.sql";'

SHOW VARIABLES LIKE "secure_file_priv" 查看能写到哪个目录
Performance on index : when join a large table
bad:
select user.*, log.LoginTime
from users user
left join login_log log on user.id=log.userid and log.LoginTime=(select max(LoginTime) from login_log where userid=log.userid and status='true');
good:
select user.*, log.LoginTime
from users user
left join (
select max(LoginTime) LoginTime,userid from login_log
where  status='true'
group by userid) temp on temp.userid=user.userid;
存储过程互相调用
DELIMITER $$
CREATE DEFINER=`dbuser`@`%` PROCEDURE `PROCE1`(
in _param varchar(50)
)
root:BEGIN
declare _count int;
select count(1) into _count from table where column=_param;
if _count<>1 then
select -1 as result;
leave root;
end if;
call PROCE2(_param);
do something else
select 0 as result;
END

DELIMITER $$
CREATE DEFINER=`dbuser`@`%` PROCEDURE `PROCE2`(
in _param int
)
BEGIN
DECLARE done INT DEFAULT FALSE;
declare _variable1 int;
declare _variable2 decimal(10,2);
declare resultCur cursor for select column1,column2 from table where column=_param;
DECLARE CONTINUE HANDLER FOR NOT FOUND SET done = TRUE;
DECLARE exit handler for sqlexception
BEGIN
ROLLBACK;
get diagnostics condition 1 @p1 = MESSAGE_TEXT;
select -1 as result, @p1 as message from dual;
END;
open resultCur;
operaLoop:Loop
fetch resultCur into _variable1,_variable2;
if done then
leave operaLoop;
end if;
do something...
end Loop;
close resultCur;
END
Multiple cursors in mysql stored procedure
DROP PROCEDURE IF EXISTS `multipleCursorsAtOne`;
DELIMITER $$
CREATE PROCEDURE `multipleCursorsAtOne`()
BEGIN
DROP TABLE IF EXISTS userNames;
CREATE TEMPORARY TABLE userNames
(userName varchar(200) NOT NULL);
BEGIN
DECLARE done BOOLEAN DEFAULT false;
DECLARE p_first_name VARCHAR(200);
DECLARE cursor_a CURSOR FOR SELECT user_name FROM user_info LIMIT 1,3;
DECLARE CONTINUE HANDLER FOR NOT FOUND SET done = TRUE;
OPEN cursor_a;
cursor_a_loop: LOOP
FETCH cursor_a INTO p_first_name;
IF done THEN
LEAVE cursor_a_loop;
END IF;
-- cursor loop statements
IF p_first_name IS NOT NULL AND p_first_name <> "" THEN
INSERT INTO userNames(userName) VALUES(p_first_name);
END IF;
END LOOP;
CLOSE cursor_a;
END;
BEGIN
DECLARE done BOOLEAN DEFAULT false;
DECLARE p_first_name VARCHAR(200);
DECLARE cursor_a CURSOR FOR SELECT user_name FROM user_info LIMIT 4,3;
DECLARE CONTINUE HANDLER FOR NOT FOUND SET done = TRUE;
OPEN cursor_a;
cursor_a_loop: LOOP
FETCH cursor_a INTO p_first_name;
IF done THEN
LEAVE cursor_a_loop;
END IF;
-- cursor loop statements
IF p_first_name IS NOT NULL AND p_first_name <> "" THEN
INSERT INTO userNames(userName) VALUES(p_first_name);
END IF;
END LOOP;
CLOSE cursor_a;
END;
SELECT * FROM userNames;
END
Recursive query
就是针对存在parent id的存在层级关系的表
Hierarchical data in MySQL: parents and children in one query
https://stackoverflow.com/questions/20215744/how-to-create-a-mysql-hierarchical-recursive-query
Managing Hierarchical Data in MySQL
https://www.mysqltutorial.org/mysql-adjacency-list-tree/
Partition
mysql> show create table TABLE_NAME\G;
public void createPartition(String theDate) {
        String sql = "SELECT count(partition_name) FROM INFORMATION_SCHEMA.PARTITIONS WHERE  TABLE_SCHEMA =SCHEMA() AND TABLE_NAME='t_xxx';";
        Integer result = jdbcTemplate.queryForObject(sql, Integer.class);
        if (result == 0) {
            sql = String.format("ALTER TABLE t_xxx PARTITION BY LIST COLUMNS(CreateDate) (PARTITION p%s VALUES IN ('%s'));", theDate, theDate);
            jdbcTemplate.execute(sql);
        } else {
            sql = String.format("SELECT count(partition_name) FROM INFORMATION_SCHEMA.PARTITIONS WHERE  TABLE_SCHEMA =SCHEMA() AND TABLE_NAME='t_xxx' AND PARTITION_NAME = 'p%s' ", theDate);
            Integer count = jdbcTemplate.queryForObject(sql, Integer.class);
            if (count == 0) {
                sql = String.format("ALTER TABLE t_xxx ADD PARTITION(PARTITION p%s VALUES IN ('%s'));", theDate, theDate);
                jdbcTemplate.execute(sql);
            }
        }
    }
# 5. HA
# 理论
https://dev.mysql.com/doc/refman/8.0/en/replication.html
In MySQL, replication involves the source database writing down every change made to the data held within one or more databases in a special file known as the binary log
Once the replica instance has been initialized, it creates two threaded processes:
master-binary log=>slave-relay log
The first, called the IO thread, connects to the source MySQL instance and reads the binary log events line by line, and then copies them over to a local file on the replica’s server called the relay log.
slave-relay log=>slave db changes
The second thread, called the SQL thread, reads events from the relay log and then applies them to the replica instance as fast as possible.
# 两种模式
基于binary log, binary log file position-based replication
When you turn a MySQL instance into a replica using this method, you must provide it with a set of binary log coordinates. These consist of the name of the binary log file on the source which the replica must read and a specific position within that file which represents the first database event the replica should copy to its own MySQL instance.
These coordinates are important since replicas receive a copy of their source’s entire binary log and, without the right coordinates, they will begin replicating every database event recorded within it. This can lead to problems if you only want to replicate data after a certain point in time or only want to replicate a subset of the source’s data.
Binary log file position-based replication is viable for many use cases, but this method can become clunky in more complex setups.
基于 global transaction identifier GTID [starting with version 5.6 and above]
GTID stands for global transaction identifier (GTID) which uniquely identifies a transaction committed on the server of origin (master). A unique GTID is created when any transaction occurs. The GTID is not just unique to the server on which it originates, but also across the servers in any given replication setup. In other words, each transaction is mapped to a GTID.
MySQL GTIDs are displayed as a pair of coordinates, separated by a colon character (😃
GTID = source_id(noramlly server uuid):transaction_id(sequential integer,start from 1, representing the order a transaction was committed on the source)server uuid: /var/lib/mysql/auto.cnf
GTID Set
rather than just a single transaction id, an interval is given a range of transactions like
baecf819-a6a5-11e9-a78d-566f18fa0007:1-699ortwo ranges with a gap
baecf819-a6a5-11e9-a78d-566f18fa0007:1-699, 702-900- Retrieved _Gtid_Set:
- All GTIDs received from the master
- Resets on:
- CHANGE MASTER
- RESET SLAVE
- server restart(if relay-log-recovery is on)
- Executed_Gtid_Set:
- All GTIDs written to binary log
- Same value seen in:
- SHOW MASTER STATUS
- SHOW SLAVE STATUS
- show global variables like 'gtid_executed';
This method involves creating a global transaction identifier (GTID) for each transaction — or, an isolated piece of work performed by a database — that the source MySQL instance executes.
The mechanics of transaction-based replication are similar to binary log file-based replication: whenever a database transaction occurs on the source, MySQL assigns and records a GTID for the transaction in the binary log file along with the transaction itself. The GTID and the transaction are then transmitted to the source’s replicas for them to process.
When the replication takes place, the slave makes use of the same GTIDs, irrespective of whether it acts as a master for any other nodes or not. With each transaction replication, the same GTIDs and transaction numbers also come along from the master and the slave will write these to the binlog if it’s configured to write its data events.
To ensure a smooth, consistent and fault-tolerant replication, the slave will then inform the master of the GTIDs that were a part of the execution, which helps master node identify if any transaction did not take place. The master node then informs the slave to carry out the left-over transactions and thereby ensures that data replication takes place accurately.
MySQL’s transaction-based replication has a number of benefits over its traditional replication method. For example, because both a source and its replicas preserve GTIDs, if either the source or a replica encounter a transaction with a GTID that they have processed before they will skip that transaction. This helps to ensure consistency between the source and its replicas. Additionally, with transaction-based replication replicas don’t need to know the binary log coordinates of the next database event to process. This means that starting new replicas or changing the order of replicas in a replication chain is far less complicated.
- Retrieved _Gtid_Set:
# 相关权限
REPLICATION CLIENT权限: replication user使用shell命令 SHOW MASTER STATUS, SHOW SLAVE STATUS和 SHOW BINARY LOGS来确定复制状态。
REPLICATION SLAVE权限: SLAVE 进行replication,使用 show slave hosts ,show binlog events;等命令;
假设想要在Slave上有权限运行"LOAD TABLE FROM MASTER" 或 "LOAD DATA FROM MASTER"语句的话,必须授予全局的 FILE 和 SELECT 权限:
RELOAD 权限:Reset slave: Access denied; you need (at least one of) the RELOAD privilege(s) for this operation
super权限:start slave,stop slave;
# Replication Solution
主机器需要允许从机器访问其3306端口
# 主从 - 基于file based / binary log replication
https://www.digitalocean.com/community/tutorials/how-to-set-up-replication-in-mysql
----------------------------------------------------------------------------
step 1: config master and slave /etc/my.cnf And restart:
----------------------------------------------------------------------------
Master:
server-id=1
log-bin=mysql-bin #This defines the base name and location of MySQL’s binary log file,When commented out, as this directive is by default, binary logging is disabled. Your replica server must read the source’s binary log file so it knows when and how to replicate the source’s data

binlog_do_db          = include_database_name 需要复制的数据库
binlog_do_db          = db_1
binlog_do_db          = db_2

replicate-ignore-db = mysql  #忽略数据库,不需要复制
replicate-ignore-db = information_schema
replicate-ignore-db = performance_schema
replicate-ignore-db = sys

Slave:
[mysqld]
server-id=2
log_bin                 = /var/log/mysql/mysql-bin.log
binlog_do_db            =  跟master一致
relay-log               = /var/log/mysql/mysql-relay-bin.log

> sudo systemctl restart mysqld

----------------------------------------------------------------------------
step 2: on master, create and grant repl user
----------------------------------------------------------------------------

good:
mysql> CREATE USER 'replica_user'@'replica_server_ip' IDENTIFIED WITH mysql_native_password BY 'password';
# Note that this command specifies that replica_user will use the mysql_native_password authentication plugin. It’s possible to instead use MySQL’s default authentication mechanism, caching_sha2_password, but this would require setting up an encrypted connection between the source and the replica. This kind of setup would be optimal for production environment: https://dev.mysql.com/doc/refman/8.0/en/replication-solutions-encrypted-connections.html

bad: 任意ip都可以访问,不安全
mysql> CREATE USER 'replica_user'@'%' IDENTIFIED BY '123456';


mysql> GRANT REPLICATION SLAVE ON *.* TO 'replica_user'@'replica_server_ip';

----------------------------------------------------------------------------
step 3: on master: Retrieving Binary Log Coordinates from the Source
----------------------------------------------------------------------------
To make sure that no users change any data while you retrieve the coordinates, which could lead to problems, you’ll need to lock the database to prevent any clients from reading or writing data as you obtain the coordinates.

mysql> FLUSH TABLES WITH READ LOCK;
mysql> SHOW MASTER STATUS; # return the current status information for the source’s binary log files

Output
+------------------+----------+--------------+------------------+-------------------+
| File             | Position | Binlog_Do_DB | Binlog_Ignore_DB | Executed_Gtid_Set |
+------------------+----------+--------------+------------------+-------------------+
| mysql-bin.000001 |      899 | db           |                  |                   |
+------------------+----------+--------------+------------------+-------------------+
1 row in set (0.00 sec)

输出的file和position即下面用到的MASTER_LOG_FILE和MASTER_LOG_POS

sudo find / -name mysql-bin.000001
mysqlbinlog /var/lib/mysql/mysql-bin.000001

----------------------------------------------------------------------------
step 4: dump and import, If Your Source Has Existing Data to Migrate
----------------------------------------------------------------------------
on master::
If you have data on your source MySQL instance that you want to migrate to your replicas, you can do so by creating a snapshot of the database with the mysqldump utility. However, your database should still be currently locked. If you make any new changes in the same window, the database will automatically unlock. Likewise, the tables will automatically unlock if you exit the client.
For this reason, you must open a new terminal window or tab on your local machine so you can create the database snapshot without unlocking MySQL.

> mysqldump -u root db > db.sql
or
> mysqldump -u repl -p 123456 --all-databases --master-data > dbdump.db


Following that you can close this terminal window or tab and return to your first one, which should still have the MySQL shell open, then:
mysql> UNLOCK TABLES;


on slave:: import data
> mysql -u root -p < dbdump.db
or
mysql> CREATE DATABASE db;
> mysql db < /tmp/db.sql


----------------------------------------------------------------------------
step 5: Slave: setting and start
----------------------------------------------------------------------------

mysql> CHANGE MASTER TO MASTER_HOST='source_server_ip',MASTER_PORT=3306,MASTER_USER='replica_user',MASTER_PASSWORD='password',MASTER_LOG_FILE='mysql-bin.000001',MASTER_LOG_POS=52113;

mysql> START SLAVE;

mysql> SHOW SLAVE STATUS\G;
Master_Log_File:	# source bin log
Read_Master_Log_Pos: # source bin log position
Relay_Log_File:		# slave relay log
Relay_Log_Pos: 		# salve relay log position
Relay_Master_Log_File:

其中,Slave_IO_Running和Slave_SQL_Running均显示yes表示Replication工作正常,可通过其余参数来了解Replication的工作状态。


Note: If your replica has an issue in connecting or replication stops unexpectedly, it may be that an event in the source’s binary log file is preventing replication. In such cases, you could run the SET GLOBAL SQL_SLAVE_SKIP_COUNTER command to skip a certain number of events following the binary log file position you defined in the previous command. This example only skips the first event:
mysql> SET GLOBAL SQL_SLAVE_SKIP_COUNTER = 1;

Following that, you’d need to start the replica again:
mysql> START REPLICA;
# 主从 - 基于GTID based replication
https://hevodata.com/learn/mysql-gtids-and-replication-set-up/
https://dev.mysql.com/doc/refman/5.7/en/replication-gtids-howto.html
gtid_executed:这个是已经执行过的所有的事务的GTID的一个系列串,也就是binary log里面已经落库的事务的序列号。这个参数是只读的,不能够进行设置。
gtid_purged:subsets of gtid_executed that are no longer in the binary logs 这个序列是指我们在binary log删除的事务的GTID的序列号。我们可以手动进行设置,方便我们做一些管理。
----------------------------------------------------------------------------
step 1: lock master&slave
----------------------------------------------------------------------------
on both master & slave:
mysql> SET @@GLOBAL.read_only = ON;
mysql> show global variables like 'read_only';
这次跟前面的lock方法不同,注意**不会影响slave同步复制的功能**

mysqladmin -uroot -p shutdown

----------------------------------------------------------------------------
step 2: config master and slave /etc/my.cnf And restart:
----------------------------------------------------------------------------
mysqld --defaults-file=/etc/my.cnf --validate-config

for master:
The Master server needs to be started with GTID mode enabled by setting the gtid_mode variable to ON. It is also essential that the enforce_gtid_consistency variable is enabled to make sure that only the statements which are safe for MySQL GTIDs Replication are logged.
[mysqld]
server-id=1
log-bin = mysql-bin
#binlog_format = row
gtid-mode=ON
enforce-gtid-consistency=ON
#read-only = ON #另一种方式设置readonly

> systemctl restart mysqld

for slave:
[mysqld]
server-id = 2
log-bin = mysql-bin
gtid-mode=ON
enforce-gtid-consistency=ON
log-slave-updates
#read-only = ON #另一种方式设置readonly
#relay-log = relay-log-server
skip-slave-start #!!!!Important In addition, you should start replicas with the --skip-slave-start option before configuring the replica settings. Tells the replica server not to start the replication threads when the server starts. To start the threads later, use a START SLAVE statement.

> systemctl restart mysqld
----------------------------------------------------------------------------
step 3: on master create replicator user
----------------------------------------------------------------------------

> mysql -uroot -p

mysql> DROP USER 'replicator'@'localhost';
--- mysql> REVOKE ALL ON *.* FROM 'replicator'@'localhost';

# replicator@localhost可以管理master本机
mysql> CREATE USER replicator@localhost IDENTIFIED BY 'password';
mysql> GRANT SUPER,RELOAD,REPLICATION SLAVE ON *.* TO 'replicator'@'localhost' IDENTIFIED BY 'password';

# 'replicator'@'replication_server_ip'在slave机器上replication_server_ip远程连接管理master以及进行基本的复制(最低需要REPLICATION SLAVE权限)
mysql> CREATE USER replicator@replication_server_ip IDENTIFIED BY 'password';
mysql> GRANT SUPER,RELOAD,REPLICATION SLAVE ON *.* TO 'replicator'@'replication_server_ip' IDENTIFIED BY 'password';

mysql> flush privileges;

mysql_config_editor set --login-path=host-rpl --host=localhost --port=3306 --user=replicator --password

----------------------------------------------------------------------------
(no need) step 4: on master: Retrieving Binary Log Coordinates from the Source
----------------------------------------------------------------------------

mysql> show master status
mysql> show global variables like 'gtid_executed';
两者输出的gtid_executed应该是一样的
select * from mysql.gtid_executed;

GTID = source_id(noramlly server uuid):transaction_id(sequential integer,start from 1, representing the order a transaction was committed on the source)

mysqlbinlog /var/lib/mysql/mysql-bin.000001
内容基本跟上面的file based replication的bin log一样,只不过多了:
                    #210621 16:50:01 server id 2  end_log_pos 259 CRC32 0x7b8ba749  GTID    last_committed=0        sequence_number=1
                    SET @@SESSION.GTID_NEXT= '878556a6-ff0e-11ea-bf92-566f18fa0008:3'/*!*/;
                    # at 259
----------------------------------------------------------------------------
step 5: dump and import, If Your Source Has Existing Data to Migrate
----------------------------------------------------------------------------

> mysqldump --all-databases -flush-privileges --single-transaction --flush-logs --triggers --routines --events -hex-blob --host=54.89.xx.xx --port=3306 --user=root  --password=XXXXXXXX > mysqlbackup_dump.sql
# head -n30 mysqlbackup_dump.sql

> mysqldump -flush-privileges --single-transaction --flush-logs --triggers --routines --events -hex-blob --host=localhost --user=root --password --databases db1 db2> source_dump.sql

            SET @MYSQLDUMP_TEMP_LOG_BIN = @@SESSION.SQL_LOG_BIN;
            SET @@SESSION.SQL_LOG_BIN= 0;

            --
            -- GTID state at the beginning of the backup
            --

            SET @@GLOBAL.GTID_PURGED='baecf819-a6a5-11e9-a78d-566f18fa0007:1-594';


on slave:: import data
mysql> show global variables like 'gtid_executed';
如果是第一次,应该是空的
mysql> SET @@GLOBAL.read_only = OFF;
mysql> source source_dump.sql ;
mysql> show global variables like 'gtid_executed';

导入完应该跟master一样了? 跟file based replication不同,两台机器上产生的gtid本来就不同的,只不过slave会复制master上面产生的gtid transaction,

另外发现readonly也变成了off,我以为第一步设置readonly会一直有效,看来是中间某一步改变了readonly(重启或者其他操作),再做一次Step 1

----------------------------------------------------------------------------
step 6: Slave: setting and start
----------------------------------------------------------------------------
The slave should be configured to use the master with GTID based transactions as the source for data replication and to use GTID-based auto-positioning rather than file-based positioning.

> mysql -uroot -p
mysql> CHANGE MASTER TO
MASTER_HOST = '54.89.xx.xx',
MASTER_PORT = 3306,
MASTER_USER = 'repl_user',
MASTER_PASSWORD = 'XXXXXXXXX',
MASTER_AUTO_POSITION = 1;

Take a new backup.  Existing backups that were made before you enabled GTIDs can no longer be used on these servers now that you have enabled GTIDs. Take a new backup at this point, so that you are not left without a usable backup.

mysql> start slave;
mysql> show slave status\G

			Retrieved_Gtid_Set:
            Executed_Gtid_Set: baecf819-a6a5-11e9-a78d-566f18fa0007:
                Auto_Position: 1
----------------------------------------------------------------------------
step 6: Finally touch: unlock
----------------------------------------------------------------------------
mysql> SET @@GLOBAL.read_only = OFF;

ON SLAVE:
> vim /etc/my.cnf
 #skip-slave-start
https://www.cnblogs.com/shengdimaya/p/6897584.html
# 主主 - 基于GTID replication
https://www.huaweicloud.com/articles/e85563c3c3c75c7d980466d800a8c43c.html
上面的操作反过来操作一遍即可,但是注意:
两个主自增id要分别为奇数偶数,不然有冲突
----------------------------------------------------------------------------
step 1: lock master&slave
----------------------------------------------------------------------------
on both master & slave:
mysql> SET @@GLOBAL.read_only = ON;
mysql> show global variables like 'read_only';
这次跟前面的lock方法不同,注意**不会影响slave同步复制的功能**

mysqladmin -uroot -p shutdown

----------------------------------------------------------------------------
step 2: config master & slave /etc/my.cnf And restart:
----------------------------------------------------------------------------
master:

[mysqld]
server-id = 1
auto_increment_offset = 1
auto_increment_increment = 2  #奇数ID


log-bin = mysql-bin  #打开二进制功能,MASTER主服务器必须打开此项
binlog-format=ROW
log-slave-updates=true
gtid-mode=ON
enforce-gtid-consistency=ON
master-info-repository=TABLE
relay-log-info-repository=TABLE
sync-master-info=1
slave-parallel-workers=0
sync_binlog=0
binlog-checksum=CRC32
master-verify-checksum=1
slave-sql-verify-checksum=1
binlog-rows-query-log_events=1
max_binlog_size=1024M       #binlog单文件最大值

replicate-ignore-db = mysql  #忽略不同步主从的数据库
replicate-ignore-db = information_schema
replicate-ignore-db = performance_schema
replicate-ignore-db = sys

max_connections = 3000
max_connect_errors = 30

lower_case_table_names=1
skip-name-resolve

skip-slave-start #!!!!Important In addition, you should start replicas with the --skip-slave-start option before configuring the replica settings. Tells the replica server not to start the replication threads when the server starts. To start the threads later, use a START SLAVE statement.

> systemctl restart mysqld

slave:
[mysqld]
server-id = 2
auto_increment_offset = 2
auto_increment_increment = 2    #偶数ID


log-bin = mysql-bin    #打开二进制功能,MASTER主服务器必须打开此项
binlog-format=ROW
log-slave-updates=true
gtid-mode=ON
enforce-gtid-consistency=ON
master-info-repository=TABLE
relay-log-info-repository=TABLE
sync-master-info=1
slave-parallel-workers=0
sync_binlog=0
binlog-checksum=CRC32
master-verify-checksum=1
slave-sql-verify-checksum=1
binlog-rows-query-log_events=1
max_binlog_size=1024M         #binlog单文件最大值

replicate-ignore-db = mysql   #忽略不同步主从的数据库
replicate-ignore-db = information_schema
replicate-ignore-db = performance_schema
replicate-ignore-db = sys

max_connections = 3000
max_connect_errors = 30

lower_case_table_names=1
skip-name-resolve

skip-slave-start #!!!!Important In addition, you should start replicas with the --skip-slave-start option before configuring the replica settings. Tells the replica server not to start the replication threads when the server starts. To start the threads later, use a START SLAVE statement.

Note:
1. 另外一种方式就是
systemctl edit mysqld.service
and then adding --skip-slave-start
https://stackoverflow.com/questions/65434207/start-mysql-replication-server-with-skip-slave-start
2. 配置完成主主复制之后一定要注释掉my.cnf里面的skip-slave-start,不然每次启动之后都要手动start slave

> systemctl restart mysqld

----------------------------------------------------------------------------
step 3: on BOTH two masters create replicator user
----------------------------------------------------------------------------

> mysql -uroot -p

ON BOTH SERVER:
# replicator@localhost可以管理master本机
mysql> CREATE USER replicator@localhost IDENTIFIED BY 'password';
mysql> GRANT SUPER,RELOAD,REPLICATION SLAVE ON *.* TO 'replicator'@'localhost' IDENTIFIED BY 'password';

# 'replicator'@'replication_server_ip'在slave机器上replication_server_ip远程连接管理master以及进行基本的复制(最低需要REPLICATION SLAVE权限)
ON SERVER 1:
mysql> CREATE USER replicator@replication_server2_ip IDENTIFIED BY 'password';
mysql> GRANT SUPER,RELOAD,REPLICATION SLAVE ON *.* TO 'replicator'@'replication_server2_ip' IDENTIFIED BY 'password';
mysql_config_editor set --login-path=host-rpl --host=replication_server2_ip --port=3306 --user=replicator --password

ON SERVER 2:
mysql> CREATE USER replicator@replication_server1_ip IDENTIFIED BY 'password';
mysql> GRANT SUPER,RELOAD,REPLICATION SLAVE ON *.* TO 'replicator'@'replication_server1_ip' IDENTIFIED BY 'password';
mysql_config_editor set --login-path=host-rpl --host=replication_server1_ip --port=3306 --user=replicator --password


mysql> flush privileges;

----------------------------------------------------------------------------
step 4: on BOTH two master: Retrieving Binary Log Coordinates from the Source
----------------------------------------------------------------------------

mysql> show master status
mysql> show global variables like 'gtid_executed';
两者输出的gtid_executed应该是一样的

----------------------------------------------------------------------------
step 5: dump and import, If Your Source Has Existing Data to Migrate
----------------------------------------------------------------------------

Method 1:
> mysqldump --all-databases -flush-privileges --single-transaction --flush-logs --triggers --routines --events -hex-blob --host=54.89.xx.xx --port=3306 --user=root  --password=XXXXXXXX > mysqlbackup_dump.sql
# head -n30 mysqlbackup_dump.sql


on slave:: import data
mysql> show global variables like 'gtid_executed';
如果是第一次,应该是空的
mysql> SET @@GLOBAL.read_only = OFF;
mysql> source mysqlbackup_dump.sql ;
mysql> show global variables like 'gtid_executed';
导入完应该跟master一样了

Method 2:
Create a dump file using mysqldump on the source server. Set the mysqldump option --master-data (with the default value of 1) to include a CHANGE MASTER TO statement with binary logging information. Set the --set-gtid-purged option to AUTO (the default) or ON, to include information about executed transactions in the dump. Then use the mysql client to import the dump file on the target server.

--master-data[=value]

Use this option to dump a source replication server to produce a dump file that can be used to set up another server as a replica of the source. It causes the dump output to include a CHANGE MASTER TO statement that indicates the binary log coordinates (file name and position) of the dumped server. These are the source server coordinates from which the replica should start replicating after you load the dump file into the replica.

If the option value is 2, the CHANGE MASTER TO statement is written as an SQL comment, and thus is informative only; it has no effect when the dump file is reloaded. If the option value is 1, the statement is not written as a comment and takes effect when the dump file is reloaded. If no option value is specified, the default value is 1.

----------------------------------------------------------------------------
step 6: Both two Slave: setting and start
----------------------------------------------------------------------------
The slave should be configured to use the master with GTID based transactions as the source for data replication and to use GTID-based auto-positioning rather than file-based positioning.

> mysql -uroot -p
mysql> CHANGE MASTER TO
MASTER_HOST = '54.89.xx.xx',
MASTER_PORT = 3306,
MASTER_USER = 'repl_user',
MASTER_PASSWORD = 'XXXXXXXXX',
MASTER_AUTO_POSITION = 1;

Take a new backup.  Existing backups that were made before you enabled GTIDs can no longer be used on these servers now that you have enabled GTIDs. Take a new backup at this point, so that you are not left without a usable backup.

mysql> start slave;
mysql> show slave status\G

----------------------------------------------------------------------------
step 6: Finally touch: unlock
----------------------------------------------------------------------------
mysql> SET @@GLOBAL.read_only = OFF;

> vim /etc/my.cnf
 #skip-slave-start
# Reset Replication
on slave:
mysql > stop slave;
mysql > reset slave (all);
	RESET SLAVE 不会改变复制连接使用的参数,例如master host, master port, master user, or master password
	RESET SLAVE ALL 则会;
    清除slave 复制时的master binlog的位置
    清空master info, relay log info
    删除所有的relay log文件,并创建一个新的relay log文件。
    重置复制延迟(CHANGE MASTER TO 的 MASTER_DELAY参数指定的)为0。

功能说明:用于删除SLAVE数据库的relaylog日志文件,并重新启用新的relaylog文件;

reset slave 将使slave 忘记主从复制关系的位置信息。该语句将被用于干净的启动, 它删除master.info文件和relay-log.info 文件以及所有的relay log 文件并重新启用一个新的relaylog文件。

使用reset slave之前必须使用stop slave 命令将复制进程停止。


on master:

mysql > RESET MASTER

    删除binlog索引文件中列出的所有binlog文件
    清空binlog索引文件
    创建一个新的binlog文件
    清空系统变量gtid_purged和gtid_executed
    在MySQL 5.7.5 及后续版本中, RESET MASTER还会会清空 mysql.gtid_executed 数据表。

功能说明:删除所有的binglog日志文件,并将日志索引文件清空,重新开始所有新的日志文件。用于第一次进行搭建主从库时,进行主库binlog初始化工作;

 注意reset master 不同于purge binary log的两处地方
1. reset master 将删除日志索引文件中记录的所有binlog文件,创建一个新的日志文件 起始值从000001 开始,然而purge binary log 命令并不会修改记录binlog的顺序的数值
2. reset master 不能用于有任何slave 正在运行的主从关系的主库。因为在slave 运行时刻 reset master 命令不被支持,reset master 将master 的binlog从000001 开始记录,slave 记录的master log 则是reset master 时主库的最新的binlog,从库会报错无法找的指定的binlog文件。
# Sync Replication
Synchronize both servers by setting them to read-only if the replication is running already by using the following command:
mysql> SET @@GLOBAL.read_only = ON;
解释:
对于Mysql数据库读写状态,主要靠"read_only"全局参数来设定;默认情况下, 数据库是用于读写操作的,所以read_only参数也是0或faluse状态,这时候不论是本地用户还是远程访问数据库的用户,都可以进行读写操作;
如需设置为只读状态,将该read_only参数设置为1或TRUE状态,但设置 read_only=1 状态有两个需要注意的地方:
read_only=1只读模式,不会影响slave同步复制的功能,所以在MySQL slave库中设定了read_only=1后,通过 "show slave status\G" 命令查看salve状态,可以看到salve仍然会读取master上的日志,并且在slave库中应用日志,保证主从数据库同步一致;
read_only=1只读模式,限定的是普通用户进行数据修改的操作,但不会限定具有super权限的用户的数据修改操作 (但是如果设置了"super_read_only=on", 则就会限定具有super权限的用户的数据修改操作了);在MySQL中设置read_only=1后,普通的应用用户进行insert、update、delete等会产生数据变化的DML操作时,都会报出数据库处于只读模式不能发生数据变化的错误,但具有super权限的用户,例如在本地或远程通过root用户登录到数据库,还是可以进行数据变化的DML操作;(也就是说"real_only"只会禁止普通用户权限的mysql写操作,不能限制super权限用户的写操作; 如果要想连super权限用户的写操作也禁止,就使用"flush tables with read lock;",这样设置也会阻止主从同步复制!)
https://www.cnblogs.com/kevingrace/p/10095332.html
# Replication Troubleshooting
# gtid
GTID Set Gaps:
Executed_Gtid_Set
uuid:1-111,113-120
occur when slave_parrallel_workers > 1, A transaction is missing;
Finding transactions:
mysqlbinlog --no-defaults -vvv --base64-output=DECODE-ROWS --include-gtids='uuid:112' /var/lib/mysql/mysql-bin.xxxxx
result: SET @@SESSION.GTID_NEXT='uuid:112'
Faking transactions:
set gtid_next='uuid:112'; BEGIN; COMMIT;
Skipping transactions:
sql_slave_skip_counter
# other
https://dev.mysql.com/doc/mysql-replication-excerpt/8.0/en/replication-problems.html
不要轻易在两种不同的replication模式间切换:
MySQL 5.7复制配置不规范修改导致的坑:http://blog.itpub.net/28218939/viewspace-2142235/
https://www.cnblogs.com/shengdimaya/p/6897584.html
ref:
https://www.digitalocean.com/community/tutorials/how-to-install-mysql-on-centos-7
benchmark: http://www.itsecure.hu/library/image/CIS_Oracle_MySQL_Enterprise_Edition_5.7_Benchmark_v1.0.0.pdf
# Keepalived+ mysql 高可用
-------------------------------------------------------------------------------
1.	两台服务都安装nginx和keepalived
-------------------------------------------------------------------------------
yum install nginx
yum install keepalived


-------------------------------------------------------------------------------
2. MYSQL check linux scripts
-------------------------------------------------------------------------------
vim /etc/keepalived/scripts/check_mysql.sh

MYSQL=/usr/bin/mysql
MYSQL_HOST=localhost
MYSQL_USER=root
MYSQL_PASSWORD=redhat

$MYSQL -h $MYSQL_HOST -u $MYSQL_USER -p$MYSQL_PASSWORD -e "show status;" >/dev/null 2>&1

if [ $? == 0 ]
then
  echo " $host mysql login successfully"
  exit 0
else
  #echo " $host mysql login faild" #若mysql关闭,则keepalived关闭
  killall keepalived
  exit 2
fi

-------------------------------------------------------------------------------
4. 修改keepalived配置文件
-------------------------------------------------------------------------------
sudo vim /etc/keepalived/keepalived.conf

! Configuration File for keepalived

global_defs {
   router_id MYSQL0001    # router_id可随意配置,主备服务器配置需不同 #运行keepalived的机器的一个标识,通常可设为hostname。故障发生时,发邮件时显示在邮件主题中的信息。
}

vrrp_script chk_mysql {
    script "/etc/keepalived/scripts/check_mysql.sh"    #脚步地址
    interval 300  #脚本执行间隔 300秒
    weight -5                    #脚本结果导致的优先级变更,检测失败(脚本返回非0)则优先级 -5
    fall 2                    #检测连续2次失败才算确定是真失败。会用weight减少优先级(1-255之间)
    rise 1                    #检测1次成功就算成功。但不修改优先级
}

vrrp_instance VI_1 { #keepalived在同一virtual_router_id中priority(0-255)最大的会成为master,也就是接管VIP,当priority最大的主机发生故障后次priority将会接管
    state BACKUP    # 主备keepalived节点此处必须都设置成BACKUP,否则非抢占模式不生效
    interface eth0 #指定HA监测网络的接口。实例绑定的网卡,因为在配置虚拟IP的时候必须是在已有的网卡上添加的
    virtual_router_id 54  # 同一个VIP的virtual_router_id必须一致 #虚拟路由标识,这个标识是一个数字,同一个vrrp实例使用唯一的标识。即同一vrrp_instance下,MASTER和BACKUP必须是一致的
    priority 100     # 优先级配置,数字越大,优先级越高(主的大,从的小)
    advert_int 1	#设定MASTER与BACKUP负载均衡器之间同步检查的时间间隔,单位是秒
    authentication {	#设置验证类型和密码。主从必须一样
        auth_type PASS	#设置vrrp验证类型,主要有PASS和AH两种
        auth_pass 1111	#设置vrrp验证密码,在同一个vrrp_instance下,MASTER与BACKUP必须使用相同的密码才能正常通信
    }
    nopreempt        # 非抢占模式,即master失效后,如重新上线,将不抢占VIP(主的需要,从的不需要)
    track_script {
        chk_mysql
    }
    track_interface {
        eth0
    }
    virtual_ipaddress {
        192.168.100.150    虚拟Ip  #根据情况配置虚拟ip
    }
    notify_master /etc/keepalived/scripts/mysql_master.sh     #脚步地址
    notify_backup /etc/keepalived/scripts/mysql_slave.sh
    notify_fault /etc/keepalived/scripts/mysql_fault.sh
#    notify_stop /etc/keepalived/scripts/mysql_stop.sh
}


在x.x.x.49上,只需要改变:
router_id MYSQL0001->MYSQL0002
priority 101 -> priority 100,
mcast_src_ip x.x.x.48 -> mcast_src_ip x.x.x.49即可。

-------------------------------------------------------------------------------
5. 启动
-------------------------------------------------------------------------------

systemctl start keepalived

ip addr show eth0
2: eth0: <BROADCAST,MULTICAST,UP,LOWER_UP> mtu 1500 qdisc mq state UP qlen 1000
    link/ether 56:6f:18:fa:00:08 brd ff:ff:ff:ff:ff:ff
    inet x.x.x.49/24 brd x.x.x.255 scope global eth0
       valid_lft forever preferred_lft forever
    inet x.x.x.44/32 scope global eth0
       valid_lft forever preferred_lft forever

再启动另外一个机器的keepalived,执行 ip addr show eth0 并不会有类似上面的输出,除非是在前面的机器上执行 systemctl stop keepalived

某台机器被选中的时候会出现如下日志,/var/log/messages :

Jun 15 17:01:08 vm2-devclr-v08 Keepalived_vrrp[4850]: VRRP_Instance(VI_1) Transition to MASTER STATE
Jun 15 17:01:09 vm2-devclr-v08 Keepalived_vrrp[4850]: VRRP_Instance(VI_1) Entering MASTER STATE
Jun 15 17:01:09 vm2-devclr-v08 Keepalived_vrrp[4850]: VRRP_Instance(VI_1) setting protocol VIPs.
Jun 15 17:01:09 vm2-devclr-v08 Keepalived_vrrp[4850]: Sending gratuitous ARP on eth0 for x.x.x.44
Jun 15 17:01:09 vm2-devclr-v08 Keepalived_vrrp[4850]: VRRP_Instance(VI_1) Sending/queueing gratuitous ARPs on eth0 for x.x.x.44
Jun 15 17:01:09 vm2-devclr-v08 Keepalived_vrrp[4850]: Sending gratuitous ARP on eth0 for x.x.x.44

-------------------------------------------------------------------------------
5. 状态检测
-------------------------------------------------------------------------------
sudo tcpdump -vvv -n -i eth0 dst 224.0.0.18 and src x.x.x.48
# 6 System Table
sys information_schema performance_schema mysql
# 7 Troubleshooting
vim /var/log/mysqld.log 注意,默认时区为 UTC
# Host 'xxx.xx.xxx.xxx' is not allowed to connect to this MySQL server**
CREATE USER 'test'@'%' IDENTIFIED BY '123456';
GRANT ALL PRIVILEGES ON * . * TO 'test'@'%';
FLUSH PRIVILEGES;
# mysql workbench The type initializer for 'HtmlRenderer.Utils.FontsUtils' threw an exception.**
http://stackoverflow.com/questions/32020024/upgrading-to-windows-10-breaks-mysql-workbench https://bugs.mysql.com/bug.php?id=75344
# mysqldump stored procedure --routines faild
mysqldump: test_dbuser has insufficent privileges to SHOW CREATE PROCEDURE pTEST!
最开始是出现
ERROR 1227 (42000) at line 5632: Access denied; you need (at least one of) the SUPER privilege(s) for this operation

5618 --
5619 -- Dumping routines for database 'db01'
5620 --
5621 /*!50003 DROP PROCEDURE IF EXISTS `pTEST1` */;
5622 ALTER DATABASE `db01` CHARACTER SET utf8 COLLATE utf8_general_ci ;
5623 /*!50003 SET @saved_cs_client      = @@character_set_client */ ;
5624 /*!50003 SET @saved_cs_results     = @@character_set_results */ ;
5625 /*!50003 SET @saved_col_connection = @@collation_connection */ ;
5626 /*!50003 SET character_set_client  = utf8 */ ;
5627 /*!50003 SET character_set_results = utf8 */ ;
5628 /*!50003 SET collation_connection  = utf8_general_ci */ ;
5629 /*!50003 SET @saved_sql_mode       = @@sql_mode */ ;
5630 /*!50003 SET sql_mode              = 'ONLY_FULL_GROUP_BY,STRICT_TRANS_TABLES,NO_ZERO_IN_DATE,NO_ZERO_DATE,ERROR_FOR_DIVISION_BY_ZERO,NO_ENGINE_SUBSTITUTION' */ ;
5631 DELIMITER ;;
5632 CREATE DEFINER=`test_dbuser`@`%` PROCEDURE `pTEST1`(IN i_asof DATE)
5633 BEGIN
5634
5635         DECLARE EXIT HANDLER FOR SQLEXCEPTION
5636     BEGIN

可以看到 5632 CREATE DEFINER=`test_dbuser`@`%` PROCEDURE `pTEST1`(IN i_asof DATE)
所以我就直接
mysql> GRANT SUPER ON *.* TO 'test_dbuser'@'%';
然后后来我想到实际上执行mysqldump的语句是
mysqldump --login-path=cn-dev-v01 --set-gtid-purged=OFF --no-tablespaces db01 >test
cn-dev-v01的host是localhost,不是%,可以看到CREATE DEFINER=`test_dbuser`@`%` 不是 @`localhost`
然后我想着设置cn-dev-v01 login path host为%,但是失败,因为%无法解析,自然无法连接db,只好改回来,
然后再试发现又有问题:
mysqldump: test_dbuser has insufficent privileges to SHOW CREATE PROCEDURE `pTEST1`!
查了下
https://dba.stackexchange.com/questions/184724/permissions-for-mysql-show-create-procedure
To use either statement, you must be the user named in the routine DEFINER clause or have SELECT access to the mysql.proc table. If you do not have privileges for the routine itself, the value displayed for the Create Procedure or Create Function field will be NULL.
https://dev.mysql.com/doc/refman/5.7/en/show-create-procedure.html
要给SELECT权限,SUPER不包含SELECT权限??
mysql> grant SELECT ON *.* TO 'test_dbuser'@'localhost';
就好了

然后又想到,既然'%'包含'localhost',干脆直接删掉 test_dbuser@'localhost'
DROP USER 'test_dbuser'@'localhost';
这次虽然没有
mysqldump: test_dbuser has insufficent privileges to SHOW CREATE PROCEDURE `pTEST1`!
但是另外一个db02还是有这个问题
mysqldump: test_dbuser has insufficent privileges to SHOW CREATE PROCEDURE `pTEST2`!

1994 DELIMITER ;
1995 /*!50003 SET sql_mode              = @saved_sql_mode */ ;
1996 /*!50003 SET character_set_client  = @saved_cs_client */ ;
1997 /*!50003 SET character_set_results = @saved_cs_results */ ;
1998 /*!50003 SET collation_connection  = @saved_col_connection */ ;
1999 /*!50003 DROP PROCEDURE IF EXISTS `pTEST2` */;
2000 /*!50003 SET @saved_cs_client      = @@character_set_client */ ;
2001 /*!50003 SET @saved_cs_results     = @@character_set_results */ ;
2002 /*!50003 SET @saved_col_connection = @@collation_connection */ ;
2003 /*!50003 SET character_set_client  = utf8 */ ;
2004 /*!50003 SET character_set_results = utf8 */ ;
2005 /*!50003 SET collation_connection  = utf8_general_ci */ ;
2006 /*!50003 SET @saved_sql_mode       = @@sql_mode */ ;
2007 /*!50003 SET sql_mode              = 'ONLY_FULL_GROUP_BY,STRICT_TRANS_TABLES,NO_ZERO_IN_DATE,NO_ZERO_DATE,ERROR_FOR_DIVISION_BY_ZERO,NO_ENGINE_SUBSTITUTION' */ ;
2008 DELIMITER ;;
2009 CREATE DEFINER=`test_dbuser`@`%` PROCEDURE `pTEST2`(IN i_asof DATE)
2010 BEGIN
2011
2012         DECLARE EXIT HANDLER FOR SQLEXCEPTION
2013     BEGIN

再把SELECT加给'test_dbuser'@'%'即可
mysql> grant SELECT ON *.* TO 'test_dbuser'@'%';
最后revoke掉SUPER权限再试
mysql> revoke SUPER ON *.* FROM 'test_dbuser'@'%';
仍然成功
# script import issue;
-- Set new delimiter '$$'
DELIMITER $$
-- Set default delimiter ';'
DELIMITER ;
# Fixing “Lock wait timeout exceeded; try restarting transaction” for a 'stuck" Mysql table?
https://stackoverflow.com/questions/5836623/getting-lock-wait-timeout-exceeded-try-restarting-transaction-even-though-im
show processlist;
kill <put_process_id_here>; 先干掉耗时长的process
# upgrade trouble shooting
https://dev.mysql.com/doc/refman/5.7/en/upgrade-troubleshooting.html
# Access denied for user 'root'@'localhost' (using password: NO) when trying to connect**
通常是因为输入了中文字符的dash -- 或者从word文档copy出来的错误编码的参数符号--
# 随机出现的connection timeout
# 起因是duird连接池报错
我们的一个springboot程序 使用了阿里druid,之前都好好的,上到生产遇到几次比较随机的错误:
Caused by: com.alibaba.druid.pool.GetConnectionTimeoutException: wait millis 60000, active 0, maxActive 500, creating 1, createElapseMillis 120001
	at com.alibaba.druid.pool.DruidDataSource.getConnectionInternal(DruidDataSource.java:1682)
	at com.alibaba.druid.pool.DruidDataSource.getConnectionDirect(DruidDataSource.java:1395)
	at com.alibaba.druid.pool.DruidDataSource.getConnection(DruidDataSource.java:1375)
	at com.alibaba.druid.pool.DruidDataSource.getConnection(DruidDataSource.java:1365)
	at com.alibaba.druid.pool.DruidDataSource.getConnection(DruidDataSource.java:109)
	at org.springframework.jdbc.datasource.DataSourceTransactionManager.doBegin(DataSourceTransactionManager.java:262)

针对这个问题个人分析方法及解决方案 :
1、代码中存在获取DataSource Connection 没有释放的情况,可查询业务代码是否存在 未释放现象。
2、程序并发数量大或者SQL执行较慢,数据库连接配置太小,可增大maxActive参数、增大wait millis 参数。
3、检查数据库连接数是否配置过低,Linux文件句柄数是否需要调整
4、此问题非druid框架引发,建议从业务代码、并发量进行分析排查。如若druid版本过低可升级,也可配置强制释放连接。
以下配置:
spring.datasource.druid.log-abandoned=true
spring.datasource.druid.remove-abandoned=true
#可根据具体情况酌情配置回收时间
spring.datasource.druid.remove-abandoned-timeout=300


###mysql show connections
show processlist;
show variables like 'max_connections';
select substring_index(host,':' ,1) as client_ip,Command,Time from information_schema.processlist;

### linux句柄数排错 mysql
https://blog.csdn.net/qq_28423997/article/details/87880653
https://blog.csdn.net/fygkchina/article/details/106537736

### mysql timeout
vi /etc/my.cnf
 wait_timeout = 28800
 interactive_timeout = 28800
 select @@wait_timeout;


### druid VS hikari
https://github.com/alibaba/druid/issues/3720
核心的提示就是这个:
Caused by: com.alibaba.druid.pool.GetConnectionTimeoutException: wait millis 60000, active 0, maxActive 500, creating 1, createElapseMillis 120001
根据我目前查到的,能知道的是,抛出异常时,池子里的active Connection是0,所以不存在池子满了的情况,另外creating 1应该是代表需要创建一个connection,但是不知道因为什么原因,创建超过了我们设置的maxWait=60000也就是1分钟,createElapseMillis 120001意思应该是创建超过了两分钟
由于之前其他环境没有遇到过,比较倾向于是服务端问题或网络问题,总结可能的问题如下
1.服务端: 1)mysql:根据log的warn,好像这个版本是经过升级的,但是没有升级完全,需要执行下mysql_upgrade,不知道是否有影响;
[Warning] InnoDB: Table mysql/innodb_table_stats has length mismatch in the column name table_name. Please run mysql_upgrade
2)网络波动,不清楚两台机器的部署情况
2.配置问题: 1)mysql connection string使用的是serverTimezone=Asia/Shanghai,服务器使用的应该是SGT Asia/Singapore,不过这个感觉应该没有影响,因为都是东八区 2)druid配置问题,官方建议mysql不要开启maxPoolPreparedStatementPerConnectionSize,目前状态是开启了
3.druid本身问题: 1)版本过低,目前使用的1.1.20是19年的版本,但是我没有看到任何新版本的release note提到了我们遇到的问题,不过有人通过升级解决了问题 2)druid本身的缺陷,我看到duird 一些开放的issue和关闭的issue从几年前到最近都有人提到这个问题,但是官方没有给出任何回应和解决,然后有人通过放弃阿里的druid,使用其他连接池解决了
https://github.com/alibaba/druid/issues/3720 https://github.com/alibaba/druid/issues/2130 https://github.com/alibaba/druid/wiki/DruidDataSource%E9%85%8D%E7%BD%AE%E5%B1%9E%E6%80%A7%E5%88%97%E8%A1%A8 (opens new window)
# 脚本连接数据库也随机出错
接着,同事反馈cron job也遇到过几次类似问题:
error 2003 (hy000) can't connect to mysql server 110
https://blog.csdn.net/qq1137623160/article/details/78927741
最后其实感觉目前缺少的是:
监控和load test performance test
https://segmentfault.com/a/1190000022336871
# 发现端倪 Aborted_connects
瞄了眼这篇文章,想到忘记认真看下连接数
https://www.jianshu.com/p/07c85b8a7997
执行 netstat -anp|grep 3306 大概三十多个,还算正常,然后
show global status like '%connection%';
结果:Connections=7772 Max_used_connections=60
查了下,好像是指服务器启动之后累积的,所以没有什么参考意义
Connections:The number of connection attempts (successful or not) to the MySQL server. Max_used_connections:The maximum number of connections that have been in use simultaneously since the server started.
show global status like '%thread%';
结果:Threads_cached=8 Threads_connected=34 Threads_created=2232 Threads_running=1
Threads_created应该也是累计的,Threads_connected应该是当前的,确实跟前面netstat差不多
show processlist;
结果显示三十多个程序,大部分都是sleep状态,唯一running的是我当前查询的这个线程;
确认了下最大连接数
SHOW VARIABLES LIKE "max_connections";
结果是151默认值,远超34,应该没什么问题,但是总感觉这些sleep状态的threads/connections有些问题,
然后看到了这个
show global status like '%aborted%';
结果:Aborted_clients 1095 Aborted connections 9
这个有点意思:
Aborted_clients:The number of connections that were aborted because the client died without closing the connection properly.
Aborted_connects:The number of failed attempts to connect to the MySQL server.
然后猜测如下: Aborted_clients=1095, big number, probably means that we have some clients(app or scripts) connected to mysql, but failed to close mysql connections properly, caused lots of sleep threads/connections in mysql processlist; at some point in time, it may reached the max connections limit; and then some new connection request coming in, mysql then start to recycle zombies, most of the time is fine, but sometimes may delayed some seconds because of recycle taking time, caused Aborted_connects=9, small number, quite random
根据Aborted_connects文档提示:
For additional connection-related information, check the Connection_errors_*xxx* (opens new window) status variables and the host_cache (opens new window) table.
show global status like '%errors%';
select * from performance_schema.host_cache;
不过并没有什么发现
# my.cnf not working
设置主从时,
change master to失败:

ERROR 1794 (HY000): Slave is not configured or failed to initialize properly. You must at least set --server-id to enable either a master or a slave. Additional error messages can be found in the MySQL error log.

刚开始使用了  mysqld --verbose --help 来验证 my.cnf是否有效,看到输出确实是对的
但是实际上连上数据库后执行:
mysql> SHOW GLOBAL VARIABLES like 'server\_id';
+---------------+-------+
| Variable_name | Value |
+---------------+-------+
| server_id     | 0     |
+---------------+-------+
1 row in set (0.00 sec)
可以看到并没有生效

查看了my.cnf也没有什么异常,怀疑是权限
#ll /etc/my.cnf
-rw-r----- 1 root root 2112 Aug  2 10:24 /etc/my.cnf
可以看到除了root之外的用户都没有读取权限,
虽然启动mysqld好像是通过root:service mysqld start,但是实际使用my.cnf的用户应该是:
/etc/passwd
mysql:x:27:27:MySQL Server:/var/lib/mysql:/bin/false

更改权限,重启即可
chmod o+r /etc/my.cnf

补充:
#service mysqld status
Redirecting to /bin/systemctl status  mysqld.service
● mysqld.service - MySQL Server
   Loaded: loaded (/usr/lib/systemd/system/mysqld.service; enabled; vendor preset: disabled)
   Active: active (running) since Mon 2021-08-02 15:59:34 SGT; 58min ago
     Docs: man:mysqld(8)
           http://dev.mysql.com/doc/refman/en/using-systemd.html
  Process: 15300 ExecStart=/usr/sbin/mysqld --daemonize --pid-file=/var/run/mysqld/mysqld.pid $MYSQLD_OPTS (code=exited, status=0/SUCCESS)
  Process: 15282 ExecStartPre=/usr/bin/mysqld_pre_systemd (code=exited, status=0/SUCCESS)
 Main PID: 15303 (mysqld)
   CGroup: /system.slice/mysqld.service
           └─15303 /usr/sbin/mysqld --daemonize --pid-file=/var/run/mysqld/mysqld.pid
查看了启动脚本/usr/lib/systemd/system/mysqld.service也没有发现什么异常

找到启动脚本 /usr/lib/systemd/system/mysqld.service:
。。。。。
[Service]
User=mysql
Group=mysql
。。。。
# Start main service
ExecStart=/usr/sbin/mysqld --daemonize --pid-file=/var/run/mysqld/mysqld.pid $MYSQLD_OPTS
。。。。。。

可以看到启动mysqld真正的用户是mysql
# Replication Issues
# Replication Issues::handler error HA_ERR_KEY_NOT_FOUND
A<->B 双主,互为主备
A: mysql> show master status; +------------------+-----------+--------------+------------------+---------------------------------------------------------------------------------------------+ | File | Position | Binlog_Do_DB | Binlog_Ignore_DB | Executed_Gtid_Set | +------------------+-----------+--------------+------------------+---------------------------------------------------------------------------------------------+ | mysql-bin.000019 | 785823599 | | | 4a79ada9-5f9c-11eb-8dea-525400b19818:1-2642682, 52a0ed6b-5f9c-11eb-b408-525400f12e4f:1-1183 | +------------------+-----------+--------------+------------------+---------------------------------------------------------------------------------------------+ mysql> show slave status\G; Last_SQL_Error: Could not execute Delete_rows event on table XXXX; Can't find record in 'XXXX', Error_code: 1032; handler error HA_ERR_KEY_NOT_FOUND; the event's master log mysql-bin.000006, end_log_pos 51662949
到该机器的master机器B上找: mysql> show master status; +------------------+-----------+--------------+------------------+---------------------------------------------------------------------------------------------+ | File | Position | Binlog_Do_DB | Binlog_Ignore_DB | Executed_Gtid_Set | +------------------+-----------+--------------+------------------+---------------------------------------------------------------------------------------------+ | mysql-bin.000011 | 909786110 | | | 4a79ada9-5f9c-11eb-8dea-525400b19818:1-2642666, 52a0ed6b-5f9c-11eb-b408-525400f12e4f:1-1186 | +------------------+-----------+--------------+------------------+---------------------------------------------------------------------------------------------+ 注意到A上52a0ed6b-5f9c-11eb-b408-525400f12e4f:1-1183,B是52a0ed6b-5f9c-11eb-b408-525400f12e4f:1-1186 B就是52a0ed6b-5f9c-11eb-b408-525400f12e4f, 所以在B上查找 52a0ed6b-5f9c-11eb-b408-525400f12e4f:1184 mysqlbinlog --verbose /var/lib/mysql/mysql-bin.000006 > check-mysql-bin.000006
/*!50718 SET TRANSACTION ISOLATION LEVEL READ COMMITTED*//*!*/;
SET @@SESSION.GTID_NEXT= '52a0ed6b-5f9c-11eb-b408-525400f12e4f:1184'/*!*/;
# at 51654542
#220110 11:54:59 server id 2  end_log_pos 51654620 CRC32 0x5ec1b3e8     Query   thread_id=16    exec_time=0     error_code=0
SET TIMESTAMP=1641786899/*!*/;
SET @@session.sql_mode=1436549152/*!*/;
SET @@session.auto_increment_increment=2, @@session.auto_increment_offset=2/*!*/;
BEGIN
/*!*/;
# at 51654620
# at 51654672
#220110 11:54:59 server id 2  end_log_pos 51654744 CRC32 0x6aeb7e9f     Table_map: `DB`.`XXXX` mapped to number 9217
# at 51654744
#220110 11:54:59 server id 2  end_log_pos 51662949 CRC32 0xc3f5e895     Delete_rows: table id 9217
# at 51662949
果然 52a0ed6b-5f9c-11eb-b408-525400f12e4f:1184就是delete语句 当然也可以在A机器上查看relay binlog mysqlbinlog --verbose --base64-output=DECODE-ROWS /var/lib/mysql/relay-bin.000022 > check-relay-bin.000022
# 解决方法:
方法一:reset整个master slave
方法二:skip error
mysql> stop slave;
mysql> SET GLOBAL SQL_SLAVE_SKIP_COUNTER = 1;
mysql> START SLAVE;

批量处理:
$ while true; do if [[ $(mysql -uroot -pP@ssw0rd -e "SHOW SLAVE STATUS\G" | grep "Last_SQL_Error:" | grep -c "HA_ERR_KEY_NOT_FOUND") -gt 0 ]]; then mysql -uroot -pP@ssw0rd -e "STOP SLAVE; SET GLOBAL SQL_SLAVE_SKIP_COUNTER = 1; START SLAVE;"; else break; fi; sleep 1; done
ERROR 1858 (HY000): sql_slave_skip_counter can not be set when the server is running with @@GLOBAL.GTID_MODE = ON. Instead, for each transaction that you want to skip, generate an empty transaction with the same GTID as the transaction
方法 三: fake transaction
在A:
mysql> stop slave;
mysql> SET @@SESSION.GTID_NEXT= '52a0ed6b-5f9c-11eb-b408-525400f12e4f:1184';
#1184是出错的地方 定位方法:
  > 通过mysqlbinlog -v去relay log找到出错的地方
  > 更简单的,对比Retrieved_Gtid_Set 和 Executed_Gtid_Set,Executed_Gtid_Set最后一条加1即下一条就是
mysql> begin ; commit ;
mysql> start slave;
ERROR 1837 (HY000): When @@SESSION.GTID_NEXT is set to a GTID, you must explicitly set it to a different value after a COMMIT or ROLLBACK. Please check GTID_NEXT variable manual page for detailed explanation. Current @@SESSION.GTID_NEXT is '878556a6-ff0e-11ea-bf92-566f18fa0008:1184'.
mysql> SET GTID_NEXT="AUTOMATIC";

注意到有趣的现象:回到B上查看slave status会发现:Retrieved_Gtid_Set多了一条 XXXX:1184 也就是在A上执行的1184空语句
方法四:直接忽视(比较危险) my.cnf: [mysqld] slave-skip-errors=1032
# 仍然存在的疑问:
Could not execute Delete_rows event on table XXXX; Can't find record in 'XXXX', Error_code: 1032; handler error HA_ERR_KEY_NOT_FOUND; 说明A机器上做删除的时候某条记录不存在,那就奇怪了,因为A和B是互为主备,既然B上面删除成功了,说明这条数据在B上存在,那应该也在A上也存在才对, 或者说如果A上的这条记录被删除了,那删除的动作也会同步到B, 如果是刚好B上面删除的时候A上面也删除了,当B同步到A的时候,A已经删除过了所以出现错误,反过来,那B也应该有错误才对,但是B上的同步正常没有错误, 所以怎么都无法说通, 除非是说可能在B上发起的delete操作也是找不到记录,但是并不会产生问题,但是replication到A的时候,A作为slave会比较严格,所以将not found错误记录出来;
这里有点解释值得看一下:
If a statement produces the same error (identical error code) on both the source and the replica, the error is logged, but replication continues. If a statement produces different errors on the source and the replica, the replication SQL thread terminates, and the replica writes a message to its error log and waits for the database administrator to decide what to do about the error. Replica Errors During Replication https://dev.mysql.com/doc/mysql-replication-excerpt/5.7/en/replication-features-slaveerrors.html
跟我的猜测差不多,总之就是同样的delete语句在A和B上的报错不同,
文档提到了两边的版本和engine,
$mysqlshow -uroot -pP@ssw0rd -i DBNAME TABLENAME;
确认了下,两边完全一致
进一步看了下A和B的时间,发现B比A快了2分钟,不知道是否有关
REFER: https://bugs.mysql.com/bug.php?id=94827 https://dev.mysql.com/doc/relnotes/mysql/5.7/en/news-5-7-20.html https://dev.mysql.com/doc/mysql-errors/5.7/en/server-error-reference.html#error_er_key_not_found https://severalnines.com/blog/mysql-tutorial-troubleshooting-mysql-replication-part-2 https://www.etlbi.com/blog/2018/08/11/mysql-gtid-1032-error/
# Replication Issues::Got fatal error 1236 from master when reading data from binary log: 'Binary log is not open'
Background: MASTER A<->MASTER B, both are master&slaves
ON SERVER B:
mysql> show slave status\G;
*************************** 1. row ***************************
               Slave_IO_State:
                  Master_Host: SERVER_A_IP
                  Master_User: replicator
                  Master_Port: 3306
                Connect_Retry: 60
              Master_Log_File: mysql-bin.000012
          Read_Master_Log_Pos: 341592308
               Relay_Log_File: sgkc2-devclr-v06-relay-bin.000033
                Relay_Log_Pos: 341592521
        Relay_Master_Log_File: mysql-bin.000012
             Slave_IO_Running: No
            Slave_SQL_Running: Yes
              Replicate_Do_DB:
Master_SSL_Verify_Server_Cert: No
                Last_IO_Errno: 1236
                Last_IO_Error: Got fatal error 1236 from master when reading data from binary log: 'Binary log is not open'
               Last_SQL_Errno: 0
               Last_SQL_Error:
  Replicate_Ignore_Server_Ids:
             Master_Server_Id: 1
                  Master_UUID: db4cbf6c-d96e-11eb-872a-566f18fa0034
             Master_Info_File: mysql.slave_master_info
                    SQL_Delay: 0
          SQL_Remaining_Delay: NULL
      Slave_SQL_Running_State: Slave has read all relay log; waiting for more updates
           Master_Retry_Count: 86400
                  Master_Bind:
      Last_IO_Error_Timestamp: 220303 14:43:40
     Last_SQL_Error_Timestamp:
               Master_SSL_Crl:
           Master_SSL_Crlpath:
           Retrieved_Gtid_Set: db4cbf6c-d96e-11eb-872a-566f18fa0034:1-230351
            Executed_Gtid_Set: db4cbf6c-d96e-11eb-872a-566f18fa0034:1-230351
                Auto_Position: 1
         Replicate_Rewrite_DB:
                 Channel_Name:
           Master_TLS_Version:

mysql> show master status;
+------------------+-----------+--------------+------------------+-----------------------------------------------+
| File             | Position  | Binlog_Do_DB | Binlog_Ignore_DB | Executed_Gtid_Set                             |
+------------------+-----------+--------------+------------------+-----------------------------------------------+
| mysql-bin.000009 | 945084747 |              |                  | db4cbf6c-d96e-11eb-872a-566f18fa0034:1-230351 |
+------------------+-----------+--------------+------------------+-----------------------------------------------+
1 row in set (0.00 sec)

mysql> SHOW BINARY LOGS;
+------------------+------------+
| Log_name         | File_size  |
+------------------+------------+
| mysql-bin.000001 | 1075544412 |
| mysql-bin.000002 | 1073857153 |
| mysql-bin.000003 | 1074315226 |
| mysql-bin.000004 | 1073856204 |
| mysql-bin.000005 | 1075105942 |
| mysql-bin.000006 | 1075591706 |
| mysql-bin.000007 | 1074646766 |
| mysql-bin.000008 | 1075091646 |
| mysql-bin.000009 |  945084747 |
+------------------+------------+
9 rows in set (0.00 sec)


ON SERVER A:
mysql> show slave status\G;
*************************** 1. row ***************************
               Slave_IO_State:
                  Master_Host: B
                  Master_User: replicator
                  Master_Port: 3306
                Connect_Retry: 60
              Master_Log_File: mysql-bin.000009
          Read_Master_Log_Pos: 945084747
               Relay_Log_File: sgkc2-devclr-v05-relay-bin.000021
                Relay_Log_Pos: 367
        Relay_Master_Log_File: mysql-bin.000009
             Slave_IO_Running: No
            Slave_SQL_Running: No
  Replicate_Ignore_Server_Ids:
             Master_Server_Id: 0
                  Master_UUID: 435441ed-10f1-11ea-b6f4-566f18fa0032
             Master_Info_File: mysql.slave_master_info
                    SQL_Delay: 0
          SQL_Remaining_Delay: NULL
      Slave_SQL_Running_State:
           Master_Retry_Count: 86400
                  Master_Bind:
      Last_IO_Error_Timestamp:
     Last_SQL_Error_Timestamp:
               Master_SSL_Crl:
           Master_SSL_Crlpath:
           Retrieved_Gtid_Set:
            Executed_Gtid_Set: db4cbf6c-d96e-11eb-872a-566f18fa0034:1-230351
                Auto_Position: 1
         Replicate_Rewrite_DB:
                 Channel_Name:
           Master_TLS_Version:
mysql> show master status;
Empty set (0.00 sec)
mysql> SHOW BINARY LOGS;
ERROR 1381 (HY000): You are not using binary logging

提示没有开通binary logging 功能
vim /etc/my.cnf
#log-bin = mysql-bin                                                     #打开二进制功能,MASTER主服务器必须打开此
someone has commentted out the log-bin!!!
在 SERVER A 上继续查看日志:
2022-03-03T06:40:04.873013Z 0 [Note] Shutting down plugin 'binlog'
2022-03-03T06:40:06.275534Z 0 [Note] /usr/sbin/mysqld: Shutdown complete

2022-03-03T06:40:22.048599Z 0 [Warning] Changed limits: max_open_files: 5000 (requested 15000)
2022-03-03T06:40:22.048850Z 0 [Warning] Changed limits: table_open_cache: 995 (requested 2000)
2022-03-03T06:40:22.238472Z 0 [Warning] TIMESTAMP with implicit DEFAULT value is deprecated. Please use --explicit_defaults_for_timestamp server option (see documentation for more details).
2022-03-03T06:40:22.244013Z 0 [Note] /usr/sbin/mysqld (mysqld 5.7.32) starting as process 4110 ...
2022-03-03T06:40:22.292202Z 0 [Warning] You need to use --log-bin to make --log-slave-updates work.
2022-03-03T06:40:22.292245Z 0 [Warning] You need to use --log-bin to make --binlog-format work.
可以看到有人在2022-03-03T06:40关闭了log-bin的功能(误解,这是因为重启,但是确实是config里面被人关闭了binlog,有人注释掉了log-bin = mysql-bin )
继续查看SERVER A上的binary log:
vim /var/lib/mysql/mysql-bin.index
./mysql-bin.000001
./mysql-bin.000002
./mysql-bin.000003
./mysql-bin.000004
./mysql-bin.000005
./mysql-bin.000006
./mysql-bin.000007
./mysql-bin.000008
./mysql-bin.000009
./mysql-bin.000010
./mysql-bin.000011
./mysql-bin.000012

不过目录/var/lib/mysql/下只剩下mysql-bin.000012,经过查看history,发现是有人手动删除
# Reset:
既然A上面的bin log已经被删除不完整了,而且已经很久没有开启bin log,中间很多操作也没有记录下来,所以只能重头重新做起
ON SERVER A:
mysql> stop slave;
mysql> reset slave all //断掉A作为slave,B作为master的复制

ON SERVER B:
mysql> stop slave;

dump data from A TO B

ON SERVER A:
> mysqldump -flush-privileges --single-transaction --flush-logs --triggers --routines --events -hex-blob --host=localhost --user=root --password --databases --set-gtid-purged=OFF DB_NAME> source_dump.sql

ON SERVER B:
import data dump:
source source_dump.sql;
mysql> reset master; //由于客户端都是连A,B上并没有任何mysql操作,所以这个可以不做
mysql> reset slave all //断掉B作为slave,A作为master的复制

enable log-bin on SERVER A and restart
mysql> show master status;
mysql> reset master; //

CHANGE MASTER ON A&B
START SLAVE ON A&B
# ERROR 1049 (42000): Unknown database
[Warning] 'db' entry 'xxx@%' had database in mixed case that has been forced to lowercase because lower_case_table_names is set. It will not be possible to remove this privilege using REVOKE.
show databases 可以看到该db比如 TEST_DB,但是 use TEST_DB提示错误找不到, /var/lib/mysql 查看目录下存在 TEST_DB这个数据库的文件夹,拥有者是mysql,文件权限也正确, 最后发现原来是 my.cnf开启了 lower_case_table_names=1 注释掉重启mysql即可!
https://stackoverflow.com/questions/19678769/error-1049-42000-unknown-database-mydatabasename
# Variables 不是所见即所得
比如:
错误:Update mysql.user set password_lifetime=90 where user='root';
正确:ALTER USER ' root'@'localhost' PASSWORD EXPIRE INTERVAL 90 DAY;