# 1.Virtualbox network mode
https://www.virtualbox.org/manual/ch06.html
| Mode | VM->Host | VM<-Host | VM1<->VM2 | VM->Net/LAN | VM<-Net/LAN |
|---|---|---|---|---|---|
| Host-only | + | + | + | - | - |
| Internal | - | - | + | - | - |
| Bridged | + | + | + | + | + |
| NAT | + | PortForward | - | + | PortForward |
| NATservice | + | PortForward | + | + | PortForward |
# 1.1 NAT Network.
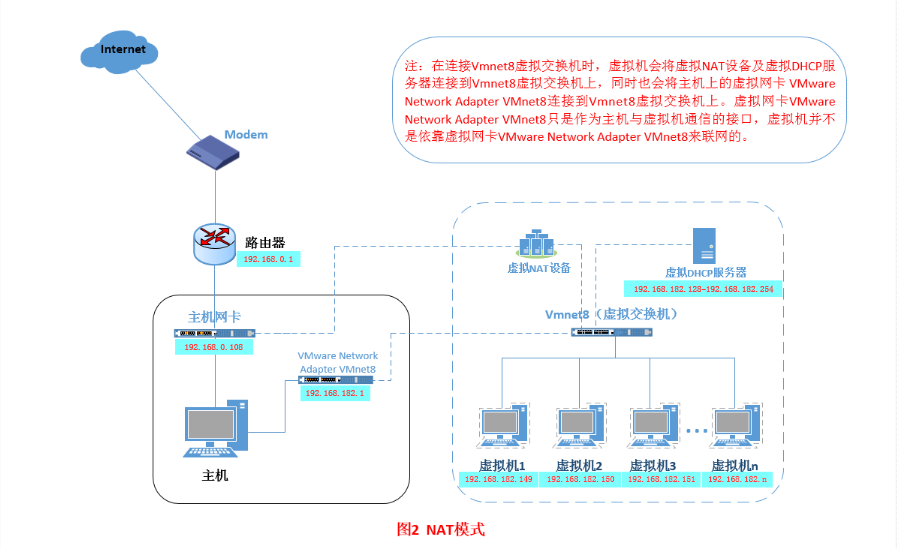
A NAT network is a type of internal network that allows outbound connections. See Section 6.4, “Network Address Translation Service”.
有虚拟路由,所以guest可以直接通过10.0.2.2:
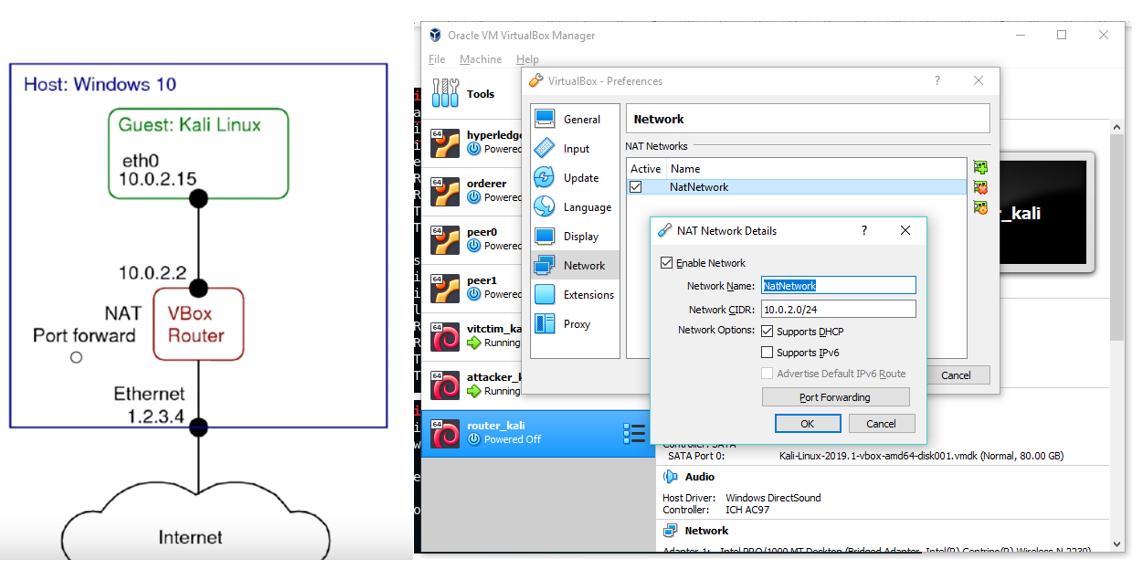
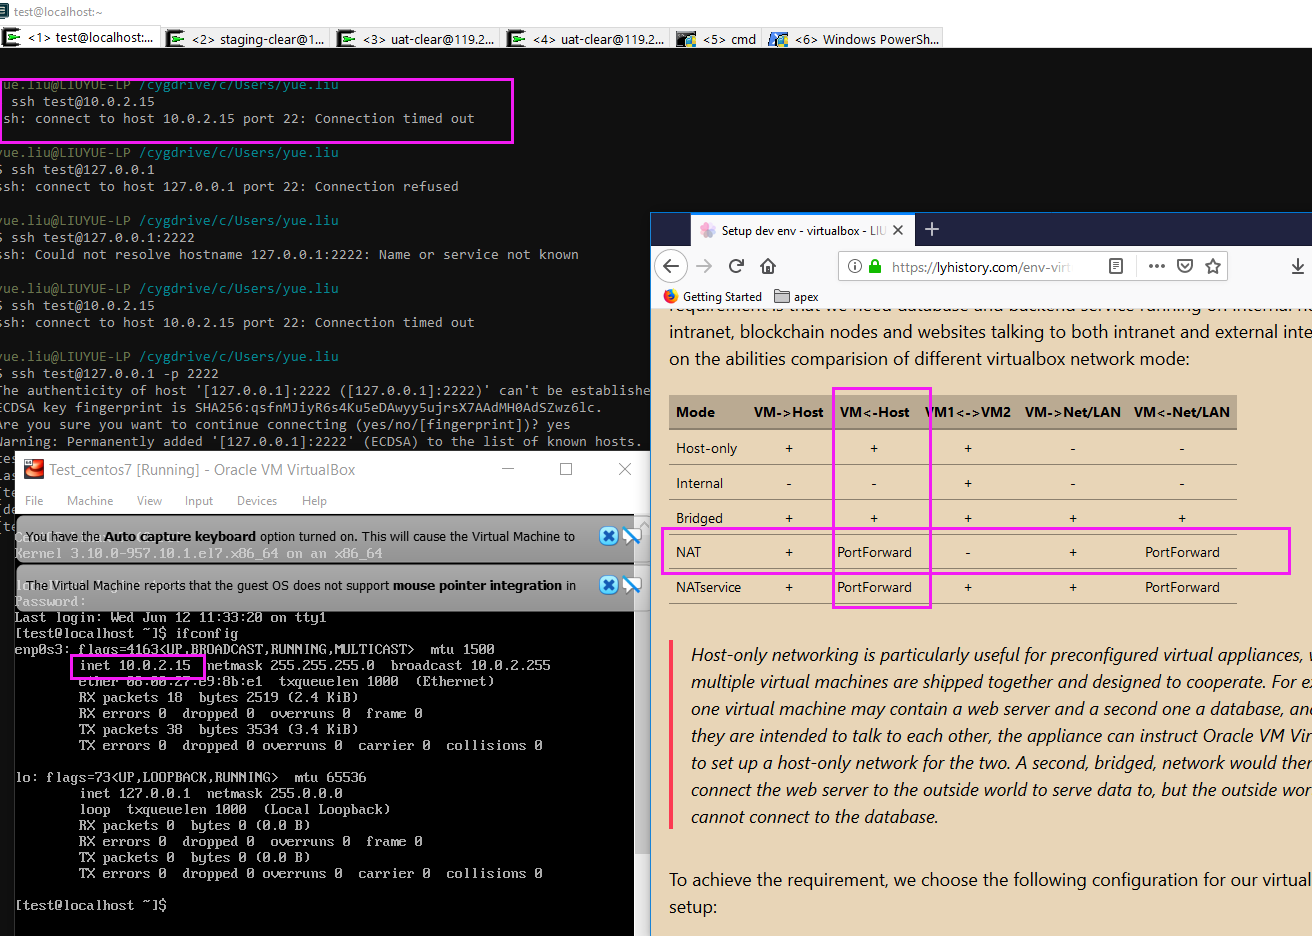
netstat -aon | findstr 'PORT' tasklist | findstr 'PID' tasklist /fi "pid eq 4444"
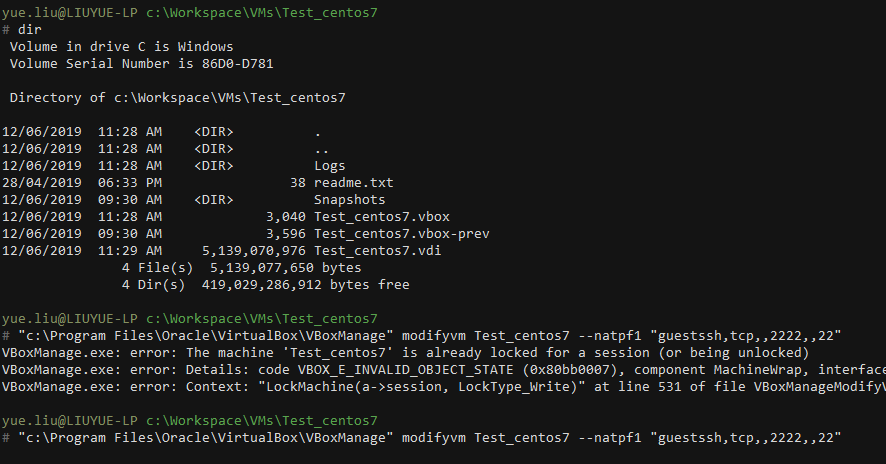
"c:\Program Files\Oracle\VirtualBox\VBoxManage" modifyvm Test_centos7 --natpf1 "guestssh,tcp,,2222,,22"
But failed on the second rule??? "c:\Program Files\Oracle\VirtualBox\VBoxManage" modifyvm Test_centos7 --natpf2 "guestkafka,tcp,,9092,,9092", work around: add in VB Network settings
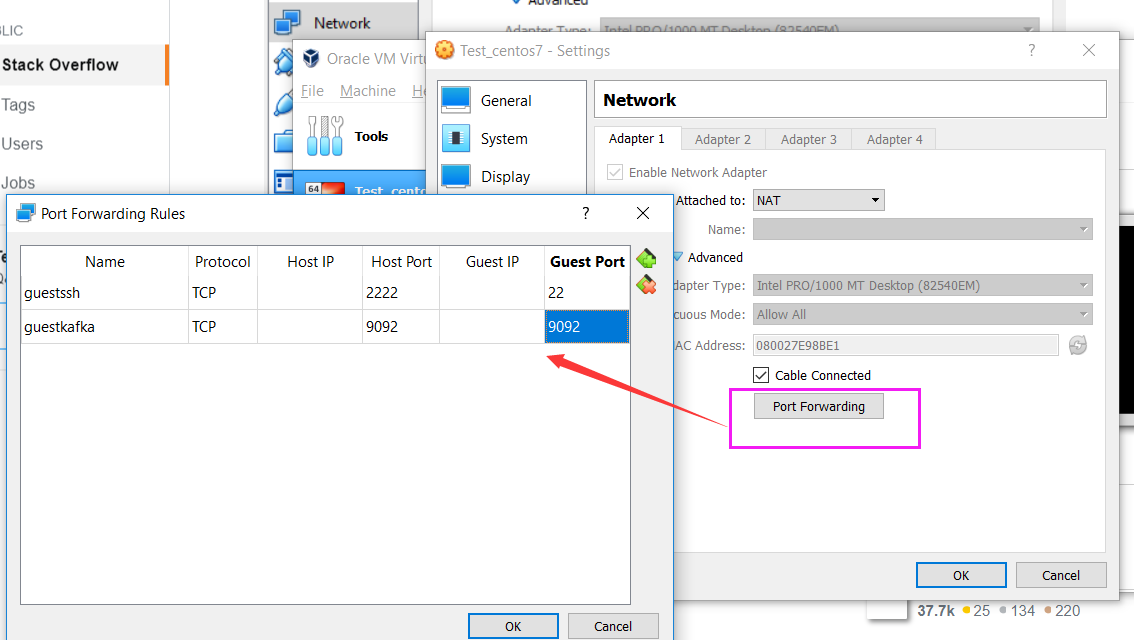
?#No network access for NAT, change dns settings, for centos:
vim /etc/sysconfig/network-scripts/ifcfg-enp0s3
	DNS1=8.8.8.8
	ONBOOT=yes
# 1.2 Bridged networking.
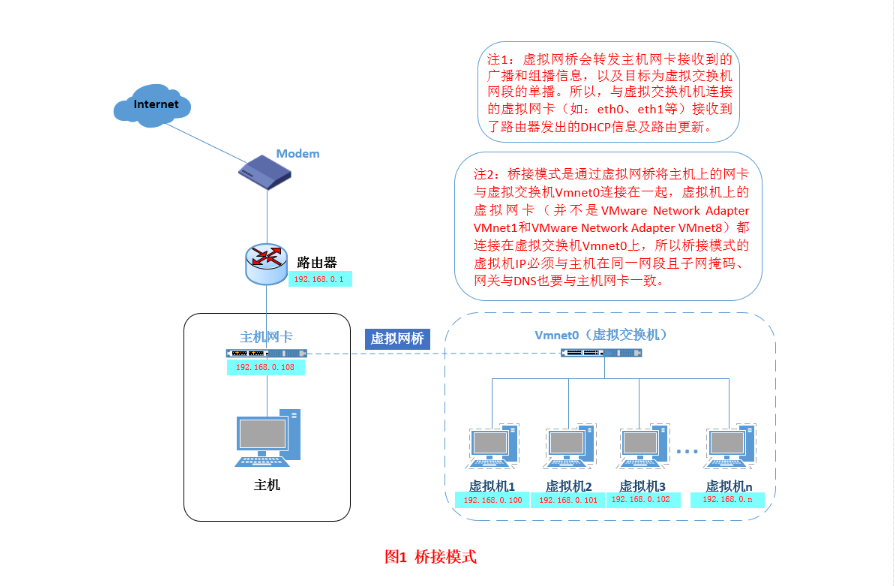
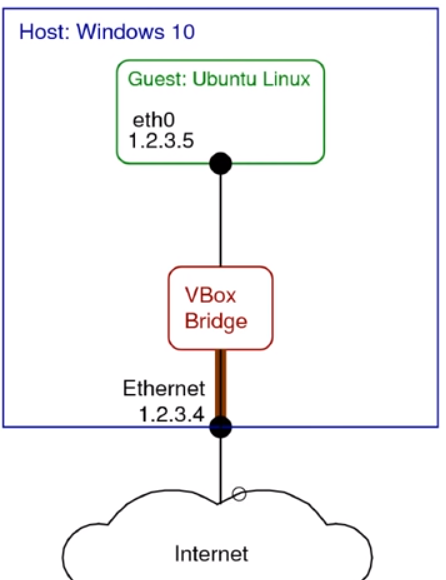
This is for more advanced networking needs, such as network simulations and running servers in a guest. When enabled, Oracle VM VirtualBox connects to one of your installed network cards and exchanges network packets directly, circumventing your host operating system's network stack.
# 1.3 Internal networking.
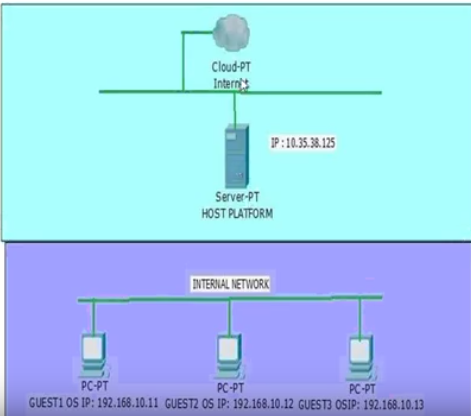
This can be used to create a different kind of software-based network which is visible to selected virtual machines, but not to applications running on the host or to the outside world.
# 1.4 Host-only networking.
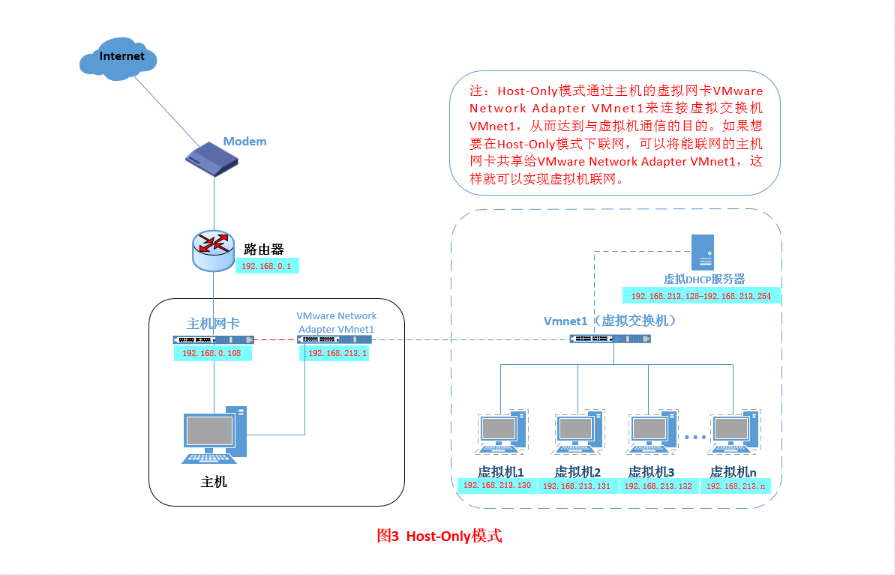 This can be used to create a network containing the host and a set of virtual machines, without the need for the host's physical network interface. Instead, a virtual network interface, similar to a loopback interface, is created on the host, providing connectivity among virtual machines and the host.
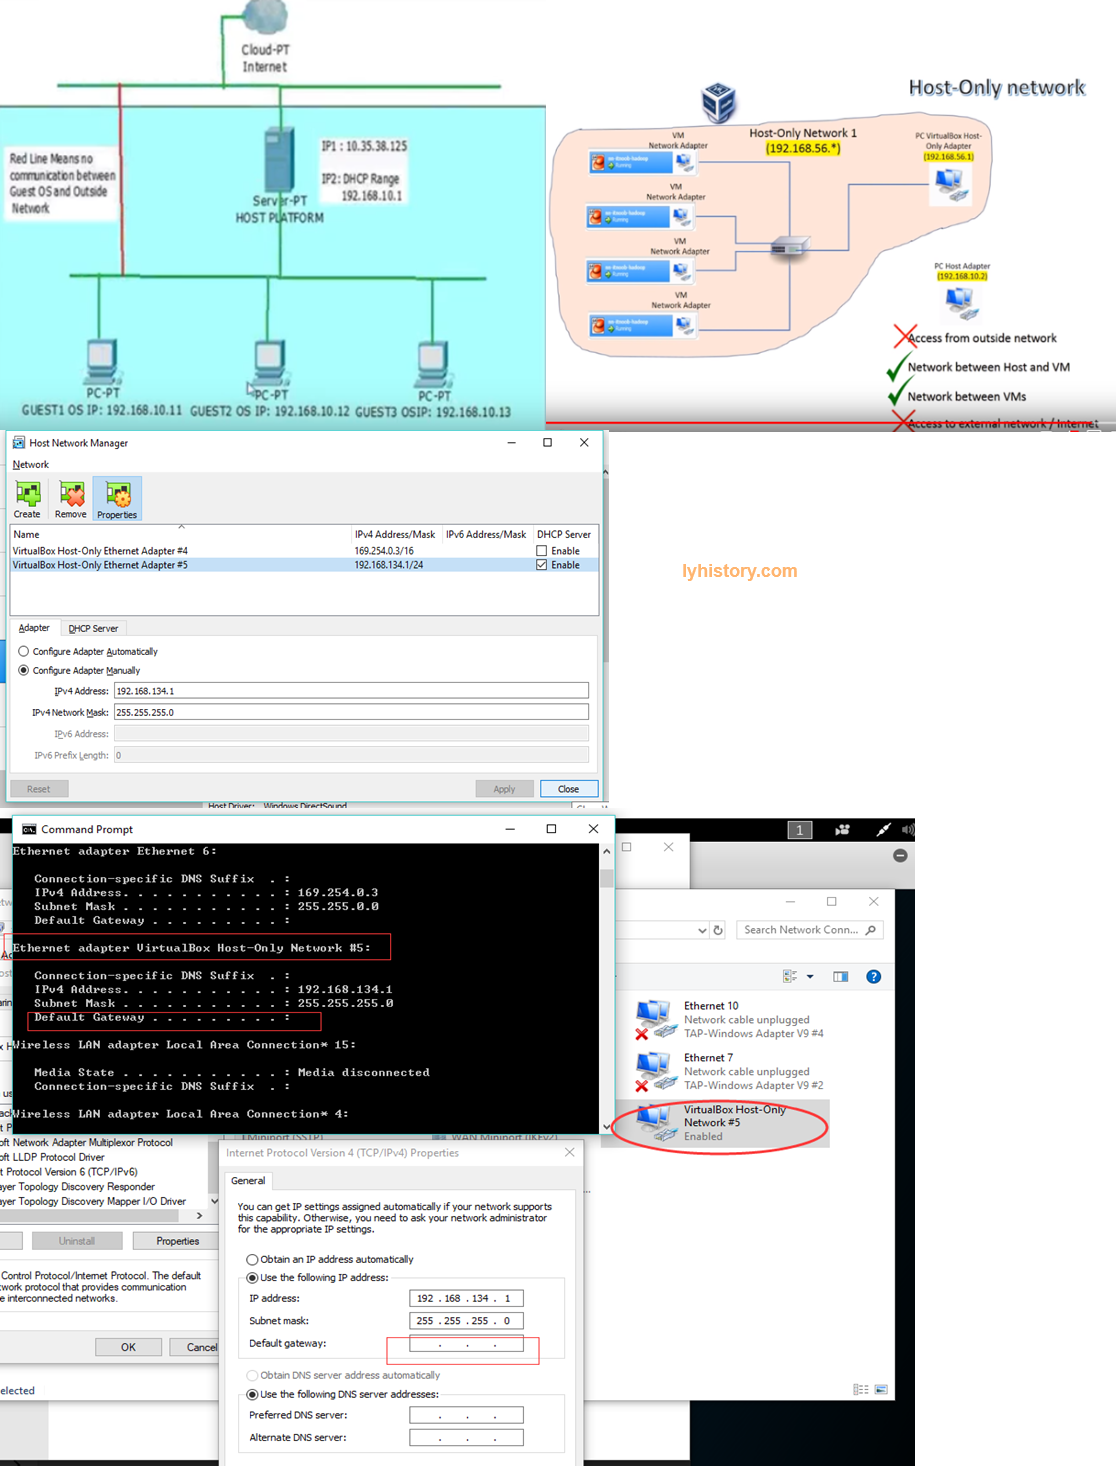
?#host-only模式下客户机vm无法访问位于host宿主机上面的web服务,比如192.168.207.1:8080
原因:不像在NAT和bridge模式下有virtual route虚拟路由,host only是直接连接的,所以宿主机访问主机如同访问外网(没有经过虚拟路由),所以会受到宿主机上面的一些权限限制,比如
可以看到下图,10.0.2.2就是NAT模式的虚拟路由,所以可以直接通过这个路由访问宿主机host的服务

Ping不通:如果宿主机是win10,文件与打印机共享开启
Port telnet不通:如果宿主机是win10,Turn Windows Defender Firewall off
Video::NAT, Bridged and Internal Networking https://www.youtube.com/watch?v=iEj42l4otNY https://www.youtube.com/watch?v=cDF4X7RmV4Q https://www.youtube.com/watch?v=VWKZqa2RjpA
# 2 Build local Lab network
# 2.1 Linux configuration
Golden trace rule: https://forums.kali.org/showthread.php?20846-Troubleshooting-Internet-Network-Access
Networkmanager configuration https://wiki.debian.org/NetworkConfiguration Kali network configuration The default network configuration relies on DHCP to obtain an IP address, DNS server, and gateway https://kali.training/topic/configuring-the-network/ http://www.solutionsatexperts.com/ip-address-configuration-in-kali-linux/
How to configure Network Adapter in Kali Linux using Command Line Interface https://www.youtube.com/watch?v=JL2_fnzCZbE Allow-hotplug ?
Restart network after change config https://www.cyberciti.biz/faq/linux-restart-network-interface/ reload /etc/resolv.conf https://askubuntu.com/questions/224966/how-do-i-get-resolvconf-to-regenerate-resolv-conf-after-i-change-etc-network-in
常用命令:
Ifconfig
Ip route show
ip a show eth0
Route -n
Ip addr
Ip route

cat /etc/network/interfaces

echo "iface eth0 inet dhcp" >> /etc/network/interfaces
/etc/init.d/networking restart

ifdown eth0
ifup eth0
dhclient eth0
Or manually::
Ifconfig eth0 192.168.1.1 netmask 255.255.255.0 up
	route add default gw 192.168.0.1 eth0
	ip route add default via 192.168.0.1 dev eth0

sudo service network-manager restart
# 2.2 基于network类型构建复杂的环境
https://www.youtube.com/watch?v=AiWRmMzwwJM https://sandilands.info/sgordon/building-internal-network-virtualbox https://blog.pythian.com/test-lab-using-virtualbox-nat-networking/ https://vorkbaard.nl/set-up-a-testlab-in-virtualbox-with-a-virtual-lan/ 'Bridged' and 'Host Only' network settings in Virtualbox https://superuser.com/questions/1352678/bridged-and-host-only-network-settings-in-virtualbox-advice-please
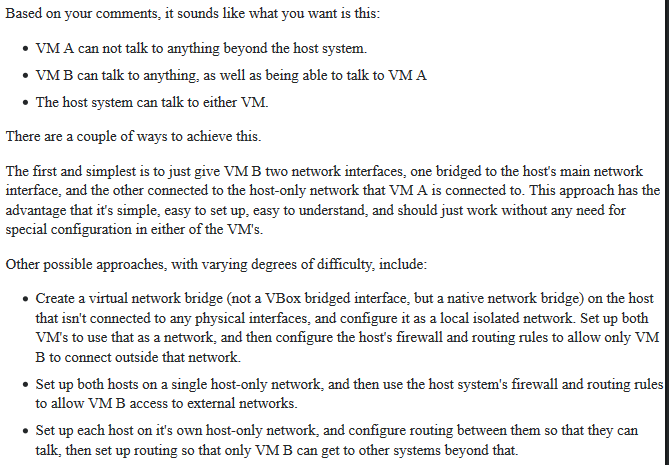
https://askubuntu.com/questions/113604/how-to-run-virtualbox-on-bridged-and-host-only-networks http://christophermaier.name/2010/09/01/host-only-networking-with-virtualbox/
VirtualBox: two network interfaces (NAT and host-only ones) https://unix.stackexchange.com/questions/37122/virtualbox-two-network-interfaces-nat-and-host-only-ones-in-a-debian-guest-on Images https://developer.microsoft.com/en-us/microsoft-edge/tools/vms
# 虚拟机 宿主机 VPN
宿主机利用在虚拟机中建立的VPN加密隧道连接内网 (opens new window) 虚拟机共享主机VPN连接 (opens new window)
https://askubuntu.com/questions/419327/how-can-i-make-virtualbox-guests-share-the-hosts-vpn-connection
# Troubleshooting
# bridged mode not assign ip address and route
- 方法一: dhclient eth0 https://unix.stackexchange.com/questions/174573/dhcp-kali-linux Havne’t try this manual method::ip route add default via ip-of-router-on-local-network dev enp0s3 https://superuser.com/questions/1075988/virtualbox-bridged-network-is-unreachable
less /var/logs/messages
Apr  1 03:05:04 kali NetworkManager[431]: <info>  [1554102304.0124] device (eth0): carrier: link connected
...............
Apr  1 03:05:05 kali NetworkManager[431]: <info>  [1554102305.3947] manager: NetworkManager state is now CONNECTED_LOCAL
Apr  1 03:05:05 kali NetworkManager[431]: <info>  [1554102305.4044] device (eth1): Activation: successful, device activated.
Apr  1 03:05:05 kali NetworkManager[431]: <info>  [1554102305.4072] manager: startup complete
dhclient eth0
Apr  1 03:09:49 kali NetworkManager[431]: <info>  [1554102589.2543] keyfile: add connection /run/NetworkManager/system-connections/eth0.nmconnection (effc3b34-06a5-49dd-886b-d21223855eac,"eth0")
Apr  1 03:09:49 kali NetworkManager[431]: <info>  [1554102589.2623] device (eth0): Activation: starting connection 'eth0' (effc3b34-06a5-49dd-886b-d21223855eac)
.........
Apr  1 03:09:49 kali NetworkManager[431]: <info>  [1554102589.3036] manager: NetworkManager state is now CONNECTED_GLOBAL
方法二 设置静态ip(注意ip不要冲突了,不然有各种异常出现)
宿主机查看当前网络:
Wireless LAN adapter Wi-Fi:

   Connection-specific DNS Suffix  . :
   Description . . . . . . . . . . . : Intel(R) Dual Band Wireless-AC 8265
   Physical Address. . . . . . . . . : 00-28-F8-22-E9-5D
   DHCP Enabled. . . . . . . . . . . : Yes
   Autoconfiguration Enabled . . . . : Yes
   Link-local IPv6 Address . . . . . : fe80::61e4:8e32:fb58:74a4%26(Preferred)
   IPv4 Address. . . . . . . . . . . : 192.168.0.141(Preferred)
   Subnet Mask . . . . . . . . . . . : 255.255.255.0
   Lease Obtained. . . . . . . . . . : Tuesday, 17 November 2020 10:59:55 AM
   Lease Expires . . . . . . . . . . : Tuesday, 24 November 2020 10:59:54 AM
   Default Gateway . . . . . . . . . : 192.168.0.1
   DHCP Server . . . . . . . . . . . : 192.168.0.1
   DHCPv6 IAID . . . . . . . . . . . : 134228216
   DHCPv6 Client DUID. . . . . . . . : 00-01-00-01-21-C8-05-55-00-28-F8-22-E9-5D
   DNS Servers . . . . . . . . . . . : 172.17.5.36
                                       172.17.5.4
   NetBIOS over Tcpip. . . . . . . . : Enabled

----------------------------------------------------------------------------
--- for ubuntu:
----------------------------------------------------------------------------
默认会出现类似下面的结果,其中 ipv4对应的是enp0s3:avahi的169的地址,
lyhistory@lyhistory-VirtualBox:~$ ifconfig
enp0s3: flags=4163<UP,BROADCAST,RUNNING,MULTICAST>  mtu 1500
        inet6 2404:e801:2001:3955:357e:c623:5742:484a  prefixlen 64  scopeid 0x0<global>
        inet6 2404:e801:2001:3955:543b:3df2:4b55:43b1  prefixlen 64  scopeid 0x0<global>
        inet6 fe80::2228:aebf:fda5:523b  prefixlen 64  scopeid 0x20<link>
        ether 08:00:27:64:46:ce  txqueuelen 1000  (Ethernet)
        RX packets 7632  bytes 1432852 (1.4 MB)
        RX errors 0  dropped 0  overruns 0  frame 0
        TX packets 7961  bytes 1009450 (1.0 MB)
        TX errors 0  dropped 0 overruns 0  carrier 0  collisions 0

enp0s3:avahi: flags=4163<UP,BROADCAST,RUNNING,MULTICAST>  mtu 1500
        inet 169.254.7.153  netmask 255.255.0.0  broadcast 169.254.255.255
        ether 08:00:27:64:46:ce  txqueuelen 1000  (Ethernet)

lo: flags=73<UP,LOOPBACK,RUNNING>  mtu 65536
        inet 127.0.0.1  netmask 255.0.0.0
        inet6 ::1  prefixlen 128  scopeid 0x10<host>
        loop  txqueuelen 1000  (Local Loopback)
        RX packets 11328  bytes 898386 (898.3 KB)
      RX errors 0  dropped 0  overruns 0  frame 0
        TX packets 11328  bytes 898386 (898.3 KB)
        TX errors 0  dropped 0 overruns 0  carrier 0  collisions 0

根据<<Linux.md/网络>>部分的原理,ubuntu 17以上版本都是UI的network manager来控制的,所以直接打开控制面板来设置静态IP和DNS即可
address 192.168.0.109
netmask 255.255.255.0
gateway 192.168.0.1
DNS: 8.8.8.8
设置完等一会即可
----------------------------------------------------------------------------
--- for 其他debain:
----------------------------------------------------------------------------
配置静态ip
/etc/network/interfaces:
#auto eth0
#iface eth0 inet dhcp
auto eth0
iface eth0 inet static
address 192.168.0.109
netmask 255.255.255.0
gateway 192.168.0.1

sudo ifdown eth0
sudo ifup eth0
or
sudo /etc/init.d/networking restart

如果还是无法上网则增加DNS配置:
不推荐下面的做法(重启后失效)
/etc/resolv.conf
nameserver 8.8.8.8

sudo systemctl restart systemd-resolved.service

解决后看下当前路由情况:
route -n

#Verify new IP settings:
ip a s eth0
#Verify new routing settings:
ip r
#Verify DNS servers settings:
cat /etc/resolv.conf
#Verify the internet connectivity:
ping -c 4 google.com

root@kali:/home/lyhistory# ip -4 addr
1: lo: <LOOPBACK,UP,LOWER_UP> mtu 65536 qdisc noqueue state UNKNOWN group default qlen 1000
    inet 127.0.0.1/8 scope host lo
       valid_lft forever preferred_lft forever
2: eth0: <BROADCAST,MULTICAST,UP,LOWER_UP> mtu 1500 qdisc pfifo_fast state UP group default qlen 1000
    inet 192.168.0.109/24 brd 192.168.0.255 scope global eth0
       valid_lft forever preferred_lft forever

root@kali:/home/lyhistory# ip route
default via 192.168.0.1 dev eth0 onlink
192.168.0.0/24 dev eth0 proto kernel scope link src 192.168.0.109
----------------------------------------------------------------------------
--- for centos
----------------------------------------------------------------------------
vim /etc/sysconfig/network-scripts/ifcfg-eth0
HWADDR=00:08:A2:0A:BA:B8
TYPE=Ethernet
#BOOTPROTO=dhcp
BOOTPROTO=none
# Server IP #
IPADDR=192.168.0.110
# Subnet #
PREFIX=24
# Set default gateway IP #
GATEWAY=192.168.0.1
# Set dns servers #
DNS1=8.8.8.8
DEFROUTE=yes
IPV4_FAILURE_FATAL=no
# Disable ipv6 #
IPV6INIT=no
NAME=eth0
# This is system specific and can be created using 'uuidgen eth0' command #
UUID=41171a6f-bce1-44de-8a6e-cf5e782f8bd6
DEVICE=eth0
ONBOOT=yes

systemctl restart network
# Can access internet but cannot ping
Firewall setting Outbound port https://askubuntu.com/questions/608194/have-internet-connection-but-cant-ping-external-sites https://networkengineering.stackexchange.com/questions/37896/ping-port-number
# eth0 not found or not configured simply restart vm
https://askubuntu.com/questions/1060980/eth0-not-configured-but-it-was-working-earlier