# 1. 基本概念
# 1.1 虚拟机和容器
VM VS Container(docker vagrant)VS JVM:
Both provide a way to isolate applications and provide a virtual platform for applications to run on;
A container is an isolated, lightweight silo for running an application on the host operating system. Containers build on top of the host operating system's kernel (which can be thought of as the buried plumbing of the operating system), and contain only apps and some lightweight operating system APIs and services that run in user mode;
In contrast to containers, VMs run a complete operating system–including its own kernel.
提一下JVM,java虚拟机,只是给字节码byte code提供解释翻译加载运行的一个工具,同样的PVM也是类似;
docker vs VMs vs vagrant Docker vs Vagrant: What You Need to Know https://www.ctl.io/developers/blog/post/docker-vs-vagrant https://www.quora.com/Whats-the-difference-between-a-VM-Docker-and-Vagrant

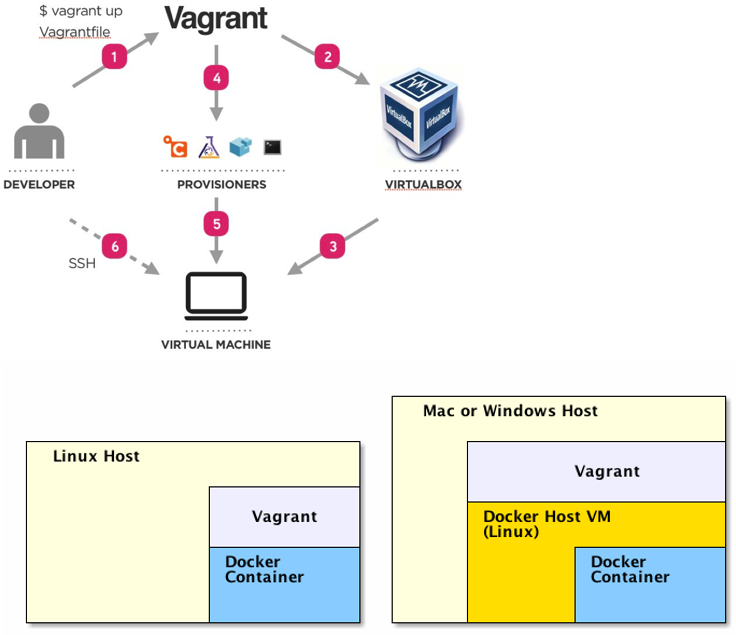
Linux Host docker+vagrant vs Win/mac Host docker+vagrant --https://blog.zenika.com/2014/10/07/setting-up-a-development-environment-using-docker-and-vagrant/
Vagrant is not just about creating VMs, it is about automating the work of setting up development environments for our projects. Also, we can check Vagrantfiles into source control with each project, so the environment is essentially stored with the code, without having to find a way to store a VM itself.
vagrant一般用来操作vm,自动化开发环境,比如可以参考hyperledger的vagrant脚本(Setup hyperledger cluster); 有点等价于docker的docker compose用来自动化docker容器; 当然vagrant也可以用来操作docker容器;
cygwin vs vm Cygwin is intended to give Windows a number of Unix tools; VMs are for when you want to run multiple operating systems at the same time. It's like having two computers without the expense of purchasing two sets of hardware. -- https://superuser.com/questions/53881/virtual-machines-vs-cygwin Cygwin is POSIX (Portable Operating System Interface for uniX) compliant which basically means it shares a common API with all the other compliant operating systems. It does not mean applications compiled for other POSIX systems such as Linux software will automatically work within Cygwin. To add new POSIX software you still need to compile the software source code under Cygwin using its own compilers and libraries. This process is a requirement with most POSIX compliant operating systems e.g. software complied for FreeBDS (Unix) will not work under Debian/Ubuntu (Linux). --https://devtidbits.com/2011/07/01/cygwin-walkthrough-and-beginners-guide-is-it-linux-for-windows-or-a-posix-compatible-alternative-to-powershell/
kubernetes? https://kubernetes.io/docs/user-journeys/users/application-developer/foundational/#section-3
# 1.2 工具
# All in one
MSYS2 - Software Distribution and Building Platform for Windows:
https://www.msys2.org/
pacman -Syu
pacman -Su
pacman -S --needed base-devel mingw-w64-x86_64-toolchain
pacman -S git
# Common tools
ConEmu:
	Ctrl+Shift+O and Ctrl+Shift+E
Cmder: https://lfire.github.io/2017/03/02/cmder/ https://www.cnblogs.com/jcuan/p/6986869.html
	https://cmder.net/
set LC_ALL=zh-CN.UTF8
xwindows http://x.cygwin.com/docs/ug/setup.html ssh https://docs.oracle.com/cd/E24628_01/install.121/e22624/preinstall_req_cygwin_ssh.htm#EMBSC150
SCP: scp /cygdrive/c/publish/PageHitExporter.py [email protected]:~/ Winscp
Database: dbeaver https://www.reddit.com/r/coolguides/comments/bu9611/cool_free_and_useful_software/?utm_source=reddit-android
**Compare:
cygwin vs git bash and others: https://macyves.wordpress.com/2014/09/18/hipsterising-windows-cygwin-vs-babun-vs-git-bash-vs-powershell-the-onion-scale/
cygwin vs putty: Cygwin provides ports of GNU/Linux utilities to offer such an environment in Windows. This allows you to use common GNU/Linux tools and methodology, to an extent, to work with your Windows system just as you would on your Linux boxes. PuTTY is an SSH client and terminal emulator. SSH is a protocol for connecting to a system and open a shell or perform remote command execution. This is a common way of interfacing with a remote *nix system. So, for example, if you wanted to use a Bash shell in Windows, you would install Cygwin. If, however, you are only interested in administering your Linux box remotely from Windows, you could choose to use PuTTY. -- www.reddit.com/r/learnprogramming/comments/qlt8w/cygwin_vs_putty/
# 2. 基本环境配置
# 2.1 配置方法
Hardware: ups(uninterrupted power supply)
- windows
- windows+VM e.g http://www.cse.scu.edu/~mwang2/projects/CDH_installConfig1_13m.pdf
- windows+POSIX (etc. cygwin) e.g run Hadoop in cygwin on windows
- windows + docker (hyper-v || virtual box) e.g https://www.cloudera.com/documentation/enterprise/5-6-x/topics/quickstart_docker_container.html
- linux
- linux + docker
- linux/win/mac + vm + vagrant e.g hyperledger cluster setup
- linux/win/mac + docker + vagrant
windows+subsysterm: https://docs.microsoft.com/en-us/windows/wsl/about
dism.exe /online /enable-feature /featurename:Microsoft-Windows-Subsystem-Linux /all /norestart
dism.exe /online /enable-feature /featurename:VirtualMachinePlatform /all

windows store: ubuntu
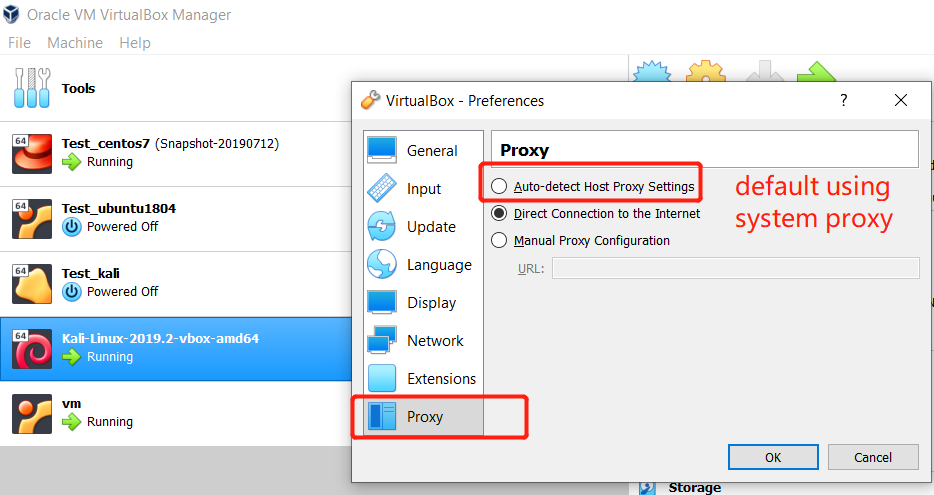
其中virtual box网络配置参考:基于virtualbox构建网络环境
# 2.2 本地开发环境配置例子
//obselete: not free: virtualbox + xshell + xmanager + virtualenv
virtualbox (save the state) +LVM+ cmder/ConEmu/cygwin (x11, tmux session+tmux-resurrect) + winscp + virtualenv
- docker(docker compose+docker volume, supervisord:grafana influxdb postgresql mongodb)
Other ssh client like: google chrome secure shell extension and http://web-console.org/
由于系统内核不同,当我们要在一个操作系统中运行另一个系统上的程序时,一般需要安装虚拟机来实现。不过常规虚拟机的安装比较麻烦,并且换用其他电脑时也可能不容许我们安装软件,遇到这种情况,我们可以制作便携式虚拟机来解决。下面就以制作绿色便携版VirtualBox虚拟机为例。
首先上网下载Portable-VirtualBox,接着再到VirtualBox主页下载对应版本的VirtualBox(注意两个软件版本号要一致)。启动Portable-VirtualBox后点击“search”选择上述下载到的“VirtualBox”安装文件,同时勾选32和64位制作版本。
点击OK,程序开始完成“VirtualBox”绿色版的制作。制作好的绿色版默认保存在“Portable-VirtualBox”安装目录下的APP目录中中如\Portable-VirtualBox\app64”。
现在可以将上述目录全部复制到闪存盘中,再将闪存盘插入到任意一部安装Windows的电脑中,运行其中的“VirtualBox.EXE”即可启动虚拟机。启动虚拟机后点击“Setting”进入设置,将USB设置开启,这样便携虚拟机可以直接读取USB设备中的内容如虚拟机系统文件,配置等。 完成上述设置后就可以新建虚拟机,为了方便读取虚拟机的文件,在新建虚拟机硬盘设置里要选择“Use an existing virtual disk file”(使用存在的虚拟文件),这样将常用的虚拟系统文件先设置好保存在闪存盘中,以后闪存盘插入到不同电脑上都可以直接选择制作好的虚拟系统文件。
# 2.2.1 常用工具
Mouse escape from ubuntu: Esc Mouse escape from centos: right click / right Ctrl
screen size fit to full screen: Devices -> Insert Guest Additions CD image
# SSH:
sudo yum install -y openssh-server https://bytefreaks.net/gnulinux/centos-6-install-start-and-stop-enable-and-disable-ssh-server
# Tmux:
Auto install:
Sudo yum install tmux
apt install tmux
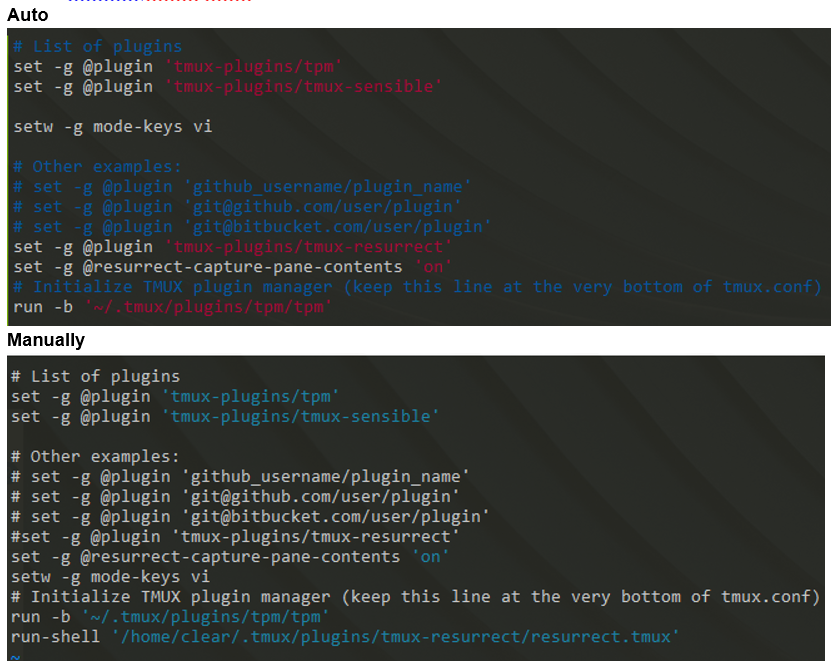
Tmux plugin manager:
git clone https://github.com/tmux-plugins/tpm ~/.tmux/plugins/tpm
~/.tmux.conf:
# List of plugins
set -g @plugin 'tmux-plugins/tpm'
set -g @plugin 'tmux-plugins/tmux-sensible'
# Other examples:
# set -g @plugin 'github_username/plugin_name'
# set -g @plugin '[email protected]:user/plugin'
# set -g @plugin '[email protected]:user/plugin'
# Initialize TMUX plugin manager (keep this line at the very bottom of tmux.conf)
run -b '~/.tmux/plugins/tpm/tpm'
tmux source ~/.tmux.conf
Tmux plugins / workflow:
https://github.com/tmux-plugins/tmux-resurrect
https://github.com/tmux-plugins/tmux-resurrect/blob/master/docs/restoring_pane_contents.md
~/.tmux.conf:
set -g @plugin 'tmux-plugins/tmux-resurrect'
set -g @resurrect-capture-pane-contents 'on'
To Load Plugin: ctrl+b I
Manually install:
tar -zxvf tmux-2.8.tar.gz
LDFLAGS="-L/usr/local/lib -Wl,-rpath=/usr/local/lib" ./configure --prefix=/usr/local
make
Sudo make install
https://gist.github.com/pierreprinetti/86fbcd28e5cc1b3e0b9b762e4c12fad2

git clone https://github.com/tmux-plugins/tmux-resurrect ~/.tmux/plugins
~/.tmux.conf:
run-shell ~/.tmux/plugins/resurrect.tmux

For manually install, don’t forget to
		chown -R user:group ~/.tmux/plugins/tmux-resurrect/
		chmod u+x ~/.tmux/plugins/tmux-resurrect/resurrect.tmux
		chmod u+x ~/.tmux/plugins/tmux-resurrect/scripts/*.sh
		chown -R user:group ~/.tmux/plugins/tpm/
		chmod u+x ~/.tmux/plugins/tpm/scripts/*.sh
		chmod u+x ~/.tmux/plugins/tpm/tpm
sudo chown test:root .tmux -R tmux source ~/.tmux.conf Enable tmux copy mode: add into .tmux.conf: setw -g mode-keys vi
Reload: Ctrl+b Shift+I Save: Ctrl+b ctrl+s Recover: Ctrl+b ctrl+r
# 其他
z.sh 是一款可让你快速跳转到过去或最近经常访问的目录的命令行工具。 https://github.com/rupa/z
how2是一款可以通过自然语言搜索问题及答案的命令行工具。 https://github.com/santinic/how2
fzf 是一款用于文本模糊查找的命令行工具。https://github.com/junegunn/fzf
tldr是一款命令行手册页简化工具,旨在让使用者能够更加清晰、简单的获得命令行工具的帮助信息。 https://github.com/tldr-pages/tldr
# 2.2.2 连接UI Display
X11 with cygwin::cmd(when x11 gui needed):
\cygwin\bin\run.exe --quote /usr/bin/bash.exe -l -c "cd; /usr/bin/xinit /etc/X11/xinit/startxwinrc -- /usr/bin/XWin :1 -multiwindow -listen tcp"
d:\cygwin\bin\run.exe --quote /usr/bin/bash.exe -l -c "cd; /usr/bin/xinit /etc/X11/xinit/startxwinrc -- /usr/bin/XWin :1 -multiwindow -listen tcp"
ssh:
ssh -Y <username>@10.20.130.54
X11 with cmder/xming: 注意如果是bash的话不要用下面的 set DISPLAY=127.0.0.1:0.0 要用 export DISPLAY=127.0.0.1:0.0
另外在如果用windows的cmd或者powershell会有奇怪的问题,例如设置DISPLAY后无法登陆ssh,所以尽量还是用bash
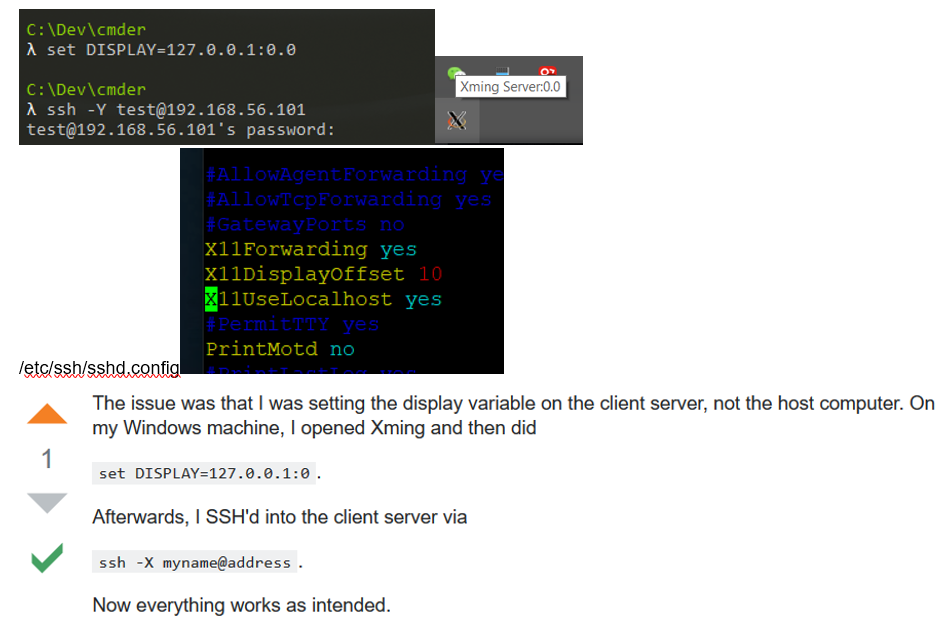
Test:: xeyes or xclock ?#issues: Error: no DISPLAY environment variable specified Solution: Remember ssh -Y OR Tick forward x11 if using putty and for ssh shell remebmer -Y ?#issues: running but not showing
In case no ip address allocated :
sudo dhclient
Disable ipv6::https://www.thegeekdiary.com/centos-rhel-7-how-to-disable-ipv6/ /etc/sysctl.conf: net.ipv6.conf.all.disable_ipv6 = 1 net.ipv6.conf.default.disable_ipv6 = 1 sysctl -p
Expose port:: [root@localhost conf]# firewall-cmd --get-active-zones [root@localhost conf]# firewall-cmd --get-default-zone public [root@localhost conf]# firewall-cmd --zone=public --add-port=8080/tcp --permanent success [root@localhost conf]# firewall-cmd --reload
# 2.2.3 基本开发设置
https://www.digitalocean.com/community/tutorials/initial-server-setup-with-ubuntu-16-04
https://www.digitalocean.com/community/tutorials/initial-server-setup-with-centos-7
用户管理
groupadd gapp
useradd newUser –g newGroup –d /home/newUser -s /bin/bash
passwd newUser
id
	uid=1001(newUser) gid=500(newGroup) groups=500(newGroup)

for ubuntu:
usermod -aG sudo newUser
for centos:
usermod -aG wheel newUser or gpasswd -a newUser wheel
id
	uid=1001(newUser) gid=500(newGroup) groups=500(newGroup),10(wheel)

mkdir -p /path/to/app
chown root:newGroup /path/
$ chown -R newUser:newGroup /path/to/app

check current bash: $0
最简单暴力方式: chmod u+w /etc/sudoers username ALL=(ALL) ALL chmod u-w /etc/sudoers
开发环境 Java yum install maven sudo yum -y install tree Python sudo yum install python-devel sudo yum install epel-release sudo yum install python-pip https://linuxize.com/post/how-to-install-pip-on-centos-7/
# 2.3 Clone和Snapshot
建议安装之后设置一个origin的snapshot,而且每个重大修改之后做一个snapshot,这样可以随时restore和clone出某个状态的机器,
注意clone的机器需要更改sid,方法是:
c:\Windows\System32\Sysprep\sysprep.exe 勾选通用 然后重启
# 3.具体操作系统
根据用途设置用户名 如 blockchain/123456
# 3.1 安装Ubuntu
测试过的例子: preditionIO dev环境,Eth开发 hyperledger
安装步骤: Ubuntu(64-bit);Create a virtual hard disk now;VDI;Dynamic allocated;
Ssh
sudo apt-get install openssh-server
sudo service ssh status
sudo service ssh restart
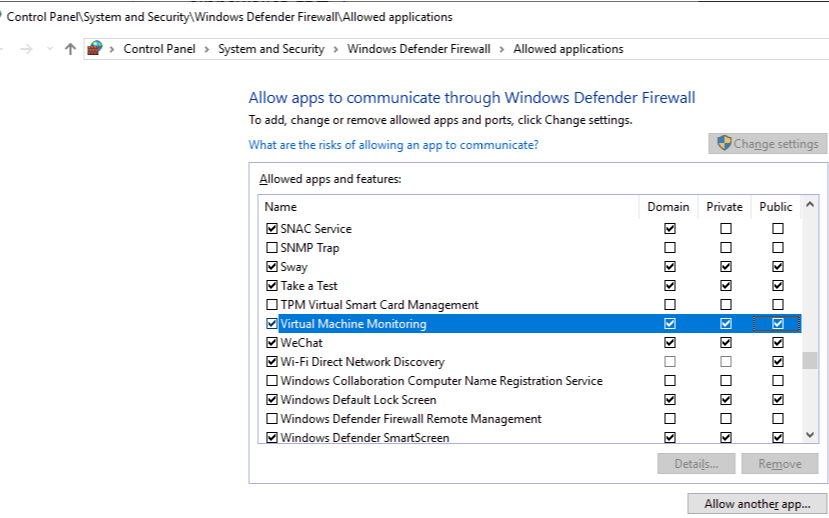
If failed connect ssh, then try to check firewall and the Network: Sudo ufw status Or when you changed the network type, you may need to restart vm More: DNS setting or DNS resolve
# 3.2 安装centos
测试过的例子: preditionIO uat环境模拟,hyperledger EOS开发
安装步骤: 选择DVD ISO Redhat(64-bit);Create a virtual hard disk now;VDI;Dynamic allocated;
Minimal version to GUI version: yum -y groups install "GNOME Desktop" startx https://unix.stackexchange.com/questions/181503/how-to-install-desktop-environments-on-centos-7
config x11 https://prasadlinuxblog.wordpress.com/2018/05/29/how-configure-x11-forwarding-in-centos-rhel-6-7/ yum install -y xorg-x11-server-Xorg xorg-x11-xauth xorg-x11-apps vim /etc/ssh/sshd_config X11Forwarding yes systemctl restart sshd
cmder x11 https://stackoverflow.com/questions/35211892/using-conemu-terminal-with-xming DISPLAY=XMING_ID;export DISPLAY; https://jdhao.github.io/2018/03/02/Windows-connect-server-x11-with-gitbash/
DNS setting for centos vim /etc/sysconfig/network-scripts/ifcfg-enp0s3
# 3.3 安装Windows
\\vboxsvr\<文件夹名字>
# 3.4 安装vmware images
新建,然后选择Use an existing Hard Disk
# 4. Troubleshooting
?#Nonexistent host networking interface
编辑器打开vbox文件
<BridgedInterface name="Linksys AE1000"/>

to this:

<BridgedInterface name="Intel(R) 82579LM Gigabit Network Connection"/>
?#Failed to open virtual machine...Cannot register the DVD image
很简单,编辑器打开vbox文件删掉<DVDImages>中间的那个Image引用即可
?#full screen 全屏显示
点击Devices菜单中的insert Guest Additions CD image ,返回虚拟机中的系统,一般情况下系统会弹出它的安装界面。如果没有弹出来的话,请打开我的电脑,找到它的盘符,双击也可以运行安装。
?# host key verification failed: faile to login ssh, WARNING: REMOTE HOST IDENTIFICATION HAS CHANGED!
ssh-keygen -R 192.168.1.101
?# failed install virtualbox on win10(64), fatal error The VirtualBox Support article I have a 64bit host, but can't install 64bit guests lists the following conditions for 64-bit guests: https://superuser.com/questions/1241956/virtualbox-only-allowing-32-bit-os
?#Not enough space for docker images Gparted to resize => refer to “Ubuntu >Resize> Step2” http://derekmolloy.ie/resize-a-virtualbox-disk/ https://gparted.sourceforge.io/download.php
?#issues: Enabling Intel VT and AMD-V virtualization hardware extensions in BIOS https://docs-old.fedoraproject.org/en-US/Fedora/13/html/Virtualization_Guide/sect-Virtualization-Troubleshooting-Enabling_Intel_VT_and_AMD_V_virtualization_hardware_extensions_in_BIOS.html Intel VT / AMD-V是做什么用的? https://zhidao.baidu.com/question/96510766.html 主板VT-X、AMD-V虚拟化设置教程 www.veryhuo.com/a/view/110093.html
?#Shared folder Could not mount the media/drive 'C:\Program Files\Oracle\VirtualBox/VBoxGuestAdditions.iso' (VERR_PDM_MEDIA_LOCKED). https://superuser.com/questions/760327/vbox-guest-additions-iso-cant-be-mounted-because-of-verr-pdm-media-locked
cd /media
mkdir cdrom
mount /dev/cdrom /media/cdrom
sh VBoxLinuxAdditions.run
Virtualbox shared folder permissions https://stackoverflow.com/questions/26740113/virtualbox-shared-folder-permissions
# 5. Other stuff
cool-retro-term https://github.com/Swordfish90/cool-retro-term
Storage: IDE vs SATA https://www.virtualbox.org/manual/ch05.html https://www.virtualbox.org/manual/ch01.html#idm485
The 2018 DevOps RoadMap https://hackernoon.com/the-2018-devops-roadmap-31588d8670cb