如果你已经购买了VPN服务比如strong vpn或者express vpn等,他们会提供openvpn的客户端配置文件,您只需查看下面的客户端安装步骤; 如果你是要服务端也亲自安装,则需要购买服务器(推荐:传送前去机场),然后参考下面client端和server端的安装步骤
# OpenVPN end to end
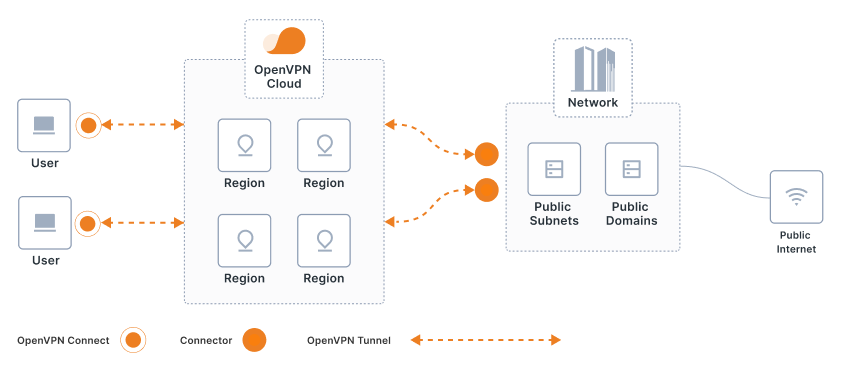
步骤: 登录 https://openvpn.net/sign-in/ 选择 CloudConnexa =》document quick start下载安装客户端,注意连接上并不能立马访问网络,还需要配置connector =》选择network,找到需要的场景如下,按照提示一步步配置远端(connector)
Tutorial: Use CloudConnexa for Secure Internet Access (opens new window)
# Client Install 客户端安装
# 基本版本
apt install openvpn

On CentOS, Fedora and openSUSE use:
$ sudo yum -y install openvpn

On CentOS you may need to install EPEL repository firstly:
$ sudo yum -y install epel-release
https://openvpn.net/community-downloads
wget https://swupdate.openvpn.org/community/releases/openvpn-2.5.5.tar.gz

tar xvf openvpn-2.5.5.tar.gz

sudo apt-get install build-essential libssl-dev iproute2 liblz4-dev liblzo2-dev libpam0g-dev libpkcs11-helper1-dev libsystemd-dev resolvconf pkg-config

cd openvpn-2.5.5

./configure --enable-systemd --enable-async-push --enable-iproute2

make

sudo make install
# Scramble版本(你懂的)
scramble options patch:
wget https://swupdate.openvpn.org/community/releases/openvpn-2.5.5.tar.gz

tar xvf openvpn-2.5.5.tar.gz

wget https://github.com/Tunnelblick/Tunnelblick/archive/master.zip

sudo apt-get install unzip

unzip master.zip

cp Tunnelblick-master/third_party/sources/openvpn/openvpn-2.5.5/patches/*.diff openvpn-2.5.5

cd openvpn-2.5.5

patch -p1 < 02-tunnelblick-openvpn_xorpatch-a.diff

patch -p1 < 03-tunnelblick-openvpn_xorpatch-b.diff

patch -p1 < 04-tunnelblick-openvpn_xorpatch-c.diff

patch -p1 < 05-tunnelblick-openvpn_xorpatch-d.diff

patch -p1 < 06-tunnelblick-openvpn_xorpatch-e.diff

sudo apt-get install build-essential libssl-dev iproute2 liblz4-dev liblzo2-dev libpam0g-dev libpkcs11-helper1-dev libsystemd-dev resolvconf pkg-config

./configure --enable-systemd --enable-async-push --enable-iproute2

make

sudo make install
# Configuration 配置(以linux为例)
举例:
StrongVPN
VPN Accounts-> VPN Account Summary->选择Open类型的地址服务器->download the .ovpn file
ExpressVPN
Dashboard->Setup the device->More->Manual Configuration->选择地址以及 Linux OpenVPN with Terminal->download the .ovpn file
$ sudo mv vpn-XXX_ovpnXXX_account.ovpn /etc/openvpn/strongvpn.conf

$ vim /etc/openvpn/auth.txt
The first line should be VPN server login.
The second line should be your password.

$ sudo chmod 400 /etc/openvpn/auth.txt

$ vim /etc/openvpn/strongvpn.conf
Change the line from “auth-user-pass” to “auth-user-pass /etc/openvpn/auth.txt” (without quotes).

$ sudo service openvpn start
$ sudo update-rc.d -f openvpn disable

On CentOS, Fedora and openSUSE:
$ sudo systemctl start [email protected]
If you have selinux enabled, you also need to run this command before the service start:
$ sudo restorecon -v /etc/openvpn/strongvpn.conf
To disconnect use:
$ sudo systemctl stop [email protected]
openvpn程序是如何读取 strongvpn.conf sudo service openvpn status 找到 /etc/init.d/openvpn 查看代码就知道是读取 /etc/openvpn/*.conf文件
# DNS traffic
Some Ubuntu systems require a script to make sure DNS traffic passes through the VPN tunnel. This is not necessary unless you successfully connect then cannot access web sites by host name.
sudo mkdir -p /etc/openvpn/scripts

sudo wget https://raw.githubusercontent.com/jonathanio/update-systemd-resolved/master/update-systemd-resolved -P /etc/openvpn/scripts/

sudo chmod +x /etc/openvpn/scripts/update-systemd-resolved
Then edit your OpenVPN client file (e.g. strong.ovpn) by adding the up/down scripts. Add these 3 lines after the line where it shows your server name (e.g. remote str-atl203.strongconnectivity.com 443 tcp)
script-security 2
up /etc/openvpn/scripts/update-systemd-resolved
down /etc/openvpn/scripts/update-systemd-resolved
# Server Install 服务端安装
Create On Demand Disposable OpenVPN Endpoints on AWS. (opens new window)
# Troubleshooting 问题排查
# 基本方法
$ sudo grep ovpn /var/log/syslog
For CentOS, Fedora and openSUSE use:
$ sudo systemctl status -l [email protected]

If you see “Initialization Sequence Completed” as the last line, the VPN should be connected fine.
# status: active (exited)
因为你懂的某些国家直接使用openvpn有问题,所以要开启scramble模式,因此我卸载了kali默认的openvpn, 安装了scramble option
结果无法用service/systemctl启动openvpn
$service/systemctl start openvpn
failed to start .service unit is masked

Check that the unit file is a symlink to /dev/null:
$file /etc/systemd/system/openvpn.service

/lib/systemd/system/openvpn.service: symbolic link to /dev/null
删除无效link后重启:
$sudo rm /lib/systemd/system/openvpn.service
$sudo systemctl daemon-reload
$service/systemctl start openvpn
但是这一次显示状态有点奇怪:
$service/systemctl status openvpn
State active (exited)

$which open
/usr/local/sbin/openvpn

$sudo find / -name "openvpn.service"
/run/systemd/generator.late/openvpn.service

$/etc/init.d/openvpn 指向错误路径:
/usr/sbin/openvpn

修改 /etc/init.d/openvpn指向 /usr/local/sbin/openvpn即可
# 连上vpn但是无法访问
尝试修改DNS
/etc/resolv.conf
如果上面这个文件是动态修改的,则需要修改(dynamic resolv.conf file for glibc generated):
/etc/resolvconf/resolv.conf.d/base
refer:
https://strongvpn.com/setup-linux-openvpn/ https://shenzhensuzy.wordpress.com/2019/01/26/openvpn-with-xor-patch/ https://scramblevpn.wordpress.com/2017/03/26/raspberry-pi-and-patched-openvpn-server-built-from-source-code-2-4-1/