refer: 《programming/js_dev_overview》
# 1. 基本概念
https://reactjs.org/docs/glossary.html
# 1.1 Reacjs Application
Single-page Applicaiton
Though you may build a single-page application in React, it is not a requirement. React can also be used for enhancing small parts of existing websites with additional interactivity. Code written in React can coexist peacefully with markup rendered on the server by something like PHP, or with other client-side libraries. In fact, this is exactly how React is being used at Facebook.
通过 react router可以实现多页面:
import { Router, BrowserRouter, Redirect, Route, Switch } from 'react-router-dom'
页面切换的时候url变化,相应触发页面的WillUnmount生命周期
CDN
CDN stands for Content Delivery Network. CDNs deliver cached, static content from a network of servers across the globe.
# 1.2 ES6, ES2015, ES2016, etc
These acronyms all refer to the most recent versions of the ECMAScript Language Specification standard, which the JavaScript language is an implementation of. The ES6 version (also known as ES2015) includes many additions to the previous versions such as: arrow functions, classes, template literals, let and const statements. You can learn more about specific versions here (opens new window).
# 1.3 Compilers
有的称之为 transpiling
A JavaScript compiler takes JavaScript code, transforms it and returns JavaScript code in a different format. The most common use case is to take ES6 syntax and transform it into syntax that older browsers are capable of interpreting. Babel (opens new window) is the compiler most commonly used with React.
# 1.4 Bundlers
又称 minimize?
Bundlers take JavaScript and CSS code written as separate modules (often hundreds of them), and combine them together into a few files better optimized for the browsers. Some bundlers commonly used in React applications include Webpack (opens new window) and Browserify (opens new window).
# 1.5 Package Managers
Package managers are tools that allow you to manage dependencies in your project. npm (opens new window) and Yarn (opens new window) are two package managers commonly used in React applications. Both of them are clients for the same npm package registry.
# 1.6 JSX
JSX is a syntax extension to JavaScript. It is similar to a template language, but it has full power of JavaScript. JSX gets compiled to React.createElement() calls which return plain JavaScript objects called “React elements”.
JSX is a special syntax developed by Facebook to support in-line templates for react components.
JSX是一个JavaScript语法扩展,类似于XML。你可以使用React,可以进行JSX语法到JavaScript的转换
react不是必须使用JSX。你可以使用普通的JS。然而,我们建议使用JSX因为它定义树结构(dom)简洁而且是我们熟悉的语法。简明的代码结构更利于开发和维护。 XML有着开闭标签,在构建复杂的树形结构时,比函数调用和对象字面量更易读。
jsx中原有的javascript的保留字都不能使用,例如:class,for必须使用className,htmlFor;
JSX并不是新语言,也没有改变JavaScript的语法,只是对JavaScript的拓展。
jsx是类似于html但是不完全相同,但是还是有不同的地方
# reactjs hooks vs class
https://www.bitovi.com/blog/react-hooks-vs-classes-the-ultimate-comparison
# 1.7 ReactJS
# 1.7.1 Elements
first-class JavaScript objects https://reactjs.org/docs/react-api.html#createelement
components的building block: React elements are the building blocks of React applications. One might confuse elements with a more widely known concept of “components”. An element describes what you want to see on the screen. React elements are immutable.
const element = <h1>Hello, world</h1>;
Typically, elements are not used directly, but get returned from components.
Unlike browser DOM elements, React elements are plain objects. React DOM takes care of updating the DOM to match the React elements.
To render a React element into a root DOM node, pass both to ReactDOM.render() (opens new window):
# 1.7.2 Component&props|State&Lifecycle Methods
https://reactjs.org/docs/react-component.html
https://reactjs.org/docs/components-and-props.html
# component&props
React components are small, reusable pieces of code that return a React element to be rendered to the page.
//The simplest version of React component is a plain JavaScript function that returns a React element
function Welcome(props) {
  return <h1>Hello, {props.name}</h1>;
}
//Components can also be ES6 classes:
class Welcome extends React.Component {
  render() {
    return <h1>Hello, {this.props.name}</h1>;
  }
}
Conceptually, components are like JavaScript functions. They accept arbitrary inputs (called “props”) and return React elements describing what should appear on the screen.
- function components: are a simpler way to write components that only contain a render method and don’t have their own state
- class componenets:
- controlled components: by lift up state
- pure components: by using immutable
从react的角度,function component和class component是等价的,只是ES6的角度写法不同
All React components must act like pure functions with respect to their props.
pure function不改变输入:
function sum(a, b) {
  return a + b;
}
非 pure function:
function withdraw(account, amount) {
  account.total -= amount;
}
readonly props are inputs to a React component. They are data passed down from a parent component to a child component.
//`props.children` is available on every component. It contains the content between the opening and closing tags of a component. For example:

<Welcome>Hello world!</Welcome>
function Welcome(props) {
  return <p>{props.children}</p>;
}
class Welcome extends React.Component {
  render() {
    return <p>{this.props.children}</p>;
  }
}
The most important difference between state and props is that props are passed from a parent component, but state is managed by the component itself. A component cannot change its props, but it can change its state.
For each particular piece of changing data, there should be just one component that “owns” it in its state. Don’t try to synchronize states of two different components. Instead, lift it up (opens new window) to their closest shared ancestor, and pass it down as props to both of them.
除了props和state,对于component来说可以定义任意的fields,比如
componentDidMount() {
    this.timerID = setInterval(
      () => this.tick(),
      1000
    );
  }
  While `this.props` is set up by React itself and `this.state` has a special meaning, you are free to add additional fields to the class manually if you need to store something that doesn’t participate in the data flow
# State & Lifecycle Methods
Lifecycle methods are custom functionality that gets executed during the different phases of a component. There are methods available when the component gets created and inserted into the DOM (mounting (opens new window)), when the component updates, and when the component gets unmounted or removed from the DOM.
componentDidMount
componentWillUnmount
// Wrong
this.state.comment = 'Hello';
// Correct
this.setState({comment: 'Hello'});

#特别小心:State Updates May Be Asynchronous
Because this.props and this.state may be updated asynchronously, you should not rely on their values for calculating the next state.

// Wrong
this.setState({
  counter: this.state.counter + this.props.increment,
});
// Correct
this.setState((state, props) => ({
  counter: state.counter + props.increment
}));
// Correct
this.setState(function(state, props) {
  return {
    counter: state.counter + props.increment
  };
});

Neither parent nor child components can know if a certain component is stateful or stateless, and they shouldn’t care whether it is defined as a function or a class.
# 1.7.3 Controlled vs. Uncontrolled Components 很重要的概念
# 1. Controlled
https://reactjs.org/docs/forms.html#controlled-components
https://reactjs.org/docs/forms.html
HTML form elements work a little bit differently from other DOM elements in React, because form elements naturally keep some internal state, such as <input>, <textarea>, and <select> typically maintain their own state and update it based on user input.
The form has the default HTML form behavior of browsing to a new page when the user submits the form. If you want this behavior in React, it just works. But in most cases, it’s convenient to have a JavaScript function that handles the submission of the form and has access to the data that the user entered into the form. The standard way to achieve this is with a technique called “controlled components”.
In React, mutable state is typically kept in the state property of components, and only updated with setState() (opens new window).
We can combine the two by making the React state be the “single source of truth”. Then the React component that renders a form also controls what happens in that form on subsequent user input. An input form element whose value is controlled by React in this way is called a “controlled component”.
class Reservation extends React.Component {
  constructor(props) {
    super(props);
    this.state = {
      isGoing: true,
      numberOfGuests: 2
    };
	this.handleSubmit = this.handleSubmit.bind(this);
    this.handleInputChange = this.handleInputChange.bind(this);
  }
  handleSubmit(event) {
    alert('A name was submitted: ' + this.state.value);
    event.preventDefault();
  }
  handleInputChange(event) {
    const target = event.target;
    const value = target.type === 'checkbox' ? target.checked : target.value;
    const name = target.name;

    this.setState({
      [name]: value
    });
  }

  render() {
    return (
      <form onSubmit={this.handleSubmit}>
        <label>
          Is going:
          <input
            name="isGoing"
            type="checkbox"
            checked={this.state.isGoing}
            onChange={this.handleInputChange} />
        </label>
        <br />
        <label>
          Number of guests:
          <input
            name="numberOfGuests"
            type="number"
            value={this.state.numberOfGuests}
            onChange={this.handleInputChange} />
        </label>
        <input type="submit" value="Submit" />
      </form>
    );
  }
}
完整解决方案/框架:
If you’re looking for a complete solution including validation, keeping track of the visited fields, and handling form submission, Formik (opens new window) (is one of the popular choices. However, it is built on the same principles of controlled components and managing state)
antd
# 2. Uncontrolled
where form data is handled by the DOM itself. To write an uncontrolled component, instead of writing an event handler for every state update, you can use a ref (opens new window) to get form values from the DOM.
class NameForm extends React.Component {
  constructor(props) {
    super(props);
    this.handleSubmit = this.handleSubmit.bind(this);
    this.input = React.createRef();
  }
  handleSubmit(event) {
    alert('A name was submitted: ' + this.input.current.value);
    event.preventDefault();
  }
  render() {
    return (
      <form onSubmit={this.handleSubmit}>
        <label>
          Name:
          <input type="text" ref={this.input} />
        </label>
        <input type="submit" value="Submit" />
      </form>
    );
  }
}

In the React rendering lifecycle, the value attribute on form elements will override the value in the DOM. With an uncontrolled component, you often want React to specify the initial value, but leave subsequent updates uncontrolled. To handle this case, you can specify a defaultValue attribute instead of value.
Likewise, <input type="checkbox"> and <input type="radio"> support defaultChecked, and <select> and <textarea> supports defaultValue.
In React, an <input type="file" /> is always an uncontrolled component because its value can only be set by a user, and not programmatically.
# 1.7.4 Handling Events
https://reactjs.org/docs/handling-events.html
Handling events with React elements is very similar to handling events on DOM elements but has some syntactic differences:
- React event handlers are named using camelCase, rather than lowercase.
- With JSX you pass a function as the event handler, rather than a string.
SyntheticEvent: https://reactjs.org/docs/events.html
When you define a component using an ES6 class (opens new window), a common pattern is for an event handler to be a method on the class.
https://stackoverflow.com/questions/6348494/addeventlistener-vs-onclick#:~:text=Summary%3A,can%20stop%20the%20event%20propagation.

## html
<button onclick="activateLasers()">
  Activate Lasers
</button>
OR
element.addEventListener('click', function() { /* do stuff here*/ }, false);

When using React, you generally don’t need to call addEventListener to add listeners to a DOM element after it is created. Instead, just provide a listener when the element is initially rendered.

## react
function ActionLink() {
  function handleClick(e) {
    e.preventDefault();
    console.log('The link was clicked.');
  }
  return (
    <a href="#" onClick={handleClick}>
      Click me
    </a>
  );
}

class Toggle extends React.Component {
  constructor(props) {
    super(props);
    this.state = {isToggleOn: true};

    // This binding is necessary to make `this` work in the callback
    this.handleClick = this.handleClick.bind(this);
  }

  handleClick() {
    this.setState(state => ({
      isToggleOn: !state.isToggleOn
    }));
  }

  render() {
    return (
      <button onClick={this.handleClick}>
        {this.state.isToggleOn ? 'ON' : 'OFF'}
      </button>
    );
  }
}


class LoggingButton extends React.Component {
  // This syntax ensures `this` is bound within handleClick.
  // Warning: this is *experimental* syntax.
  handleClick = () => {
    console.log('this is:', this);
  }

  render() {
    return (
      <button onClick={this.handleClick}>
        Click me
      </button>
    );
  }
}

class LoggingButton extends React.Component {
  handleClick() {
    console.log('this is:', this);
  }

  render() {
    // This syntax ensures `this` is bound within handleClick
    //The problem with this syntax is that a different callback is created each time the LoggingButton renders. In most cases, this is fine. However, if this callback is passed as a prop to lower components, those components might do an extra re-rendering. We generally recommend binding in the constructor or using the class fields syntax, to avoid this sort of performance problem.
    return (
      <button onClick={() => this.handleClick()}>
        Click me
      </button>
    );
  }
}
# 1.7.5 Conditional Rendering
// if else
function Greeting(props) {
  const isLoggedIn = props.isLoggedIn;
  if (isLoggedIn) {
    return <UserGreeting />;
  }
  return <GuestGreeting />;
}

ReactDOM.render(
  // Try changing to isLoggedIn={true}:
  <Greeting isLoggedIn={false} />,
  document.getElementById('root')
);

//Inline If with Logical && Operator (embed expressions in JSX)
function Mailbox(props) {
  const unreadMessages = props.unreadMessages;
  return (
    <div>
      <h1>Hello!</h1>
      {unreadMessages.length > 0 &&
        <h2>
          You have {unreadMessages.length} unread messages.
        </h2>
      }
    </div>
  );
}
const messages = ['React', 'Re: React', 'Re:Re: React'];
ReactDOM.render(
  <Mailbox unreadMessages={messages} />,
  document.getElementById('root')
);

//Inline If-Else with Conditional Operator
render() {
  const isLoggedIn = this.state.isLoggedIn;
  return (
    <div>
      The user is <b>{isLoggedIn ? 'currently' : 'not'}</b> logged in.
    </div>
  );
}

// Return null to prevent rendering
// Returning null from a component’s render method does not affect the firing of the component’s lifecycle methods. For instance componentDidUpdate will still be called.

function WarningBanner(props) {
  if (!props.warn) {
    return null;
  }

  return (
    <div className="warning">
      Warning!
    </div>
  );
}
# 1.7.6 Lists & Keys
https://reactjs.org/docs/lists-and-keys.html
Don’t pass something like Math.random() to keys. It is important that keys have a “stable identity” across re-renders so that React can determine when items are added, removed, or re-ordered. Ideally, keys should correspond to unique and stable identifiers coming from your data, such as post.id.
Keys only make sense in the context of the surrounding array.
## wrong:
function ListItem(props) {
  const value = props.value;
  return (
    // Wrong! There is no need to specify the key here:
    <li key={value.toString()}>
      {value}
    </li>
  );
}
function NumberList(props) {
  const numbers = props.numbers;
  const listItems = numbers.map((number) =>
    // Wrong! The key should have been specified here:
    <ListItem value={number} />
  );
  return (
    <ul>
      {listItems}
    </ul>
  );
}

const numbers = [1, 2, 3, 4, 5];
ReactDOM.render(
  <NumberList numbers={numbers} />,
  document.getElementById('root')
);

##correct:

function ListItem(props) {
  // Correct! There is no need to specify the key here:
  return <li>{props.value}</li>;
}
function NumberList(props) {
  const numbers = props.numbers;
  const listItems = numbers.map((number) =>
    // Correct! Key should be specified inside the array.
    <ListItem key={number.toString()} value={number} />
  );
  return (
    <ul>
      {listItems}
    </ul>
  );
}
const numbers = [1, 2, 3, 4, 5];
ReactDOM.render(
  <NumberList numbers={numbers} />,
  document.getElementById('root')
);

# JSX allows embedding any expression in curly braces so we could inline the map() result:
function NumberList(props) {
  const numbers = props.numbers;
  return (
    <ul>
      {numbers.map((number) =>
        <ListItem key={number.toString()}
                  value={number} />
      )}
    </ul>
  );
}
# 1.7.7 Components设计思想
# Thinking in React 基本封装
判断什么是state:
- Is it passed in from a parent via props? If so, it probably isn’t state.
- Does it remain unchanged over time? If so, it probably isn’t state.
- Can you compute it based on any other state or props in your component? If so, it isn’t state.
谁是state拥有者:
React is all about one-way data flow down the component hierarchy. It may not be immediately clear which component should own what state. For each piece of state in your application:
- Identify every component that renders something based on that state.
- Find a common owner component (a single component above all the components that need the state in the hierarchy).
- Either the common owner or another component higher up in the hierarchy should own the state.
- If you can’t find a component where it makes sense to own the state, create a new component solely for holding the state and add it somewhere in the hierarchy above the common owner component.
# Lifting State Up 联动类组件
If something can be derived from either props or state, it probably shouldn’t be in the state. For example, instead of storing both celsiusValue and fahrenheitValue, we store just the last edited temperature and its scale. The value of the other input can always be calculated from them in the render() method.
When you see something wrong in the UI, you can use React Developer Tools (opens new window) to inspect the props and move up the tree until you find the component responsible for updating the state. This lets you trace the bugs to their source
const scaleNames = {
  c: 'Celsius',
  f: 'Fahrenheit'
};

function toCelsius(fahrenheit) {
  return (fahrenheit - 32) * 5 / 9;
}

function toFahrenheit(celsius) {
  return (celsius * 9 / 5) + 32;
}

function tryConvert(temperature, convert) {
  const input = parseFloat(temperature);
  if (Number.isNaN(input)) {
    return '';
  }
  const output = convert(input);
  const rounded = Math.round(output * 1000) / 1000;
  return rounded.toString();
}

function BoilingVerdict(props) {
  if (props.celsius >= 100) {
    return <p>The water would boil.</p>;
  }
  return <p>The water would not boil.</p>;
}

class TemperatureInput extends React.Component {
  constructor(props) {
    super(props);
    this.handleChange = this.handleChange.bind(this);
  }

  handleChange(e) {
    this.props.onTemperatureChange(e.target.value);
  }

  render() {
    const temperature = this.props.temperature;
    const scale = this.props.scale;
    return (
      <fieldset>
        <legend>Enter temperature in {scaleNames[scale]}:</legend>
        <input value={temperature}
               onChange={this.handleChange} />
      </fieldset>
    );
  }
}

class Calculator extends React.Component {
  constructor(props) {
    super(props);
    this.handleCelsiusChange = this.handleCelsiusChange.bind(this);
    this.handleFahrenheitChange = this.handleFahrenheitChange.bind(this);
    this.state = {temperature: '', scale: 'c'};
  }

  handleCelsiusChange(temperature) {
    this.setState({scale: 'c', temperature});
  }

  handleFahrenheitChange(temperature) {
    this.setState({scale: 'f', temperature});
  }

  render() {
    const scale = this.state.scale;
    const temperature = this.state.temperature;
    const celsius = scale === 'f' ? tryConvert(temperature, toCelsius) : temperature;
    const fahrenheit = scale === 'c' ? tryConvert(temperature, toFahrenheit) : temperature;

    return (
      <div>
        <TemperatureInput
          scale="c"
          temperature={celsius}
          onTemperatureChange={this.handleCelsiusChange} />
        <TemperatureInput
          scale="f"
          temperature={fahrenheit}
          onTemperatureChange={this.handleFahrenheitChange} />
        <BoilingVerdict
          celsius={parseFloat(celsius)} />
      </div>
    );
  }
}

ReactDOM.render(
  <Calculator />,
  document.getElementById('root')
);
# Containment 容器类组件(弹窗类和布局类)
--- 弹窗类
Some components don’t know their children ahead of time. This is especially common for components like `Sidebar` or `Dialog` that represent generic “boxes”. We recommend that such components use the special `children` prop to pass children elements directly into their output:

function FancyBorder(props) {
  return (
    <div className={'FancyBorder FancyBorder-' + props.color}>
      {props.children}
    </div>
  );
}
function WelcomeDialog() {
  return (
    <FancyBorder color="blue">
      <h1 className="Dialog-title">
        Welcome
      </h1>
      <p className="Dialog-message">
        Thank you for visiting our spacecraft!
      </p>
    </FancyBorder>
  );
}

--- 布局类
sometimes you might need multiple “holes” in a component. In such cases you may come up with your own convention instead of using children:

function SplitPane(props) {
  return (
    <div className="SplitPane">
      <div className="SplitPane-left">
        {props.left}
      </div>
      <div className="SplitPane-right">
        {props.right}
      </div>
    </div>
  );
}

function App() {
  return (
    <SplitPane
      left={
        <Contacts />
      }
      right={
        <Chat />
      } />
  );
}
# Specialization 通用到定制
a more “specific” component renders a more “generic” one and configures it with props
function Dialog(props) {
  return (
    <FancyBorder color="blue">
      <h1 className="Dialog-title">
        {props.title}
      </h1>
      <p className="Dialog-message">
        {props.message}
      </p>
      {props.children}
    </FancyBorder>
  );
}

function WelcomeDialog() {
  return (
    <Dialog
      title="Welcome"
      message="Thank you for visiting our spacecraft!" />
  );
}

class SignUpDialog extends React.Component {
  constructor(props) {
    super(props);
    this.handleChange = this.handleChange.bind(this);
    this.handleSignUp = this.handleSignUp.bind(this);
    this.state = {login: ''};
  }

  render() {
    return (
      <Dialog title="Mars Exploration Program"
              message="How should we refer to you?">
        <input value={this.state.login}
               onChange={this.handleChange} />
        <button onClick={this.handleSignUp}>
          Sign Me Up!
        </button>
      </Dialog>
    );
  }

  handleChange(e) {
    this.setState({login: e.target.value});
  }

  handleSignUp() {
    alert(`Welcome aboard, ${this.state.login}!`);
  }
}
# More
If you want to reuse non-UI functionality between components, we suggest extracting it into a separate JavaScript module. The components may import it and use that function, object, or a class, without extending it.
# 1.7.8 Refs
https://reactjs.org/docs/refs-and-the-dom.html
In the typical React dataflow, props (opens new window) are the only way that parent components interact with their children. To modify a child, you re-render it with new props. However, there are a few cases where you need to imperatively modify a child outside of the typical dataflow. The child to be modified could be an instance of a React component, or it could be a DOM element. For both of these cases, React provides an escape hatch.
React supports a special attribute that you can attach to any component. The ref attribute can be an object created by React.createRef() function (opens new window) or a callback function, or a string (in legacy API). When the ref attribute is a callback function, the function receives the underlying DOM element or class instance (depending on the type of element) as its argument. This allows you to have direct access to the DOM element or component instance.
Use refs sparingly. If you find yourself often using refs to “make things happen” in your app, consider getting more familiar with top-down data flow (opens new window).
可以在html element或者class component上面用ref,但是不可以在function component上面使用! because they don’t have instances
使用方式:
推荐:When a ref is passed to an element in render, a reference to the node becomes accessible at the current attribute of the ref.
即将移除:If you worked with React before, you might be familiar with an older API where the ref attribute is a string, like "textInput", and the DOM node is accessed as this.refs.textInput. We advise against it because string refs have some issues (opens new window), are considered legacy, and are likely to be removed in one of the future releases.
使用场景:
There are a few good use cases for refs:
- Managing focus, text selection, or media playback.
- Triggering imperative animations.
- Integrating with third-party DOM libraries.
比如有些情况下,确实需要通过拿到dom元素来获取其clientheight,scrollheight之类的,虽然读取需要ref,但是set还是尽量用state来更新,而不是直接通过dom去改变;
但是不好的做法:没有设计好parent child,所以造成有时候只好偷懒通过ref直接操作child的dom或方法,其实可以 Avoid using refs for anything that can be done declaratively 通过在parent维护state 然后传给child prop,然后在handler里面去更改state来解决:例如, instead of exposing open() and close() methods on a Dialog component, pass an isOpen prop to it.
# 1.7.9 Reconciliation
https://reactjs.org/docs/reconciliation.html
When a component’s props or state change, React decides whether an actual DOM update is necessary by comparing the newly returned element with the previously rendered one. When they are not equal, React will update the DOM. This process is called “reconciliation”.
# 2. 深入解读
https://reactjs.org/docs/hello-world.html https://reactjs.org/tutorial/tutorial.html
# JSX?EMAC SCRIPT(ES5 ES6)?REACTJS
说白了ecma script就是javascript
语法全在这里:
https://developer.mozilla.org/en-US/docs/Web/JavaScript
如reactjs常用的 import export
reacjts就是基于javascript搞的前端框架,提供了众多api和组件
jsx是Facebook搞的,为了给reactjs简化in-line模板
直观可以这么看:
react without es6
The API of ES6 classes is similar to createReactClass() with a few exceptions.

with es6:
class Greeting extends React.Component {
  onstructor(props) {
    super(props);
    this.state = {count: props.initialCount};
    // This line is important!
    this.handleClick = this.handleClick.bind(this);
  }
  handleClick() {
    alert(this.state.message);
  }
  render() {
    return <h1 onClick={this.handleClick}>Hello, {this.props.name}</h1>;
  }
}
Greeting.defaultProps = {
  name: 'Mary'
};

without es6:
var createReactClass = require('create-react-class');
var Greeting = createReactClass({
  getDefaultProps: function() {
    return {
      name: 'Mary'
    };
  },
  getInitialState: function() {
    return {count: this.props.initialCount};
  },
  handleClick: function() {
    alert(this.state.message);
  },
  render: function() {
    return <h1 onClick={this.handleClick}>Hello, {this.props.name}</h1>;
  }
});
react without JSX
with JSX:
class Hello extends React.Component {
  render() {
    return <div>Hello {this.props.toWhat}</div>;
  }
}

ReactDOM.render(
  <Hello toWhat="World" />,
  document.getElementById('root')
);

without JSX:
class Hello extends React.Component {
  render() {
    return React.createElement('div', null, `Hello ${this.props.toWhat}`);
  }
}

ReactDOM.render(
  React.createElement(Hello, {toWhat: 'World'}, null),
  document.getElementById('root')
);
# Reactjs
Forms
Composition vs Inheritance
Fragment
HOCs: Higher-Order Components
For Cross-Cutting Concerns 主要是为了重用一些重复的逻辑(比如订阅datasource)
Hooks
为了替换HOCs,为了重用一些“有状态的 stateful”逻辑
Component:
- class App extends React.Component{…} is the method that creates a React component.
- componentDidMount is the API invoked after React renders a component in the DOM.
- render is the API that “draws” the component on the screen.
top level api: https://reactjs.org/docs/react-api.html
# 生命周期排查
某个项目,由于需求是高度定制化的类似Excel的表格,市面没有现成产品,所以某高人通过模仿antd写了一套原生的表格组件,层层嵌套,大概是windowtable下面包了一层table叫Seperatetable
县看下普通组件生命周期
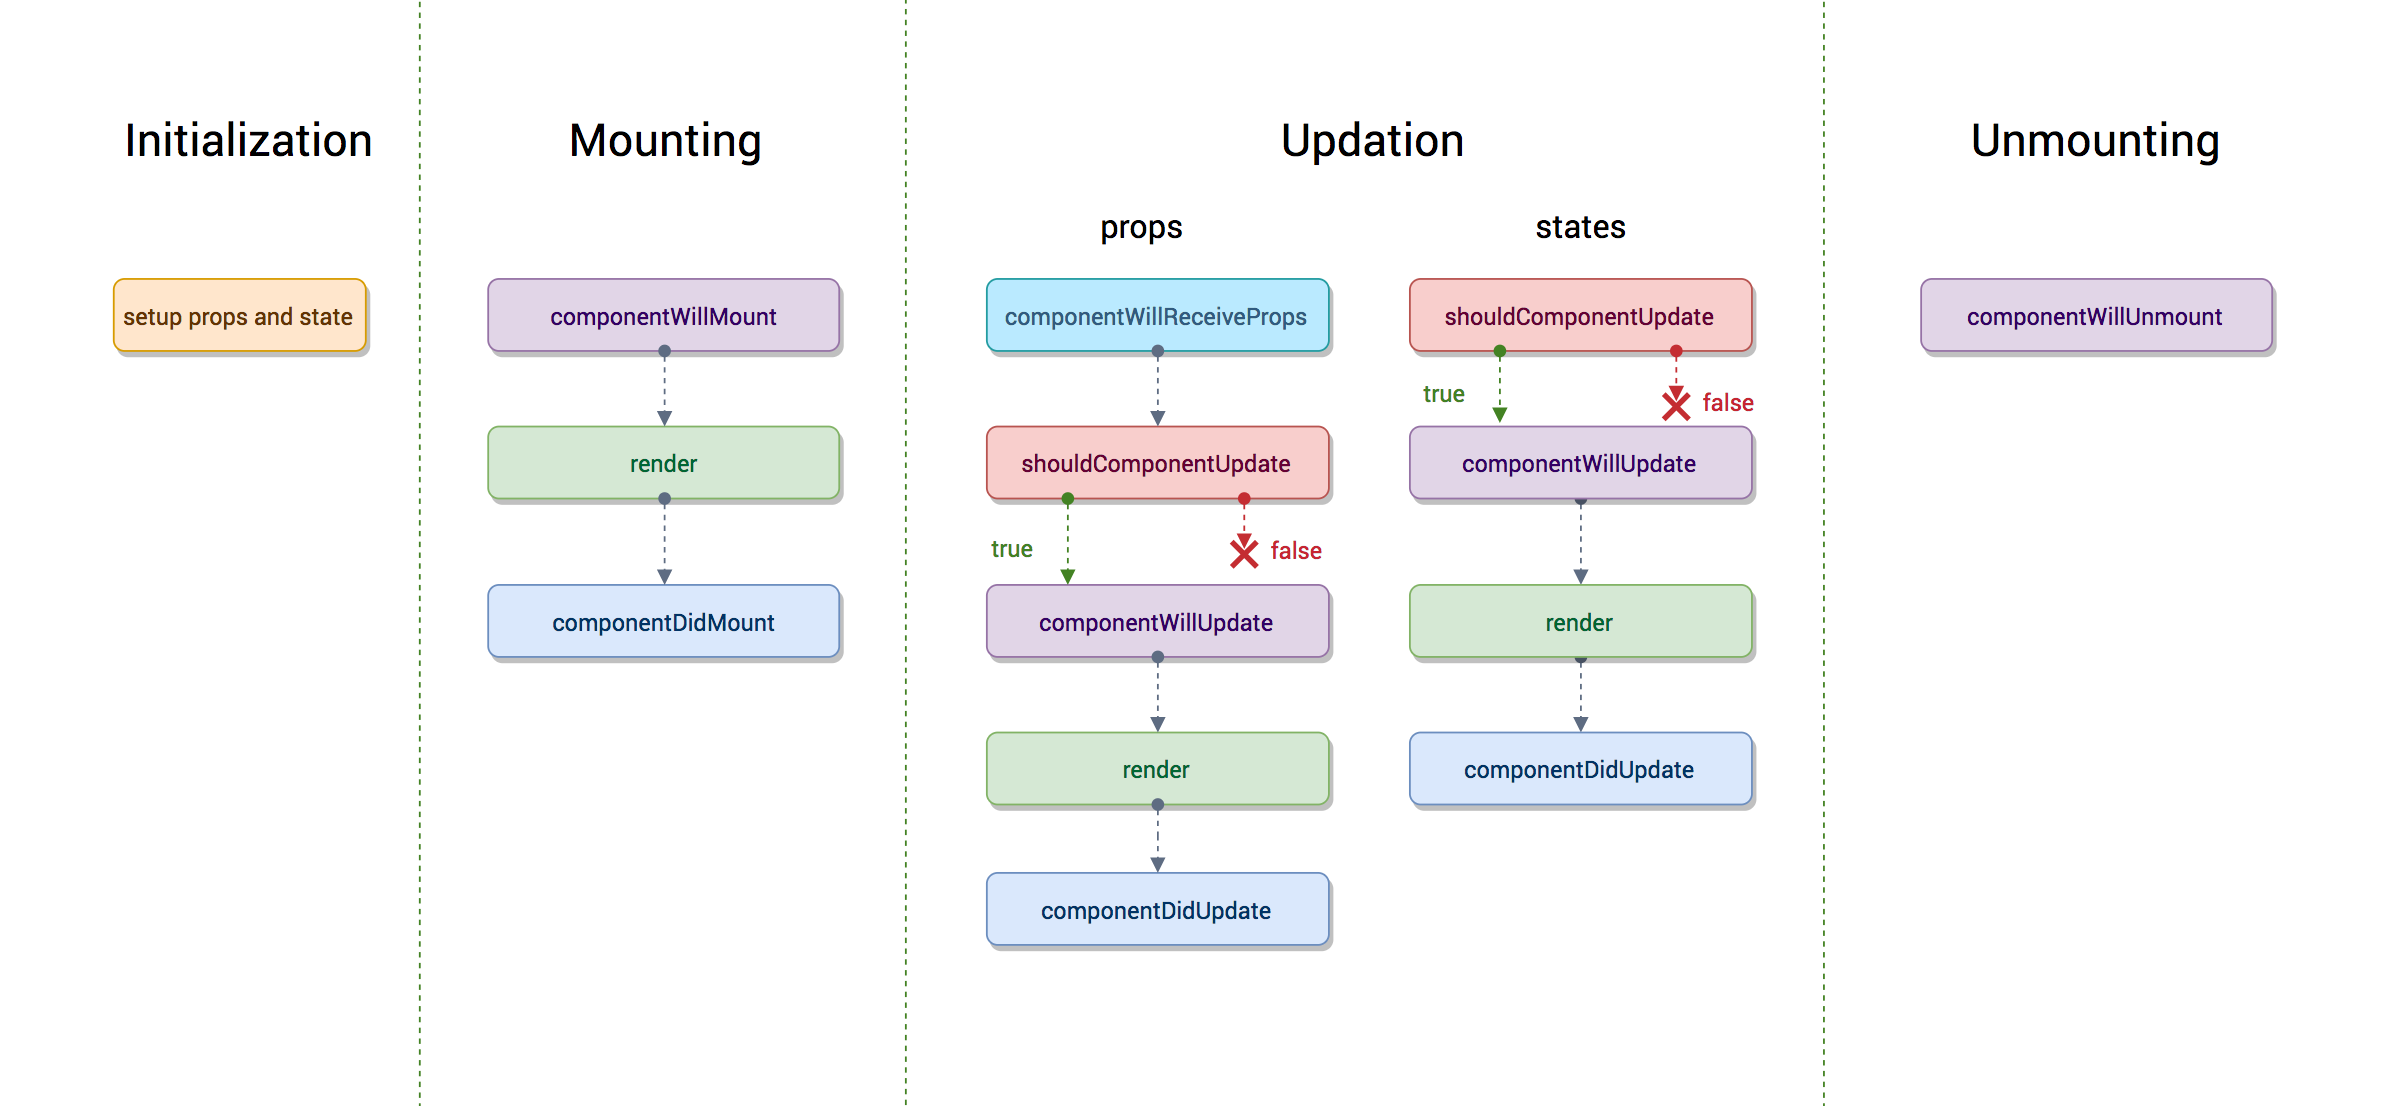
实际项目中,会将api调用获取数据逻辑放在didmount里面(为什么不放在willmount?好像有问题),所以获取数据后必然会触发setSate数据变动操作,从而有一次引发render,这都是正常的,但是因为高人哥们包装的不算太好,造成render完之后Seperatetable又多了一次render,然后windowtable接着触发render,由此循环几次才结束,分析如下
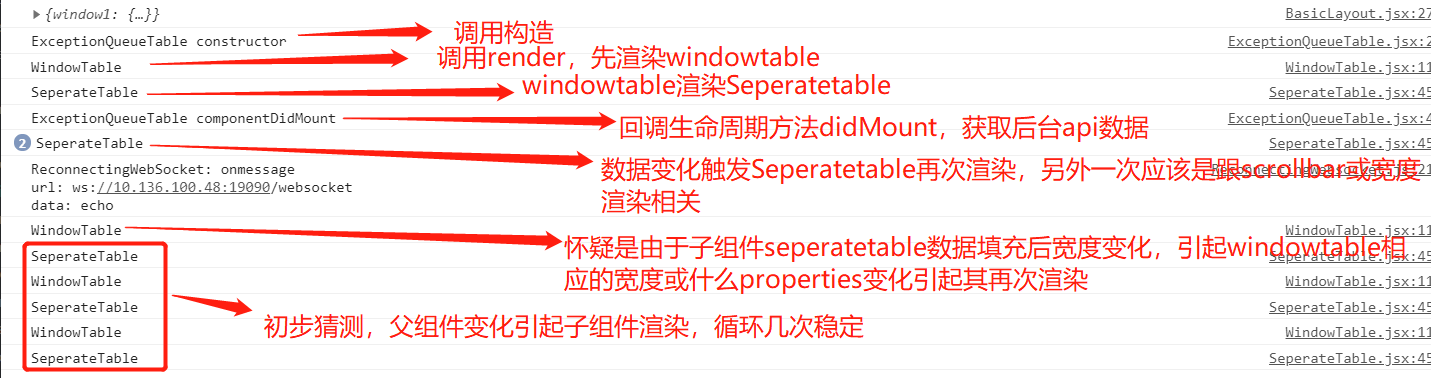
此问题还在研究中
willunmount已经被干掉了 https://reactjs.org/docs/react-component.html#componentwillunmount
# ES6
# 解构属性
https://es6.ruanyifeng.com/#docs/destructuring
spread attributes:
https://stackoverflow.com/questions/28452358/what-is-the-meaning-of-this-props-in-reactjs
<Component x={} y={} z={} />
=>
var props = { x: 1, y: 1, z:1 };
<Component {...props} />
# AutoBinding
https://blog.csdn.net/qq_42817227/article/details/82689047
https://www.cnblogs.com/daidechong/p/11586448.html
In React components declared as ES6 classes, methods follow the same semantics as regular ES6 classes. This means that they don’t automatically bind this to the instance. You’ll have to explicitly use .bind(this) in the constructor:
This means writing ES6 classes comes with a little more boilerplate code this.handleClick = this.handleClick.bind(this); for event handlers, but the upside is slightly better performance in large applications.
If the boilerplate code is too unattractive to you, you may enable the experimental Class Properties (opens new window) syntax proposal with Babel:
class SayHello extends React.Component {
  constructor(props) {
    super(props);
    this.state = {message: 'Hello!'};
    // This line is important!
    this.handleClick = this.handleClick.bind(this);
  }

  handleClick() {
    alert(this.state.message);
  }

===>

  // WARNING: this syntax is experimental!
  // Using an arrow here binds the method:
  handleClick = () => {
    alert(this.state.message);
  }

Please note that the syntax above is experimental and the syntax may change, or the proposal might not make it into the language.

If you’d rather play it safe, you have a few options:

1) Bind methods in the constructor.即用第一种方法
2) Use arrow functions, e.g. onClick={(e) => this.handleClick(e)}. 这种也不错
3) Keep using createReactClass. 这个就是说用原生reactjs without ES6
# export
基本
named export vs default export:
https://developer.mozilla.org/en-US/docs/web/javascript/reference/statements/export

普通模式:
export defalt new BirdStore();
导出class? export defalt <classname>;
单例模式
const store = new BirdStore();
export default store;

import store from '../xxx/store'
class TestStore {
  imported_store = store
  mystore = new MyStore()
}
export default new TestStore()
逻辑代码中调用UI,如弹窗
##
import Modal from '/mymodal' //默认是寻找到/mymodal/index.js

## /mymodal/index.js
import Modal from './Modal'
import { close, open, information, withInfo, withSuccess, withError, withWarn, withConfirm } from './fake'
import './modal.less'

Modal.open = open
Modal.close = close
Modal.info = function infoFn (props) {
  return information(withInfo(props))
}
Modal.error = function errorFn (props) {
  return information(withError(props))
}
export default Modal

## fake.js
function createDiv (props) {
  const { id } = props
  let div = getDiv(props.id)
  if (div) {
    return div
  }
  div = document.createElement('div')
  document.body.appendChild(div)
  // div.className = 'modal'

  containers[id] = { div }

  return div
}
export const open = (props, isPortal = false) => {
  const { content, onClose } = props
  const div = createDiv(props)

  const scrollWidth = window.innerWidth - document.body.clientWidth
  const doc = document.body.parentNode
  doc.style.overflow = 'hidden'
  doc.style.paddingRight = `${scrollWidth}px`

  const handleClose = () => {
    if (onClose) {
      onClose()
    }
    close(props)
  }

  const modal = (
    <Panel
      visible={true}
      {...props}
      onClose={handleClose}>
      {content}
    </Panel>
  )
  ReactDOM.render(modal, div)
  return null
}

export const information = (props, isPortal = false) => {
  const { content, onClose } = props
  const div = createDiv(props)

  const scrollWidth = window.innerWidth - document.body.clientWidth
  const doc = document.body.parentNode
  doc.style.overflow = 'hidden'
  doc.style.paddingRight = `${scrollWidth}px`

  const handleClose = () => {
    if (onClose) {
      onClose()
    }
    close(props)
  }

  const modal = (
    <div>
      <div className="ant-modal-mask"/>
      <div className={'ant-modal-wrap '} role={'dialog'}>
        <div role="document" className="ant-modal ant-modal-confirm ant-modal-confirm-confirm"
          style={{ display: 'block', width: 416 }}>
          <div className={'ant-modal-content'}>
            <div className="ant-modal-body">
              <div className="ant-modal-confirm-body-wrapper">
                <div className="ant-modal-confirm-body">
                  {props.icon}
                  <span className="ant-modal-confirm-title">{props.title || ''}</span>
                  <div className="ant-modal-confirm-content">{props.content || ''}</div>
                </div>
                <div className="ant-modal-confirm-btns">
                  {props.okCancel && <button type="button" className="ant-btn" onClick={() => {
                    handleClose()
                    props.onCancel && props.onCancel()
                  }}><span>{props.cancelText || 'cancel'}</span></button>}
                  <button type="button" className="ant-btn ant-btn-primary" onClick={() => {
                    handleClose()
                    props.onOk && props.onOk()
                  }}><span>{props.okText || 'confirm'}</span></button>
                </div>
              </div>
            </div>
          </div>
        </div>
      </div>
    </div>
  )
  ReactDOM.render(modal, div)
  return null
}
# 其他常用语法
we used the ES6 computed property name syntax to update the state key
https://developer.mozilla.org/en/docs/Web/JavaScript/Reference/Operators/Object_initializer#Computed_property_names
this.setState({
  [name]: value
});
equivalent to this ES5 code:
var partialState = {};
partialState[name] = value;
this.setState(partialState);

import时候 {}
const { BirdStore } = this.props;
==
const BirdStore = this.props.BirdStore;
# JSX
为什么用JSX?
React embraces the fact that rendering logic is inherently coupled with other UI logic: how events are handled, how the state changes over time, and how the data is prepared for display.
Prevents Injection Attacks
By default, React DOM escape any values embedded in JSX before rendering them. Thus it ensures that you can never inject anything that’s not explicitly written in your application. Everything is converted to a string before being rendered. This helps prevent XSS (cross-site-scripting) (opens new window) attacks.
const title = response.potentiallyMaliciousInput;
// This is safe:
const element = <h1>{title}</h1>;
Each JSX element is just syntactic sugar for calling
React.createElement(component, props, ...children). So, anything you can do with JSX can also be done with just plain JavaScript, If you’re curious to see more examples of how JSX is converted to JavaScript, you can try out the online Babel compiler (opens new window).Babel compiles JSX down to
React.createElement()calls.React DOM uses camelCase property naming convention instead of HTML attribute names. For example,
tabindexbecomestabIndexin JSX. The attributeclassis also written asclassNamesinceclassis a reserved word in JavaScript
in-depth tutorial on JSX (opens new window).
-------------------------------------------------------------
--- react使用首字母大小写的惯例区分本地组件和html标签
-------------------------------------------------------------
<Person/>(这是react组件)
<p>这是html标签</p>
-------------------------------------------------------------
--- jsx transform
-------------------------------------------------------------
React JSX从类似于xml的语法转换成javascript。xml的元素,属性和子节点转换成参数传入React.createElement方法
//使用JSX
React.render(
<label className="xxx" htmlFor="input">content</label>,
document.getElementById('example')
);
//不使用JSX
React.render(
React.createElement('label', {className: 'xxx', htmlFor: 'input'}, 'content'),
document.getElementById('example')
);
var Nav, Profile;
// 输入(JSX):
var app = <Nav color="blue"><Profile>click</Profile></Nav>;
// 转换后(JS):
var app = React.createElement(
Nav,
{color:"blue"},
React.createElement(Profile, null, "click")
);
-------------------------------------------------------------
--- JavaScript 表达式
-------------------------------------------------------------
使用JavaScript表达式为一个属性值,将表达式写在一对花括号({})中代替双引号(“”)。
// Input (JSX):
var person = <Person name={window.isLoggedIn ? window.name : ''} />;
// Output (JS):
var person = React.createElement(
Person,
{name: window.isLoggedIn ? window.name : ''}
);
-------------------------------------------------------------
--- 布尔型属性
-------------------------------------------------------------
// These two are equivalent in JSX for disabling a button
<input type="button" disabled />;
<input type="button" disabled={true} />;
// And these two are equivalent in JSX for not disabling a button
<input type="button" />;
<input type="button" disabled={false} />;
-------------------------------------------------------------
--- 子表达式
-------------------------------------------------------------
// Input (JSX):
var content = <Container>{window.isLoggedIn ? <Nav /> : <Login />}</Container>;
// Output (JS):
var content = React.createElement(
Container,
null,
window.isLoggedIn ? React.createElement(Nav) : React.createElement(Login)
);
-------------------------------------------------------------
--- 注释
-------------------------------------------------------------
在JSX添加注释是很容易的;他们只是JS表达式。当你在一个标签区域内,你只需要小心地把{ }放在注释的周围
var content = (
<Nav>
{/* 我是注释, 使用{} 包围着*/}
<Person
/* 我是
多行
注释*/
name={window.isLoggedIn ? window.name : ''} //结尾处注释
/>
</Nav>
);
-------------------------------------------------------------
--- JSX解构赋值
-------------------------------------------------------------
如果提前就知道了组件的属性的话,写起来很容易。例如component组件有两个动态的属性foo和bar
var component = <Component foo={x} bar={y} />;
而实际上,有些属性可能是后续添加的,我们没办法一开始就确定,我们可能会写出下面不好的代码:
var component = <Component />;
component.props.foo = x; // bad
component.props.bar = y; // also bad
这样写是错误的,因为我们手动直接添加的属性React后续没办法检查到属性类型错误,也就是说,当我们手动添加的属性发生类型错误时,在控制台是看不到错误信息的。
在React的设定中,初始化完props后,props是不可变的。改变props会引起无法想象的后果。
为了解决这个问题,React引入了解构属性,其实就是es6的语法实现具体看
https://es6.ruanyifeng.com/#docs/destructuring
var props = {};
props.foo = x;
props.bar = y;
var component = <Component {...props} />;
你可以使用结构赋值方式和普通的方式混合使用,但如果碰到同名的属性的时候后者覆盖前者的属性如下
var props = { foo: 'default' };
var component = <Component {...props} foo={'override'} />;
console.log(component.props.foo); // 'override'
-------------------------------------------------------------
--- JSX踩坑
-------------------------------------------------------------
1. HTML 实体需要采用
使用unicode编码;
String.fromCharCode(183);
使用属性:dangerouslySetInnerHTML如:<div dangerouslySetInnerHTML={{__html: 'First · Second'}} />
否则:
{/*
正常显示
First · Second
*/}
<div>First · Second</div>
{/*
显示异常
First · Second
*/}
<div>{'First · Second'}</div>
2.自定义HTML属性
如果在编写React过程中使用了自定义属性,React不会渲染的
React.createClass({
render: function(){
return (
<input type="text" placeholder="test" dd="test"/>
)
}
})
要想使用请在属性前面添加data-
3.style属性
在React中写行内样式时,需要写在双大括号中({{}}),不能采用引号的书写方式
style举例:
render () {
    const { appInfoStore } = this.props
    return (
      <Modal
        visible={appInfoStore.notificationBell.isShowDetailsModal}
        title="Notification List"
        cancelButtonText={CommonItem.getLocalLang('close')}
        onClose={this.onCancelClick}
        onCancelClick={this.onCancelClick}
        width={ 800 }>
        <div>
          <Table
            fixed="both"
            isModalTable={true}
            onGridItemClick={this.onGridItemClick}
            columns={toJS(appInfoStore.notificationTableColumns)}
            data={toJS(appInfoStore.notificationBell.data)}
            style={{ marginLeft: 18, marginBottom: 15 }}/>
        </div>
      </Modal>
    )
  }

## width={ 800 }
import React, { createRef, PureComponent } from 'react'
import { Scrollbars } from 'react-custom-scrollbars'

import './modal.less'
import { CloseOutlined, LoadingOutlined } from '@ant-design/icons'

class Panel extends PureComponent {
  static defaultProps = {
    visible: false,
    cancelLoadingVisible: false,
    confirmLoadingVisible: false,
    hideCloseButton: false,
    title: '',
    width: 'auto',
    cancelButtonText: 'Cancel',
    confirmButtonText: 'Confirm',
    footerButtons: null,
    onClose: () => {},
    onCancelClick: null,
    onConfirmClick: null
  }

  render () {
    debugger
    const {
      visible, title, width,
      cancelButtonText, confirmButtonText,
      onClose, onCancelClick, onConfirmClick, hideCloseButton,
      footerButtons, children, cancelLoadingVisible, confirmLoadingVisible
    } = this.props
    if (!visible) {
      return null
    }
    return (
      <div className="modal">
        <div
          style={{ width }}	等同于 style={{ width: width }} 同名可以被简写
          className="modal-inner">
		...............
        </div>
      </div>
    )
  }
}


## style={{ marginLeft: 18, marginBottom: 15 }}
class Table extends PureComponent {

  render () {
    const {
      height,
      columns,
      value,
      children,
      data,
      style,
      fixed,
      width,
      loadingVisible,
      loadingContent,
      verticalAlign,
      isModalTable,
      ...others
    } = this.props

    const { scrollLeft, scrollRight } = this.state
    const className = classnames(
      'so-table',
      'so-table-bordered',
      'so-table-fixed',
      scrollLeft > 0 && 'so-table-left-float',
      scrollRight < 0 && 'so-table-right-float',
      `so-table-vertical-${verticalAlign}`,
      this.props.className
    )

    const props = {
      ...others,
      children,
      fixed,
      loadingVisible,
      rowsInView: this.getRowsInView(),
      height,
      isModalTable,
      width,
      data,
      columns
    }
    const newStyle = Object.assign({}, style)
    debugger // newStyle: {marginLeft: 18, marginBottom: 15}
    return (
      <div
        className={className}
        ref={this.bindTable}
        style={newStyle}>
        <SeperateTable {...props} height={newStyle.height}/>
        <Loading content={loadingContent || 'Loading...'} visible={loadingVisible}/>
      </div>
    )
  }
}
# Code Bundling&Splitting
Effective Code Splitting in React: A Practical Guide: https://hackernoon.com/effective-code-splitting-in-react-a-practical-guide-2195359d5d49
Bundling
Most React apps will have their files “bundled” using tools like Webpack (opens new window), Rollup (opens new window) or Browserify (opens new window). Bundling is the process of following imported files and merging them into a single file: a “bundle”. This bundle can then be included on a webpage to load an entire app at once.
If you’re using Create React App (opens new window), Next.js (opens new window), Gatsby (opens new window), or a similar tool, you will have a Webpack setup out of the box to bundle your app.
If you aren’t, you’ll need to setup bundling yourself. For example, see the Installation (opens new window) and Getting Started (opens new window) guides on the Webpack docs.
// math.js
export function add(a, b) {
  return a + b;
}

// app.js
import { add } from './math.js';

console.log(add(16, 26)); // 42

//bundle result:
function add(a, b) {
  return a + b;
}
console.log(add(16, 26)); // 42
Splitting
Bundling is great, but as your app grows, your bundle will grow too. Especially if you are including large third-party libraries.
To avoid winding up with a large bundle, it’s good to get ahead of the problem and start “splitting” your bundle. Code-Splitting is a feature supported by bundlers like Webpack (opens new window), Rollup (opens new window) and Browserify (via factor-bundle (opens new window)) which can create multiple bundles that can be dynamically loaded at runtime.
Code-splitting your app can help you “lazy-load” just the things that are currently needed by the user, which can dramatically improve the performance of your app.
If you’re using Create React App, this is already configured for you and you can start using it (opens new window) immediately. It’s also supported out of the box in Next.js (opens new window).
If you’re setting up Webpack yourself, you’ll probably want to read Webpack’s guide on code splitting (opens new window). Your Webpack config should look vaguely like this (opens new window).
When using Babel (opens new window), you’ll need to make sure that Babel can parse the dynamic import syntax but is not transforming it. For that you will need babel-plugin-syntax-dynamic-import (opens new window).
import("./math").then(math => {
  console.log(math.add(16, 26));
});
Lazy Loadding
before:
import OtherComponent from './OtherComponent';

after:
const OtherComponent = React.lazy(() => import('./OtherComponent'));
This will automatically load the bundle containing the OtherComponent when this component is first rendered.

The lazy component should then be rendered inside a Suspense component, which allows us to show some fallback content (such as a loading indicator) while we’re waiting for the lazy component to load.

import React, { Suspense } from 'react';

const OtherComponent = React.lazy(() => import('./OtherComponent'));

function MyComponent() {
  return (
    <div>
      <Suspense fallback={<div>Loading...</div>}>
        <OtherComponent />
      </Suspense>
    </div>
  );
}

Deciding where in your app to introduce code splitting can be a bit tricky. You want to make sure you choose places that will split bundles evenly, but won’t disrupt the user experience.A good place to start is with routes.

import React, { Suspense, lazy } from 'react';
import { BrowserRouter as Router, Route, Switch } from 'react-router-dom';

const Home = lazy(() => import('./routes/Home'));
const About = lazy(() => import('./routes/About'));

const App = () => (
  <Router>
    <Suspense fallback={<div>Loading...</div>}>
      <Switch>
        <Route exact path="/" component={Home}/>
        <Route path="/about" component={About}/>
      </Switch>
    </Suspense>
  </Router>
);

React.lazy currently only supports default exports. If the module you want to import uses named exports, you can create an intermediate module that reexports it as the default. This ensures that tree shaking keeps working and that you don’t pull in unused components.

// ManyComponents.js
export const MyComponent = /* ... */;
export const MyUnusedComponent = /* ... */;
// MyComponent.js
export { MyComponent as default } from "./ManyComponents.js";
// MyApp.js
import React, { lazy } from 'react';
const MyComponent = lazy(() => import("./MyComponent.js"));
# TypeScript
从 React 迁移到 TypeScript:忍受了 15 年的 JavaScript 错误从此走远
https://mp.weixin.qq.com/s/EvOkI-g3VCzzzuh0Cc4AkA
# 4.2 开发
# 4.2.1 toolchain
根据具体需求(放在服务端的静态页面或者动态渲染页面)有以下几种toolchain可以利用:
- If you’re learning React or creating a new single-page app, use Create React App.
- If you’re building a server-rendered website with Node.js, try Next.js (opens new window).
- If you’re building a static content-oriented website, try Gatsby (opens new window)
- If you’re building a component library or integrating with an existing codebase, try More Flexible Toolchains:
- Neutrino combines the power of webpack with the simplicity of presets, and includes a preset for React apps and React components.
- Parcel is a fast, zero configuration web application bundler that works with React.
- Razzle is a server-rendering framework that doesn’t require any configuration, but offers more flexibility than Next.js.
- 自定义toolchain Creating a Toolchain from Scratch, A JavaScript build toolchain typically consists of:
- A package manager, such as Yarn or npm. It lets you take advantage of a vast ecosystem of third-party packages, and easily install or update them.
- A bundler, such as webpack or Parcel. It lets you write modular code and bundle it together into small packages to optimize load time.
- A compiler such as Babel. It lets you write modern JavaScript code that still works in older browsers.
- 参考 https://blog.usejournal.com/creating-a-react-app-from-scratch-f3c693b84658
# 4.2.2 create-react-app(highly recommend)
下面我们就采用第一种方式创建一个single-page app
参考 https://code.visualstudio.com/docs/nodejs/reactjs-tutorial
使用reactjs生成器create-react-app generator有两种方法:
其一:直接用npx生成项目 npx create-react-app hello-react
其二:安装到node module path
npm install -g create-react-app
然后可以生成项目
create-react-app hello-react

结果(package.json中的script定义):
Success! Created hello-react at C:\Workspace\Repository\TestReact\hello-react
Inside that directory, you can run several commands:

  npm start
    Starts the development server.

  npm run build
    Bundles the app into static files for production.

  npm test
    Starts the test runner.

  npm run eject
    Removes this tool and copies build dependencies, configuration files
    and scripts into the app directory. If you do this, you can’t go back!

We suggest that you begin by typing:

  cd hello-react
  npm start

Happy hacking!
cd my-app
code .
debug react
new react dev tool https://react-devtools-tutorial.now.sh/
go to vscode extension: install "debugger for chrome" & https://www.npmjs.com/package/@welldone-software/why-did-you-render
then go to run&debug: click "create a launch.json file", select environment "chrome",默认端口3000:
	{
    "version": "0.2.0",
    "configurations": [
        {
            "type": "chrome",
            "request": "launch",
            "name": "Launch Chrome against localhost",
            "url": "http://localhost:3000",
            "webRoot": "${workspaceFolder}"
        }
    ]
}
make sure "npm start" first, then F5 or click the debug button
Chrome React Devtools extension
Linting
frist install eslint module:
npm install -g eslint
then in vscode extension install "eslint"
ctrl+shift+P : create eslint config:
结果:
PS C:\Workspace\Repository\TestReact\hello-react> node_modules\.bin\eslint.cmd --init
? How would you like to use ESLint? To check syntax and find problems
? What type of modules does your project use? JavaScript modules (import/export)
? Which framework does your project use? React
? Does your project use TypeScript? No
? Where does your code run? Browser
? What format do you want your config file to be in? JSON
打包部署
npm run build
结果:
The build folder is ready to be deployed.
You may serve it with a static server:

  npm install -g serve
  serve -s build

Find out more about deployment here:

  bit.ly/CRA-deploy
more: dependencies/import/router/typescript: https://create-react-app.dev/docs
React.js and Spring Data REST https://spring.io/guides/tutorials/react-and-spring-data-rest/
自定义环境变量
There is also a built-in environment variable called NODE_ENV. You can read it from process.env.NODE_ENV. When you run npm start, it is always equal to 'development', when you run npm test it is always equal to 'test', and when you run npm run build to make a production bundle, it is always equal to 'production'. You cannot override NODE_ENV manually. This prevents developers from accidentally deploying a slow development build to production.
https://create-react-app.dev/docs/adding-custom-environment-variables/
Windows (cmd.exe)#
set "REACT_APP_NODE_ENV=uat" && npm run start
Linux, macOS (Bash)#
export REACT_APP_NODE_ENV=uat && npm run start
package.json:
"scripts": {
"start": "node scripts/start.js",
"build": "node scripts/build.js",
"test": "node scripts/test.js",
"startDevOnWinCmd": "set \"REACT_APP_NODE_ENV=dev\" && node scripts/start.js",
"startDevOnLinux": "export REACT_APP_NODE_ENV=dev && node scripts/start.js",
"buildQaOnWinCmd": "set \"REACT_APP_NODE_ENV=qa\" && node scripts/build.js",
"buildQaOnLinux": "export REACT_APP_NODE_ENV=qa && node scripts/build.js",
usage:
```
npm run start #default for dev/development start
npm run build #default for prod/produciton build
npm run startDevOnWinCmd #example for dev start
npm run buildQaOnWinCmd #example for qa build
```
# 4.2.3 webpack
https://webpack.js.org/concepts/
Tutorial: How to set up React, webpack, and Babel from scratch (2020) (opens new window)
step 1: setting up the project
mkdir webpack-react-tutorial && cd $_
mkdir -p src
npm init -y
step 2: setting up webpack
webpack will ingest raw React components for producing JavaScript code that (almost) every browser can understand.
npm i webpack webpack-cli --save-dev
package.json
  "name": "webpack-react-tutorial",
  "version": "1.0.0",
  "description": "",
  "main": "index.js",

"scripts": {
  "build": "webpack --mode production"
}
At this point there is no need to define a configuration file for webpack. Older webpack versions would automatically look for a configuration file. Since version 4 that is no longer the case.
step 3: setting up Babel for transpiling our code
npm i @babel/core babel-loader @babel/preset-env @babel/preset-react --save-dev
.babelrc
{
  "presets": ["@babel/preset-env", "@babel/preset-react"]
}
webpack.config.js
module.exports = {
  module: {
    rules: [
      {
        test: /\.(js|jsx)$/,
        exclude: /node_modules/,
        use: {
          loader: "babel-loader"
        }
      }
    ]
  }
};
The configuration is quite minimal. For every file with a js or jsx extension Webpack pipes the code through babel-loader. With this in place we're ready to write a React.
step 4: writing React components
pull in react
npm i react react-dom
mkdir -p src/js/components/
src/js/components/Form.js:
import React, { Component } from "react";
import ReactDOM from "react-dom";

class Form extends Component {
  constructor() {
    super();

    this.state = {
      value: ""
    };

    this.handleChange = this.handleChange.bind(this);
  }

  handleChange(event) {
    const { value } = event.target;
    this.setState(() => {
      return {
        value
      };
    });
  }

  render() {
    return (
      <form>
        <input
          type="text"
          value={this.state.value}
          onChange={this.handleChange}
        />
      </form>
    );
  }
}

export default Form;

const wrapper = document.getElementById("container");
wrapper ? ReactDOM.render(<Form />, wrapper) : false;
src/index.js:
import Form from "./js/components/Form";
npm run build
step 5:the HTML webpack plugin
To display our React form we must tell webpack to produce an HTML page. The resulting bundle will be placed inside a <script> tag.
webpack needs two additional components for processing HTML: html-webpack-plugin and html-loader
npm i html-webpack-plugin html-loader --save-dev
Then update webpack.config.js:
const HtmlWebPackPlugin = require("html-webpack-plugin");

module.exports = {
  module: {
    rules: [
      {
        test: /\.(js|jsx)$/,
        exclude: /node_modules/,
        use: {
          loader: "babel-loader"
        }
      },
      {
        test: /\.html$/,
        use: [
          {
            loader: "html-loader"
          }
        ]
      }
    ]
  },
  plugins: [
    new HtmlWebPackPlugin({
      template: "./src/index.html",
      filename: "./index.html"
    })
  ]
};
src/index.html:
<!DOCTYPE html>
<html lang="en">
<head>
    <meta charset="utf-8">
    <title>How to set up React, Webpack, and Babel</title>
</head>
<body>
<div id="container"></div>
</body>
</html>
npm run build
result published to ./dist
step 6: Configuring the webpack dev server
You don't want to type npm run build every time you change a file. Once configured webpack will launch your application inside a browser. Also, every time you save a file after a modification webpack dev server will refresh the browser's window.
npm i webpack-dev-server --save-dev
package.json
"start": "webpack-dev-server --open --mode development",
# 4.2.4 mobx
concepts
https://mobx.js.org/README.html https://cn.mobx.js.org/ https://mobx.js.org/getting-started.html
Use the @observable decorator or observable(object or array) functions to make objects trackable for MobX.
The @computed decorator can be used to create functions that can automatically derive their value from the state.
Use autorun to automatically run functions that depend on some observable state. This is useful for logging, making network requests, etc.
reactions will not fire initially, only on change
transactions
actions
strict mode: only allow data modified in actions
"never" (default): State can be modified from anywhere
"observed": All state that is observed somewhere needs to be changed through actions. This is the recommended strictness mode in non-trivial applications.
"always": State always needs be updated (which in practice also includes creation) in actions.
import { configure } from "mobx"
// don't allow state modifications outside actions
configure({ enforceActions: "always" })
actions VS flow(function * (fn)
通过我发现的一个“bug”来理解下单线程非阻塞的JS模型在mobx flow中的运用,flow会根据异步请求将代码段切分成多块,每块都是一个action,也就是每块如果有状态变化都会触发render:
https://github.com/mobxjs/mobx/issues/2715
https://mobx.js.org/actions.html#using-flow-instead-of-async--await-
class testStore {
  @observable tableData = []
  @observable requestComplete = false
  @action //这里的action是没用的,因为下面用了flow!You don't need action when using flow... the point of flow is to automatically insert actions in between time-separated blocks of code - that is - in between individual awaits - which are replaced by yields (which allows us to insert these actions).
  retrieveTableData = (flow(function * () {
    try {
      console.log('Mark 1')
      this.requestComplete = false
      console.log('Mark 2')
      const tempTableData = yield axios.post('someEndpoints','someParam') //以此分割成两块action,代码运行到此处,因为这里是等待异步请求,而js是非阻塞的单线程,所以就会跑去做其他事情,即如果之前观测数据requestComplete是true,这里改成了false,此时js就刚好腾出手来去触发render!
      console.log('Mark 3')
      if (Array.isArray(tempTableData)) {
        this.tableData = doSthTo(tempTableData)
        console.log('Mark 4')
      }
      this.requestComplete = true
      console.log('Mark 5')
    } catch (error) {
	  console.log('Mark -1')
      this.requestComplete = true
    }
  }))
}

@inject('testStore')
@observer
class testTable extends Component {
    componentDidMount () {
    const { testStore } = this.props
    testStore.retrieveTableData()
  }
  render () {
    console.log('Mark render...')
    return <Sth>
  }
#关于runInAction,在strict模式下,所有的setState操作都必须在action方法中,比如:
loadWeather = city => {
fetch(
https://abnormal-weather-api.herokuapp.com/cities/search?city=${city}
)
.then(response => response.json())
.then(data => {
this.setWeatherData(data); // <==== here
});
};
@action
setWeatherData = data => {
  this.weatherData = data;
};

可以看到这种写法为了设置weatherData还需要写一个action方法,可以通过runInAction简写成
loadWeatherRunInThen = city => {
  fetch(`https://abnormal-weather-api.herokuapp.com/cities/search?city=${city}`)
    .then(response => response.json())
    .then(data => {
      runInAction(() => {
        this.weatherData = data;         // <====== We dont have to define an action
      });
    });
};
```
@action @action.bound https://stackoverflow.com/questions/48639891/difference-between-mobxs-action-bound-and-arrow-functions-on-class-functions
- Use the @observer decorator from the mobx-react package to make your React components truly reactive. They will update automatically and efficiently. Even when used in large complex applications with large amounts of data.
mobx vs redux: https://blog.logrocket.com/redux-vs-mobx/ https://redux.js.org/introduction/getting-started
这个视频深入讲解了mobx的特性,如何转换现有js为mobx版本,并且对比react和加了mobx后的性能,调试技巧: https://www.youtube.com/watch?v=XGwuM_u7UeQ
mobx-ract Provider Injection基本原理:hooks https://reactjs.org/docs/hooks-overview.html
Mobx React autorun called more times on every change
https://stackoverflow.com/questions/72755792/mobx-react-autorun-called-more-times-on-every-change
Why when watching an array the autorun will run two times? https://github.com/mobxjs/mobx/discussions/3169
create-react-app + mobx
Introduction to MobX and React (opens new window)
npx create-react-app hello-mobx

//This moves files around and makes your app’s configuration accessible.
npm run eject
eject result:
? Are you sure you want to eject? This action is permanent. Yes
Ejecting...

Copying files into C:\Workspace\Repository\learn_coding\frontend\hello-mobx
  Adding \config\env.js to the project
  Adding \config\getHttpsConfig.js to the project
  Adding \config\modules.js to the project
  Adding \config\paths.js to the project
  Adding \config\pnpTs.js to the project
  Adding \config\webpack.config.js to the project
  Adding \config\webpackDevServer.config.js to the project
  Adding \config\jest\cssTransform.js to the project
  Adding \config\jest\fileTransform.js to the project
  Adding \scripts\build.js to the project
  Adding \scripts\start.js to the project
  Adding \scripts\test.js to the project

Updating the dependencies
  Removing react-scripts from dependencies
  Adding @babel/core to dependencies
  Adding @svgr/webpack to dependencies
  Adding @typescript-eslint/eslint-plugin to dependencies
  Adding @typescript-eslint/parser to dependencies
  Adding babel-eslint to dependencies
  Adding babel-jest to dependencies
  Adding babel-loader to dependencies
  Adding babel-plugin-named-asset-import to dependencies
  Adding babel-preset-react-app to dependencies
  Adding camelcase to dependencies
  Adding case-sensitive-paths-webpack-plugin to dependencies
  Adding css-loader to dependencies
  Adding dotenv to dependencies
  Adding dotenv-expand to dependencies
  Adding eslint to dependencies
  Adding eslint-config-react-app to dependencies
  Adding eslint-loader to dependencies
  Adding eslint-plugin-flowtype to dependencies
  Adding eslint-plugin-import to dependencies
  Adding eslint-plugin-jsx-a11y to dependencies
  Adding eslint-plugin-react to dependencies
  Adding eslint-plugin-react-hooks to dependencies
  Adding file-loader to dependencies
  Adding fs-extra to dependencies
  Adding html-webpack-plugin to dependencies
  Adding identity-obj-proxy to dependencies
  Adding jest to dependencies
  Adding jest-environment-jsdom-fourteen to dependencies
  Adding jest-resolve to dependencies
  Adding jest-watch-typeahead to dependencies
  Adding mini-css-extract-plugin to dependencies
  Adding optimize-css-assets-webpack-plugin to dependencies
  Adding pnp-webpack-plugin to dependencies
  Adding postcss-flexbugs-fixes to dependencies
  Adding postcss-loader to dependencies
  Adding postcss-normalize to dependencies
  Adding postcss-preset-env to dependencies
  Adding postcss-safe-parser to dependencies
  Adding react-app-polyfill to dependencies
  Adding react-dev-utils to dependencies
  Adding resolve to dependencies
  Adding resolve-url-loader to dependencies
  Adding sass-loader to dependencies
  Adding semver to dependencies
  Adding style-loader to dependencies
  Adding terser-webpack-plugin to dependencies
  Adding ts-pnp to dependencies
  Adding url-loader to dependencies
  Adding webpack to dependencies
  Adding webpack-dev-server to dependencies
  Adding webpack-manifest-plugin to dependencies
  Adding workbox-webpack-plugin to dependencies

Updating the scripts
  Replacing "react-scripts start" with "node scripts/start.js"
  Replacing "react-scripts build" with "node scripts/build.js"
  Replacing "react-scripts test" with "node scripts/test.js"

Configuring package.json
  Adding Jest configuration
  Adding Babel preset

Running npm install...
audited 931631 packages in 24.439s

59 packages are looking for funding
  run `npm fund` for details

found 1 low severity vulnerability
  run `npm audit fix` to fix them, or `npm audit` for details
Ejected successfully!
npm install mobx --save
npm install mobx-react --save
由于create-react-app默认是不支持mobx的decorator的,为了enable decorator,需要这么做: https://mobx.js.org/best/decorators.html
Method 1 Babel 6: using babel-preset-mobx
npm install --save-dev babel-preset-mobx package.json OR .babelrc:
{
    "presets": ["mobx"]
}
实际上我在Babel 7也测试成功,
Method 2 Babel 6: manually enabling decorators
npm i --save-dev babel-plugin-transform-decorators-legacy
{
    "presets": ["es2015", "stage-1"],
    "plugins": ["transform-decorators-legacy"]
}
未测试
Method 3 Babel 7
npm install --save-dev @babel/plugin-proposal-decorators
npm install --save-dev @babel/plugin-proposal-class-properties
package.json:
"babel": {
  "plugins":[
    [
      "@babel/plugin-proposal-decorators",
      {
        "legacy":true
      }
    ],
    [
      "@babel/plugin-proposal-class-properties",
      {
        "loose":true
      }
    ]
  ],
  "presets":[
    "react-app"
  ]
}
# Storybook
导读:https://www.youtube.com/watch?v=va-JzrmaiUM
创建demo项目:
npx create-react-app hello-storybook
npx storybook
运行和发布:
npm run storybook
npm run builds
# Troubleshooting
?# uncaught TypeError: Cannot read property 'setState' of undefined https://stackoverflow.com/questions/32317154/react-uncaught-typeerror-cannot-read-property-setstate-of-undefined
?# resolve version by npm-force-resolutions e.g. Can't resolve './locale' in 'node_modules\moment\src\lib\locale'
npm install --save-dev npm-force-resolutions
package.json:
	"resolutions": {
	"moment": "2.24.0"
	}
	"scripts":{
	"preinstall": "npx npm-force-resolutions"
	....
	}
npm install
mobx debug tools: google extension "MobX Developer Tools"
?# Attempted import error: '' is not exported from
since it's a default export, and not a named export.
import { combineReducers } from '../../store/reducers';
should be
import combineReducers from '../../store/reducers';
https://stackoverflow.com/questions/53328408/receiving-attempted-import-error-in-react-app
?# 非单例模式(不同实例)引起的一次问题排查
------------------------------------------
folderA/TableA:
------------------------------------------
import ViewDetail from '../folderB/ViewDetail'

@inject('aStore')
@observer
class TableA extends Component {
onXXClick = (controlData) => {
    const { aStore } = this.props
	aStore.bAnotherStore.displayDetailsModal(controlData)
}
render () {
    const { aStore } = this.props
    return [
		<ViewDetail key="details"/>,
		xxxx
   ]
  }
}
------------------------------------------
folderA/AStore:
------------------------------------------
import { BAnotherStore } from '../folderB/BAnotherStore'
class AStore {
  bAnotherStore = new BAnotherStore()
}
export default new AStore()

------------------------------------------
folderB/TableB:
------------------------------------------
import ViewDetail from './ViewDetail'
@inject('bStore')
@observer
class TableB extends React.Component {
render () {
    const { bStore } = this.props
    return [
		<ViewDetail key="details"/>,
		xxxx
   ]
  }
}
export default TableB

------------------------------------------
folderB/bStore:
------------------------------------------
import { BAnotherStore } from './bAnotherStore'
class BStore {
	bAnotherStore
	constructor () {
    	this.bAnotherStore = new BAnotherStore()
    }
}
export default new BStore()

------------------------------------------
folderB/bAnotherStore:
------------------------------------------
export class BAnotherStore {
	@observable isVisible = false
	@observable detailsData = {}
	@action.bound
	displayDetailsModal (controlData) {
    	this.isVisible = !this.isVisible
    	if (this.isVisible) {
      		this.detailsData = JSON.parse(controlData.content)
    }
  }
}
------------------------------------------
folderB/ViewDetail:
------------------------------------------
@inject('bStore')
@observer
class ViewDetail extends Component {
render () {
      const { bStore } = this.props
      if (!bStore.bAnotherStore.isVisible) {
        return null
      }
      const entity = bStore.bAnotherStore.detailsData
      return (
        <Modal
          visible={true}
          <DetailPart title={'Basic Information'} partArray={[
            { title: 'Name', value: entity.name },
            { title: 'Status', value: entity.status }
          ]}/>
        </Modal>
      )
    }
}

export default Form.create({ name: 'details' })(ViewDetail)


index.js:
import aStore from '../folderA/aStore'
import bStore from '../folderB/bStore'
ReactDOM.render(
  <Provider
  	aStore={aStore}
    bStore={bStore}
        <App/>
  </Provider>,
  document.getElementById('root')
)

App.jsx:
import TableA from '../folderA/TableA'
import TableB from '../folderB/TableB'
class App extends Component {
    render () {
    	<TableA/>
		<TableB/>
    }
}


问题就是:
TableA引用的页面是folderB/ViewDetail,folderB/ViewDetail所inject的bStore实例是index.js传入的bStore,index.js的bStore是通过import folderB/bStore而来的一个单例,
但是 TableA 调用的aStore.bAnotherStore并不是前面的实例bStore的成员变量,而是自己在构造aStore的时候自己new的!
所以换言之,ViewDetail页面渲染用的实例 和 TableA更改状态的实例是两回事!
更改方法很简单:
folderA/AStore:
import { BAnotherStore } from '../folderB/BAnotherStore' //注意这里加大括号是因为BAnotherStore是name export的class
class AStore {
  bAnotherStore = new BAnotherStore()
}
=>
import bStore from '../folderB/bStore' //注意这里不能加大括号,因为是Default export的实例
class AStore {
  bStore = bStore
}
以及:
folderA/TableA:
onXXClick = (controlData) => {
    const { aStore } = this.props
	aStore.bAnotherStore.displayDetailsModal(controlData)
}
=>
onXXClick = (controlData) => {
    const { aStore } = this.props
	aStore.bStore.bAnotherStore.displayDetailsModal(controlData)
}
reactjs learn roadmap: https://www.freecodecamp.org/news/learning-react-roadmap-from-scratch-to-advanced-bff7735531b6/
react-indepth: https://legacy.gitbook.com/book/developmentarc/react-indepth/details