# Overview
# 代理设计模式
┌─────────────────────────────────────────────────────────────┐
│                    代理设计模式 (Proxy Pattern)               │
│              —— 为其他对象提供一种代理以控制访问               │
└───────────┬─────────────────────────────────┬───────────────┘
            │                                 │
    ┌───────▼────────┐               ┌────────▼────────┐
    │   静态代理       │               │   动态代理        │
    │ (编译期确定)     │               │ (运行期生成)      │
    └────────────────┘               ├─────────────────┤
                                    │ • JDK动态代理    │──→ 基于接口
                                    │ • CGLIB动态代理  │──→ 基于继承(增强类)
                                    └─────────────────┘
                                             │
                    ┌────────────────────────┼────────────────────────┐
                    │                        │                        │
            ┌───────▼───────┐      ┌────────▼────────┐     ┌────────▼────────┐
            │  Spring AOP    │      │  MyBatis Mapper │     │  远程调用(RPC)   │
            │ @Transactional│      │ Mapper接口代理   │     │ Feign/Dubbo     │
            │ @Async @Cache  │      │ SQL自动映射      │     │ 像本地方法调用   │
            └───────────────┘      └─────────────────┘     └─────────────────┘
代理模式 → 远程调用看起来像本地调用,是代理模式的另一个经典应用方向(不是AOP,但思想同源):
// 你写的代码 - 看起来就是本地调用
@Autowired
private OrderService orderService;  // 实际可能是 Feign 代理 / Dubbo 代理

orderService.createOrder(request);  // 实际走了网络请求
对开发者来说,就像调用本地方法一样。这和AOP的区别在于:
AOP:代理的目的是增强方法(加日志、事务、鉴权等)
RPC代理:代理的目的是屏蔽通信细节(网络、序列化)
MyBatis 的 Mapper 代理
// 你只定义了接口,没有实现类
public interface UserMapper {
    @Select("SELECT * FROM user WHERE id = #{id}")
    User selectById(Long id);
}

// 使用时
User user = userMapper.selectById(1L);  // 谁执行的SQL?
MyBatis 在启动时通过 JDK动态代理 为 UserMapper接口生成了代理实现类:
MapperProxy implements InvocationHandler {
    invoke() {
        // 解析注解/XML中的SQL
        // 执行JDBC操作
        // 映射结果集
    }
}
这也是代理模式,但和 Spring AOP 的关系是:MyBatis 自己管自己的代理,Spring 只是把它创建的代理对象纳入IOC容器管理。
Spring AOP 选择动态代理,因为AOP需要在不修改源码的情况下,对任意Bean的方法进行增强。如果用手写静态代理,那每个Service都要写一个代理类,完全不可维护。
Spring AOP 底层有两种动态代理方式:
JDK动态代理:
条件:目标类实现了接口
原理:java.lang.reflect.Proxy在运行时生成一个实现相同接口的代理类
限制:只能代理接口中定义的方法
CGLIB动态代理:
条件:目标类没有实现接口(或配置强制使用CGLIB)
原理:通过ASM字节码框架,继承目标类生成子类,重写父类方法来实现增强
产物:你看到的 xxx$$EnhancerBySpringCGLIB$$xxx就是这个子类
// Spring 选择代理策略的逻辑(简化版)
if (目标类实现了接口) {
    使用 JDK 动态代理;
} else {
    使用 CGLIB;
}
fastclassbyspringcglib是 CGLIB 的一个性能优化机制:
普通反射调用:Method.invoke()→ JVM需要检查方法权限、参数校验等,较慢
FastClass机制:CGLIB 会为代理类和目标类各生成一个 FastClass,里面用一个 switch或数组索引直接调用方法,绕过反射,速度接近直接调用 生成的类名类似: UserService$$EnhancerBySpringCGLIB$$a3b4c5d6 // 代理类 UserService$$FastClassBySpringCGLIB$$e7f8g9h0 // 代理类的FastClass UserService$$FastClassBySpringCGLIB$$i1j2k3l4 // 目标类的FastClass
保存生成的动态代理类或者增强类:
@EnableAsync
@SpringBootApplication
public class Application {
    public static void main(String[] args) {
    	System.setProperty(DebuggingClassWriter.DEBUG_LOCATION_PROPERTY,"C:\\Workspace\\debug"); //这行代码的作用是:让 CGLIB 把运行时生成的字节码 .class文件保存到磁盘,方便你反编译查看。配合 @EnableAsync很有意义:@EnableAsync会让 Spring 为标注了 @Async方法的 Bean 创建AOP代理,没有这个代理,@Async方法就是普通同步方法,保存下来的 class 文件里,你能看到代理类是如何在方法调用前后织入异步逻辑的
        SpringApplication.run(Application.class, args);
    }
你可以试着反编译看看那个 $$EnhancerBySpringCGLIB$$类,会发现它的方法体大致是:
// 伪代码:CGLIB代理方法的真实逻辑
public Object methodName(args) {
    if (methodInterceptors匹配) {
        return adviceChain.proceed();  // 走AOP拦截器链
    } else {
        return super.methodName(args); // 直接调用父类(目标类)方法
    }
}
# AOP概念点
AOP是aspect oriented programing的简称,意为面向切面编程,对OOP的补充。
AOP is used along with spring Ioc to provide a very capable middleware solution.
Note: Cross cutting concerns are one of the concerns in any application such as logging, security, caching, etc. They are present in one part of the program but they may affect other parts of the program too.
通知(Advice)包含了需要用于多个应用对象的横切行为,完全听不懂,没关系,通俗一点说就是定义了“什么时候”和“做什么”。It’s the behavior that addresses system-wide concerns (logging, security checks, etc…). This behavior is represented by a method to be executed at a JoinPoint. This behavior can be executed Before, After, or Around the JoinPoint according to the Advice type as we will see later.
interceptor == Advice
连接点(Join Point)是程序执行过程中能够应用通知的所有点。a JoinPoint is a point in the execution flow of a method where an Aspect (new behavior) can be plugged in.
切点(Poincut)是定义了在“什么地方”进行切入,哪些连接点会得到通知。显然,切点一定是连接点。A Pointcut is an expression that defines at what JoinPoints a given Advice should be applied.
切面(Aspect)是通知和切点的结合。通知和切点共同定义了切面的全部内容——是什么,何时,何地完成功能。Aspect is a class in which we define Pointcuts and Advices.
引入(Introduction)允许我们向现有的类中添加新方法或者属性。
织入(Weaving)是把切面应用到目标对象并创建新的代理对象的过程,分为编译期织入、类加载期织入和运行期织入。
# java aop(aspectj) VS spring aop
Comparing Spring AOP and AspectJ (opens new window) Spring JDK Proxies vs CGLIB vs AspectJ (opens new window)
# spring web mvc http拦截
MVC Interceptor is a MVC only concept. They are more or less like Servlet Filters. They can intercept requests to the controller only. AOP can be used to intercept calls to any public method in any Spring loaded bean.
rpc系列5-添加拦截器链,实现rpc层面的AOP (opens new window) 在spring web mvc中实现拦截功能时,有三种方式
使用功能servlet filter
使用springmvc 提供的 HandlerInterceptor
使用spring core 提供的 MethodInterceptor(spring aop)
# servlet的过滤器Filter
我们自己写的Filter类,Filter是Servlet规范的一部分,是Servlet容器(如Tomcat)实现的。
在spring boot下注册一个filter的三种方式(servlet、listener也是如此)
方式1:可以使用@WebFilter+@ServletComponentScan的方式
方式2:可以使用FilterRegistrationBean 进行API级别的注册,注意,在这种情况下可以对Filter order进行设置,而使用spring @Order注解是无效的
@Bean
public ServletRegistrationBean asyncServletServletRegistrationBean(){
    ServletRegistrationBean registrationBean =  new ServletRegistrationBean(new AsyncServlet(),"/");
    registrationBean.setName("MyAsyncServlet");
    registrationBean.setOrder(Ordered.HIGHEST_PRECEDENCE);
    return registrationBean;
}
方式3:创建一个类去实现 ServletContextInitializer 接口,并把它注册为一个 Bean,Spring Boot 会负责调用这个接口的 onStartup 方法。
@Bean
public ServletContextInitializer servletContextInitializer() {
    return servletContext -> {
        CharacterEncodingFilter filter = new CharacterEncodingFilter();
        FilterRegistration.Dynamic registration = servletContext.addFilter("filter", filter);
        registration.addMappingForUrlPatterns(EnumSet.of(DispatcherType.REQUEST), false, "/");
    };
}
FilterRegistrationBean其实也是通过 ServletContextInitializer 来实现的,它实现了 ServletContextInitializer 接口
特点: 可以拿到原始的http请求和响应的信息,但是拿不到真正处理这个请求的方法的信息
存在的问题: 通过Filter只能拿到http的请求和响应,只能从请求和响应中获得一些参数。当前发过来的这个请求实际上真正是由哪个控制器的哪个方法来处理的,在Filter里面是不知道的,因为javax.servlet.Filter是J2EE规范中定义的,J2EE规范里面实际上并不知道与spring相关的任何内容。而我们的controller实际上是spring mvc定义的一套机制。如果你需要这些信息,那么就需要使用拦截器Interceptor
# springmvc的拦截器Interceptor
在我们真正访问的Controller的某个方法被调用之前,会调用preHandler方法,在Controller的方法调用之后,会调用postHandler方法,如果你的controller中的方法抛出了异常,那么postHandler这个方法不会被调用。但无论controller中的方法是否抛出异常,afterCompletion方法都是会被调用的。
public class TimeInterceptor implements HandlerInterceptor {}

@Override
public boolean preHandle(HttpServletRequest request, HttpServletResponse response, Object handler){}

最后一个参数,Object handler,这个是我真正用来处理这个请求的Controller的方法声明

public void postHandle(HttpServletRequest request, HttpServletResponse response, Object handler, ModelAndView modelAndView) throws Exception {}
# AspectJ
跟 spring aop的区别是: 1.apsectj支持自我调用的时候也能触发AOP 代码 2. spring aop是run time weaving,而aspectj: Build-time weaving weaves classes and aspects together during the build process before deploying the application. Load-time weaving (LTW) weaves just in time as the classes are loaded by the VM, obviating any pre-deployment weaving.
# 原理
Different Types of AspectJ Weaving (opens new window)
# Compile-time Weaving
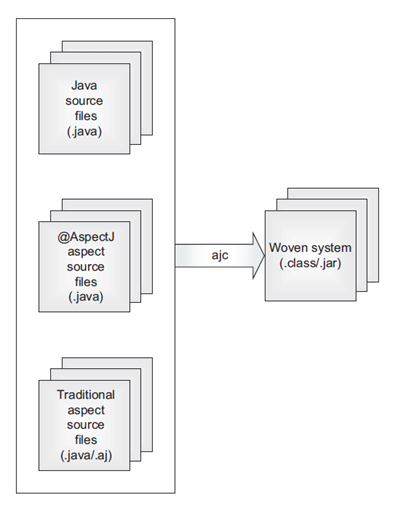 The weaving process in compile-time weaving happens (obviously) at compile time. As you can see from the diagram above, the left-hand side describes our source codes which are java files, java classes with @Aspect annotation, and the last one are traditional aspect classes. They are then compiled by ajc (AspectJ Compiler) to be woven into a compiled class called woven system. To give more perspective on this, take a look at several code snippets below.
Target class to be woven:
@Component
public class Target {
  public void greet(String name) {
    System.out.println("[Actual] Hi " + name + " from target!");
  }
}

Before Advice:
@Aspect
@Component
public class GdnBeforeAspect {
  @Before("execution(* greet(..))")
  public void beforeGreet(final JoinPoint joinPoint) {
    doBefore(joinPoint);
  }
  private void doBefore(final JoinPoint joinPoint) {
    System.out.println("[ASPECTJ BEFORE]");
    System.out.println("Target class' name: " + joinPoint.getTarget().getClass());
    System.out.println("Target method's name: " + joinPoint.getSignature().getName());
    System.out.println("Target method's arguments: " + Arrays.toString(joinPoint.getArgs()));
    System.out.println("[ASPECTJ BEFORE]");
  }
}
Those 2 code snippets are just regular steps to do if we want to do AOP. The 2 snippets above mean that we want to advise the greet() method (which resides inside Target class) with before advice. Nothing fancy happens in the aspect, it’ll just print some information about the method invocation.

Now, this is where something is getting interesting. Let’s define a plugin inside our pom.xml.
AspectJ Maven Plugin:
<plugin>
                <groupId>org.codehaus.mojo</groupId>
                <artifactId>aspectj-maven-plugin</artifactId>
                <version>1.11</version>
                <configuration>
                    <complianceLevel>1.8</complianceLevel>
                    <source>1.8</source>
                    <target>1.8</target>
                    <showWeaveInfo>true</showWeaveInfo>
                    <verbose>true</verbose>
                    <Xlint>ignore</Xlint>
                    <encoding>UTF-8 </encoding>
                </configuration>
                <executions>
                    <execution>
                        <goals>
                            <!-- use this goal to weave all your main classes -->
                            <goal>compile</goal>
                        </goals>
                    </execution>
                </executions>
            </plugin>
The AspectJ Maven plugin stated above will weave the aspects when we execute mvn clean compile. Now, let’s try to do just that and see what happens.
If you see inside the target directory (which consists of every compiled class) and open Target.class, you’ll see this.

Target class woven using CTW (Compile-time Weaving):
@Component
public class Target {
  public Target() {
  }
  public void greet(String name) {
    JoinPoint var2 = Factory.makeJP(ajc$tjp_0, this, this, name);
    GdnBeforeAspect.aspectOf().beforeGreet(var2);
    System.out.println("[Actual] Hi " + name + " from target!");
  }
  static {
    ajc$preClinit();
  }
}
You see that on lines 7–8, the compiler inserts additional functionality which calls the aspect we defined before. This way, the before advice will be executed before the actual process done by the target. Now you know how CTW works internally.
# Post-compile (binary) weaving
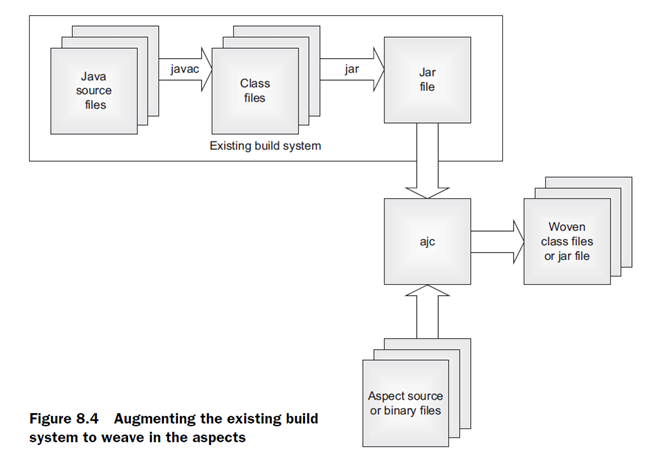
Basically, binary weaving is similar to CTW (Compile-time Weaving), the weaving process is also done on compile-time. The difference is that with Binary Weaving, we’re able to weave aspects into 3rd party library’s source code. Let’s take a look at the code snippets below.
Add the new library as dependency to our main project’s pom.xml:
<dependency>
            <groupId>com.axell</groupId>
            <artifactId>aspectj-aop-lib</artifactId>
            <version>0.0.1-SNAPSHOT</version>
        </dependency>
Advising greetFromLib() method which exists inside our 3rd party library added previously:

@Aspect
@Component
public class GdnBeforeAspect {
  @Before("execution(* greetFromLib(..))")
  public void beforeGreetLib(final JoinPoint joinPoint) {
    doBefore(joinPoint);
  }

  private void doBefore(final JoinPoint joinPoint) {
    System.out.println("[ASPECTJ BEFORE]");
    System.out.println("Target class' name: " + joinPoint.getTarget().getClass());
    System.out.println("Target method's name: " + joinPoint.getSignature().getName());
    System.out.println("Target method's arguments: " + Arrays.toString(joinPoint.getArgs()));
    System.out.println("[ASPECTJ BEFORE]");
  }
}
At this point, we know that greetFromLib() exists inside our 3rd party library, which means in form of .jar file instead of our own written source codes. We need to do several modifications to our AspectJ Maven plugin to accommodate this.

Adding our third-party lib into weave dependency to be woven:
<plugin>
...
                <configuration>
                    ...
                    <weaveDependencies>
                        <weaveDependency>
                            <groupId>com.axell</groupId>
                            <artifactId>aspectj-aop-lib</artifactId>
                        </weaveDependency>
                    </weaveDependencies>
                </configuration>
...
</plugin>
Now that we’ve added necessary information to our AspectJ maven plugin, we simply just have to execute mvn clean compile again, and let’s see what changes inside our target directory.

TargetLib class woven using Binary Weaving:
public class TargetLib {
  public TargetLib() {
  }
  public void greetFromLib(final String name) {
    JoinPoint var2 = Factory.makeJP(ajc$tjp_0, this, this, name);
    GdnBeforeAspect.aspectOf().beforeGreetLib(var2);
    System.out.println("[ACTUAL] Hi " + name + " from target lib!");
  }
  static {
    ajc$preClinit();
  }
}
Similar to what we’ve observed from CTW, the TargetLib class (in which the source code exists on 3rd party library, we don’t host the source code in our main project) got woven by Binary Weaving by using a similar mechanism.
# Load-time weaving
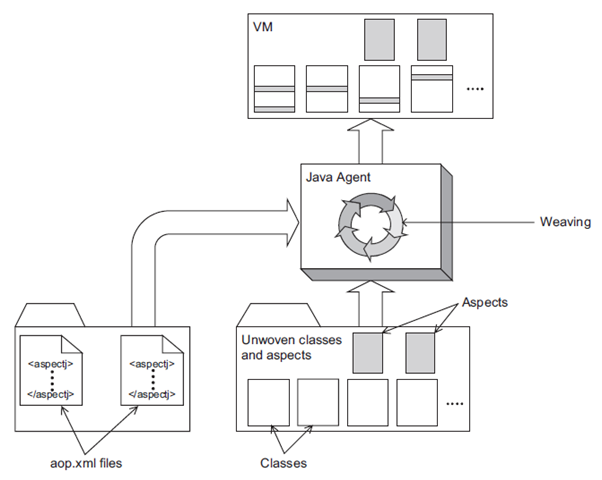
Load-time weaving happens when the classes are about to be loaded into JVM. This means that after compilation, nothing will be added into our compiled classes (unlike CTW and Binary Weaving).
- Deploy an application.
- VM initializes the weaving agent.
- The weaving agent loads all aop.xml files (Yes, we can define multiple aop.xml files and everything gets loaded).
- Weaving agent loads listed aspects in aop.xml files.
- The system starts normal execution.
- VM loads classes during execution (as usual).
- The VM notifies the weaving agent whenever it loads a class.
- The weaving agent (after being notified), inspects the to-be-loaded class to determine if any of the aspects need to be woven to the to-be-loaded class.
- If so, the weaving agent will weave the class and the aspect.
- The woven byte code will be loaded to VM and used.
# 用法
Intro to AspectJ (opens new window)
handle self-invocation within one class: https://stackoverflow.com/questions/49159666/how-to-intercept-each-method-call-within-given-method-using-spring-aop-or-aspect
https://blog.csdn.net/gavin_john/article/details/80252414
# Spring(Boot) AOP
# 例子
Spring AOP = 代理设计模式 + 动态代理技术(JDK/CGLIB)+ 拦截器链
public interface UserService {
    void addUser(String name);
    void deleteUser(String name);
}

public class UserServiceImpl implements UserService {
    @Override
    public void addUser(String name) {
        System.out.println("   [目标] 添加用户: " + name);
        deleteUser(name); // ← 注意:内部调用!
    }

    @Override
    public void deleteUser(String name) {
        System.out.println("   [目标] 删除用户: " + name);
    }
}
第一部分:手撕 JDK 动态代理 Demo
- 写一个 InvocationHandler
import java.lang.reflect.*;

public class MyInvocationHandler implements InvocationHandler {
    private final Object target; // 被代理的目标对象

    public MyInvocationHandler(Object target) {
        this.target = target;
    }

    @Override
    public Object invoke(Object proxy, Method method, Object[] args) throws Throwable {
        // 方法调用前的增强
        System.out.println("[代理] 准备执行: " + method.getName());

        // 调用目标对象的实际方法
        Object result = method.invoke(target, args);

        // 方法调用后的增强
        System.out.println("[代理] 执行完毕: " + method.getName());
        return result;
    }
}
- 创建代理对象并使用
public class Demo {
    public static void main(String[] args) {
        UserService target = new UserServiceImpl();

        UserService proxy = (UserService) Proxy.newProxyInstance(
                target.getClass().getClassLoader(),
                target.getClass().getInterfaces(),
                new MyInvocationHandler(target)
        );

        proxy.addUser("张三");
    }
}

[代理] 准备执行: addUser
   [目标] 添加用户: 张三
   [目标] 删除用户: 张三          ← 注意这里!
[代理] 执行完毕: addUser
- 核心原理
JDK 动态代理在运行时生成了一个类似这样的代理类(伪代码):
public class $Proxy0 extends Proxy implements UserService {
    public void addUser(String name) {
        // 所有方法调用都转发给 InvocationHandler.invoke()
        handler.invoke(this, addUserMethod, new Object[]{name});
    }
}
关键点:代理对象持有目标对象的引用,在 invoke方法中决定何时、如何调用目标方法。这就是 Spring AOP 的地基。
第二部分:升级——模拟 Spring AOP 拦截器链
Spring AOP 不是在 InvocationHandler里写死增强逻辑,而是用责任链模式把多个增强(Advice)串起来。
- 定义拦截器接口(模仿 Spring 的 MethodInterceptor)
public interface MyMethodInterceptor {
    Object invoke(MyMethodInvocation invocation) throws Throwable;
}
- 写两个拦截器
public class LogInterceptor implements MyMethodInterceptor {
    @Override
    public Object invoke(MyMethodInvocation invocation) throws Throwable {
        System.out.println("  [日志] 方法名: " + invocation.getMethod().getName());
        return invocation.proceed(); // 继续链
    }
}

public class TransactionInterceptor implements MyMethodInterceptor {
    @Override
    public Object invoke(MyMethodInvocation invocation) throws Throwable {
        System.out.println("  [事务] begin transaction");
        try {
            Object result = invocation.proceed(); // 继续链
            System.out.println("  [事务] commit");
            return result;
        } catch (Exception e) {
            System.out.println("  [事务] rollback");
            throw e;
        }
    }
}
- 实现 MethodInvocation(责任链驱动器)
这是 Spring AOP 最核心的设计——ReflectiveMethodInvocation的简化版:
import java.lang.reflect.Method;
import java.util.List;

public class MyMethodInvocation {
    private final Object target;
    private final Method method;
    private final Object[] args;
    private final List<MyMethodInterceptor> interceptors;
    private int currentIndex = 0;

    public MyMethodInvocation(Object target, Method method, Object[] args,
                              List<MyMethodInterceptor> interceptors) {
        this.target = target;
        this.method = method;
        this.args = args;
        this.interceptors = interceptors;
    }

    public Method getMethod() { return method; }

    public Object proceed() throws Throwable {
        // 所有拦截器都执行完了,才调用目标方法
        if (currentIndex == interceptors.size()) {
            return method.invoke(target, args);
        }
        // 取出当前拦截器,index+1,然后调用
        MyMethodInterceptor interceptor = interceptors.get(currentIndex++);
        return interceptor.invoke(this); // ← 递归调用,形成链式
    }
}
- 改造 InvocationHandler
public class AopInvocationHandler implements InvocationHandler {
    private final Object target;
    private final List<MyMethodInterceptor> interceptors;

    public AopInvocationHandler(Object target, List<MyMethodInterceptor> interceptors) {
        this.target = target;
        this.interceptors = interceptors;
    }

    @Override
    public Object invoke(Object proxy, Method method, Object[] args) throws Throwable {
        MyMethodInvocation invocation =
                new MyMethodInvocation(target, method, args, interceptors);
        return invocation.proceed(); // 启动责任链
    }
}
- 测试
public class AopDemo {
    public static void main(String[] args) {
        UserService target = new UserServiceImpl();

        List<MyMethodInterceptor> chain = List.of(
                new TransactionInterceptor(),
                new LogInterceptor()
        );

        UserService proxy = (UserService) Proxy.newProxyInstance(
                target.getClass().getClassLoader(),
                target.getClass().getInterfaces(),
                new AopInvocationHandler(target, chain)
        );

        proxy.addUser("李四");
    }
}

[事务] begin transaction
  [日志] 方法名: addUser
   [目标] 添加用户: 李四
   [目标] 删除用户: 李四
  [事务] commit

调用流程图
proxy.addUser()
  │
  ▼
AopInvocationHandler.invoke()
  │
  ▼
MyMethodInvocation.proceed()
  │
  ├─→ TransactionInterceptor.invoke()
  │     │
  │     ├─→ MyMethodInvocation.proceed()
  │           │
  │           ├─→ LogInterceptor.invoke()
  │                 │
  │                 ├─→ MyMethodInvocation.proceed()
  │                       │
  │                       ├─→ method.invoke(target)  ← 目标方法!
  │                       │
  │                 ◄─────┤
  │           ◄────────────┤
  │     ◄──────────────────┤
  ▼
返回结果
Spring AOP 的本质:代理对象 + InvocationHandler+ MethodInvocation责任链。每一个 @Before、@After、@Around最终都被包装成一个 MethodInterceptor,由 ReflectiveMethodInvocation按顺序驱动执行。
第三部分:为什么 @Transactional 会失效?
现在我们回到第一部分的那个输出,仔细看这一行:
[目标] 删除用户: 张三 ← 注意这里没有经过代理!
场景复现
@Service
public class UserServiceImpl implements UserService {

    @Transactional
    @Override
    public void addUser(String name) {
        // ... 数据库操作 ...
        deleteUser(name); // 内部调用
    }

    @Transactional(propagation = Propagation.REQUIRES_NEW)
    @Override
    public void deleteUser(String name) {
        // ... 数据库操作 ...
    }
}
预期:deleteUser应该开启一个新事务。
实际:deleteUser上的 @Transactional(REQUIRES_NEW)完全不生效,它直接加入了 addUser的事务。
原因剖析
外部调用者 → proxy.addUser()
                  │
                  ▼
         TransactionInterceptor.invoke()
                  │
                  ▼
         target.addUser()    ← 这里的 this 是目标对象!
                  │
                  ├── deleteUser()   ← this.deleteUser()
                  │                     等于 target.deleteUser()
                  │                     绕过了 proxy!
                  │                     没有经过 TransactionInterceptor!

用我们上面手撕的代码来解释:
// 在 MyMethodInvocation.proceed() 中
method.invoke(target, args);  // ← target 是原始对象,不是代理!

// 所以在 target.addUser() 里调用 deleteUser() 时
// 等价于 this.deleteUser(),也就是 target.deleteUser()
// 根本没有走 proxy → InvocationHandler → 拦截器链
一句话总结:@Transactional是靠代理对象织入的,而内部调用(this.xxx())不经过代理对象,所以事务拦截器不会被触发。
解决办法 用 AopContext.currentProxy()或拆到另一个 Service
方案一:AopContext.currentProxy()
@SpringBootApplication
@EnableAspectJAutoProxy(exposeProxy = true) // ← 必须加这个!否则 AopContext 拿不到代理
public class Application {
    public static void main(String[] args) {
        SpringApplication.run(Application.class, args);
    }
}

@Service
public class UserServiceImpl implements UserService {

    @Override
    @Transactional
    public void addUser(String name) {
        System.out.println("   [addUser] 添加用户: " + name);

        // 关键改动:通过 AopContext 拿到当前代理对象,再调用 deleteUser
        ((UserService) AopContext.currentProxy()).deleteUser(name);
    }

    @Override
    @Transactional(propagation = Propagation.REQUIRES_NEW)
    public void deleteUser(String name) {
        System.out.println("   [deleteUser] 删除用户: " + name);
        // 这里会开启一个新事务,独立于 addUser 的事务
    }
}

外部调用 → proxy.addUser()
               │
               ▼
        TransactionInterceptor(addUser事务开启)
               │
               ▼
        target.addUser()
               │
               ├── AopContext.currentProxy()  ← 拿到了 proxy 本身!
               │       │
               │       ▼
               │  proxy.deleteUser()
               │       │
               │       ▼
               │  TransactionInterceptor(REQUIRES_NEW,挂起旧事务,开新事务)
               │       │
               │       ▼
               │  target.deleteUser()
               │       │
               │       ▼
               │  TransactionInterceptor(提交新事务,恢复旧事务)
               │
               ▼
        TransactionInterceptor(提交 addUser 事务)
方案二:拆到另一个 Service(推荐)
// ===== 第一个 Service:负责"添加"相关 =====
@Service
public class AddUserService {

    @Autowired
    private DeleteUserService deleteUserService; // ← 注入另一个 Service

    @Transactional
    public void addUser(String name) {
        System.out.println("   [addUser] 添加用户: " + name);

        // 通过另一个 Service 的代理对象调用
        deleteUserService.deleteUser(name); // ← 这里走的是 proxy!
    }
}

// ===== 第二个 Service:负责"删除"相关 =====
@Service
public class DeleteUserService {

    @Transactional(propagation = Propagation.REQUIRES_NEW)
    public void deleteUser(String name) {
        System.out.println("   [deleteUser] 删除用户: " + name);
    }
}

外部调用 → AddUserService的proxy.addUser()
               │
               ▼
        TransactionInterceptor(addUser事务)
               │
               ▼
        AddUserService.target.addUser()
               │
               ├── deleteUserService.deleteUser()  ← 这是另一个 Bean 的代理!
               │       │
               │       ▼
               │  DeleteUserService的proxy.deleteUser()
               │       │
               │       ▼
               │  TransactionInterceptor(REQUIRES_NEW)
               │       │
               │       ▼
               │  target.deleteUser()
补充方案三:Self-Injection(自注入)
@Service
public class UserServiceImpl implements UserService {

    @Autowired  // ← 注入自己(Spring 注入的是代理对象!)
    @Lazy //⚠️ 注意:自注入在某些老版本 Spring 中需要加 @Lazy避免循环依赖报错:
    private UserService self;

    @Override
    @Transactional
    public void addUser(String name) {
        System.out.println("   [addUser] 添加用户: " + name);
        self.deleteUser(name); // ← 通过代理调用!
    }

    @Override
    @Transactional(propagation = Propagation.REQUIRES_NEW)
    public void deleteUser(String name) {
        System.out.println("   [deleteUser] 删除用户: " + name);
    }
}
原理:@Autowired注入的是 Spring 容器里的 Bean,而这个 Bean 已经被 AOP 代理过了。所以 self实际上是代理对象,不是 this。
# 原理
Spring AOP uses either JDK dynamic proxies or CGLIB to create the proxy for a given target object. JDK dynamic proxies are built into the JDK, whereas CGLIB is a common open-source class definition library (repackaged into spring-core).
If the target object to be proxied implements at least one interface, a JDK dynamic proxy is used. All of the interfaces implemented by the target type are proxied. If the target object does not implement any interfaces, a CGLIB proxy is created.
利用动态代理也能实现AOP(spring aop vs aspectj):动态代理提供了一种方式,能够将分散的方法调用转发到一个统一的处理函数处理。AOP的实现需要能够提供这样一种机制,即在执行函数前和执行函数后都能执行自己定义的钩子。那么,首先使用动态代理让代理类忠实的代理被代理类,然后处理函数中插入我们的自定义的钩子。之后让代理类替换被代理类需要使用的场景,这样,相当于对该类的所有方法定义了一个切面。
spring aop使用了动态代理技术在运行期织入增强的代码,使用了两种代理机制: 一种是基于jdk的动态代理,另一种是基于CGLib的动态代理。 详细请看深入理解代理模式设计模式:代理模式
在spring中,Advice的实现接口就是Interceptor
注意,Advice和Interceptor都是在org.aopalliance包下,并非在spring包下,为spring引入的外部依赖
Interceptor接口在spring中的实现类MethodInterceptor,通过before, after, afterReturing, afterThrowing等增强器来对目标方法进行增强
spring aop源码解析参考:spring aop源码解析1: 创建、初始化并注册AnnotationAwareAspectJAutoProxyCreator (opens new window)
AOP API: MethodInterceptor
managed components & proxy(jdk proxy&cglib)
Whenever you declare a bean in XML or use @Component, @Service, or @Repository on a class targeted by Spring’s annotation component scanning (which is enabled by default for Spring Boot), that class is instantiated and managed as a singleton bean by the Spring framework. However, Spring doesn’t actually provide a literal reference to the original bean when it’s injected—it wraps the bean in a proxy class to give Spring a chance to weave in AOP code if needed. https://docs.spring.io/spring/docs/2.5.x/reference/aop.html
https://www.credera.com/blog/technology-insights/open-source-technology-insights/aspect-oriented-programming-in-spring-boot-part-2-spring-jdk-proxies-vs-cglib-vs-aspectj/
# 规则
Spring 在选择代理技术时,有一个非常明确的优先级逻辑。
- 默认规则(Boot 2.x 之后)
只要这个类有接口,默认用 JDK 动态代理;没有接口,用 CGLIB。
- 目标类实现了至少一个接口 JDK 动态代理 基于接口规范,性能好,JDK 原生支持
- 目标类没有实现接口 CGLIB 只能通过继承(子类化)来增强
- 为什么 @Async/ @Configuration强制用 CGLIB? @Async和 @Configuration是个很好的观察点。
- @Configuration(类级别代理): 它需要拦截类内部的方法调用(this.method())。
JDK 动态代理是基于接口的,它没法拦截类内部的方法调用(因为调用的是目标对象本身,而不是代理对象)。
CGLIB 通过继承类并重写方法,能做到这一点(虽然 @Transactional这种 Method-level 的自调用依然不行,但 Class-level 的拦截逻辑 CGLIB 更强)。
- @Async:
它需要增强具体的方法逻辑(扔到线程池)。
同样,为了稳妥地覆盖所有情况(尤其是类内部的调用意图),Spring 强制使用 CGLIB。
- Spring Boot 2.x 之后的“潜规则”
现在的 Spring Boot 项目,如果你看到日志里全是 CGLIB,不要惊讶。
因为在 Spring Boot 2.x 之后,默认配置变成了:
spring.aop.proxy-target-class=true
这意味着:默认强制使用 CGLIB,不管你有没有接口。
为什么要改?
因为 JDK 动态代理有个大坑:它只能拦截接口中定义的方法。如果你的类里有一个方法没写在接口里,JDK 代理就拦不住。CGLIB 基于继承,能拦截所有 public和 protected方法(只要不是 final),更安全,心智负担更小。
# 如何通过日志/代码确认 Bean 是否被代理?
这是排查 @Transactional失效、AOP 不生效的终极手段。
方法 1:看类名(最直观)
在调试时打个断点,或者打印 bean.getClass().getName():
@Autowired
private OrderService orderService;

@PostConstruct
public void checkProxy() {
    System.out.println(orderService.getClass().getName());
}
方法 2:开启 DEBUG 日志(推荐)
在 application.yml中开启 Spring AOP 的日志:
logging:
  level:
    org.springframework.aop: debug
    org.springframework.transaction: trace
启动应用时,你会看到类似这样的日志:
DEBUG o.s.aop.framework.CglibAopProxy - Creating CGLIB proxy...
TRACE o.s.t.i.TransactionInterceptor - Getting transaction for...
这能明确告诉你:
哪个类正在被代理。
事务拦截器是否在正确的时机介入。
方法 3:利用 AopContext(验证自调用场景)
如果你想验证是不是因为自调用导致事务失效,可以用我们之前提到的 AopContext:
@Service
public class OrderService {

    public void B() {
        // 如果不加 @EnableAspectJAutoProxy(exposeProxy = true),这里会抛异常
        Object proxy = AopContext.currentProxy();
        System.out.println(proxy == this); // false 说明当前在代理环境中
    }
}
如果这段代码抛了 IllegalStateException,说明当前方法根本不在 Spring AOP 的管理范围内(或者没开启暴露代理),这是排查问题的铁证。
# 用法
# Spring AOP
https://www.baeldung.com/spring-aop
# Springboot AOP starter
<dependency>
    <groupId>org.springframework.boot</groupId>
    <artifactId>spring-boot-starter-aop</artifactId>
</dependency>
AOP in Spring, if you have an interface, use the JDK dynamic proxy, no interface, use Cglib dynamic proxy. Spring Boot AOP, before 2.0 and Spring the same; 2.0 after the preferred Cglib dynamic proxy, if users want to use JDK dynamic proxy, you need to manually configure their own.
- https://www.springcloud.io/post/2022-01/springboot-aop/#gsc.tab=0
Spring Boot使用AOP的正确姿势 (opens new window)
# example:
# log 使用AOP做日志切面
<dependency>
    <groupId>org.springframework.boot</groupId>
    <artifactId>spring-boot-starter-aop</artifactId>
</dependency>

@Aspect	// 添加Aspect注解
@Component	// 注册为SpringBean
public class LogAspect {

    private static final Logger log = LoggerFactory.getLogger(LogAspect.class);

    // 定义该切面的切入点为allCtlMethod(), 需要被切入的方法为: ctl这个包下的所有带@RequestMapping, @PostMapping, @GetMapping的方法
    @Pointcut("execution(* com.welldone.calcprogram.ctl..*.*(..)) "
            + "&& "
            + "(@annotation(org.springframework.web.bind.annotation.RequestMapping)"
            + "|| @annotation(org.springframework.web.bind.annotation.PostMapping)"
            + "|| @annotation(org.springframework.web.bind.annotation.GetMapping)"
            + ")"
    )
    public void allCtlMethod() {}


    /** allCtlMethod()指定的目标方法执行前执行before方法
     * @param call 切入点,即目标方法
     */
    @Before("allCtlMethod()")
    public void before(JoinPoint call) {
        if (log.isInfoEnabled()) {
            String clazzName = call.getTarget().getClass().getName();
            String methodName = call.getSignature().getName();
            Object[] args = call.getArgs();
            StringBuffer sb = new StringBuffer()
                    .append("[start]").append(clazzName).append(".").append(methodName).append(", args: ");
            for (Object arg : args) {
                sb.append(arg);
            }
            log.info(sb.toString());
        }
    }

	/** allCtlMethod()指定的目标方法返回后执行afterReturning方法
		returning的值要和Object的参数名obj一致
     * @param call 切入点,即目标方法
     * @param obj 目标方法返回值
     */
    @AfterReturning(pointcut = "allCtlMethod()", returning = "obj")
    public void afterReturning(JoinPoint call, Object obj) {
        if (log.isInfoEnabled()) {
            String clazzName = call.getTarget().getClass().getName();
            String methodName = call.getSignature().getName();
            String output = obj != null ? obj.toString() : "";
            log.info("[end]" + clazzName + "." + methodName + ", returnValue: " + output);
        }
    }
}
https://stackoverflow.com/questions/38494974/use-spring-aop-and-get-respective-class-name-in-log-file
# MyBatis Plugin插件开发
Spring / MyBatis——插件机制(AOP) https://blog.csdn.net/qq_22078107/article/details/85781594 https://blog.csdn.net/u012525096/article/details/82389240
记一次Spring的aop代理Mybatis的DAO所遇到的问题 (opens new window)
使用spring的MethodInterceptor实现aop功能的三种方式 https://blog.csdn.net/u013905744/article/details/91364736
Why in Spring AOP the object are wrapped into a JDK proxy that implements interfaces? https://stackoverflow.com/questions/29650355/why-in-spring-aop-the-object-are-wrapped-into-a-jdk-proxy-that-implements-interf