Book: Linux Bible, 9th Edition LAB: Minimal Linux (opens new window)
# 万物皆文件
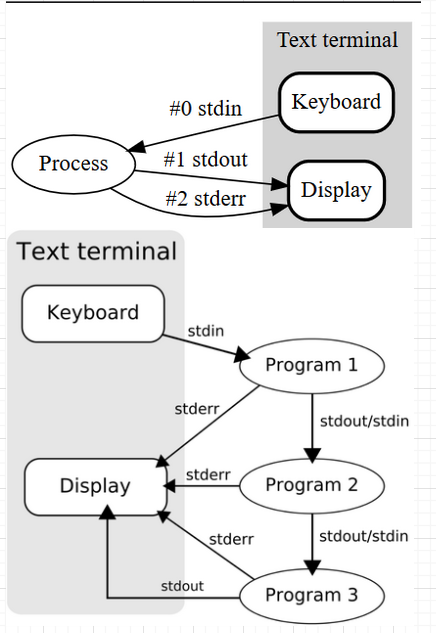
文件描述符(file descriptor)是操作系统内核为了高效管理已被打开的文件所创建的索引,用于指代被打开的文件 在linux操作系统中,每一个进程中都有一个文件描述符表,它是一个指针数组,系统默认初始化了数组的前3位。第0位指向标准的输入流(一般是键盘),第1位指向标准的输出流(一般是显示器),第2位指向标准的错误流(一般是也显示器)。 现在如果有一个进程中只打开了一个 hello.txt 文件,那么这个进程的文件描述符表的第3位就是指向这个 hello.txt 的指针。之后如果该进程创建了一个socket,那么这个文件描述符表的第4位就是指向这个socket的指针,因为在linux中一切皆文件,socket也是一个文件。我们所说的文件描述符就是进程中这个数组的下标,因此他也可以说是一个索引
# 命令执行本质
一个命令行终端是一个shell进程,在这个终端里执行的程序都是作为该shell进程的子进程。 如果子进程命令阻塞终端shell进程,shell进程就会等待子进程退出才能接收其他命令; 如果关掉了shell终端,,依附的所有子进程都会退出; 加上&号可以避免这种情况,原理是将命令挂在systemd系统守护进程名下,其他办法还有nohup或者开tmux或者screen,并且加&可以让shell进程不再阻塞,从而继续响应新命令;
how to find whether a script run as a nohup finished or not?
- method 1:
put
echo $$ > /var/run/myscript.pidat the top of your script: to check if it's still running: ps -pcat /var/run/myscript.pid - method 2:
After running
nohup script.sh &store the PID into a variable. $! is the PID of the last background process.HISPID=$!Then you can check if it's there with ps or kill:ps -p $HISPIDkill -0 $HISPID
set -x 可以显示shell在执行什么程序
当使用 sudo 时,系统会使用 /etc/sudoers 这个文件中规定的该用户的权限和环境变量
# 重定向/管道
重定向
输入<+输出流>
exec 8<> /dev/tcp/www.baidu.com/80重定向到文件:
> file重定向到文件描述符要加&
>& fdecho -e "GET / HTTP/1.0\n" 1>& 8cat 0<& 8 或 cat<&8标准输出重定向:
比如标准输出重定向 java -jar **.jar > log.txt
2>&1 标准错误输出重定向到标准输出
如果需要sudo权限,可以用tee:sudo tee
cat shopee.sg.domain.uniq | filter-resolved > shopee.sg.domain.uniq.resolved
cat shopee.sg.domain.uniq | filter-resolved | sudo tee shopee.sg.domain.uniq.resolved
标准输入重定向:管道|和<<< 以及命令替换$():
首先$()主要则是command substitution,比如
rm $(where connect.sh)

dos2unix $(find . -type f)
echo $(cmd) 和 echo "$(cmd)",结果差不多,但是仍然有区别。注意观察,双引号转义完成的结果会自动增加单引号,而前者不会, 如果 $ 读取出的参数字符串包含空格,应该用双引号括起来,否则就会出错。
管道:
ps -aef | grep -v grep | grep "java -server -jar" | awk '{print $2}'$(2)获取管道前面等输出结果第二列,此时可以用$2替代;yes|cp -r source_folder target_folder/标准输入重定向符:
<<< String 比如脚本中读取第一个参数并取分隔''的第一个值
IFS='/' read -ra target_arr <<< "$1"位置参数${}:
${}主要是作为positional parameter,
${2}还可以表示获取脚本输入参数等第二个,此时也可以用$2替代,$#是输入参数个数;
$ animal=cat
$ echo $animals
# No such variable as “animals”.
$ echo ${animal}s
cats
{}https://askubuntu.com/questions/339015/what-does-mean-in-the-find-command
https://labuladong.gitbook.io/algo/di-wu-zhang-ji-suan-ji-ji-shu/linux-jin-cheng https://labuladong.gitbook.io/algo/di-wu-zhang-ji-suan-ji-ji-shu/linuxshell
difference between ${} and $() in shell script https://superuser.com/questions/935374/difference-between-and-in-shell-scriptcd /proc/$$/fd $$代表当前解释程序
哪些命令接受标准输入
命令默认都接受参数 -argument,有些命令还接受标准输入(可以使用管道符|和重定向符< <<<), 简单判别方式:命令是否可以阻塞终端(如cat不加任何命令会阻塞终端) 如 echo"trade:trade"|chpasswd
# 用户身份和权限
sudo 是一种常见的提权方式,它可以让普通用户暂时获得管理员权限。具体来说,用户通过 sudo 命令运行某个命令时,系统将询问用户密码,并验证其是否有权限执行该命令。如果验证通过,则该命令将以管理员身份运行。下面是一个 sudo 的示例
su 命令(即 "superuser")则是另外一种提权方式,它允许用户将自己切换到 root 用户账户并获取 root 权限。这比 sudo 命令提供的管理员特权更高级。通常情况下,建议尽可能少使用 su 命令,以避免出现安全问题
SUID(Set User ID on Execution)是一种能够直接为二进制可执行文件设置权限的机制。通过它,用户可以在运行某个程序时暂时获取其所有者的权限。在SUID技术中,如果文件属于 root 用户且相应的 SUID 位被设置了,则用户将在运行该程序时以 root 身份运行
SGID 类似SUID,SGID(Set Group ID on Execution)也是一种控制二进制可执行文件权限的方式。通过它,用户可以在运行某些程序时暂时获取文件所在组的身份和权限。当你要涉及到多个用户同步操作同一文件、同一组时,SGID 是非常有用的方式
su – The difference between the su and the hyphenated su – commands is the su command without arguments keeps almost all environment variables belonging to the original user. Contrary to this, the hyphenated su – command clears most environment variables.
su _gvm
This account is currently not available.

sudo -u _gvm gvmd --migrate
sudo su -l _gvm -s /bin/bash

sudo sh -c "cmds"
Permissions take a different meaning for directories. Here's what they mean:
- read determines if a user can view the directory's contents, i.e. do ls in it.
- write determines if a user can create new files or delete file in the directory. (Note here that this essentially means that a user with write access toa directory can delete files in the directory even if he/she doesn't have write permissions for the file! So be careful with this.)
- execute determines if the user can cd into the directory.
系统启动用户
-----------------------------------------------------
--- mysql
-----------------------------------------------------
$ systemctl status mysqld
● mysqld.service - MySQL Server
   Loaded: loaded (/usr/lib/systemd/system/mysqld.service; enabled; vendor preset: disabled)
   Active: active (running) since Thu 2021-07-08 09:44:33 SGT; 2 months 1 days ago
     Docs: man:mysqld(8)
           http://dev.mysql.com/doc/refman/en/using-systemd.html
  Process: 2934 ExecStart=/usr/sbin/mysqld --daemonize --pid-file=/var/run/mysqld/mysqld.pid $MYSQLD_OPTS (code=exited, status=0/SUCCESS)
  Process: 2913 ExecStartPre=/usr/bin/mysqld_pre_systemd (code=exited, status=0/SUCCESS)
 Main PID: 2936 (mysqld)
   CGroup: /system.slice/mysqld.service
           └─2936 /usr/sbin/mysqld --daemonize --pid-file=/var/run/mysqld/mysqld.pid

$ vim /usr/lib/systemd/system/mysqld.service
[Unit]
Description=MySQL Server
Documentation=man:mysqld(8)
Documentation=http://dev.mysql.com/doc/refman/en/using-systemd.html
After=network.target
After=syslog.target

[Install]
WantedBy=multi-user.target

[Service]
User=mysql
Group=mysql

Type=forking

PIDFile=/var/run/mysqld/mysqld.pid
.....
# Start main service
ExecStart=/usr/sbin/mysqld --daemonize --pid-file=/var/run/mysqld/mysqld.pid $MYSQLD_OPTS
...........

-----------------------------------------------------
--- keepalived
-----------------------------------------------------
$ systemctl status keepalived
● keepalived.service - LVS and VRRP High Availability Monitor
   Loaded: loaded (/usr/lib/systemd/system/keepalived.service; disabled; vendor preset: disabled)
   Active: active (running) since Sun 2021-08-29 14:39:15 SGT; 1 weeks 2 days ago
  Process: 15401 ExecStart=/usr/sbin/keepalived $KEEPALIVED_OPTIONS (code=exited, status=0/SUCCESS)
 Main PID: 15402 (keepalived)

$ vim /usr/lib/systemd/system/keepalived.service
[Unit]
Description=LVS and VRRP High Availability Monitor
After=syslog.target network-online.target

[Service]
Type=forking
PIDFile=/var/run/keepalived.pid
KillMode=process
EnvironmentFile=-/etc/sysconfig/keepalived
ExecStart=/usr/sbin/keepalived $KEEPALIVED_OPTIONS
ExecReload=/bin/kill -HUP $MAINPID

[Install]
WantedBy=multi-user.target

可以看到mysqld的实际用户是mysql,而keepalived没有指定,所以其用户就是执行启动命令systemctl start keepalived的用户
系统自动启动程序: sudo systemctl list-unit-files --type=service --state=enabled --all
# 文件系统
umask 指定在建立文件时预设的权限掩码
# About Env
先确认默认的shell: BASH OR ZSH OR..
echo $0 or echo $SHELL or ps -p $$
改变默认shell
cat /etc/shells
type -a bash
chsh -s /usr/bin/bash
restart
"-bash: !": event not found" ! is a special character to bash, it is used to refer to previous commands;
# env
The files in /etc directory sets the respective shell configuration for all the users on the system. This is normally set up by the system administrator.
The files in the home directory of the user are user-specific, obviously. This allows users to create alias for frequently used commands or use a custom PATH variable for a program.
i) 特定用户的PATH ~/bashrc ~/bash_profile
- Bash Startup Files When a "login shell" starts up, it reads the file /etc/profile and then ~/.bash_profile or ~/.bash_login or ~/.profile (whichever one exists - it only reads ONE of these, checking for them in the order mentioned). When a "non-login shell" starts up, it reads the file /etc/bashrc and then the file ~/.bashrc.
ii) system wide全局PATH /etc/profile或/root/.bashrc (/etc/environment?)
Anything in ~/.profile and ~/.bashrc is run after /etc/profile and /bash.bashrc
所以如果是修改了/etc/profile对root或sudo操作无效,要看下root下面的~/.bashXXX是不是有PATH设置,
如果还不生效,就要看下/etc/sudoers: Defaults secure_path = /sbin:/bin:/usr/sbin:/usr/bin,可以使用 sudo -E 绕过
For some setups the -E switch will not work. To "workaround" it you can use sudo env "PATH=$PATH" bash. This will also carry your current $PATH forward to your sudo environment.
# 登录式 shell 和非登录式 shell
https://linuxhandbook.com/login-shell/
https://unix.stackexchange.com/questions/38175/difference-between-login-shell-and-non-login-shell
交互式 shell 指的是在终端有交互的模式,用户输入命令,并在回车后立即执行的 shell,这种模式也是大部分情况下用户执行的一种方式,比如 ssh 登录
You can start a new shell from your current shell (an interactive shell): $ bash (subshell)
when you run a shell script, it runs in its own shell (a non-interactive shell).
非交互式 shell 指的是 bash shell 以命令脚本的形式执行,这种模式下,shell 不会和用户有交互,而是读取脚本文件并执行,直到读取到文件 EOF 时结束
The login shell is the first process that is executed with your user ID when you log into an interactive session.
The login process tells the shell to behave as a login shell with a convention: passing argument 0, which is normally the name of the shell executable, with a
-character prepended (e.g.-bashwhereas it would normally bebash.The login shell reads environment variable and other configuration from /etc/profile and a profile file in the home directory. This allows you to have tab completion, colored output and sets other stuff such as umask etc.
登录式 shell 是用户使用自己的 user ID 登录交互式 shell 的第一个进程
login shell 会读取不同的配置文件,比如 bash 会读取
/etc/profile,~/.profile,~/.bash_profile等配置文件。而 zsh 会是/etc/zprofile和~/.zprofileWhen you log in on a text console, or through SSH, or with
su -, you get an interactive login shell. When you log in in graphical mode (on an X display manager (opens new window)), you don't get a login shell, instead you get a session manager or a window manager.non-login shell
It's rare to run a non-interactive login shell, but some X settings do that when you log in with a display manager, so as to arrange to read the profile files. Other settings (this depends on the distribution and on the display manager) read
/etc/profileand~/.profileexplicitly, or don't read them. Another way to get a non-interactive login shell is to log in remotely with a command passed through standard input which is not a terminal, e.g.ssh example.com <my-script-which-is-stored-locally(as opposed tossh example.com my-script-which-is-on-the-remote-machine, which runs a non-interactive, non-login shell).interactive, non-login shell
When you start a shell in a terminal in an existing session (screen, X terminal, Emacs terminal buffer, a shell inside another, etc.), you get an interactive, non-login shell. That shell might read a shell configuration file (
~/.bashrcfor bash invoked asbash,/etc/zshrcand~/.zshrcfor zsh,/etc/csh.cshrcand~/.cshrcfor csh, the file indicated by theENVvariable for POSIX/XSI-compliant shells such as dash, ksh, and bash when invoked assh,$ENVif set and~/.mkshrcfor mksh, etc.).当你在已经存在的终端 session 中开启一个 shell,比如在 screen, Tmux, X terminal 等中,会得到一个交互式,非登录 shell
只会读取
~/.bashrc配置(~/.bashrcfor bash,/etc/zshrcand~/.zshrcfor zsh)。non-interactive, non-login shell
When a shell runs a script or a command passed on its command line, it's a non-interactive, non-login shell. Such shells run all the time: it's very common that when a program calls another program, it really runs a tiny script in a shell to invoke that other program. Some shells read a startup file in this case (bash runs the file indicated by the
BASH_ENVvariable, zsh runs/etc/zshenvand~/.zshenv), but this is risky: the shell can be invoked in all sorts of contexts, and there's hardly anything you can do that might not break something.当 shell 执行一个脚本,或者通过命令行将命令传送过去执行,这时就是非交互,非登录的 shell
不会读取任何profile 或 rc
举例1:
echo $0
- `-bash` 中 `-` 表示当前是一个 login shell
- `bash` 表示不是 login shell

用户在当前交互式的shell中执行:
$ bash
就会开启一个新的 subshell,这个subshell就是一个 non-login shell,在该subshell中可以读取`~/.bashrc` 也可以读取`~/.bash_profile`(继承parent)

On desktop Linux, you don't use login shell. Your login is managed by a display manager. This is why when you open a terminal in Linux desktop, you'll see that even the first shell running in the terminal is not login shell.
举例2:
https://www.tecmint.com/change-a-users-default-shell-in-linux/
There are several reasons for changing a user’s shell in Linux including the following:
- To block or disable normal user logins (opens new window) in Linux using a nologin shell.
- Use a shell wrapper script or program to login user commands before they are sent to a shell for execution. Here, you specify the shell wrapper as a user’s login shell.
- To meet a user’s demands (wants to use a specific shell), especially those with administrative rights
举例3 non-interactive, non-login shell:
使用crontab自动启动jar的时候,java代码中getHostName抛错,手动启动则没有问题
----------------------------------------------------------------------------------------------------------
--- java code
----------------------------------------------------------------------------------------------------------
private Long getDataCenterId(){
        int[] ints = StringUtils.toCodePoints(SystemUtils.getHostName());
        int sums = 0;
        for (int i: ints) {
            sums += i;
        }
        return (long)(sums % 32);
    }

Caused by: java.lang.NullPointerException
	at com.lyhistory.util.IdWorkerConfiguration.getDataCenterId(IdWorkerConfiguration.java:64)
	at com.lyhistory.util.IdWorkerConfiguration.getDateFromConfig(IdWorkerConfiguration.java:43)

查了下,在linux下面,SystemUtils.getHostName()实际是去获取linux env的HOSTNAME,
在该linux机器上使用执行crontab对应相同的用户登录,并执行env,正常显示HOSTNAME(当然了,毕竟手动运行没问题)
所以合理的怀疑是,crontab没有拿到env


----------------------------------------------------------------------------------------------------------
--- crontab
----------------------------------------------------------------------------------------------------------
$ crontab -e
44 17 * * * /opt/scripts/start_some_service.sh && &>> /opt/logs/start_some_service`date +\%F`.log   2>&1

----------------------------------------------------------------------------------------------------------
--- start_some_service.sh
----------------------------------------------------------------------------------------------------------
$ vim start_some_service
#!/bin/bash

readonly PROGNAME=$(basename $0)
readonly PROGDIR=$(readlink -m $(dirname $0))

# source env
L_INVOCATION_DIR="$(pwd)"
L_CMD_DIR="/opt/scripts"

if [ "${L_INVOCATION_DIR}" != "${L_CMD_DIR}" ]; then
  pushd ${L_CMD_DIR} &> /dev/null
fi

source ./_set_env.sh
./start_service.sh A
./start_service.sh B

----------------------------------------------------------------------------------------------------------
--- start_service.sh
----------------------------------------------------------------------------------------------------------
$ vim start_service.sh
PID=`ps -aef | grep -v grep | grep "java -server -jar ./${1}.jar" | awk '{print $2}'`

if [ ! -z "$PID" ]; then
        echo "Service $1 already running on the server. PID is [$PID];"
        exit 0
fi

ulimit -c unlimited

nohup java -server -jar $1.jar > ../logs/`date +\%F`_$1_`date +\%H.%M.%S`.log 2>&1 &
sleep 1
PID=`ps -aef | grep -v grep | grep "java -server -jar ${1}.jar" | awk '{print $2}'`

if [ ! -z "$PID" ]; then
        echo "Service $1 started. PID is [$PID]"
else
        echo "Failed to start service $1"
fi

popd &>/dev/null


----------------------------------------------------------------------------------------------------------
--- 修复方式
----------------------------------------------------------------------------------------------------------
start_some_service.sh 替换 #!/bin/bash 为 #!/bin/bash -l
或者crontab添加bash -l
44 17 * * * bash -l /opt/scripts/start_some_service.sh && &>> /opt/logs/start_some_service`date +\%F`.log       2>&1
----------------------------------------------------------------------------------------------------------
--- 原因
----------------------------------------------------------------------------------------------------------
$ man 5 crontab
............
Several environment variables are set up automatically by the cron(8) daemon.  SHELL is set to /bin/sh, and LOGNAME and HOME are set from the /etc/passwd line of  the  crontab´s
       owner.  HOME and SHELL can be overridden by settings in the crontab; LOGNAME can not.

       (Note: the LOGNAME variable is sometimes called USER on BSD systems and is also automatically set).
.............

$ man bash
 -l        Make bash act as if it had been invoked as a login shell (see INVOCATION below).

The -l option tells bash to read all the various "profile" scripts, from /etc and from your home directory. Bash normally only does this for interactive sessions (in which bash is run without any command line parameters).

Normal scripts have no business reading the profile; they're supposed to run in the environment they were given. That said, you might want to do this for personal scripts, maybe, if they're tightly bound to your environment and you plan to run them outside of a normal session.

A crontab is one example of running a script outside your session, so yes, go do it!

refer:
https://www.baeldung.com/linux/load-env-variables-in-cron-job
https://unix.stackexchange.com/questions/422499/what-are-the-pros-and-cons-in-using-the-l-in-a-script-shebang/422505
https://stackoverflow.com/questions/2229825/where-can-i-set-environment-variables-that-crontab-will-use
https://stackoverflow.com/questions/36885909/cronjob-does-not-execute-a-script-that-works-fine-standalone/69100347#69100347
https://unix.stackexchange.com/questions/321315/get-cron-to-run-in-the-same-environment-as-i-get-with-ssh-login
# 安装包管理
# 不同发行版选择
Ubuntu / kali / parrotOS
based on debian,
Centos
for bigdata
Redhat
for databases(because those database companies use redhat, it’s tested)
# 基本安装方法
apt或yum安装
add to apt/yum repository, and then apt-get/yum install ***
Normally will be put in /usr/bin/
Additionally, you can use
yum localinstall <packagename>to intelligently install dependencies as needed.Know the version before installing:
apt policy <packagename>yum info/search <packagename>deb或rpm安装 / AppImage
download deb for ubuntu or rpm for centos, and install it, it will help you install all related dependencies
版本
amd64, i386,x64 https://askubuntu.com/questions/32402/amd64-i386-32bit-64bit-which-version-to-choose (opens new window)
包类型:dpkg(Ubuntu) , rpm(centos)
http://linuxintro.org/index.php?title=Dpkg-rpm_equivalent_commands&redirect=no
deb for debian
dpkg -i google-chrome-stable_current_amd64.deb
apt install ./google-chrome-stable_current_amd64.deb
rpm for # CentOS/RHEL
rpm -Uvh gitlab-ce-<version>.rpm
如果是第一次安装可以用rpm -ivh gitlab-ce-<version>.rpm
yum localinstall gitlab-ce-<version>.rpm
AppImage for all: is a universal software package format, 只需要下载然后给可执行权限
解压直接使用 download tar file, and extract, then:
- set env variable or persist it in:
e.g. vim ~/.bash_profile export PATH=$PATH:/usr/local/go/bin, more read section #About ENV e.g. Create one file test.sh in /etc/profile.d with following content: #!/bin/sh export PATH=/opt/something/bin:$PATHor just mv it into /usr/local/bin/
or link
cd /usr/bin sudo ln -s /home/lyhistory/.local/bin/tldr tldrOR
sudo ln -sf /usr/local/share/$PHANTOM_JS/bin/phantomjs /usr/local/bin缺点: if there is dependencies, you have to manually install them
源码编译安装
configuration(configure --prefix=安装路径)或cmake之后make install,通常安装的路径在 install_manifest.txt,所以删除方式:
cat install_manifest.txt | xargs echo sudo rm | shThe steps:
The
autogen.shscript generates theconfigurescript (fromconfigure.ac, using autoconf) and any files it needs (like creatingMakefile.infromMakefile.amusing automake). This requires autotools to be installed on your system, and it must be run when checking out the project from source control (ifconfigureisn’t checked in). People who download source tarballs can usually skip this step, because output of this step is included in source tarballs.Note This is usually equivalent to
autoreconf --install. If there is notautogen.shfile, then just runautoreconf --installinstead. If you have inherited a project with anautogen.sh, consider deleting it if you can useautoreconf --install.The
configurescript generatesMakefileand other files needed to build. TypicallyMakefile.inis used as a template to generateMakefile(andconfig.h.into generateconfig.h). This process happens using only standard tools installed on your system, like sed and awk, and doesn't require autotools to be installed.The
makecommand builds the software.The
make installcommand installs it.
https://stackoverflow.com/questions/50044091/what-is-the-job-of-autogen-sh-when-building-a-c-package-on-linux
常见问题:
前面几种安装方法的比较:rpm -ivh -uvh VS yum install vs yum localinstall
[https://serverfault.com/questions/825320/difference-between-rpm-ivh-package-and-yum-install-package#:~:text=there%20is%20no%20difference%20if,works%20with%20file(s).](https://serverfault.com/questions/825320/difference-between-rpm-ivh-package-and-yum-install-package#:~:text=there is no difference if,works with file(s).)
安装后管理
- rpm:
rpm -qa | grep "package name"。 yum list installed | grep "package name" - deb:
dpkg -l | grep "package name" apt list --installed|grep "package name" ```; - 如果是以源码包自己编译安装的,例如.tar.gz或者tar.bz2形式的,这个只能看可执行文件是否存在了,如果是以root用户安装的,可执行程序通常都在/usr/local/sbin:/usr/bin目录下。
- rpm:
安装后找不到命令,因为安装的位置不在系统path上,可以参考上面的“解压后使用”的方式中的,link或设置环境变量方式来搞;
# apt
apt vs apt-get
更新repo:apt update
apt upgrade / apt full-upgrade
apt search "PKG"
apt list --installed | grep "PKG"
# yum
# Basics
更新repo:yum clean all / yum repolist / yum check-update
yum provides package-name / rpm -q --provides openssl
yum list/search/info package-name
yum update package-name
# list dependency
yum deplist package-name
yum history
yum history info 21

// find references
rpm -q --whatrequires openssl

[root@liuyuelocal ~]# yum repolist
Loaded plugins: fastestmirror, langpacks
Repodata is over 2 weeks old. Install yum-cron? Or run: yum makecache fast
Determining fastest mirrors
 * base: mirror.newmediaexpress.com
 * epel: mirrors.aliyun.com
 * extras: mirror.newmediaexpress.com
 * updates: mirror.newmediaexpress.com
repo id                                                                                   repo name                                                                                                       status

!base/7/x86_64                                                                            CentOS-7 - Base                                                                                                 10,097

!docker-ce-stable/x86_64                                                                  Docker CE Stable - x86_64                                                                                           63

!epel/x86_64                                                                              Extra Packages for Enterprise Linux 7 - x86_64                                                                  13,499

!extras/7/x86_64                                                                          CentOS-7 - Extras                                                                                                  307

!ius/x86_64                                                                               IUS for Enterprise Linux 7 - x86_64                                                                                714

!updates/7/x86_64                                                                         CentOS-7 - Updates                                                                                                 997

repolist: 25,677


#yum repolist
Loaded plugins: product-id, search-disabled-repos, subscription-manager
This system is not registered with an entitlement server. You can use subscription-manager to register.
repo id                                                                              repo name                                                                                                            status

nodesource/x86_64                                                                    Node.js Packages for Enterprise Linux 7 - x86_64                                                                         37

repolist: 55,117
DNF, or Dandified Yum, which is the next major version of the Yum package manager was introduced with Fedora 18. As of Fedora 22, it has become the default package manager.
https://www.rootusers.com/how-to-install-dnf-package-manager-in-centosrhel/
# offical repo
- Remi's RPM repository https://rpms.remirepo.net
# 服务管理 service/systemctl
# System V
is the oldest init system, used in Debian 6 and earlier Ubuntu 9.04 and earlier CentOS 5 and earlier In System V, an init script is a shell script. They are also called rc (run command) scripts. The scripts are located under the /etc/init.d directory
To make a service restart after a crash or reboot, you can usually add a line like this to the init script:
ms:2345:respawn:/bin/sh /usr/bin/service_name

To enable/disable a System V service to start at system boot time, run this command:
sudo chkconfig service_name on
sudo chkconfig service_name off
sudo service service_name status

update-rc.d - install and remove System-V style init script links
https://manpages.ubuntu.com/manpages/xenial/man8/update-rc.d.8.html
  https://askubuntu.com/questions/72127/when-you-run-update-rc-d-myscript-default-what-is-called-on-startup-shutdown#:~:text=If%20defaults%20is%20used%20then,overridden%20if%20there%20are%20dependencies.
# Upstart
came after System V and was used in Ubuntu 9.10 to Ubuntu 14.10, including Ubuntu 14.04 CentOS 6
To keep things simple, Upstart is backward-compatible with System V. The /etc/init.d/rc script still runs to manage native System V services. Its main difference is the way it allows multiple events to be associated with a service. This event-based architecture allowed Upstart to be a flexible service manager. At startup, Upstart will run any System V init scripts normally. It will then look under the /etc/init directory and execute the shell commands in each service configuration file. The files have a naming style of service_name.conf
# systemd
is the newest Linux service manager, used in Debian 7 and above Ubuntu 15.04 and above CentOS 7 and above
systemd is backward-compatible with System V commands and initialization scripts. That means any System V service will also run under systemd. The main difference between systemd and the other two init methods is that systemd is responsible for the initialization of service daemons and other types of resources like device operating system paths, mount points, sockets, etc. The naming style for a unit file is service_name.unit_type. So, you will see files like dbus.service, sshd.socket, or home.mount
main location:
/lib/systemd/system/
/etc/systemd/system
ls -l /etc/systemd/system/default.target
sudo ls -l /etc/systemd/system/multi-user.target.wants/*.service
sudo systemctl show --property "Requires" multi-user.target | fmt -10
sudo systemctl show --property "Requires" basic.target | fmt -10
sudo systemctl show --property "Wants" basic.target | fmt -10

sudo vi /etc/systemd/system/multi-user.target.wants/xxx.service


How To Configure a Linux Service to Start Automatically After a Crash or Reboot https://www.digitalocean.com/community/tutorials/how-to-configure-a-linux-service-to-start-automatically-after-a-crash-or-reboot-part-2-reference
sudo systemctl daemon-reload
sudo systemctl restart mysqld.service
# example -openvpn on kali linux
因为某国直接使用openvpn有问题,所以要开启scramble模式,因此我卸载了kali默认的openvpn, 安装了scramble option
apt remove openvpn
then
make install the patched version
结果无法用service/systemctl启动openvpn
$service/systemctl start openvpn
failed to start .service unit is masked

Check that the unit file is a symlink to /dev/null:
$file /etc/systemd/system/openvpn.service

/lib/systemd/system/openvpn.service: symbolic link to /dev/null
删除无效link后重启:
$sudo rm /lib/systemd/system/openvpn.service
$sudo systemctl daemon-reload

$service/systemctl start openvpn

忘记尝试 sudo systemctl unmask openvpn.service
但是这一次显示状态有点奇怪:
$service/systemctl status openvpn
State active (exited)
means that systemd has successfully run the commands but that it does not know there is a daemon to monitor. https://unix.stackexchange.com/questions/241970/what-does-status-active-exited-mean-for-a-systemd-service
$which open
/usr/local/sbin/openvpn

$sudo find / -name "openvpn.service"
/run/systemd/generator.late/openvpn.service

$/etc/init.d/openvpn still point to:
/usr/sbin/openvpn

configuration file for /etc/init.d/openvpn: /etc/default/openvpn

修改 /etc/init.d/openvpn指向 /usr/local/sbin/openvpn即可
install /etc/init.d/script https://askubuntu.com/questions/335242/how-to-install-an-init-d-script
# 基础服务
# 网络
# Ubuntu
注意,对于Ubuntu 17.10 switched from ifupdown (which uses the /etc/network/interfaces file) to netplan,
所以新版本已经找不到 /etc/network/interfaces
netplan貌似只是个接口: https://netplan.io/examples/
具体的控制还是: NetworkManager 和 networkd, 其中desktop版本默认是 NetworkManager,而对于无UI的server版本只能用networkd https://askubuntu.com/questions/1031439/am-i-running-networkmanager-or-networkd
To configure netplan, save configuration files under /etc/netplan/ with a .yaml extension (e.g. /etc/netplan/config.yaml), then run sudo netplan apply. This command parses and applies the configuration to the system. Configuration written to disk under /etc/netplan/ will persist between reboots.

---------------------------------------------------------
对于NetworkManager:
---------------------------------------------------------
First any interfaces defined in /etc/network/interfaces are ignored by network-manager. (man 5 NetworkManager)
systemctl status network-manager

vim /etc/netplan/01-network-manager-all.yaml
# Let NetworkManager manage all devices on this system
network:
  version: 2
  renderer: NetworkManager

UI是使用NetworkManager,所以直接打开控制面板来设置静态IP和DNS即可
address 192.168.0.109
netmask 255.255.255.0
gateway 192.168.0.1
DNS: 8.8.8.8
设置完等一会即可

---------------------------------------------------------
对于Networkd:
---------------------------------------------------------
systemd-networkd will only manage network addresses and routes for any link for which it finds a .network file with an appropriate [Match] section. (man 8 systemd-networkd).
systemctl status systemd-netword

vim /etc/netplan/01-network-manager-all.yaml
network:
    version: 2
    renderer: networkd
    ethernets:
        enp3s0:
            dhcp4: true
# Debain based : Kali
--- for debain:
配置静态ip
/etc/network/interfaces:
#auto eth0
#iface eth0 inet dhcp
auto eth0
iface eth0 inet static
address 192.168.0.109
netmask 255.255.255.0
gateway 192.168.0.1

sudo ifdown eth0
sudo ifup eth0
or
sudo /etc/init.d/networking restart

如果还是无法上网(上面172.17.5.36是某ISP提供的,貌似虚拟机无法用):
/etc/resolv.conf
nameserver 8.8.8.8

sudo systemctl restart systemd-resolved.service

解决后看下当前路由情况:
route -n

#Verify new IP settings:
ip a s eth0
#Verify new routing settings:
ip r
#Verify DNS servers settings:
cat /etc/resolv.conf
#Verify the internet connectivity:
ping -c 4 google.com

root@kali:/home/lyhistory# ip -4 addr
1: lo: <LOOPBACK,UP,LOWER_UP> mtu 65536 qdisc noqueue state UNKNOWN group default qlen 1000
    inet 127.0.0.1/8 scope host lo
       valid_lft forever preferred_lft forever
2: eth0: <BROADCAST,MULTICAST,UP,LOWER_UP> mtu 1500 qdisc pfifo_fast state UP group default qlen 1000
    inet 192.168.0.109/24 brd 192.168.0.255 scope global eth0
       valid_lft forever preferred_lft forever

root@kali:/home/lyhistory# ip route
default via 192.168.0.1 dev eth0 onlink
192.168.0.0/24 dev eth0 proto kernel scope link src 192.168.0.109
# Centos
--- for centos
vim /etc/sysconfig/network-scripts/ifcfg-eth0
HWADDR=00:08:A2:0A:BA:B8
TYPE=Ethernet
#BOOTPROTO=dhcp
BOOTPROTO=none
# Server IP #
IPADDR=192.168.0.110
# Subnet #
PREFIX=24
# Set default gateway IP #
GATEWAY=192.168.0.1
# Set dns servers #
DNS1=8.8.8.8
DEFROUTE=yes
IPV4_FAILURE_FATAL=no
# Disable ipv6 #
IPV6INIT=no
NAME=eth0
# This is system specific and can be created using 'uuidgen eth0' command #
UUID=41171a6f-bce1-44de-8a6e-cf5e782f8bd6
DEVICE=eth0
ONBOOT=yes

systemctl restart network
# proxy
/etc/profile http_proxy
# Troubleshooting
# error: Package Requires
[lyhistory/opt]#nginx -v
nginx version: nginx/1.12.1
[lyhistory/opt]#yum localinstall nginx-1.20.1-1.el7.ngx.x86_64.rpm
Loaded plugins: product-id, search-disabled-repos, subscription-manager
This system is not registered to Red Hat Subscription Management. You can use subscription-manager to register.
Examining nginx-1.20.1-1.el7.ngx.x86_64.rpm: 1:nginx-1.20.1-1.el7.ngx.x86_64
Marking nginx-1.20.1-1.el7.ngx.x86_64.rpm as an update to 1:nginx-1.12.1-1.el7.ngx.x86_64
Resolving Dependencies
--> Running transaction check
---> Package nginx.x86_64 1:1.12.1-1.el7.ngx will be updated
---> Package nginx.x86_64 1:1.20.1-1.el7.ngx will be an update
--> Processing Dependency: libcrypto.so.10(OPENSSL_1.0.2)(64bit) for package: 1:nginx-1.20.1-1.el7.ngx.x86_64
--> Finished Dependency Resolution
Error: Package: 1:nginx-1.20.1-1.el7.ngx.x86_64 (/nginx-1.20.1-1.el7.ngx.x86_64)
           Requires: libcrypto.so.10(OPENSSL_1.0.2)(64bit)
 You could try using --skip-broken to work around the problem
** Found 2 pre-existing rpmdb problem(s), 'yum check' output follows:
redhat-access-insights-1.0.6-0.el7.noarch has missing requires of libcgroup
redhat-access-insights-1.0.6-0.el7.noarch has missing requires of libcgroup-tools
[lyhistory/opt]#cat /etc/os-release
NAME="Red Hat Enterprise Linux Server"
VERSION="7.2 (Maipo)"
ID="rhel"
ID_LIKE="fedora"
VERSION_ID="7.2"
PRETTY_NAME="Red Hat Enterprise Linux Server 7.2 (Maipo)"
ANSI_COLOR="0;31"
CPE_NAME="cpe:/o:redhat:enterprise_linux:7.2:GA:server"
HOME_URL="https://www.redhat.com/"
BUG_REPORT_URL="https://bugzilla.redhat.com/"

REDHAT_BUGZILLA_PRODUCT="Red Hat Enterprise Linux 7"
REDHAT_BUGZILLA_PRODUCT_VERSION=7.2
REDHAT_SUPPORT_PRODUCT="Red Hat Enterprise Linux"
REDHAT_SUPPORT_PRODUCT_VERSION="7.2"


[lyhistory/opt]#openssl version
OpenSSL 1.0.1e-fips 11 Feb 2013

[lyhistory/opt]#rpm -q --provides openssl
openssl = 1:1.0.1e-42.el7_1.9
openssl(x86-64) = 1:1.0.1e-42.el7_1.9
[lyhistory/opt]#rpm -q --provides openssl-libs | grep libcrypto.so.10
libcrypto.so.10()(64bit)
libcrypto.so.10(OPENSSL_1.0.1)(64bit)
libcrypto.so.10(OPENSSL_1.0.1_EC)(64bit)
libcrypto.so.10(libcrypto.so.10)(64bit)


[lyhistory/opt]#yum localinstall openssl-libs-1.0.2k-19.el7.x86_64.rpm
Loaded plugins: product-id, search-disabled-repos, subscription-manager
This system is not registered to Red Hat Subscription Management. You can use subscription-manager to register.
Examining openssl-libs-1.0.2k-19.el7.x86_64.rpm: 1:openssl-libs-1.0.2k-19.el7.x86_64
Marking openssl-libs-1.0.2k-19.el7.x86_64.rpm as an update to 1:openssl-libs-1.0.1e-42.el7_1.9.x86_64
Resolving Dependencies
--> Running transaction check
---> Package openssl-libs.x86_64 1:1.0.1e-42.el7_1.9 will be updated
--> Processing Dependency: openssl-libs(x86-64) = 1:1.0.1e-42.el7_1.9 for package: 1:openssl-devel-1.0.1e-42.el7_1.9.x86_64
--> Processing Dependency: openssl-libs(x86-64) = 1:1.0.1e-42.el7_1.9 for package: 1:openssl-1.0.1e-42.el7_1.9.x86_64
---> Package openssl-libs.x86_64 1:1.0.2k-19.el7 will be an update
--> Finished Dependency Resolution
Error: Package: 1:openssl-1.0.1e-42.el7_1.9.x86_64 (@anaconda/7.2)
           Requires: openssl-libs(x86-64) = 1:1.0.1e-42.el7_1.9
           Removing: 1:openssl-libs-1.0.1e-42.el7_1.9.x86_64 (@anaconda/7.2)
               openssl-libs(x86-64) = 1:1.0.1e-42.el7_1.9
           Updated By: 1:openssl-libs-1.0.2k-19.el7.x86_64 (/openssl-libs-1.0.2k-19.el7.x86_64)
               openssl-libs(x86-64) = 1:1.0.2k-19.el7
Error: Package: 1:openssl-devel-1.0.1e-42.el7_1.9.x86_64 (@local-repo)
           Requires: openssl-libs(x86-64) = 1:1.0.1e-42.el7_1.9
           Removing: 1:openssl-libs-1.0.1e-42.el7_1.9.x86_64 (@anaconda/7.2)
               openssl-libs(x86-64) = 1:1.0.1e-42.el7_1.9
           Updated By: 1:openssl-libs-1.0.2k-19.el7.x86_64 (/openssl-libs-1.0.2k-19.el7.x86_64)
               openssl-libs(x86-64) = 1:1.0.2k-19.el7
 You could try using --skip-broken to work around the problem
** Found 2 pre-existing rpmdb problem(s), 'yum check' output follows:
redhat-access-insights-1.0.6-0.el7.noarch has missing requires of libcgroup
redhat-access-insights-1.0.6-0.el7.noarch has missing requires of libcgroup-tools

[lyhistory]#rpm -q --whatrequires openssl
nginx-1.12.1-1.el7.ngx.x86_64
尝试解决
[lyhistory]#yum remove openssl-libs.x86_64 / yum remove openssl-libs-1.0.1e-42.el7_1.9.x86_64
Loaded plugins: product-id, search-disabled-repos, subscription-manager
This system is not registered to Red Hat Subscription Management. You can use subscription-manager to register.
Resolving Dependencies
--> Running transaction check
---> Package openssl-libs.x86_64 1:1.0.1e-42.el7_1.9 will be erased
....
--> Finished Dependency Resolution
Error: Trying to remove "systemd", which is protected
Error: Trying to remove "yum", which is protected
失败!
最终解决
cd /etc/yum.repos.d/
vi nginx.repo
  [nginx]
  name=nginx repo
  baseurl=http://nginx.org/packages/centos/$releasever/$basearch/
  gpgcheck=0
  enabled=1

yum clean all
yum repolist
yum update nginx
rpm -qa | grep nginx
nginx -v
未尝试的另一种方案:
yum swap -- remove openssl-libs-1.0.1e-42.el7_1.9.x86_64 -- install openssl-libs-1.0.2k-19.el7.x86_64.rpm