npm, nodejs, reactjs, javascript, typescript ?
javascript是nodejs、reactjs和浏览器都在使用的一种编程语言, nodejs reactjs和浏览器用的都是javascript;
nodejs reactjs及浏览器用的都是V8引擎,但是不同的是:
reactjs是前端框架(当然也提供了部分server-side功能,但是我理解是有限的功能,主要还是client端),reactjs和浏览器都有DOM API, 所以浏览器可以直接识别JavaScript操作dom,reactjs又增加了virtual dom(ReactDOM.render)来提升performance; 而nodejs是server-side后端框架,跟前端没有半毛钱关系,虽然都是用JavaScript,V8引擎,它没有DOM API,不能操作DOM,但是有其他API,比如可以访问硬件的电源,它跟java php这些没有区别,
可以比较下truffle的web3-nodejs和web3-react的区别: web3-react里面index.html基本只有一个root div,其他全靠index.js去画,而web3-nodejs的index.html则基本要写好,然后调用index.js里面的JavaScript互动, 然后这个JavaScript因为是nodejs所以操作dom的时候只能用原始的document.getElementById,当然了这里并没有体现出nodejs的特别之处,因为并没有访问特别的api;
总体来说nodejs和reactjs都是用npm来管理package,只不过有些module只能在nodejs或者reactjs下面才工作,有些则是两者都可以用; 而在实际前端项目中,一般也会用到nodejs,因为为了开发方便,一般都会提供脚本运行开启一个web server,比如webpack使用的noop-service-worker-middleware就是一个express middleware, 当然如果不用这些现成的包,可以自己集成reactjs和nodejs从而创建一个full dev environment,然后开发完成则是编译成静态html,扔给比如nginx托管,当然了如果这些静态html请求的后端服务可能就是nodejs提供的;
安装nodejs会自带npm,所以一般reactjs的安装也就是安装nodejs的npm;
TypeScript是JavaScript类型的超类,可以使用JavaScript中的所有代码和编程概念,TypeScript是为了使JavaScript的开发变得更加容易而创建的, TypeScript代码需要被编译(成JavaScript)。
Node and browser(javascript) both uses V8 engine, but browser has DOM, node doesn't, nodejs has other kind of APIs, nodejs has more freedom to access the os (because it has modules like filesystem, http server, even batteries, so you can create mobile app from nodejs), both nodejs and reactjs use npm for moduel managment, but what's the difference??
The confusing bit is that npm is a package manager for JavaScript, not necessarily node (even though node is in the name..). Therefore, we can use npm also for web applications. (If we do, we need to use a bundler like webpack though). Some npm modules might work both in the browser and in node, but some will only work on one of them. If the npm module requires some platform-spcific API (DOM for the browser for example) then it will not work for the other platform. https://stackoverflow.com/questions/58985983/general-question-about-reactjs-nodejs-and-npm
javascript?ECMAScript?Typescript?
JavaScript is a scripting language which helps you create interactive web pages. It followed rules of client-side programming, so it runs in the user's web browser without the need of any resources forms the web server. You can also use Javascript with other technologies like REST APIs, XML, and more. The idea behind developing this script is to make it a complementary scripting language like Visual Basic was to C++ in Microsoft's language families. However, JavaScript is not designed for large complex applications. It was developed for applications with a few hundred lines of code!
ECMAScript 6.0(以下简称 ES6)是 JavaScript 语言的下一代标准,ECMAScript 和 JavaScript 的关系是,前者是后者的规格,后者是前者的一种实现(另外的 ECMAScript 方言还有 JScript 和 ActionScript)。日常场合,这两个词是可以互换的。 https://es6.ruanyifeng.com/#docs/intro
TypeScript is a strict superset of ECMAScript 2015, which is itself a superset of ECMAScript 5, commonly referred to as JavaScript. As such, a JavaScript program is also a valid TypeScript program, and a TypeScript program can seamlessly consume JavaScript. Typescript is a modern age Javascript development language. It is a statically compiled language to write clear and simple Javascript code. It can be run on Node js or any browser which supports ECMAScript 3 or newer versions. Typescript provides optional static typing, classes, and interface. For a large JavaScript project adopting Typescript can bring you more robust software and easily deployable with a regular JavaScript application.
ECMAScript6 VS ECMAScript5 http://es6-features.org/#Constants
什么是transpiling:
React components are mostly written in modern JavaScript syntax. Take the class keyword for example. Stateful React components can be declared as classes, or as arrow (or regular functions). But older browsers don't understand ECMAScript 2015, thus we need some kind of transformation. That transformation is called transpiling. Webpack per-se doesn’t know how to transform JavaScript. Instead it relies on loaders: think of them as of transformers. A webpack loader takes something as the input and produces an output, called bundle.
for latest ECMAScript syntax support (like ES5, ES6). React.js library itself insists you to make use of the latest JavaScript’s offerings for cleaner, less and more readable code. But unfortunately our browsers do not understands most of the syntax and this is where we need Babel’s help.
babel-loader is the webpack loader responsible for talking to Babel. Babel on the other hand must be configured to use presets. We need two of them:
- babel preset env for compiling modern Javascript down to ES5
- babel preset react for compiling JSX and other stuff down to Javascript
create-react-app已经在package-lock.json锁定了webpack和Babel依赖
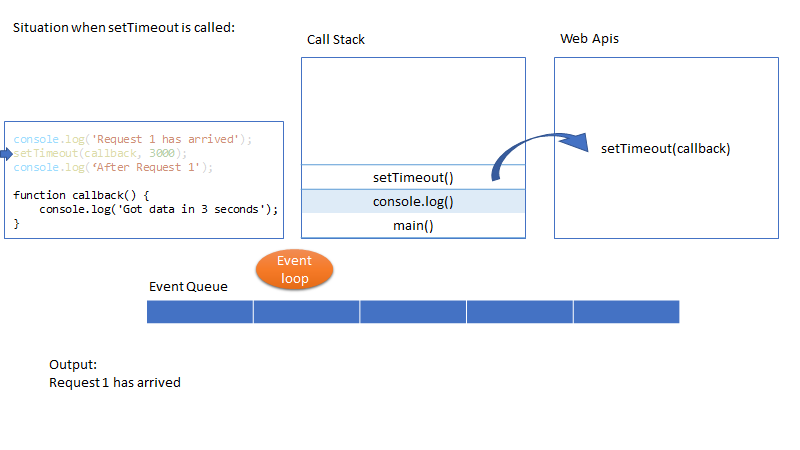
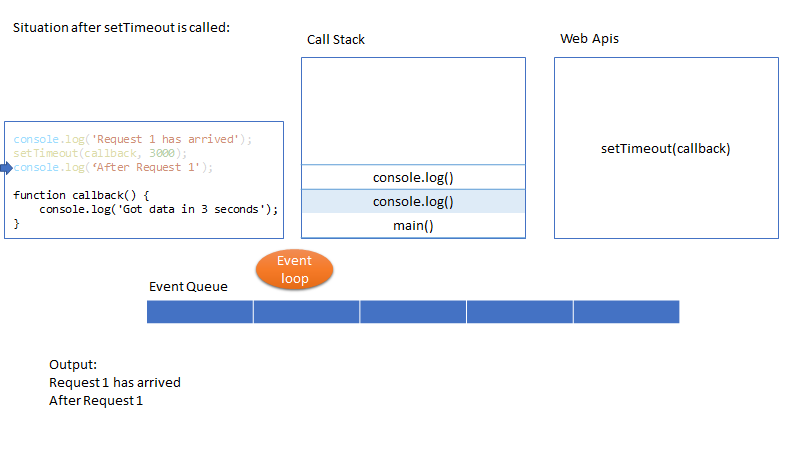
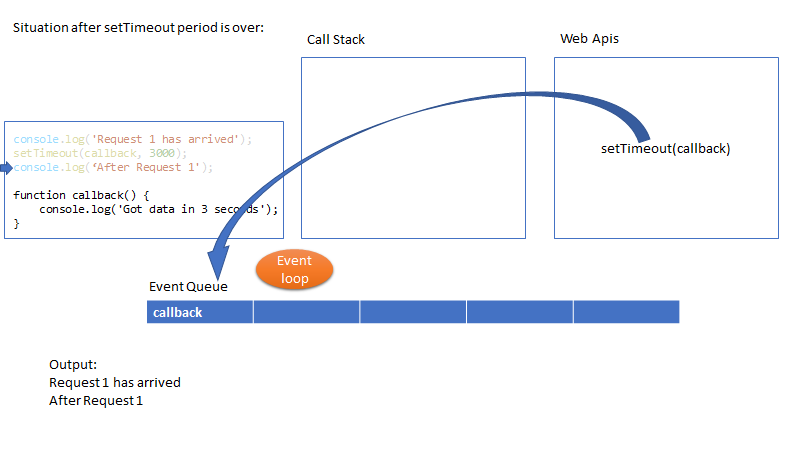
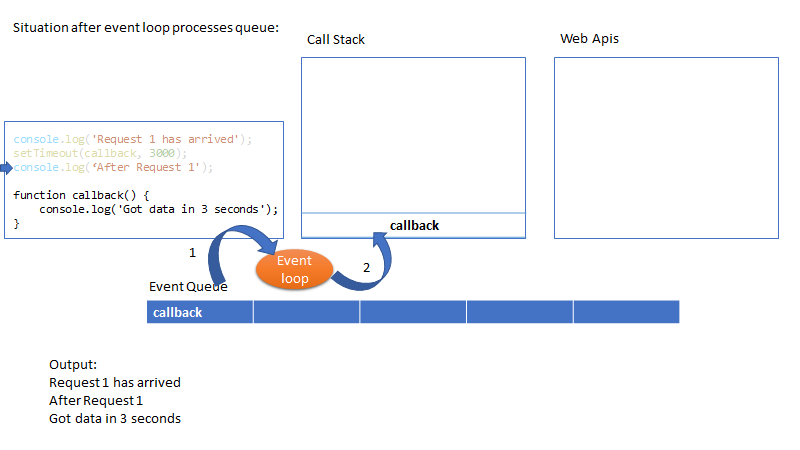
核心概念:event loop
Java Script is a Single threaded, non-blocking asynchronous concurrent language.
With other languages, when server receives request, it allocates a thread to fulfill it. As part of handling the request let’s say it queries the database and the thread waits till it gets the response back from database. So it requires new thread to server the another request. If we have large number of concurrent requests then server capacity is most likely to be run out and new requests may need to wait until some thread is available or we need more hardware for more concurrent requests.
Where as in JS (non-blocking IO), it is asynchronous by default. It has single thread to handle all requests. Thread doesn’t wait for the IO (for example DB response) and thread can be used to serve another request. In this example if there is a response from DB then it will be put in Event Queue. Node will monitor the queue and when there is an event in the queue, it will be processed in FIFO order.
This is why Node (btw, node is just a run time environment to run java script at server side) is suitable for I/O intensive apps (e.g. DB read or network access). In contrast, Node shouldn’t be used for CPU intensive apps like video encoding etc.
Understanding Important Concepts in JavaScript (opens new window)
# 1. JavaScript
latest version:ES6
Unlike most programming languages, the JavaScript language has no concept of input or output. It is designed to run as a scripting language in a host environment, and it is up to the host environment to provide mechanisms for communicating with the outside world. The most common host environment is the browser, but JavaScript interpreters can also be found in a huge list of other places, including Adobe Acrobat, Adobe Photoshop, SVG images, Yahoo's Widget engine, server-side environments such as Node.js, NoSQL databases like the open source Apache CouchDB, embedded computers, complete desktop environments like GNOME (one of the most popular GUIs for GNU/Linux operating systems), and others. https://developer.mozilla.org/en-US/docs/Web/JavaScript/
- Number
- String
- Boolean
- Symbol (new in ES2015)
- Object:
- Function
- Array
- Date
- RegExp
- null
- undefined
JavaScript objects can be thought of as simple collections of name-value pairs. As such, they are similar to:
- Dictionaries in Python.
- Hashes in Perl and Ruby.
- Hash tables in C and C++.
- HashMaps in Java.
- Associative arrays in PHP.
In classic Object Oriented Programming, objects are collections of data and methods that operate on that data. JavaScript is a prototype-based language that contains no class statement, as you'd find in C++ or Java (this is sometimes confusing for programmers accustomed to languages with a class statement). Instead, JavaScript uses functions as classes.
prototype:
function Person(first, last) {
  this.first = first;
  this.last = last;
}
Person.prototype.fullName = function() {
  return this.first + ' ' + this.last;
};
Person.prototype.fullNameReversed = function() {
  return this.last + ', ' + this.first;
};
Person.prototype is an object shared by all instances of Person. It forms part of a lookup chain (that has a special name, "prototype chain"): any time you attempt to access a property of Person that isn't set, JavaScript will check Person.prototype to see if that property exists there instead. As a result, anything assigned to Person.prototype becomes available to all instances of that constructor via the this object.
Closures:
Inner functions leads us to one of the most powerful abstractions that JavaScript has to offer — but also the most potentially confusing. What does this do?

function makeAdder(a) {
  return function(b) {
    return a + b;
  };
}
var add5 = makeAdder(5);
var add20 = makeAdder(20);
add5(6); // ?
add20(7); // ?

The name of the makeAdder() function should give it away: it creates new 'adder' functions, each of which, when called with one argument, adds it to the argument that it was created with.

What's happening here is pretty much the same as was happening with the inner functions earlier on: a function defined inside another function has access to the outer function's variables. The only difference here is that the outer function has returned, and hence common sense would seem to dictate that its local variables no longer exist. But they do still exist — otherwise, the adder functions would be unable to work. What's more, there are two different "copies" of makeAdder()'s local variables — one in which a is 5 and the other one where a is 20. So the result of that function calls is as follows:

add5(6); // returns 11
add20(7); // returns 27

Here's what's actually happening. Whenever JavaScript executes a function, a 'scope' object is created to hold the local variables created within that function. It is initialized with any variables passed in as function parameters. This is similar to the global object that all global variables and functions live in, but with a couple of important differences: firstly, a brand new scope object is created every time a function starts executing, and secondly, unlike the global object (which is accessible as this and in browsers as window) these scope objects cannot be directly accessed from your JavaScript code. There is no mechanism for iterating over the properties of the current scope object, for example.

So when makeAdder() is called, a scope object is created with one property: a, which is the argument passed to the makeAdder() function. makeAdder() then returns a newly created function. Normally JavaScript's garbage collector would clean up the scope object created for makeAdder() at this point, but the returned function maintains a reference back to that scope object. As a result, the scope object will not be garbage-collected until there are no more references to the function object that makeAdder() returned.

Scope objects form a chain called the scope chain, similar to the prototype chain used by JavaScript's object system.

A closure is the combination of a function and the scope object in which it was created. Closures let you save state — as such, they can often be used in place of objects.
Var, let and const- what's the difference? https://dev.to/sarah_chima/var-let-and-const--whats-the-difference-69e
# JS 基本语法
if( value ) {
}
will evaluate to true if value is not:
- null
- undefined
- NaN
- empty string ("")
- 0
- false
var labels = document.getElementsByClassName('xxxx');
for (var i = 0; i < labels.length; i++) {
	var span=labels[i].getElementsByTagName('span');
	if(span.length>0){
		if(span[0].getAttribute('title')=='查看'){
			labels[i].getElementsByTagName("input")[0].click();
			console.log('gotcha');
		}
	}
}
js code samples in https://github.com/lyhistory/learn_coding/tree/master/frontend
# 2. nodejs/reactjs共同开发环境
# 2.1 npm
# npm安装
---------------------------------------------------------------------------------------
--- ubuntu
---------------------------------------------------------------------------------------
一般安装nodejs就自动自带按照npm,但是Ubuntu貌似并非如此
apt install npm
但是默认版本很低,升级:
sudo npm install -g npm
hash -d npm
---------------------------------------------------------------------------------------
--- centos
---------------------------------------------------------------------------------------
yum install nodejs
yum uninstall nodejs

---------------------------------------------------------------------------------------
--- redhat
---------------------------------------------------------------------------------------
https://github.com/nodesource/distributions/blob/master/README.md#rpminstall

$ curl -fsSL https://rpm.nodesource.com/setup_15.x | sudo bash -

$ yum repolist
Loaded plugins: product-id, search-disabled-repos, subscription-manager
This system is not registered with an entitlement server. You can use subscription-manager to register.
repo id           repo name     											status
nodesource/x86_64 Node.js Packages for Enterprise Linux 7 - x86_64          37
repolist: 55,117

## Inspecting system...
+ rpm -q --whatprovides redhat-release || rpm -q --whatprovides centos-release || rpm -q --whatprovides cloudlinux-release || rpm -q --whatprovides sl-release
+ uname -m
## Confirming "el7-x86_64" is supported...
+ curl -sLf -o /dev/null 'https://rpm.nodesource.com/pub_15.x/el/7/x86_64/nodesource-release-el7-1.noarch.rpm'
## Downloading release setup RPM...
+ mktemp
+ curl -sL -o '/tmp/tmp.YhLB6BeGzL' 'https://rpm.nodesource.com/pub_15.x/el/7/x86_64/nodesource-release-el7-1.noarch.rpm'
## Installing release setup RPM...
+ rpm -i --nosignature --force '/tmp/tmp.YhLB6BeGzL'
## Cleaning up...
+ rm -f '/tmp/tmp.YhLB6BeGzL'
## Checking for existing installations...
+ rpm -qa 'node|npm' | grep -v nodesource

## Run `sudo yum install -y nodejs` to install Node.js 15.x and npm.
## You may also need development tools to build native addons:
     sudo yum install gcc-c++ make
## To install the Yarn package manager, run:
     curl -sL https://dl.yarnpkg.com/rpm/yarn.repo | sudo tee /etc/yum.repos.d/yarn.repo
     sudo yum install yarn

---------------------------------------------------------------------------------------
--- Upgrade to nodejs8
---------------------------------------------------------------------------------------
https://tech.amikelive.com/node-663/quick-tip-installing-nodejs-8-on-centos-7/
yum install epel-release
curl --silent --location https://rpm.nodesource.com/setup_8.x | sudo bash -
yum install gcc-c++ make
yum install -y nodejs

在console运行,会提示找不到module,比如 cannot find module 'request'
只需要执行npm -request即可,如果提示 Error: ENOENT, stat '\AppData\Roaming\npm'
只需要当前目录下创建npm即可

---------------------------------------------------------------------------------------
--- windows安装node js
---------------------------------------------------------------------------------------
Windows upgrade npm
npm install -g npm-windows-upgrade npm-windows-upgrade
# npm 使用
npm包路径node module path:
%appdata%\Roaming\npm\node_modules 或 ~/node_modules/
常用命令
--------------------------------------------
--- view
--------------------------------------------
node --version
npm --version
npx -version

node -v
npm -v

npm list -g --depth=0
npm view vuepress version
npm outdated

--------------------------------------------
--- install
--------------------------------------------
npm install -D(--save-dev)
https://stackoverflow.com/questions/23177336/what-does-npm-d-flag-mean
https://stackoverflow.com/questions/19223051/what-does-save-dev-mean-in-npm-install-grunt-save-dev

npm install vuepress@latest
--------------------------------------------
--- update
--------------------------------------------
Use npm outdated to discover dependencies that are out of date
Use npm update to perform safe dependency upgrades
Use npm install <packagename>@latest to upgrade to the latest major version of a package
Use npx npm-check-updates -u and npm install to upgrade all dependencies to their latest major versions
项目package.json:
不管是手动创建还是自动创建的nodejs或者reactjs项目,比如: nodejs的webpack(比如truffle的https://www.trufflesuite.com/boxes/webpack), reactjs的create-react-app(truffle也有react版本https://www.trufflesuite.com/boxes/react), 最终生成的项目都必有package.json,其中也必然含有:
a)依赖 dependencies
"devDependencies": {
    "copy-webpack-plugin": "^5.0.5",
    "webpack": "^4.41.2",
    "webpack-cli": "^3.3.10",
    "webpack-dev-server": "^3.9.0"
  },
  "dependencies": {
    "web3": "^1.2.4"
  }
b)执行脚本 scripts
  "scripts": {
    "start": "react-scripts start",
    "build": "react-scripts build",
    "test": "react-scripts test",
    "eject": "react-scripts eject"
  },
# npm仓库
npm私有仓库搭建 https://www.jianshu.com/p/cf2e9f580e6d
# 2.2 vscode
# 离线安装
#安装插件
插件市场搜索
https://marketplace.visualstudio.com/items?itemName=dbaeumer.vscode-eslint
右侧有个 Download Extension 点击下载
放到vscode的安装目录如 D:\Microsoft VS Code\bin
打开cmd
code --install-extension *.vsix

#安装npm
连线机器
>npm install -g npm-bundle
>npm install -g eslint
>npm-bundle eslint
eslint-7.8.1.tgz
目标机器
>npm install -g ./eslint-7.8.1.tgz

npm-bundle的本质是借助npm pack来实现打包的。npm pack会打包包本身以及bundledDependencies中的依赖,npm-bundle则是将pm2的所有dependencies记录到bundledDependencies,来实现所有依赖的打包。
这种方式不需要安装多余的devDependencies,并且不需要克隆pm2的源码
# ESLINT
https://marketplace.visualstudio.com/items?itemName=dbaeumer.vscode-eslint
preference->settings->search eslint->edit in settings.json
   "editor.codeActionsOnSave": {
        "source.fixAll": true
    }
# Debug
.eslintrc.js
rules: {
    'no-debugger': 0,
    .....
  }

然后代码里面可以用 debugger 下断点
# js开发
create Components without any frontend tooling (no React, Babel, Webpack, etc) https://discuss.streamlit.io/t/code-snippet-create-components-without-any-frontend-tooling-no-react-babel-webpack-etc/13064
# webpack
https://wangtunan.github.io/blog/webpack/webpack/loader.html#%E5%A6%82%E4%BD%95%E7%BC%96%E5%86%99%E5%8F%8A%E4%BD%BF%E7%94%A8%E8%87%AA%E5%B7%B1%E7%9A%84loader
Webpack has some main concepts which we need to understand clearly before digging in its practical implementation. Let’s examine them one by one:
- Entry: the entry point is the module that webpack uses to start building its internal dependency graph. From there, it determines which other modules and libraries that entry point depends on (directly and indirectly) and includes them in the graph until no dependency is left. By default, the entry property is set to ./src/index.js, but we can specify a different module (or even multiple modules) in the webpack configuration file.
- Output: the output property instructs webpack where to emit the bundle(s) and what name to use for the file(s). The default value for this property is ./dist/main.js for the main bundle and ./dist for other generated files — such as images, for example. Of course, we can specify different values in the configuration depending on our needs.
- Loaders: by default, webpack only understands JavaScript and JSON files. To process other types of files and convert them into valid modules, webpack uses loaders. Loaders transform the source code of non-JavaScript modules, allowing us to preprocess those files before they’re added to the dependency graph. For example, a loader can transform files from a CoffeeScript language to JavaScript or inline images to data URLs. With loaders we can even import CSS files directly from our JavaScript modules.
- Plugins: plugins are used for any other task that loaders can’t do. They provide us with a wide range of solutions about asset management, bundle minimization and optimization, and so on.
- Mode: typically, when we develop our application we work with two types of source code — one for the development build and one for the production build. Webpack allows us to set which one we want to be produced by changing the mode parameter to development, production or none. This allows webpack to use built-in optimizations corresponding to each environment. The default value is production. The none mode means that no default optimization options will be used. To learn more about the options webpack uses in development and production mode
https://www.sitepoint.com/webpack-beginner-guide/
mkdir learn-webpack
cd learn-webpack
npm init -y

npm install webpack webpack-cli --save-dev

vim package.json:

"scripts": {
  "test": "echo \"Error: no test specified\" && exit 1",
  "dev": "webpack --mode development",
  "build": "webpack --mode production"
},

mkdir -p src

vim index.js:

console.log("Hello, Webpack!");

npm run dev (what webpack does when we run the dev task is to get the source code from index.js file and bundle the final code in a main.js file.)

But to verify that we get the correct output, we need to display the result in the browser. To do that, let’s create an index.html file in the dist directory:

<!doctype html>
<html>
  <head>
    <title>Getting Started With Webpack</title>
  </head>
  <body>
    <script src="main.js"></script>
  </body>
</html>

 But writing our index.html file manually can be problematic in some cases. For example, if we change the name of our entry point, the generated bundle will be renamed, but our index.html file will still reference the old name. So, we’ll need to update our HTML file manually every time we rename an entry point or add new one. Fortunately, we can easily fix that with the html-webpack-plugin. Let’s install it now:

npm install html-webpack-plugin --save-dev

At this point, to activate the plugin, we need to create a webpack.config.js file in the root directory with the following content:
const HtmlWebpackPlugin = require("html-webpack-plugin");
const path = require('path');

module.exports = {
  plugins: [
    new HtmlWebpackPlugin({
      title: "Webpack Output",
    }),
  ],
};

run
npm run dev
again
will update dist/index.html or create a one if not exists

Let’s now expand our project and specify custom names for the entry and output properties. In webpack.config.js we add the following before the plugins property:

entry: {
  main: path.resolve(__dirname, './src/app.js'),
},
output: {
  filename: '[name].bundle.js',
  path: path.resolve(__dirname, 'deploy')
},

Here, we change the entry file to app.js and the output folder to deploy. We also tweak the name of the generated bundle file slightly. Now it will start with the name of the entry (“main”) followed by the word “bundle” and the .js file extension.

Next, we rename index.js to app.js

we’ll create an src/component.js file:

export default (text = "Hello, Webpack!") => {
  const element = document.createElement("h1");

  element.innerHTML = text;

  return element;
};

update app.js:
import component from './component';

document.body.appendChild(component());


npm run dev


Transpiling Modern JavaScript to ES5

we’ll discover how ES6 can be transpiled to ES5-compliant code that works in all browsers. Let’s start by running the following command:

npm run dev -- --devtool inline-source-map

Here, I run webpack with devtool option set to inline-source-map in order to render the code more readable. This way I can demonstrate the code transpilation from ES6 to ES5 more clearly.

Next, let’s open main.bundle.js:

As you can see, the modern ES6 features (the arrow function and the const declaration) from component.js module are not transformed to ES5-compliant code by default. To make our code work in older browsers, we must add the Babel loader:

npm install babel-loader @babel/core @babel/preset-env --save-dev

Then, in webpack.config.js add module after the output property:
module: {
  rules: [
    {
      test: /\.js$/,
      exclude: /node_modules/,
      use: {
        loader: 'babel-loader',
        options: {
          presets: ['@babel/preset-env']
        }
      }
    },
  ]
},

When we define rules for a webpack loader, there are usually three main properties we need to define:

test, which describes what kind of files should be transformed.
exclude, which defines the files that shouldn’t be processed from the loader(s), if we have such.
use, which tells which loader(s) should be used against the matched modules. Here, we can also set the loader options, as we’ve just done with the presets option.

Run the following command again:
npm run dev -- --devtool inline-source-map

This time, the code in main.bundle.js is compiled

Now we can use the modern JS features, and webpack will transform our code so it can be executed by older browsers.


Working with Styles

npm install css-loader style-loader --save-dev

css-loader parses the CSS into JavaScript and resolves any dependencies
style-loader outputs our CSS into a <style> tag in the HTML document.

webpack.config.js

module: {
  rules: [
    ...
    {
      test: /\.css$/,
      use: ["style-loader", "css-loader"]
    },
  ]
},

create a file src/style.css:
h1 {
  color: red;
}

import it into app.js:
import './style.css';

Asset Management
Most often your project will contain assets such as images, fonts, and so on. In webpack 4, to work with assets, we had to install one or more of the following loaders: file-loader, raw-loader, and url-loader. In webpack 5, as we saw earlier, this is not needed anymore, because the new version comes with the built-in asset modules.

webpack.config.js:
module: {
  rules: [
    ...
    {
      test: /\.(?:ico|gif|png|jpg|jpeg)$/i,
      type: 'asset/resource',
    },
  ]
},

to test the loader we’ll create an image-component.js file, in the src directory, with the following content:

import image from "./image.png";

const img = document.createElement("img");
img.src = image;
document.body.appendChild(img);

app.js:
import './image-component';


Configuring the webpack dev server

You don't want to type npm run build every time you change a file.
Once configured webpack will launch your application inside a browser. Also, every time you save a file after a modification webpack dev server will refresh the browser's window.

npm i webpack-dev-server --save-dev

package.json

"start": "webpack-dev-server --open --mode development",


webpack.config.js
 adding the following property after the output:
devServer: {
  contentBase: './deploy',
  open: true
},


Clean Up the Output
As our project progresses, the deploy folder might become quite cluttered. On every build, webpack will generate the bundles and put them in the deploy folder, but it doesn’t keep track of which files are actually in use by your project. So it’s a good practice to clean the deploy folder before each build, so that only the files in use will be generated. To do this, we need to install and configure the clean-webpack-plugin:

npm install clean-webpack-plugin --save-dev

In webpack.config.js:
const { CleanWebpackPlugin } = require('clean-webpack-plugin');

...

plugins: [
  ...
  new CleanWebpackPlugin()
],
https://zhuanlan.zhihu.com/p/47390957
# 3.nodejs开发
后端框架,虽然是用JavaScript,但是是后端代码,当然一般不直接用JavaScript,而是用超类typescript,可以更好的管理大项目架构,需要编译成JavaScript;
# 4.reactJS开发
前端框架,引入了virtual dom的概念 (opens new window), 前面也说过,其实reactjs也是有server-side服务端功能的,不过一般都是说服务端动态渲染,Demystifying server-side rendering in React (opens new window)
一般来说都只是将reactjs作为前端,然后搭配一个后端程序来获取动态数据,后端程序可以是nodejs、java等等;
# 5. Angularjs
ref:
Tutorial: How to set up React, webpack, and Babel from scratch (2020) (opens new window)
Getting started with REACT.js, using Webpack and Babel (opens new window)
How to Setup React and Node JS in a project (opens new window)