回目录 《spring分布式微服务入门》
# Overview
我们今天来梳理归纳一下java的开发框架,首先为什么需要框架?
- 节约成本
不可能所有东西都从零造起,成本太高,spring融合了市场上大部分的开源项目,可以直接‘免费’利用
- 安全考虑
当前网络环境复杂,攻击无处不在,成熟的框架已经被主流公司接受使用,很多坑已经被前人踩过,站在巨人的肩膀上是明智之选,不用交额外的智商税
- 业务发展
spring boot不只是框架,还是spring cloud的一部分,spring cloud是微服务架构的一套完整是有序框架集合, spring是建筑材料,spring boot是脚手架,spring cloud就是行业规范,采用行业规范的开发模式有利于IT更好的服务business和业务拓展
# SOA?微服务?
我们常说用spring boot构建微服务,又说spring cloud构建微服务,他们到底是什么关系?
引用我在微服务架构一章中关于微服务的解释:
首先微服务是啥,微服务首先是一种架构思想, 首先最初的很多产品都是单体monolithic架构,所有的服务都紧紧耦合在一个解决方案中,难以扩展,只能通过加cpu加内存的方式扩展,举例一个电商平台, 刚开始所有功能都放在一个解决方案,比如托管在Apache的一个war或者托管在iis的一个.net mvc程序, 随着项目的发展,团队的壮大,单体会变得庞大而难以维护,我们需要将功能拆分开,比如商家系统、买家系统、管理后台系统等,面向业务或者叫服务切分,分而治之,这种粒度的就是SOA架构, 其显著缺点: 1.从技术的角度,其实业务的切分在技术层面上仍然会有大面积的重叠,因此如果业务切割的不好,形成各种依赖,有可能在修改时牵一发而动全身 2.从业务角度来说,由于是业务的切分,所以当需要发展新的业务时就需要重新构建一个完全新的服务,不利于基于业务创新和发现 所以引入微服务的概念,微服务进一步将服务自底向上或自上到下做更细的切分,最下面是基础系统服务(短信、邮件、存储、缓存、消息推送等),中间是共享服务(支付系统、订单系统、仓储系统等), 最上面则是业务层(零售系统、团购系统、采购系统),比如我们要加一个闪购业务也是很轻松的,不用从底到上再来一遍,只需要基于基础服务和共享服务做业务开发
# spring VS Springboot
# Spring Boot 不是一个新的 IoC 容器,它只是 Spring Framework 的上层封装。
Rod Johnson创建的开源框架interface21是 Spring的前身,随着spring从小框架发展为大而全的企业级框架,spring对市面上主流的开源软件都有了对应的组件支持, 人们发现使用spring项目开发变得难用,往往需要引入很多配置,难以维护容易出错,spring因此冠名配置地狱;
Spring boot是基于spring抽象出来的开发框架,是快速开发的scaffold脚手架,spring boot丧心病狂的运用依赖注入DI的思想,配置文件可以auto config,用户只需要定义好需要的bean, spring boot的大容器会进行管理,丰富的starter让开发者可以集中精力在业务逻辑上而不是依赖的配置管理;
依赖注入的思想简单来说就比如小孩要从冰箱拿吃的,但是不应该自己拿,应该交由家长来处理,因为小孩可能会忘记关冰箱门,可能会打乱冰箱里面其他东西,总之小孩这个组件应该只关心自己的事情,不要做这些大人才能做好的事情, 所以从冰箱拿东西吃要交由家长处理,在spring boot中,小孩可以采用构造函数注入或者setter based如autowired方式来使用家长组件;
Spring Boot 不是对 Spring 的替代,而是在 Spring 基础上的"封装和增强",解决的是 Spring 自身的痛点。核心差异:
- 配置方式:从"XML地狱"到"零配置启动"
- 依赖管理:从"版本地狱"到"起步依赖"
- 内嵌服务器:从"部署战争"到"java -jar"
- 自动配置(Auto-Configuration):最核心的差异 这是 Spring Boot 的灵魂。原理一句话:根据 classpath 里有什么依赖,自动帮你配好对应的 Bean。
- 生产级特性:Actuator Spring 本身没有内置的运维监控能力。Spring Boot Actuator 提供:spring-boot-starter-actuator
- 开发体验:DevTools spring-boot-devtools
Spring Boot 有什么缺点? JAR 包体积大(内嵌容器+所有依赖);启动时间比传统部署稍长;自动配置的"黑盒感"有时会让排查问题变难(需要理解自动配置原理);对于极简场景有些"杀鸡用牛刀"。
# 为什么叫 Spring Bean 而不是 Spring Boot Bean
Bean 的管理者是 Spring Framework,不是 Spring Boot Spring Boot Application ↓ 启动 SpringApplication.run() ↓ 创建并启动 ApplicationContext(来自 Spring Framework) ↓ 管理 Bean 的整个生命周期
Spring Boot 做的事情是:
自动帮你创建了 ApplicationContext(以前你要自己写 new ClassPathXmlApplicationContext("app.xml"))
自动帮你扫描和注册 BeanDefinition(以前你要手动在 XML 里一个个
自动配置一堆常用组件(DataSource、WebMvc 等)
但它没有自己实现一套 Bean 的创建、注入、初始化、销毁流程。这些全是 Spring Framework 的 AbstractApplicationContext、DefaultListableBeanFactory、BeanFactory在做。
所以:Bean 的生命周期 = Spring Framework 的 Bean 生命周期。跟 Spring Boot 无关。
We usually say Spring Bean, not Spring Boot Bean. Because the IoC container and bean lifecycle management come from Spring Framework. Spring Boot is just a layer on top that simplifies configuration through auto-configuration and starter dependencies. Whether you define a bean with XML, @Component, or @Bean, it all goes through the same Spring container — same lifecycle, same scope, same proxy mechanism.
# XML 和注解的本质区别 —— 只是"配置方式"不同
传统 Spring 用 XML,Spring Boot 用注解。但这只是 Bean 定义的来源不同,Bean 本身和生命周期完全一样。 关键认知:注解不是 Spring Boot 发明的
Spring 2.5 (2007) 引入的特性 @Autowired、@Component、@Service、@Repository Spring 3.0 (2009) 引入的特性 @Configuration、@Bean、@ComponentScan Spring 3.1 (2011) 引入的特性 @Profile Spring 4.x 引入的特性 @Conditional Spring Boot 1.0 (2014) 引入的特性 啥新注解都没加,只是用上面的东西做了自动配置,没有发明任何新的 Bean 管理方式。 它只是把 Spring Framework 已有的注解能力组合成了"自动配置"(比如 @EnableAutoConfiguration背后就是一堆 @Conditional判断)。 refresh()里的 12 个步骤,从 Spring 2.x 到 Spring 6.x,核心流程几乎没变
# Spring Boot 到底多了什么
| 能力 | 传统 Spring | Spring Boot |
|---|---|---|
| 定义 Bean | XML <bean> 或 @Component | @Component / @Bean(一样) |
| 依赖注入 | @Autowired | @Autowired(一样) |
| 生命周期 | @PostConstruct | @PostConstruct(一样) |
| 扫描包 | XML 里配 <context:component-scan> | @SpringBootApplication 自动扫(底层还是 ComponentScan) |
| 第三方库集成 | 手写 XML 配置 | spring-boot-starter-* 自动配置(底层还是 @Configuration + @Conditional) |
| 嵌入 Web 容器 | 外置 Tomcat + WAR | 内嵌 Tomcat + JAR(容器变了,Bean 没变) |
# SpringBoot SpringCloud
spring-cloud是一套完整的微服务解决方案,是一系列框架的有序集合,提供了分布式的各种解决方案: 服务开发(springBoot spring springMVC)、服务配置中心(SpringCloudConfig Chef)、服务发现(eureka zookeeper)、服务调用(rest rpc)、负载均衡(ribbon nginx)、服务熔断器、服务监控、服务部署(docker kubernetes)、消息队列(kafka rabbitmq)
所以可见一个个具体的微服务(这里说的微服务就是具体的一个个应用了)是用spring boot开发,spring cloud又提供了服务配置中心、服务注册发现等所谓微服务治理的解决方案
1.spring boot是一个快速开发框架,应该说是spring系列的集大成者。我们可以简单的把spring boot理解成是一个快速开发的脚手架。 2.微服务往往是指Spring Cloud,微服务是一个框架。 3.如果把基于微服务架构的软件比作是一个大厦,钢筋混凝土结构就是spring cloud,而砖头瓦块等就是spring boot。微服务的一个一个服务是用spring boot开发的,spring cloud提供服务注册与发现、负载均衡、API网管、熔断路由、配置中心等框架性服务,当然一个完整的微服务系统有很多其他的内容,例如服务拆分、监控、限流降级等等。
dubbo常常拿来跟spring cloud对比,实际目前已经不具有可比性了,Dubbo现在只是一款高性能的Java RPC框架,只能跟spring cloud集合中的服务调用部分REST RPC做对比
spring cloud alibaba是spring cloud的其中一个微服务解决方案
# Spring Framework
# JVM 类加载机制(前置知识)
JVM 在 HotSpot 实现中提供了 3 种内置类加载器:Bootstrap ClassLoader(加载核心类库)、Platform ClassLoader(Java 9+,替代原有的 Extension ClassLoader)、Application ClassLoader(加载应用的 classpath)。它们遵循双亲委派模型:一个类加载器收到加载请求时,先委派父加载器处理,只有父加载器无法加载时才自己尝试。这保证了核心类库不会被篡改,比如无论谁加载 java.lang.Object,最终都由 Bootstrap 加载,得到的是同一个对象。
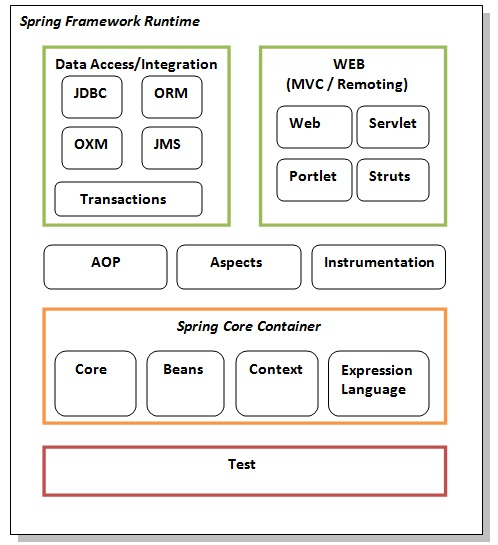
# Spring 整体架构(模块划分)
# IoC/DI 核心思想
New->Factory->容器
new: 你 → new → 对象 工厂: 你 → factory.create() → 对象 IoC容器: 容器 → 自动注入 → 你(你声明需要什么,容器给你)
Bean 是什么?(Spring bean)
The objects that form the backbone of your application and that are managed by the Spring IoC container are called beans. A bean is an object that is instantiated, assembled, and otherwise managed by a Spring IoC container. https://www.tutorialspoint.com/spring/spring_bean_definition.htm
Spring Bean VS Java Bean:
Java Beans are simple Java classes that encapsulate objects, while Spring Beans are managed by the Spring Framework and are used for dependency injection and lifecycle management.
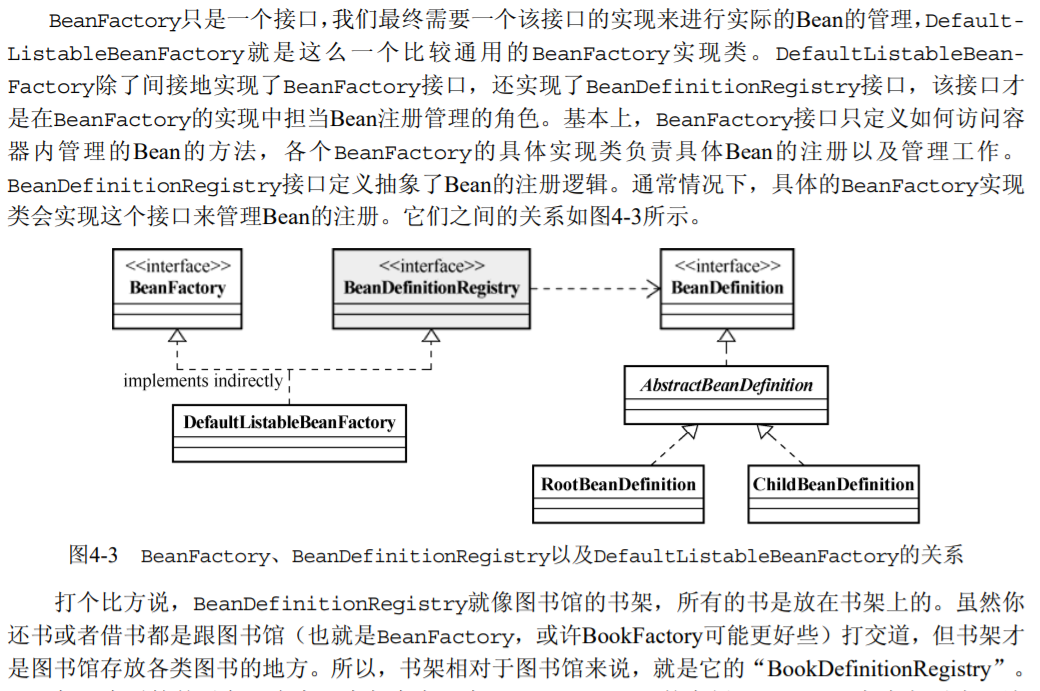
IoC容器想要管理各个业务对象以及它们之间的依赖关系,需要通过某种途径来记录和管理这些信息。 BeanDefinition对象就承担了这个责任:容器中的每一个bean都会有一个对应的BeanDefinition实例,该实例负责保存bean对象的所有必要信息,包括bean对象的class类型、是否是抽象类、构造方法和参数、其它属性等等。 当客户端向容器请求相应对象时,容器就会通过这些信息为客户端返回一个完整可用的bean实例; 默认是单例模式;
事先这些bean需要向大管家注册,BeanDefinitionRegistry抽象出bean的注册逻辑,BeanFactory则抽象出了bean的管理逻辑,而各个BeanFactory的实现类就具体承担了bean的注册以及管理工作 然后大管家生成bean也是通过这个工厂模式; DefaultListableBeanFactory作为一个比较通用的BeanFactory实现,它同时也实现了BeanDefinitionRegistry接口,因此它就承担了Bean的注册管理工作, 具体的beanFactory实现类就是实现了DefaultListableBeanFactory这个接口;
# 容器架构(BeanFactory → ApplicationContext → 扩展接口)
IoC容器是大管家,你只需要告诉它需要某个bean,它就把对应的实例(instance)扔给你,至于这个bean是否依赖其他组件,怎样完成它的初始化,根本就不需要你关心。
Spring提供了两种容器类型:BeanFactory和ApplicationContext:
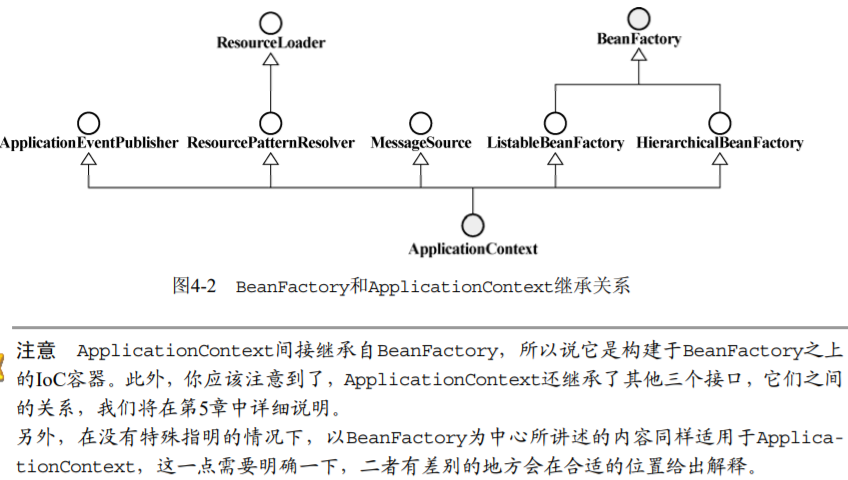
BeanFactory只是Spring IoC容器的一种实现,如果没有特殊指定,它采用采用延迟初始化策略:只有当访问容器中的某个对象时,才对该对象进行初始化和依赖注入操作。 对于资源有限,并且功能要求不是很严格的场景,BeanFactory是比较合适的IoC容器选择。
而在实际场景下,我们更多的使用另外一种类型的容器: ApplicationContext,它构建在BeanFactory之上,属于更高级的容器,除了具有BeanFactory的所有能力之外,还提供对事件监听机制以及国际化的支持等。它管理的bean,在容器启动时全部完成初始化和依赖注入操作。
ApplicationContext所管理的对象,在该类型容器启动之后,默认全部初始化并绑定完成。所以,相对于BeanFactory来说,ApplicationContext要求更多的系统资源,同时,因为在启动时就完成所有初始化,容器启动时间较之BeanFactory也会长一些。
在那些系统资源充足,并且要求更多功能的场景中,ApplicationContext类型的容器是比较合适的选择。
Spring IoC容器的整个工作流程大致可以分为两个阶段:
容器启动阶段
容器启动时,会通过某种途径加载 ConfigurationMetaData, ConfigurationMetaData可能定义在代码中,比如注解方式,也可能在在外部配置文件(XML/Properties)中, ,容器需要依赖某些工具类如BeanDefinitionReader,BeanDefinitionReader会对加载的 ConfigurationMetaData进行解析和分析,并将分析后的信息组装为相应的BeanDefinition, 最后把这些保存了bean定义的BeanDefinition,注册到相应的BeanDefinitionRegistry, 这样容器的启动工作就完成了。
Bean的实例化阶段
这个阶段触发是:当某个请求通过容器的getBean方法请求某个对象,或者因为依赖关系容器需要隐式的调用getBean时(如bean的注解@DependsOn 或者Autowired); 容器会首先检查所请求的对象之前是否已经实例化完成。如果没有,则会根据注册的BeanDefinition所提供的信息实例化被请求对象,并为其注入依赖。当该对象装配完毕后,容器会立即将其返回给请求方法使用。
Notes:Autowire vs getbean:
Injecting a Prototype Bean into a Singleton Bean Problem (opens new window)
# Environment vs ApplicationContext
Environment是ApplicationContext的一部分
一句话区分: Environment 管"配置从哪来、当前是什么环境",ApplicationContext 管"Bean 怎么创建、怎么协作、生命周期怎么走"。
Environment= 建筑工地的施工图纸+材料清单(告诉你要建什么、用什么材料)
ApplicationContext= 整栋楼+物业管理系统(建成后所有设施运转的地方)
Environment(环境抽象) 核心职责:统一管理配置属性和环境标识(Profile)
解决的问题:屏蔽配置来源的差异性——无论是 application.yml、环境变量、命令行参数还是远程配置中心,对上层都暴露为同一个 getProperty()API
三大组成:
- PropertySources:所有配置源的抽象集合(有优先级顺序)
- Profiles:环境标识(如 dev/test/prod),决定哪些 Bean/配置生效
- PropertyResolver:统一的属性解析和类型转换 API
创建时机:在 ApplicationContext 创建之前就已经准备好,是容器启动的前置依赖
ApplicationContext(应用上下文)
核心职责:Spring 容器的顶层抽象,管理 Bean 的完整生命周期
本质:在 BeanFactory 的基础上,增加了企业级服务能力
继承体系:
ApplicationContext
├── BeanFactory(Bean 定义和生命周期管理)
├── MessageSource(国际化)
├── ApplicationEventPublisher(事件发布)
├── ResourceLoader(统一资源访问)
└── EnvironmentCapable(持有 Environment 引用)


ApplicationContext(应用上下文)
├── Environment(环境配置)
│   ├── PropertySources(属性源)
│   ├── Profiles(环境配置)
│   └── 配置数据存取API
│
├── BeanFactory(Bean管理)
├── MessageSource(国际化)
├── ApplicationEventPublisher(事件发布)
├── ResourceLoader(资源加载)
└── 其他容器服务

SpringApplication.run()
  │
  ├── 1. 创建并准备 Environment(加载配置、激活 Profile)
  │
  ├── 2. 创建 ApplicationContext
  │     └── 把 Environment 注入进去(setEnvironment)
  │
  └── 3. 刷新容器(此时 Bean 定义加载、自动配置等才开始)
Q:Environment 和 @Value 是什么关系?
Environment 是底层存储,@Value 是上层消费方式。当你写 @Value("${server.port}")时,Spring 实际上是通过 Environment.getProperty("server.port")来解析的。@Value只是一个注解驱动的便捷方式,底层全靠 Environment。
# Beans
Spring uses the class name and converts the first letter to lowercase. (opens new window)
# Spring Bean 作用域
- singleton / prototype / request / session
# Spring Bean 生命周期完整时序图
┌─────────────────────────────────────────────────────────────────────────────┐
│                        Spring IoC Container Startup                          │
├─────────────────────────────────────────────────────────────────────────────┤
│
   │
│  1. 扫描 & 解析配置
   │
│     ├── 读取 @ComponentScan / @Import / XML
   │
│     └── 将 BeanDefinition 注册到 BeanFactory
   │
│
   │
│  2. 实例化前 (Instantiation Aware)
   │
│     ├── BeanFactoryPostProcessor 执行(可修改 BeanDefinition)
   │
│     └── InstantiationAwareBeanPostProcessor.postProcessBeforeInstantiation()
   │
│
   │
│  3. 实例化 (Instantiation)
   │
│     └── 调用构造器创建对象(此时依赖还没注入,对象处于"半成品"状态)
   │
│         ├── ★ 如果有构造器注入 → 递归触发依赖 Bean 的创建(回到步骤2)
   │
│         └── ★ 这就是"构造器注入控制顺序"的底层原因
   │
│
   │
│  4. 属性填充 (Populate Properties)
   │
│     ├── 解析 @Autowired / @Value / @Resource
   │
│     ├── 字段注入 & Setter 注入在这里完成
   │
│     └── InstantiationAwareBeanPostProcessor.postProcessProperties()
   │
│
   │
│  5. Aware 回调
   │
│     ├── BeanNameAware.setBeanName()
   │
│     ├── BeanClassLoaderAware.setBeanClassLoader()
   │
│     ├── BeanFactoryAware.setBeanFactory()
   │
│     └── ApplicationContextAware.setApplicationContext()
   │
│
   │
│  6. 初始化前 (Before Initialization)
   │
│     └── BeanPostProcessor.postProcessBeforeInitialization()
   │
│         ├── @PostConstruct 就是在这里被调用的!
   │
│         └── ApplicationContext 里的 CommonAnnotationBeanPostProcessor
   │
│
│  7. 初始化 (Initialization)
│     ├── ★ @PostConstruct 标注的方法执行
│     ├── InitializingBean.afterPropertiesSet()
│     └── 自定义 init-method / @Bean(initMethod=...)
│
│  8. 初始化后 (After Initialization)
│     └── BeanPostProcessor.postProcessAfterInitialization()
│         └── ★ AOP 代理就是在这里织入的(如果 Bean 需要被代理)//如果这个 Bean 需要被代理(因为有切面、事务、异步等增强逻辑),代理就在这里织入。如果不需要,这一步什么都不做,Bean 原样返回。
│
│  9. Bean 就绪 — 放入单例池 (Singleton Objects),可以被使用
│
│  ───────────────────── 应用运行期间 ─────────────────────
│
│  10. 销毁阶段 (Shutdown)
│      ├── @PreDestroy 标注的方法
│      ├── DisposableBean.destroy()
│      └── 自定义 destroy-method
│
└─────────────────────────────────────────────────────────────────────────────┘
键顺序速记口诀:
构 → 填 → Aware → @PostConstruct → afterPropertiesSet → initMethod → AOP代理 → 就绪
常见的"会触发AOP代理"的注解:
- @Transactional JDK 动态代理 / CGLIB
- @Async CGLIB(因为要拦截方法调用)
- @Cacheable/ @CacheEvict JDK 动态代理 / CGLIB
- @Validated CGLIB
- @FeignClient 动态代理(Feign 自己生成的)
- 自定义 @Aspect切面匹配到的 JDK 动态代理 / CGLIB 注意: 这些注解不是只能加在 @Service上,加在 @Component、@Repository、@Controller甚至普通类上(如果该类被扫描为 Bean)都会触发代理。 一个容易忽略的点
@Service
public class UserService {

    @Transactional
    public void createUser() { ... }
}
这个 UserService会被代理。但代理的是 UserService,不是 createUser方法本身。代理对象包裹着原始对象,在调用 createUser前后插入事务逻辑。
Bean的生命周期:从配置到实例化:
建立Bean定义注册表:Spring容器(如ClassPathXmlApplicationContext)启动时,会读取配置信息(XML、注解等),解析每个
<bean>或@Component注解,在内存中创建一个BeanDefinition对象来存储所有配置信息。这就是配置阶段。实例化Bean:当应用程序向容器请求一个Bean(或容器初始化所有单例Bean)时,容器会根据BeanDefinition的信息,通过Java反射机制调用构造方法来创建对象。这就是new一个对象的过程。
Bean注入(依赖注入):对象被创建后,它里面的属性可能还是null。此时,Spring容器会根据配置(如
<property>标签或@Autowired注解),将这个Bean所依赖的其他Bean注入(设置)到相应的属性中。这就是“注入”发生的关键步骤!
IoC容器负责管理容器中所有bean的生命周期,而在bean生命周期的不同阶段,Spring提供了不同的扩展点来改变bean的命运,例如EnvironmentPostProcessor、BeanFactoryPostProcessor等(具体参照:第2节 SpringApplication启动流程):
单例模式
spring boot默认bean是单例的,spring mvc默认的servlet也是单例的,当然bean @Controller也是单例的,多线程体现在httpservletrequest本身是线程间互相隔离的, 一般都是通过ThreadLocal实现, 之所以默认单例是因为,springboot本身就是ioc容器,启动过程很长,启动时会实例化加载bean(当然也有lazy模式),bean的实例化通常需要读取配置文件或者有很多其他bean的依赖, 所以每次都重建销毁性能很差,而且浪费内存; https://stackoverflow.com/questions/10096483/is-threadlocal-preferable-to-httpservletrequest-setattributekey-value
单例就是为了共享从而减少内存开销,多线程就是为了区别每个线程的上下文或者working thread context,所以线程上下文一定不能被共享, 比如ThreadLocal不能跟ExecutorService共用,就是因为ExecutorService破坏了线程间的隔离 Do Not Use ThreadLocal With ExecutorService https://www.baeldung.com/java-threadlocal https://www.cnblogs.com/MrSaver/p/11191028.html
单例模式 工厂模式 建造者模式
Spring单例Bean与单例模式的区别在于它们关联的环境不一样,单例模式是指在一个JVM进程中仅有一个实例,而Spring单例是指一个Spring Bean容器(ApplicationContext)中仅有一个实例。 首先看单例模式,在一个JVM进程中(理论上,一个运行的JAVA程序就必定有自己一个独立的JVM)仅有一个实例,于是无论在程序中的何处获取实例,始终都返回同一个对象,以Java内置的Runtime为例(现在枚举是单例模式的最佳实践),无论何时何处获取,下面的判断始终为真: Runtime.getRuntime() == Runtime.getRuntime() 与此相比,Spring的单例Bean是与其容器(ApplicationContext)密切相关的,所以在一个JVM进程中,如果有多个Spring容器,即使是单例bean,也一定会创建多个实例,代码示例如下:
//  第一个Spring Bean容器
ApplicationContext context_1 = new FileSystemXmlApplicationContext("classpath:/ApplicationContext.xml");
Person yiifaa_1 = context_1.getBean("yiifaa", Person.class);
//  第二个Spring Bean容器
ApplicationContext context_2 = new FileSystemXmlApplicationContext("classpath:/ApplicationContext.xml");
Person yiifaa_2 = context_2.getBean("yiifaa", Person.class);
//  这里绝对不会相等,因为创建了多个实例
System.out.println(yiifaa_1 == yiifaa_2);

<!-- 即使声明了为单例,只要有多个容器,也一定会创建多个实例 -->
<bean id="yiifaa" class="com.stixu.anno.Person" scope="singleton">
    <constructor-arg name="username">
        <value>yiifaa</value>
    </constructor-arg>
</bean>
# Spring 配置元数据的三种形式(定义 Bean + 组装关系)
配置的含义包括:
Bean 定义(Definition): 告诉容器"有哪些 Bean 要管理",方式:
- XML 方式:
<bean id="" class=""> - 注解方式:@Component, @Service, @Repository, @Controller
- JavaConfig 方式:@Configuration + @Bean
- XML 方式:
Bean 注入 / 依赖注入(Injection):告诉容器"这个 Bean 怎么组装:依赖谁,怎么给它"
- 构造器注入(推荐,保证不可变和空安全)
- Setter 注入(可选依赖)
- 字段注入(不推荐,测试困难)
┌────────────────────────────────────────────────────────┐
│ 配置方式演进 │
├────────────────────────────────────────────────────────┤
│ 1. XML显式配置 (Spring 1.x) │
│ ├──
# XML:<bean> 定义 + <property> 注入
  //XML装配bean的缺点
  //1.当Spring发现这个<bean>元素时,它将会调用SgtPeppers的默认构造器来创建bean.在XML配置中,bean的创建显得更加被动
  //2.不如JavaConfig强大,在JavaConfig配置中,可以通过任何想象到的方法来创建bean实例(构造器,set方法等)
  //3.在简单的<bean>声明中,将bean的类型以字符串的形式设置在了class属性中,不能保证设置给class属性的值是真正的类
  //4.重命名了类,也会引起麻烦

  --------------------------------------------------------------------------------------
  ---基本
  --------------------------------------------------------------------------------------
  <?xml version="1.0" encoding="UTF-8">
  <beans xmlns="http://........"
               xmlns:xsi="http://.....''>
    <!--  configuration details go here -->
  	<bean class="soundsystem.SgtPeppers" />
  	//这里声明一个很简单的bean,因为没有明确给定ID,所以这个bean将会根据全限定类名来进行命名,
  	//这里的bean的ID将会是"soundsystem.SgtPeppers#0".其中,"#0"是一个计数的形式,来区分相同类型的bean.

  	//更好的方法是借助id属性
  	<bean id="compactDisc" class="soundsystem.SgtPeppers" />


   	//当Spring遇到<bean>这个元素时,它会创建一个CDPlayer实例.<constructor-arg>元素会告知Spring要将
      //一个ID为compactDisc的bean引用传递到CDPlayer的构造器中.
      <bean id="cdPlayer" class="soundsystem.CDPlayer">
        <constructor-arg ref="compactDisc">
      </bean>

  </beans>

  作为替代方案,也可以使用Spring的c-命名空间(Spring3.0所引入的c-命名空间)
  <?xml version="1.0" encoding="UTF-8">
  <beans xmlns="http://........"
              xmlns:c="http://www.springframework.org/schema/c"
               xmlns:xsi="http://.....''>
    <!--  configuration details go here -->
  	<bean id="cdPlayer" class="soundsystem.CDPlayer"
     	c:cd-ref="compactDisc">
      //"c:" 命名空间的前缀
      //"cd" 构造器参数名
      //"-ref"注入bean引用
      //"compactDisc" 要注入bean 的ID

      如果在优化构建的过程,将调试标志移除掉,那么这种方式可能无法正常执行.代替方案:
  	<bean id="cdPlayer" class="soundsystem.CDPlayer"
     c:_0-ref="compactDisc">
  	//把参数名换成"0",也就是参数的索引,但XML中不允许数字作为属性的第一个字符,因此添加下划线"_"

  </beans>
  --------------------------------------------------------------------------------------
  --- 字面量string注入
  --------------------------------------------------------------------------------------
  public class BlankDisc implements CompactDisc{
    private String title;
    private String artist;

    public BlandDisc(String title,String artist){
      this.title = title;
      this.artist = artist;
    }

    public void paly(){
      System.out.println("Playing"+title+"by"+artist);
    }

  }

  <bean id="compactDisc"
      class="soundysytem.BlankDisc">
    <constructor-arg value="Sgt.Peper's Lonely Hearts" />
    <constructor-arg value="The beatles"/>
  </bean>
  等价
  <bean id="compactDisc"
      class="soundsystem.BlanDisc"
      c:_title="Sgt.Peper's Lonely Hearts"
      c:_artist="The beatles"/>
  </bean>
  或
  <bean id="compactDisc"
      class="soundsystem.BlanDisc"
      c:_0="Sgt.Peper's Lonely Hearts"
      c:_1="The beatles"/>
  </bean>

  --------------------------------------------------------------------------------------
  --- 集合注入
  --------------------------------------------------------------------------------------
  public class BlankDisc implements CompactDisc{

    private String title;
    private String artist;
    private List<String> tracks;

     public void setTitel(String title){
      this.title = title;
      }

      public void setArtist(String artist){
        this.artist= artist;
      }
     public void setTracks(List<String> tracks){
      this.tracks= tracks;
      }

      public void play(){
        ....
      }
  }

  <bean id="compactDisc"
      class="soundsystem.BlankDisc">
    <constructor-arg value="Sgt.Peper's Lonely Hearts" />
    <constructor-arg value="The beatles" />
    <constructor-arg>
      <list>
        <value>Sgt. Pepper's Lonely Heats</value>
        <value>With a Little Help</value>
        <value>Lucy in the Sky</value>
        <value>Getting Better</value>
        <value>Fixing a Hole</value>
      </list>
    </constructor-arg>
  </bean>
  等价于p命名空间
  <bean id="compactDisc"
        class="soundsystem.BlankDisc"
        p:title="Sgt.peper's loney hearts club"
        p:artist="The Beatles">
    <property name="tracks">
      <list>
        <value>Sgt.peper's loney hearts club</value>
        <value>loney hearts club</value>
        <value>hearts club</value>
        <value>club hearts</value>
        ...
      </list>
     </property>
  注意list不能直接使用p空间,可以借用util-命名空间
  <util:list id="trackList">
       <value>Sgt.peper's loney hearts club</value>
       <value>loney hearts club</value>
       <value>hearts club</value>
       <value>club hearts</value>
  </util:lsit>
  <bean id="compactDisc"
             class = "soundsystem.BlankDisc"
             p:title="Sgt.pepers lonely hearts"
             p:artist="The Beatles"
             p:tracks-ref="trackList">

  复杂类型的list:
  public Discography(String artist,List<CompactDisc> cds){...}

  <bean id="beatlesDiscography" class="soundsystem.Discography">
    <constructor-arg value="The Beatles" />
    <constructor-arg>
      <list>
        <ref bean="sgtPeppers" />
        <ref bean="whiteAlbum" />
        ...
      </lsit>
    </constructor-arg>

  --------------------------------------------------------------------------------------
  --- 属性注入
  --------------------------------------------------------------------------------------
  import soundsystem.CompactDisc;
  import soundsystem.MediaPlayer;

  public class CDPlayer implements MediaPlayer{
    private CompactDisc compactDisc;

    @Autowired
    public void setCompactDisc(CompactDisc compactDisc){
      this.compactDisc = compactDisc;
    }

    public void paly(){
      compactDisc.play();
    }
  }
  <bean id="cdPlayer" class="soundsystem.CDPlayer">
      <property name="compactDisc" ref="compactDisc" />
  </bean>
  //通过ref引用了ID为compactDisc的bean,将其注入到compactDisc属性中(通过setCompactDisc()方法)

  等价于通过p命名空间
  <?xml version="1.0" encoding="UTF-8">
  <beans xmlns="http://........"
         xmlns:p="http://www.springframework.org/schema/p"
         xmlns:xsi="http://.....''>
    <!--  configuration details go here -->
    <bean id="cdPlayer" class="soundsystem.CDPlayer"
      p:compactDisc-ref="compactDisc" />
  </bean>
  //"p:" :前缀
  //前面的compactDisc: 属性名
  //-ref:  注入bean引用
  //后面的compactDisc: 所注入bean的ID

  </beans>


  <?xml version="1.0" encoding="UTF-8" ?>
  <beans xmlns="http://www.springframework.org/schema/beans"
         xmlns:xsi="http://www.w3.org/2001/XMLSchema-instance"
         xsi:schemaLocation="http://www.springframework.org/schema/beans
              http://www.springframework.org/schema/beans/spring-beans.xsd
              http://www.springframework.org/schema/context">
      <import resource="spring/spring-dao.xml"/>

      <bean id="postservice" class="com.bbs.service.impl.PostserviceImpl">
            <constructor-arg ref="postdao"/>
              <constructor-arg ref="userdao"/>
      </bean>
  </beans>

  配置postservice的bean时需要引入两个bean,postdao和userdao,放到constructor-arg的标签中,ref指的是依赖的bean的ID。如果是在javaConfig中配置的,就写@Bean的内容。如果是@Component就写@Qualifier的内容。这里是引入的是动态实现的dao接口的bean,是在spring-dao.xml中配置的,引入这个配置文件就可以自动获得beanID。
# Annotation-based 注解:@Component + 组件扫描 + @Autowired
Annotation-based configuration (opens new window) 使用注解Annotation定义Bean
Spring 2.5 introduced support for annotation-based configuration metadata.
spring从两个角度实现自动化装配:组件扫描和自动装配
- 创建可被发现的bean
@Component
这个简单的注解表明该类会作为组件类,并告知Spring要为这个类创建bean

----------------------------------------------------------------------------------------
--- 命名 bean id
----------------------------------------------------------------------------------------
如果没有个bean设置ID,Spring会根据类名为其指定一个ID,默认名字就是把类名的第一个字母变为小写.
@Component("lonelyHeartsClub") //设置期望的ID
	public class SgtPeppers implements CompactDisc{
}
另外还一种为bean命名的方式,使用Java依赖注入规范中所提供的@Named注解来为bean设置ID
@Named("lonelyHeartsClub")
public class SgtPeppers implements CompactDisc{
}

----------------------------------------------------------------------------------------
--- 设置组件扫描的基础包
----------------------------------------------------------------------------------------
当对一个类标注@Component注解时,表明该类会作为组件类,spring将为这个类创建bean。当在应用文中引用这个bean,spring会自动扫描事先指定的包查找这个  bean。但spring默认是不启用组件扫描的,可以在XML中配置加上。还有一种方法:在新建一个配置类,类中可以什么不用写,在配置类上加上@ComponentScan注解,spring会自动扫描改配置类所在的包。
//直接在value属性中指明包的名称
@Configuration
@ComponentScan("soundsystem")
public class CDPlayerConfig{}

//通过basePackages属性配置
@Configuration
@ComponentScan(basePackages="soundsystem")
public class CDPlayerConfig{}

//设置多个基础包,用数组表示
@Configuration
@ComponentScan(basePackages={"soundsystem","video"})
public class CDPlayerConfig{}

//基础包以String类型表示是不安全的,如果重构代码的话,指定的基础包可能会出现错误,用指定为包中所包含的类或接口的方法
@Configuration
@ComponentScan(basePackageClasses={CDPlayer.class,DVDPlayer.class})
public class CDPlayerConfig{}

----------------------------------------------------------------------------------------
--- 添加注解自动装配Autowired
@Autowired可以换成@Inject,@Inject注解来源于Java依赖注入规范,该规范同时还为我们定义了@Named注解.
尽管@Inject和@Autowierd有细微的差别,但大多数场景下,它们都可以互换.
----------------------------------------------------------------------------------------
@Autowired注解构造器:
@Component
public class CDPlayer implements MediaPlayer{
  private CompactDisc cd;

  @Autowired//这表明当Spring创建CDPlayer bean的时候,会通过这个构造器来进行实例化并且会传入一个可设置给CompactDisc类型的bean.
  public CDPlayer(CompactDisc cd){//构造器
    this.cd = cd;
  }

  public void paly(){
    cd.paly();
  }
}

@Autowired注解属性的Setter方法:
@Autowired
public void setCompactDisc(CompactDisc cd){
  this.cd = cd;
}

如果没有匹配的bean,那么在应用上下文创建的时候,Spring会抛出一个异常,为了避免异常的出现,你可以将@Autowired的requied属性设置为false
@Autowired(required=false)
public void setCompactDisc(CompactDisc cd){
  this.cd = cd;
}

如果有多个bean都能满足依赖关系的话,Spring将会抛出一个异常,表明没有明确指定要选择哪个bean进行自动装配, 一般在组件类上添加注解@Qualifier()括号写这个bean的id,在注入时也加上@Qualifier(),写上bean的id
@Component
@Qualifier("postdao")
public interface Postdao{
. . . .
}

@Component
@Qualifier("userdao")
public interface Userdao{
. . . .
}

@Autowired
@Qualifier("usedao")
public void setUserdao(Userdao userdao)
{. . .
}

@Autowired
@Qualifier("postdao")
public void setUserdao(Postdao postdao)
{. . .
}
# JavaConfig:@Configuration + @Bean
Starting with Spring 3.0, many features provided by the Spring JavaConfig project (opens new window) became part of the core Spring Framework. Thus you can define beans external to your application classes by using Java rather than XML files. To use these new features, see the @Configuration, @Bean, @Import and @DependsOn annotations.
Spring 官方文档在讲"配置元数据"时,明确把三种形式并列:
- XML-based
- Annotation-based —— 用 @Component、@Autowired等(需要开启组件扫描)
- Java-based —— 用 @Configuration+ @Bean
原因不是语法,而是"配置元数据的来源不同":
- XML:元数据在 .xml文件里
- Annotation-based:元数据在业务类的字节码里(类本身带着 @Component)
- Java-based:元数据在配置类的 Java 方法里(方法返回值就是 Bean)
虽然 Java-based 也用了注解(@Configuration、@Bean),但它的本质是用 Java 代码代替 XML 文件,而不是在业务类上贴标签。Spring 团队认为这是一种独立的配置形式,因为它:不需要组件扫描(可以显式指定配置类),可以用 Java 语言的所有特性(if/else、循环、方法调用)来控制 Bean 的创建,更接近"代码即配置"的理念,而不是"注解即配置"
# 例子:第三方库
情况1: 有些情况下,比如说,要将第三方库的组件装配到你的应用中,就不能使用前面的自动化装配方法 到第三方库中去给类加@Component和@Autowired注解, 在这种情况下,就需要采用显示装配的方式.在进行显示配置有Java和XML两种方案显示装配bean. 实例:现在假设你要用一个数据库连接池,它来自一个 jar 包:
// 这个类在 hikari-cp.jar 里面,你没法改它的源码
package com.zaxxer.hikari;

public class HikariDataSource {
    // ...
}

你想让 Spring 管理它,怎么办?

方式 A:@Component —— 做不到
@Component  // ❌ 你没法这么做,因为你不能打开 jar 包改人家的源码
public class HikariDataSource {  // 这是人家写的类,你动不了
}

方式 B:@Bean —— 轻松搞定
@Configuration
public class DataSourceConfig {

    @Bean  // ✅ 你不需要改 HikariDataSource 的源码
    public HikariDataSource dataSource() {
        return new HikariDataSource();  // 你只是在自己的配置类里 new 了一下
    }
}
你没法给它的类加 @Component,但你可以用 @Bean 把它交给 Spring 管。
# 例子 控制过程
情况2:有时候你想控制创建过程(比如带参数的构造、条件判断),有时候一个接口有多个实现,你想明确指定用哪个
@Bean
public PaymentService paymentService() {
    if (env.equals("prod")) {
        return new AlipayService();   // 生产用支付宝
    } else {
        return new MockPaymentService(); // 测试用模拟
    }
}
这种逻辑用 @Component是做不到的——@Component只能傻瓜式地"我是 Bean",不能带条件。 所以 Spring 把它们分成两条线,不是因为语法不同,而是因为: @Component是类自报家门(类自己说"我是 Bean") @Bean是配置类代工生产(配置类说"我帮你造一个 Bean")
# @Configuration 到底特别在哪?
特别之处:它不是在 postProcessAfterInitialization里代理的
@Configuration的 CGLIB 代理发生在更早的阶段——在 Bean 实例化之前,由 ConfigurationClassPostProcessor(它是一个 BeanFactoryPostProcessor)完成。
容器启动
  → ConfigurationClassPostProcessor.postProcessBeanFactory()
    → 扫描所有 @Configuration 类
    → 用 CGLIB 生成一个子类,替换原来的 BeanDefinition
      ↓
  等到真正实例化这个 Bean 时,new 出来的已经是代理对象了
为什么要这么早? 因为 @Configuration里的 @Bean方法可能在方法体内互相调用
Spring 对 @Bean的处理分两种情况:
情况 1:写在 @Configuration类里(Full Mode)
@Configuration
public class AppConfig {

    @Bean
    public DataSource dataSource() {
        System.out.println("=== 创建 DataSource ===");
        HikariDataSource ds = new HikariDataSource();
        ds.setJdbcUrl("jdbc:mysql://localhost:3306/test");
        return ds;
    }

    @Bean
    public UserService userService() {
        System.out.println("=== 创建 UserService ===");
        // 这里看起来是"调用方法",实际上是被 CGLIB 拦截了
        DataSource ds = dataSource();  // ← 不是真的新建,是从容器取
        return new UserService(ds);
    }

    @Bean
    public OrderService orderService() {
        System.out.println("=== 创建 OrderService ===");
        // 再次"调用"同一个方法
        DataSource ds = dataSource();  // ← 还是从容器取同一个实例
        return new OrderService(ds);
    }
}

=== 创建 DataSource ===        ← 只打印一次!
=== 创建 UserService ===
=== 创建 OrderService ===

如果去掉 @Configuration,换成 @Component(Lite Mode):
=== 创建 DataSource ===        ← 第一次:userService 里调用
=== 创建 UserService ===
=== 创建 DataSource ===        ← 第二次:orderService 里调用,又 new 了一个!
=== 创建 OrderService ===

@Configuration类被代理后,内部所有 @Bean方法的调用都会被拦截:
userService() 里调用 dataSource()
       ↓
CGLIB 代理拦截
       ↓
检查容器里有没有 dataSource Bean?
  ├── 有 → 直接返回容器里的实例
  └── 没有 → 调用原始的 dataSource() 方法创建,然后缓存
@SpringBootApplication 等同于 @EnableAutoConfiguration + @ComponentScan + @Configuration
除了 @Configuration和 AOP 相关的,Spring 里还有一些特殊对待的 Bean:
@Repository—— 自动异常转换 它除了是一个普通的 @Component,还会被 PersistenceExceptionTranslationPostProcessor识别,把 JDBC/JPA 的异常自动转换为 Spring 统一的 DataAccessException。但它本身不一定被代理,除非你也加了事务注解。
@Scope(proxyMode = ScopedProxyMode.TARGET_CLASS)
@Component
 @Scope(value = "request", proxyMode = ScopedProxyMode.TARGET_CLASS)
 public class RequestScopedBean { ... }
这会创建一个作用域代理,即使你在单例 Bean 里注入它,注入的也不是真实对象,而是一个代理,每次方法调用时再去对应作用域取真正的实例。
FactoryBean—— 工厂 Bean 本身和它生产的对象
@Component
 public class MyFactoryBean implements FactoryBean<MyObject> { ... }
容器里有一个名为 myFactoryBean的 Bean(工厂本身) 但 @Autowired MyObject拿到的是工厂生产出来的对象 如果想拿到工厂本身,要写 @Autowired MyFactoryBean或用 &myFactoryBean
BeanPostProcessor/ BeanFactoryPostProcessor—— 容器级组件 这些不是普通业务 Bean,它们在容器启动过程中被特殊对待: 它们自己不走完整生命周期(或者说在非常早的阶段就被实例化了) 它们的作用是干预其他 Bean 的创建过程
所有被 @Component / @Service / @Repository / @Controller / @Configuration 标注的类
  ↓
都会被扫描,注册为 BeanDefinition
  ↓
容器启动时,根据"有没有特殊需求"决定是否增强:

┌─────────────────────────────────────────────────────────────┐
│  不需要代理的(大多数)
   │
│  → 普通 @Service, @Component, @Repository
   │
│  → 直接实例化、初始化、放进单例池
   │
├─────────────────────────────────────────────────────────────┤
│  需要特殊处理的
   │
│
   │
│  ① @Configuration
   │
│     → CGLIB 代理(实例化前,确保 @Bean 方法拦截)
   │
│
   │
│  ② @Transactional / @Async / @Cacheable / @Validated
   │
│     → AOP 代理(初始化后,由 AutoProxyCreator 织入)
   │
│
   │
│  ③ @Scope(proxyMode=...)
   │
│     → 作用域代理(后处理器生成)
   │
│
   │
│  ④ @Repository
   │
│     → 异常翻译(不一定代理,但会被后处理器特殊处理)
   │
│
   │
│  ⑤ FactoryBean / BeanPostProcessor
   │
│     → 容器级特殊组件,生命周期不同
   │
└─────────────────────────────────────────────────────────────┘
# @Conditional @ConditionalOn
表示在满足某种条件后才初始化一个bean或者启用某些配置。它一般用在由 @Component、 @Service、 @Configuration等注解标识的类上面,或者由 @Bean标记的方法上。如果一个 @Configuration类标记了 @Conditional,则该类中所有标识了 @Bean的方法和 @Import注解导入的相关类将遵从这些条件。
@Conditional是为 Java-based configuration 量身定制的。在 XML 时代没有这个条件机制(XML 只能通过 profile 做有限的隔离),JavaConfig 才让它成为可能。 @ConditionalOn属于 Spring Boot 的自动配置
# @ConfigurationProperties与@EnableConfigurationProperties
当某些属性的值需要配置的时候,我们一般会在 application.properties文件中新建配置项,然后在bean中使用 @Value注解来获取配置的值;
@Configuration
public class MyBatisConfiguration {
	@Value("${spring.datasource.driverClassName}")
    private String jdbcDriverClassName;
	@Value("${spring.datasource.url}")
    private String jdbcUrl;
    @Value("${spring.datasource.username}")
    private String jdbcUsername;
    @Value("${spring.datasource.password}")
    private String jdbcPassword;

	@Bean(name = "dataSource",destroyMethod = "close")
    public DataSource dataSource() {
    	DruidDataSource datasource = new DruidDataSource();
    	datasource.setDriverClassName(jdbcDriverClassName);
    	datasource.setUrl(jdbcUrl);
    	datasource.setUsername(jdbcUsername);
    	datasource.setPassword(jdbcPassword);
        return datasource;
    }

	@Bean(name = {"sqlSessionFactory"})
	@ConditionalOnMissingBean(name = {"sqlSessionFactory"})
	public SqlSessionFactory sqlSessionFactory(DataSource dataSource) throws Exception {
	....
但是如果同一个配置在多个地方使用,也存在不方便维护的问题,对于更为复杂的配置,Spring Boot提供了更优雅的实现方式,那就是 @ConfigurationProperties注解 而@EnableConfigurationProperties的作用是将其注册为bean,否则项目不会将其scan为bean,具体:
In order to use a configuration class in our project, we need to register it as a regular Spring bean.
First of all, we can annotate such a class with @Component. Alternatively, we can use a @Bean factory method.
However, in certain situations, we may prefer to keep a @ConfigurationProperties class as a simple POJO. This is when @EnableConfigurationProperties comes in handy. We can specify all configuration beans directly on this annotation.
This is a convenient way to quickly register @ConfigurationProperties annotated beans.
@ConfigurationProperties(prefix = "additional")
public class AdditionalProperties {

    private String unit;
    private int max;

    // standard getters and setters
}
@Configuration
@EnableConfigurationProperties(AdditionalProperties.class)
public class AdditionalConfiguration {

    @Autowired
    private AdditionalProperties additionalProperties;

    // make use of the bound properties
}
# @Import, @ImportResource
@Import是 spring-context模块提供的注解,专门用于 Java-based configuration(JavaConfig)场景,用来组合多个配置类。但它和"注入"完全不是一回事:
注入解决的是"Bean A 怎么拿到 Bean B 的实例",@Import是告诉容器"去哪里找更多的 Bean 定义",解决的是"配置类 A 怎么把配置类 B 里的 Bean 定义合并进来"
在4.2之前, @Import注解只支持导入配置类,但是在4.2之后,它支持导入普通类
@Import是 spring-context模块提供的注解,专门用于 Java-based configuration(JavaConfig)场景,用来组合多个配置类。
@Configuration
@Import({DatabaseConfig.class, SecurityConfig.class})
public class AppConfig {
    // DatabaseConfig 和 SecurityConfig 里定义的 @Bean 都会被注册到容器
}

它等价于 XML 里的:
<import resource="database-config.xml"/>
<import resource="security-config.xml"/>
# 多一个例子,使用java代码,先新建一个配置类JavaConfig,里面都是配置所需的bean,不应该有业务逻辑代码,所以单独建一个类。
@Configuration
public class AppConfig {
  @Bean
  public MyService myService() {
      return new MyServiceImpl();
  }
}
public static void main(String[] args) {
  ApplicationContext ctx = new AnnotationConfigApplicationContext(AppConfig.class);
  MyService myService = ctx.getBean(MyService.class);
  myService.doStuff();
}

public static void main(String[] args) {
  AnnotationConfigApplicationContext ctx = new AnnotationConfigApplicationContext();
  ctx.register(AppConfig.class, OtherConfig.class);
  ctx.register(AdditionalConfig.class);
  ctx.refresh();
  MyService myService = ctx.getBean(MyService.class);
  myService.doStuff();
}

//创建JavaConfig类的关键在于为其添加@Configruation注解,表明这是一个配置类
@Configuration
public class CDPlayerConfig{
    @Bean
    public CompactDisc sgtPeppers(){
      return new SgtPeppers();
    }
    //@Bean注解会告诉Spring这个方法将会返回一个对象,该对象要注册为Spring应用上下文的bean,默认情况下,
    bean的ID于带有@Bean注解的方法名一样,也可以重命名

    @Bean(name="lonelyHeartsClubBand")
    public CompactDisc sgtPeppers(){
      return new SgtPeppers();
    }

    声明CompactDisc bean是非常简单,它自身没有其他依赖,但现在,我们需要声明CDPlayer bean,它依赖于CompactDisc,在JavaConfig中,如何将他们装配在一起呢?
    @Bean
    public CDPlayer cdPlayer(){
      return new CDPlayer(sgtPeppers()); //因为sgtPeppers()方法上添加了@Bean注解,Spring将会拦截所有对它的调用,
    //并确保直接返回该方法创建的bean,而不是每次都对其进行实际的调用.
    }
    等价于下面这种方式

    @Bean
    public CDPlayer cdPlayer(CompactDisc compactDisc){//在这里,cdPlayer()方法请求一个CompactDisc作为参数,当Springs调用cdPlayer()创建CDPlayer bean的时候,
//它会自动装配一个CompactDisc到配置方法之中,然后方法体按照合适的方法来使用它.
      return new CDPlayer(compactDisc);
    }
	@Bean(name="lonelyHeartsClubBandPlayer")
    public CDPlayer cdPlayer(CompactDisc lonelyHeartsClubBand){
		return new CDPlayer(compactDisc);
    }
}

More example:

@Configuration
@ContextConfiguration(locations = {"classpath:spring/spring-dao.xml","classpath:scan.xml"})
public class bbsConfig{
  private Postdao postdao;
  private Userdao userdao;
  @Bean(name="postservice")
   public PostService getPost()
  {
  return new PostserviceImpl(postdao,userdao);
  }
}

在对PostService的bean注入时,同时又依赖了两个bean,postdao和userdao。直接引用beanID就可以,spring会自动地从容器中获取这些bean,只要他们的配置是正确的就行。这个例子中userdao、postdao是Mybatis配置自动扫描将dao接口生成代理注入到spring的,其实也算是xml装配bean
这里如果再声明一个bean,返回的仍是postserviceImpl对象,和之前的那个bean完全一样,是同一个实例。一般spring @bean如果是同一个beanID,默认返回的是一个单例bean,注入的是同一个实例。如果修改其中一个会都改变的。
不过在这里要注意进行测试时,由于spring的单元测试和springIoc容器是完全独立的,postdao和userdao注入检测时是使用locations加载xml文件,而postservice使用classes加载config类的,但是两个不能同时混用在@ContextConfiguration中。所以非要都测试的话,就分开测试吧。
# 依赖注入
# 三种注入机制(不管用什么配置形式,本质就这三种)
- 构造器注入(推荐,不可变、空安全)
- Setter 注入(可选依赖)
- 字段注入(不推荐,隐藏依赖、测试困难)
# 注解驱动的自动装配(Spring 2.5+)
@[Autowired](https://www.baeldung.com/spring-autowire)(Spring 原生,默认 byType):可用于构造器、方法、字段、参数,默认 byType@Resource(JSR-250,默认 byName):主要用于字段和 setter,默认 byName@Inject(JSR-330,类似 @Autowired)类似 @Autowired,但不支持 required=false
三者均可用于构造器、Setter 方法、字段,Spring 4.3+ 如果类只有一个构造器,@Autowired可省略。
| 注解 | 来源 | 默认匹配方式 | 适用位置 | 是否支持 required=false | 限定符 / 指定名称 | 备注 |
|---|---|---|---|---|---|---|
@Autowired | Spring 原生(org.springframework.beans.factory.annotation) | byType(按类型) | 构造器、方法、字段、参数 | ✅ required = false | 配合 @Qualifier("beanName") | Spring 4.3+ 单构造器时可省略 |
@Resource | JSR-250(javax.annotation) | byName(按名称) | 字段、Setter 方法 | ❌ 不支持 | name 属性指定 Bean 名称 | 找不到名称匹配时才 fallback 到 byType |
@Inject | JSR-330(javax.inject) | byType(按类型) | 构造器、方法、字段、参数 | ❌ 不支持 | 配合 @Named("beanName") 或 @Qualifier | 功能和 @Autowired 最接近,但不依赖 Spring 特定 API |
// ============================================================
// 一、构造器注入
// ============================================================

// 1. @Autowired(Spring 原生)—— 最推荐
@Service
public class OrderServiceA {

    private final PaymentService paymentService;

    @Autowired  // Spring 4.3+ 单构造器时可省略
    public OrderServiceA(PaymentService paymentService) {
        this.paymentService = paymentService;
    }
}

// 2. @Inject(JSR-330)—— 与 @Autowired 等价,不依赖 Spring API
@Service
public class OrderServiceB {

    private final PaymentService paymentService;

    @Inject
    public OrderServiceB(PaymentService paymentService) {
        this.paymentService = paymentService;
    }
}

// 3. @Resource —— ❌ 不支持构造器注入,无法用于此场景


// ============================================================
// 二、Setter 注入
// ============================================================

// 1. @Autowired
@Service
public class OrderServiceC {

    private PaymentService paymentService;

    @Autowired
    public void setPaymentService(PaymentService paymentService) {
        this.paymentService = paymentService;
    }
}

// 2. @Resource
@Service
public class OrderServiceD {

    private PaymentService paymentService;

    @Resource(name = "paymentServiceImpl")  // 可指定 Bean 名称
    public void setPaymentService(PaymentService paymentService) {
        this.paymentService = paymentService;
    }
}

// 3. @Inject
@Service
public class OrderServiceE {

    private PaymentService paymentService;

    @Inject
    public void setPaymentService(PaymentService paymentService) {
        this.paymentService = paymentService;
    }
}


// ============================================================
// 三、字段注入(不推荐,仅作了解)
// ============================================================

// 1. @Autowired
@Service
public class OrderServiceF {

    @Autowired
    private PaymentService paymentService;
}

// 2. @Resource
@Service
public class OrderServiceG {

    @Resource
    private PaymentService paymentService;
}

// 3. @Inject
@Service
public class OrderServiceH {

    @Inject
    private PaymentService paymentService;
}
# 基于Autowired 的三种注入方式
如果你使用的是构造器注入,当你有十几个甚至更多对象需要注入时,你的构造函数的参数个数可能会长到无法想像。
如果你使用的是field反射注入,如果不使用Spring框架,这个属性只能通过反射注入,太麻烦了!这根本不符合JavaBean规范。 还有,当你不是用过Spring创建的对象时,还可能引起NullPointerException。 并且,你不能用final修饰这个属性。
如果你使用的是setter方法注入,那么你将不能将属性设置为final。
两者取其轻,Spring3.0官方文档建议使用setter注入覆盖构造器注入。 Spring4.0官方文档建议使用构造器注入。
结论: 如果注入的属性是必选的属性,则通过构造器注入。 如果注入的属性是可选的属性,则通过setter方法注入。 至于field注入,不建议使用。
通过field反射注入, field injection (不推荐)
@Component
public class Dependency(){
}
@Component
public class DI(){
	@Autowired
	private Dependency dependency;
}
通过构造器注入
public class DI(){
	//通过构造器注入
	private DependencyA a;
	@Autowired
	public DI(DependencyA a){
		this.a = a;
	}

}
通过setter方法注入
public class DI(){
	//通过setter方法注入
	private DependencyB b;
	@Autowired
	public void setDependencyB(DependencyB b){
		this.b = b;
	}

}
# XML 配置方式(传统)
# 显式配置三种注入方式
属性注入
package com.java.entity;

public class People {
    private int id;
    private String name;
    private int age;

    public People() {
        //调用默认的构造方法
    }

    public int getId() {
        return id;
    }

    public void setId(int id) {
        this.id = id;
    }

    public String getName() {
        return name;
    }

    public void setName(String name) {
        this.name = name;
    }

    public int getAge() {
        return age;
    }

    public void setAge(int age) {
        this.age = age;
    }

      @Override
    public String toString() {
        return "People{" +
                "id=" + id +
                ", name='" + name + '\'' +
                ", age=" + age +
                '}';
    }
}

<?xml version="1.0" encoding="UTF-8"?>
<beans xmlns="http://www.springframework.org/schema/beans"
    xmlns:xsi="http://www.w3.org/2001/XMLSchema-instance"
    xsi:schemaLocation="http://www.springframework.org/schema/beans
        http://www.springframework.org/schema/beans/spring-beans.xsd">

    <bean id="people" class="com.java.entity.People"></bean>
    //属性注入
    <bean id="people2" class="com.java.entity.People">
            <property name="id" value="1"></property>
            <property name="age" value="18"></property>
            <property name="name" value="张三"></property>
        </bean>
</beans>

public class Test2 {
    public static void main(String[] args) {
        //加载beans.xml文件,调用Spring接口
        ApplicationContext ac=new ClassPathXmlApplicationContext("beans.xml");
        //通过id获取bean,返回一个对象
        People people=(People)ac.getBean("people");
        //调用方法
        System.out.println(people);

        //属性注入
        People people2=(People)ac.getBean("people2");
        System.out.println(people2);
    }
}
构造函数注入
public People(int id, String name, int age) {
        this.id = id;
        this.name = name;
        this.age = age;
    }
<!--类型注入-->
    <bean id="people3" class="com.java.entity.People">
        <constructor-arg type="int" value="2"></constructor-arg>
        <constructor-arg type="String" value="李四"></constructor-arg>
        <constructor-arg type="int" value="19"></constructor-arg>
    </bean>

    <!--索引注入-->
    <bean id="people4" class="com.java.entity.People">
        <constructor-arg index="0" value="3"></constructor-arg>
        <constructor-arg index="1" value="王五"></constructor-arg>
        <constructor-arg index="2" value="20"></constructor-arg>
    </bean>

    <!--联合使用-->
    <bean id="people5" class="com.java.entity.People">
        <constructor-arg type="int" index="0" value="4"></constructor-arg>
        <constructor-arg type="String" index="1" value="赵六"></constructor-arg>
        <constructor-arg type="int" index="2" value="21"></constructor-arg>
    </bean>

//类型注入
People people3=(People)ac.getBean("people3");
System.out.println(people3);

//类型注入
People people4=(People)ac.getBean("people4");
System.out.println(people4);

//联合使用
People people5=(People)ac.getBean("people5");
System.out.println(people5);
工厂方法注入,分为静态工厂和非静态工厂; 一般用得多的都是静态工厂;
package com.java.factory;

import com.java.entity.People;

public class PeopleFactory {
    //非静态工厂
    public People createPeople(){
        People p=new People();
        p.setId(5);
        p.setName("阿七");
        p.setAge(22);
        return p;
    }

    //静态工厂
    public static People createPeople1(){
        People p=new People();
        p.setId(6);
        p.setName("阿八");
        p.setAge(23);
        return p;
    }
}

 <!--工厂模式的非静态方法-->
    <bean id="peopleFactory" class="com.java.factory.PeopleFactory"></bean>

    <bean id="people6" factory-bean="peopleFactory" factory-method="createPeople"></bean>

    <!--工厂模式的静态方法-->
    <bean id="people7" class="com.java.factory.PeopleFactory" factory-method="createPeople1"></bean>

 //工厂方式注入,非静态
People people6=(People)ac.getBean("people6");
System.out.println(people6);

//工厂方式注入,静态
People people7=(People)ac.getBean("people7");
System.out.println(people7);
# XML自动装配 autowire="no|byName|byType|constructor|default"
# JavaConfig 方式(Spring 3.0+)
@Configuration+@Bean,方法参数自动注入- 本质上是构造器注入的变体(方法参数 = 构造器参数)
JavaConfig 确实是"定义"和"注入"合二为一的地方。这正是它和注解方式(@Component+ @Autowired)最大的结构差异:
- 注解驱动:定义bean是@Component标在类上,注入依赖是@Autowired标在字段/构造器/方法上,完全分离——定义在一个类上,注入在另一个地方
- XML: 定义bean是
<bean>标签注入依赖是<property>或 <constructor-arg>,写在同一个文件里,但可以是不同标签 - JavaConfig, 定义bean是 @Bean方法,注入依赖是方法参数或方法体内调用其他 @Bean,写在同一个方法里,完全合一
@Configuration
public class AppConfig {

    @Bean
    public B b() {
        return new B();  // ← 定义 B
    }

    @Bean
    public A a() {
        return new A(b());  // ← 定义 A,同时把 B 注入给 A
    }
}
# 事件驱动模型 Spring容器的事件监听机制
  #### 事件类型(ApplicationEvent 及内置实现)
  #### 监听器(ApplicationListener)
  #### 事件发布(ApplicationEventPublisher)
  #### 广播机制(ApplicationEventMulticaster)
  #### Spring 4.2+ 变化(泛型监听、任意对象事件)
Java提供了实现事件监听机制的两个基础类:自定义事件类型扩展自 java.util.EventObject、事件的监听器扩展自 java.util.EventListener
Spring的ApplicationContext容器内部中的所有事件类型均继承自 org.springframework.context.ApplicationEvent,容器中的所有监听器都实现 org.springframework.context.ApplicationListener接口,并且以bean的形式注册在容器中。一旦在容器内发布ApplicationEvent及其子类型的事件,注册到容器的ApplicationListener就会对这些事件进行处理。
ApplicationEvent继承自EventObject,Spring提供了一些默认的实现,比如: ContextClosedEvent表示容器在即将关闭时发布的事件类型, ContextRefreshedEvent表示容器在初始化或者刷新的时候发布的事件类型......
容器内部使用ApplicationListener作为事件监听器接口定义,它继承自EventListener。ApplicationContext容器在启动时,会自动识别并加载EventListener类型的bean(Spring 在 refresh()阶段的 registerListeners()步骤中,从 BeanFactory中获取所有实现了 ApplicationListener接口的 bean,注册到 ApplicationEventMulticaster上。它不是扫描 EventListener标记接口,而是按 ApplicationListener类型查找。),一旦容器内有事件发布,将通知这些注册到容器的EventListener。
ApplicationContext接口继承了ApplicationEventPublisher接口,该接口提供了 voidpublishEvent(ApplicationEventevent)方法定义,不难看出,ApplicationContext容器担当的就是事件发布者的角色。如果有兴趣可以查看 AbstractApplicationContext.publishEvent(ApplicationEventevent)方法的源码:ApplicationContext将事件的发布以及监听器的管理工作委托给 ApplicationEventMulticaster接口的实现类。在容器启动时,会检查容器内是否存在名为applicationEventMulticaster的ApplicationEventMulticaster对象实例。如果有就使用其提供的实现,没有就默认初始化一个SimpleApplicationEventMulticaster作为实现。
最后,如果我们业务需要在容器内部发布事件,只需要为其注入ApplicationEventPublisher依赖即可:实现ApplicationEventPublisherAware接口或者ApplicationContextAware接口
### Spring 4.2+ 的改进

1. **事件不再强制继承 ApplicationEvent**
   context.publishEvent(new UserCreatedEvent(user)); // 自动包装

2. **泛型监听器(推荐写法)**
   @Component
   public class UserCreatedListener implements ApplicationListener<UserCreatedEvent> {
       @Override
       public void onApplicationEvent(UserCreatedEvent event) { ... }
   }

3. **@EventListener 注解(最简洁)**
   @Component
   public class MyListener {
       @EventListener
       public void handle(UserCreatedEvent event) { ... }

       // 还可以加 condition SpEL 表达式
       @EventListener(condition = "#event.user.age > 18")
       public void handleAdult(UserCreatedEvent event) { ... }
   }
# Aware 接口体系
# Spring AOP(代理机制、@Aspect、切点表达式)
# SpringFactoriesLoader(Spring Framework 核心工具)
SpringFactoriesLoader是 Spring Framework(spring-core模块)提供的一个工厂加载工具类,本质上是一种 Spring 私有的 SPI 实现。它通过 ClassLoader扫描 classpath 下所有 META-INF/spring.factories文件,按 key 读取类名列表并通过反射实例化。
AppClassLoader.getResources("META-INF/spring.factories")
       ↓
SpringFactoriesLoader 读取文件内容
       ↓
反射 Class.forName(className, classLoader)
       ↓
实例化对象
关键点:
它不是类加载器,不打破双亲委派,只是 ClassLoader.getResources()的上层封装
它属于 Spring Framework,不是 Spring Boot 的发明
Spring Boot 的自动配置(@EnableAutoConfiguration)、ApplicationContextInitializer等核心功能都基于它实现
Spring Boot 2.7+ 开始用 META-INF/spring/*.imports文件逐步替代 spring.factories中的自动配置注册
# Spring MVC
spring mvc 处理流程源码解析 (opens new window)
Spring 是基础底盘;Spring MVC 是在 Spring 基础上专门干 Web 的那一层;SpringBoot 是把 Spring + SpringMVC + 一堆常用组件打包好、帮你省配置的脚手架。
# 请求处理全流程
# 常用注解与参数绑定
# 拦截器与异常处理
# 视图解析(可选,现在多前后端分离)
# SpringBoot Framework
# Spring Cloud
# Versions Compatibility
# Spring VS Spring Integration VS Spring Boot VS 3rd-party clients
3rd-party
通常是Apache library
Spring 集成了3rd party,比如 spring kafka,spring data redis,相当于在相应的3rd party,kafka-clients,redis的lettuce、jedis等基础上提供了统一的接口和规范,provides a "template" as a high-level abstraction,helps you apply core Spring concepts (dependency injection and declarative),如果直接使用3rd-party,我们需要自定义@ConfigurationProperties来管理配置,以及@Configuration来定义比如kafkaProuducer等bean,从而使用autowired注入(在spring boot中,注入配置和定义bean都是在spring-boot-autoconfigure)
例如:
spring kafka 提供了 kafkaTemplate和KafkaListener,
替代了kafka-clients的producer和consumer实际上通过pom dependency hierarchy可以看到spring-kafka是依赖于kafka-clients的,只需要引入spring-kafka即可 https://www.baeldung.com/spring-kafka但是有些时候不仅需要引用spring提供的lib,还需要引用3rd party lib,比如使用spring data redis也需要自己引入lettuce或者jedis https://www.baeldung.com/spring-data-redis-tutorial
这个时候经常就会因为 spring data redis版本和三方包版本不同有冲突,这种情况下使用spring boot就可以解决这个烦恼,spring boot提供的starter帮我们引用好了相应版本的spring data redis以及 lettuce和jedis
using spring:
<dependency>
    <groupId>org.springframework.data</groupId>
    <artifactId>spring-data-redis</artifactId>
    <version>2.3.3.RELEASE</version>
 </dependency>

<dependency>
    <groupId>redis.clients</groupId>
    <artifactId>jedis</artifactId>
    <version>3.3.0</version>
    <type>jar</type>
</dependency>

using spring boot:
<dependency>
    <groupId>org.springframework.boot</groupId>
    <artifactId>spring-boot-starter-data-redis</artifactId>
    <version>2.3.3.RELEASE</version>
</dependency>
Spring Integration
based on Spring, Extends the Spring programming model to support the well-known Enterprise Integration Patterns.
https://spring.io/projects/spring-integration
Spring boot
如前面所说提供starter,集成了3rd party,所有的starter在这里
https://github.com/spring-projects/spring-boot/tree/main/spring-boot-project/spring-boot-starters
# Compatibility Troubleshooting
general
查看release note,比如
https://stackoverflow.com/questions/61118552/zookeeper-3-5-x-backwards-compability-with-zookeeper-3-4-x-clients
- 3.4.x clients compatible with 3.5.x server
- 3.4.x and 3.5.x clients can be mixed on 3.5 server
- 3.5.x clients incompatible with 3.4 server
kafka
Kafka is tested against the Zookeeper version it comes with.
If you want to upgrade, you'll need to verify Zookeeper itself is backwards compatible with older clients/protocols that Kafka may use.
https://github.com/apache/kafka/search?q=zookeeper+version&type=commits
https://archive.apache.org/dist/kafka/1.1.0/RELEASE_NOTES.html
curator
curator-recipies 2.12.0=>
curator-framework 2.12.0=>
curator-client 2.12.0=>
zookeeper 3.4.8
使用 springfox2.9.2,升级springboot从2.0.5到2.4.5,遇到错误:
Description:

An attempt was made to call a method that does not exist. The attempt was made from the following location:

    org.springframework.hateoas.server.core.DelegatingLinkRelationProvider.<init>(DelegatingLinkRelationProvider.java:36)

The following method did not exist:

    org.springframework.plugin.core.PluginRegistry.of([Lorg/springframework/plugin/core/Plugin;)Lorg/springframework/plugin/core/PluginRegistry;

The method's class, org.springframework.plugin.core.PluginRegistry, is available from the following locations:

    jar:file:/C:/Users/yue.liu/.m2/repository/org/springframework/plugin/spring-plugin-core/1.2.0.RELEASE/spring-plugin-core-1.2.0.RELEASE.jar!/org/springframework/plugin/core/PluginRegistry.class

The class hierarchy was loaded from the following locations:

    org.springframework.plugin.core.PluginRegistry: file:/C:/Users/yue.liu/.m2/repository/org/springframework/plugin/spring-plugin-core/1.2.0.RELEASE/spring-plugin-core-1.2.0.RELEASE.jar


Action:

Correct the classpath of your application so that it contains a single, compatible version of org.springframework.plugin.core.PluginRegistry
spring-boot-starter-data-rest => spring-data-rest-webmvc => spring-data-rest-core => spring-plugin-core
springfox-swagger2 => spring-plugin-core
https://github.com/springfox/springfox/issues/3052
https://github.com/springfox/springfox/releases
springfox 3.0: Requires SpringBoot 2.2+ (not tested with earlier versions)
# 3rd-party&wrapper: kafka
# Client & Sever
直接使用3rd-party
<dependency>
     <groupId>org.apache.kafka</groupId>
     <artifactId>kafka-clients</artifactId>
     <version>2.2.0</version>
 </dependency>
版本
https://cwiki.apache.org/confluence/display/KAFKA/Compatibility+Matrix
https://www.confluent.io/blog/upgrading-apache-kafka-clients-just-got-easier/
Bidirectional Client Compatibility--- KIP-35 enabled clients: any version (Release: Broker protocol - 0.10.0, Java clients - 0.10.2)
https://stackoverflow.com/questions/55691662/determine-the-kafka-client-compatibility-with-kafka-broker/67463949#67463949
# Client & Client Wrapper
使用 Spring-Kafka(spring-kafka自身依赖于kafka-clients)
https://docs.spring.io/spring-kafka/reference/html/#introduction
If you are not using Spring Boot, declare the
spring-kafkajar as a dependency in your project.<dependency> <groupId>org.springframework.kafka</groupId> <artifactId>spring-kafka</artifactId> <version>2.7.0</version> </dependency>When using Spring Boot, (and you haven’t used start.spring.io to create your project), omit the version and Boot will automatically bring in the correct version that is compatible with your Boot version:
<parent>
    <groupId>org.springframework.boot</groupId>
    <artifactId>spring-boot-starter-parent</artifactId>
    <version>2.1.4.RELEASE</version>
</parent>

<dependency>
  <groupId>org.springframework.kafka</groupId>
  <artifactId>spring-kafka</artifactId>
</dependency>
版本
https://spring.io/projects/spring-kafka
# 3rd-party&wrapper: Redis
https://github.com/spring-projects/spring-data-redis/issues/2061
# Client & Server
直接使用3rd-party lettuce / jedis
版本
查看release note
Redis 2.6+ up to Redis 6.x. In terms of Java runtime, Lettuce requires at least Java 8 and works with Java 16. It is tested continuously against the latest Redis source-build.
https://github.com/lettuce-io/lettuce-core/releases
# Client & Client Wrapper
使用
spring-boot-starter-data-redis(自动引入spring-data-redis 和lettuce和jedis)
版本
https://search.maven.org/artifact/org.springframework.boot/spring-boot-starter-data-redis/2.4.5/jar
spring-boot-starter-data-redis 2.4.5
=> spring-data-redis 2.4.8
=> lettuce 6.0.4.RELEASE
# ref
为什么说 Java 程序员到了必须掌握 Spring Boot 的时候? (opens new window) 聊一聊Spring中的代理 (opens new window) Spring Cloud (opens new window) spring boot 和微服务的关系? (opens new window) 重新理解微服务 (opens new window) 架构设计漫步:从单体架构、SOA到微服务 (opens new window) Microservices (opens new window)
guides: https://spring.io/guides#gs https://spring.io/guides/gs/spring-boot/ Starters samples code: https://docs.spring.io/spring-boot/docs/2.1.4.RELEASE/reference/htmlsingle/#using-boot-starter https://github.com/spring-projects/spring-boot/tree/master/spring-boot-samples Docs: https://docs.spring.io/spring-boot/docs/2.1.4.RELEASE/reference/htmlsingle/ Unit test: https://stackabuse.com/how-to-test-a-spring-boot-application/ https://docs.spring.io/spring-boot/docs/current/reference/html/boot-features-testing.html
Spring Boot中如何干掉过多的if else! https://mp.weixin.qq.com/s/Uf8KGTbNcuDtwIlpMJnaXg
https://docs.spring.io/spring/docs/current/spring-framework-reference/ Project generator https://start.spring.io/ https://www.tutorialspoint.com/spring/spring_quick_guide.htm https://docs.spring.io/spring/docs/5.1.6.RELEASE/spring-framework-reference/ (spring boot 2.1.4 depend on spring 5.1.6)
todo: Mvc Thymeleaf Realm