回目录 《web开发》
# 1.web开发基础
# 1.1 web协议
Http 协议: http, https, web sockets
HTTP stateless web API - intention restful session - cookie OR cookieless - HTTP context (not necessary store user login info, can also store before login info) token - authenticate and authorise between servers/applications
request handling pipeline
web sockets WebSockets, caution required! https://samsaffron.com/archive/2015/12/29/websockets-caution-required
What’s the difference between JavaScript and ECMAScript? https://medium.freecodecamp.org/whats-the-difference-between-javascript-and-ecmascript-cba48c73a2b5
Https https://groups.google.com/forum/#!topic/httpfiddler/RCkzE3HhhxY
- When going through a proxy, HTTPS traffic flows through what are called "CONNECT Tunnels". The reason HTTPS traffic is special is that it encrypts all of the data so that an intermediary (like Fiddler) cannot normally see it. The problem with doing that is that if the intermediary proxy (like Fiddler) can't see the traffic, it doesn't know where to send it. So the client sends a HTTP CONNECT request to the proxy and specifies the target destination. E.g. CONNECT husband.umd.edu:443 HTTP/1.1. (Note that the request line doesn't include a URL, only the hostname).
The proxy is expected to open a connection to the target and then just blindly shuffle bytes back and forth. Fiddler could show the hostname in the HOST column and in the URL column, but for readability in English it instead shows the HOST only in the URL column and shows "Tunnel to" in the host column.
Yes, the fact that the browser felt the need to establish a connection to ssl.google-analytics.com is a good sign that the page it loaded includes one or more tracking requests to the Google servers. If you enable HTTPS decryption, you can see the actual requests and not just the tunnels.
SPDY is a new protocol that sits between TCP/IP and HTTP; it reformats HTTP messages in a compressed binary way to improve performance. SPDY traffic is always over SSL and hence you see it in Tunnels. When a tunnel is established, Fiddler looks at flags in the client and server's handshakes to determine if SPDY is likely in use and if so, it shows this icon. Note that if you enable HTTPS decryption, SPDY will no longer be used because the flags sent in a SPDY handshake cannot be sent by Fiddler and thus the client and server speak plain HTTPS instead.
# 1.2 Web server技术-后端开发
Common Gateway Interface(CGI): c c++ Hypertext Preprocessor (PHP):
.net: Request processor:: httphandler MVC framework based on httphandler/mvchandler web api IIS http://beletsky.net/2011/06/inside-aspnet-mvc-route-to-mvchanlder.html Java: Request processor:Servlet VS reactive Mvc framework based on servlet container Rest client and server tomcat/jetty/apache Ruby related https://bundler.io/v1.3/rationale.html
# 1.3相关开发工具/插件/seo工具
# 1.3.1 开发辅助工具
https://codebeautify.org/yaml-validator
Visual studio code Ctrl+Shift+V Ctrl+K V
https://toolbox.googleapps.com/apps/har_analyzer/
# 1.3.2 常用插件
Search provider lunr (default), algolia, google https://cse.google.com/all
Comments disqus https://lyhistory.disqus.com/admin/ https://lyhistory.disqus.com/admin/install/complete
Webmaster and Analytics https://marketingplatform.google.com https://analytics.google.com/analytics/web/#/report-home/a55774263w89029290p92512103 https://support.google.com/analytics/answer/7532985?hl=en_SG&utm_id=ad
https://search.google.com/search-console
Webhoster ads https://brave.com/creators/
# 2.Static page generator
# 2.1 Blog
# jekyll
install ruby:
https://www.ruby-lang.org/en/documentation/installation/
安装是勾选UTF-8,不然会遇到问题
ruby -v
gem -v
install jekyll&bundler:
https://jekyllrb.com/docs/installation/windows/
- Download and install a Ruby+Devkit version from RubyInstaller Downloads (opens new window). Use default options for installation.
- Run the
ridk installstep on the last stage of the installation wizard. This is needed for installing gems with native extensions. You can find additional information regarding this in the RubyInstaller Documentation (opens new window). From the options choose MSYS2 and MINGW development tool chain. - Open a new command prompt window from the start menu, so that changes to the PATH environment variable becomes effective. Install Jekyll and Bundler using
gem install jekyll bundler - Check if Jekyll has been installed properly:
jekyll -v
Jekyllrb create site
Jekyllrb quick start (opens new window)
# Creates a Jekyll site in the current directory
$ jekyll new --skip-bundle .
# exists and is not empty
$ jekyll new --skip-bundle . --force
$ bundle install / bundle install --force
$ bundle exec jekyll serve
$ bundle exec jekyll serve --livereload
Browse to http://localhost:4000
添加管理插件 Add admin dashboard(to manage blogs in local, github doesn’t support this plugin yet) Native:: https://jekyll.github.io/jekyll-admin/ ThirdParty:: https://github.com/singh1114/theJekyllProject
# hugo
https://gohugo.io/getting-started/installing https://gohugo.io/getting-started/quick-start/ https://themes.gohugo.io/minimal/ Markdown Cheatsheet https://github.com/adam-p/markdown-here/wiki/Markdown-Cheatsheet
git init; git submodule add https://github.com/calintat/minimal.git themes/minimal $ git submodule init $ git submodule update git submodule update --remote themes/minimal git submodule update --init --recursive
cp themes/minimal/exampleSite/config.toml .
hugo server –d hugo server -wDs ~/Code/hugo/docs -d dev
hugo -s D:\sourcecode\ -d D:\publish\
# 2.2 Documentation
# gitbook
https://docsify.js.org/#/more-pages
# Vuepress
https://vuepress.vuejs.org/
	npm view vuepress versions/version
  npm info vuepress version
	npm ls vuepress -g
	npm install vuepress@^1.0
	npm install @vuepress/plugin-google-analytics
module.exports = {
- ga: 'UA-12345678-9'
+ plugins: [
+   [
+     '@vuepress/google-analytics',
+     { ga: 'UA-12345678-9' }
+   ]
+ ]
}
https://codecook.de/articles/2021/05/01/vuepress-global-footer/#the-problem
# 3.托管服务Hosts
# 3.1 个人主机
vps and free hosting: 点击这里去vultr官网领取100美金免费体验 (opens new window)
oracle free tier (opens new window)
tomcat
sudo yum install tomcat
sudo yum install tomcat-webapps tomcat-admin-webapps tomcat-docs-webapp tomcat-javadoc
sudo systemctl status httpd
sudo systemctl start tomcat
sudo systemctl enable tomcat
sudo vim /usr/share/tomcat/conf/tomcat-users.xml
sudo sytemctl restart tomcat
sudo systemctl restart tomcat
# 3.2-0 Github pages (static pages)
https://pages.github.com/
# user/organization site
每个用户名只能建立 一个; 默认 master 分支;
Head over to GitHub and create a new public repository named username.github.io, where username is your username (or organization name) on GitHub. 注意:这里的username必须是github的用户名一样,否则不生效
git clone https://github.com/username/username.github.io
cd username.github.io

echo "Hello World" > index.html
git add --all

git commit -m "Initial commit"

git push -u origin main
Fire up a browser and go to https://username.github.io.
成功标志: settings->Pages看到 Your site is live at http://username.github.io
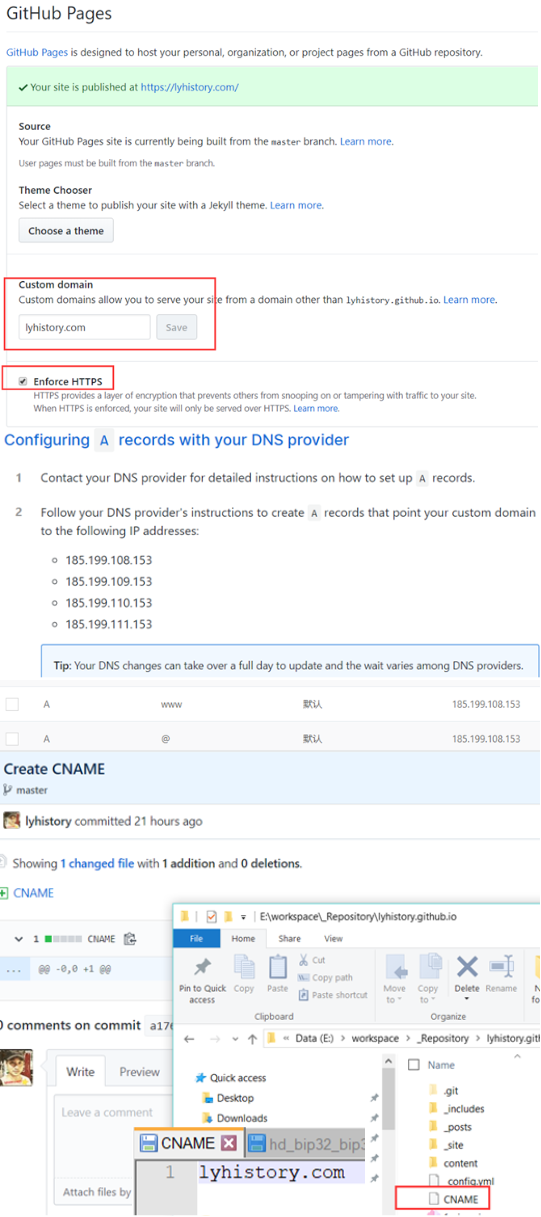
自定义domain:
A 记录
A Record	@	185.199.108.153
A Record	@	185.199.110.153
....
CNMAE记录
CNAME Record	www		lyhistory.github.io.
# project site
一个项目只能建立一个; 默认分支:gh-pages;
- Auto Create
Start from scratch Create an index file Head over to GitHub.com and create a new repository, or go to an existing one. Create new file index.html and type some HTML content into the editor. commit Repository Settings Click on the Settings tab and scroll down to the GitHub Pages section. Then select the main branch source and click on the Save button. Fire up a browser and go to http://username.github.io/repository.
Choose a theme Head over to GitHub.com and create a new repository, or go to an existing one. Click on the Settings tab. Scroll down to the GitHub Pages section. Press Choose a theme. Choose one of the themes from the carousel at the top. When you're done, click Select theme on the right. Use the editor to add content to your site. Commit Fire up a browser and go to http://username.github.io/repository
- Manual Create
$ cd testproject
$ git checkout --orphan gh-pages
$ git rm -rf .
$ git clone https://github.com/plusjade/jekyll-bootstrap
$ mv jekyll-bootstrap testproject
$ cd testproject
$ rm -rf .git
$ git init
$ git add .
$ git commit -m "initial project page commit"
$ git remote add origin [email protected]:username/testproject.git
$ git push -u origin gh-pages
# 3.2-1 Github pages with jekyllrb
GitHub Pages are powered by Jekyll behind the scenes, so they’re a great way to host your Jekyll-powered website for free.
official links (opens new window)
# 搭建
这里有个快速搭建的方式,自行参考 (opens new window),下面我们还是一步步操作
第一步: 安装 Jekyllrb
jekyllrb and github pages (opens new window)
Open the Gemfile that Jekyll created:
Add "#" to the beginning of the line that starts with gem "jekyll" to comment out this line.
Add the github-pages gem by editing the line starting with # gem "github-pages". Change this line to:
gem "github-pages", "~> GITHUB-PAGES-VERSION", group: :jekyll_plugins
Replace GITHUB-PAGES-VERSION with the latest supported version of the github-pages gem. You can find this version here: ("Dependency versions."](https://pages.github.com/versions/)
run
bundle install
第二步:配置 _config.yml
domain: my-site.github.io       # if you want to force HTTPS, specify the domain without the http at the start, e.g. example.com
url: https://my-site.github.io  # the base hostname and protocol for your site, e.g. http://example.com
baseurl: /REPOSITORY-NAME/
第三步:主题Theme - Minimal-mistakes
方法一:配置官方支持的主题 (opens new window)
方法二:remote theme (GitHub Pages compatible) https://github.com/mmistakes/minimal-mistakes https://mmistakes.github.io/minimal-mistakes/docs/quick-start-guide/
Gemfile:
gem "jekyll-include-cache", group: :jekyll_plugins
Add jekyll-include-cache to the plugins array of your _config.yml.
Fetch and update bundled gems by running the following Bundler command: bundle
Add remote_theme: "mmistakes/[email protected]" to your _config.yml file. Remove any other theme: or remote_theme: entry.
注意: 默认会生成 index.md:
---
# You don't need to edit this file, it's empty on purpose.
# Edit theme's home layout instead if you wanna make some changes
# See: https://jekyllrb.com/docs/themes/#overriding-theme-defaults
layout: home
---
以及一篇默认的post 2023-04-23-welcome-to-jekyll.markdown:
---
layout: post
title:  "Welcome to Jekyll!"
date:   2023-04-23 15:53:59 +0800
categories: jekyll update
---
You’ll find this post in your `_posts` directory. Go ahead and edit it and re-build the site to see your changes. You can rebuild the site in many different ways, but the most common way is to run `jekyll serve`, which launches a web server and auto-regenerates your site when a file is updated.

To add new posts, simply add a file in the `_posts` directory that follows the convention `YYYY-MM-DD-name-of-post.ext` and includes the necessary front matter. Take a look at the source for this post to get an idea about how it works.

Jekyll also offers powerful support for code snippets:

{% highlight ruby %}
def print_hi(name)
  puts "Hi, #{name}"
end
print_hi('Tom')
#=> prints 'Hi, Tom' to STDOUT.
{% endhighlight %}

Check out the [Jekyll docs][jekyll-docs] for more info on how to get the most out of Jekyll. File all bugs/feature requests at [Jekyll’s GitHub repo][jekyll-gh]. If you have questions, you can ask them on [Jekyll Talk][jekyll-talk].

[jekyll-docs]: https://jekyllrb.com/docs/home
[jekyll-gh]:   https://github.com/jekyll/jekyll
[jekyll-talk]: https://talk.jekyllrb.com/
所以默认首页是 home layout: A derivative archive page layout to be used as a simple home page. It is built to show a paginated list of recent posts based off of the pagination settings in _config.yml.
如果要改成splash,可以更改 index.md或者删除index.md 然后在 _pages目录下创建比如 home.md,内容参考:Splash Page Sample (opens new window)
Minimal-mistakes主题入门:
_layouts (opens new window), _includes (opens new window), _sass, and /assets/
Comments (opens new window) Multi language Jekyll i18n (opens new window)
# 开发维护
To update::
- If you followed our setup recommendations and installed Bundler, run
bundle update github-pagesor simplybundle updateand all your gems will update to the latest versions. - If you don't have Bundler installed, run
gem update github-pages
bundle info "github-pages"
bundle info "jekyll-remote-theme"
Debug locally (opens new window)
Migration 迁移
Import from wordpress (opens new window)
# 例子
example site 1 (opens new window) example site 2 (opens new window) Terminal based portfolio website for CodeNerve (opens new window) Github Pages+Firebase=Dynamic Web Apps (opens new window)
# 3.2-2 Github pages with hugo
official links (opens new window)
# 3.3-1 google sites
sites.google.com
# 3.3-1 google Firebase(dynamic apps)
https://firebase.google.com/docs
# 3.4-1 cloudflare page
Computer(Workers)->Select Pages
# 3.4-1 cloudflare page WORKER
Computer(Workers)->Select Worker
<project name>->Settings->Build
	Build Configuration
		Deploy Command: npx wrangler pages deploy ./ --project-name=test

当我从cloudflare在线编辑代码的时候发现,cloudflare page显示的代码是个worker.js: export default {
  async fetch(request, env) {
    return new Response("Hello world")
  }
}

my-project/
├── worker.js          # Workers 入口文件
├── src/               # 源代码目录
│   ├── api.js         # 业务逻辑
│   └── utils.js       # 工具函数
├── public/            # 静态资源
│   └── index.html
├── wrangler.toml      # 部署配置
└── package.json       # 依赖管理

// 导入 GitHub 仓库中的模块
import { handleApiRequest } from './src/api.js';
import { validateRequest } from './src/utils.js';

// 静态资源处理
const staticFileHandler = {
  async fetch(request) {
    return fetch(new URL(request.url));
  }
};

// Worker 主逻辑
export default {
  async fetch(request, env) {
    const url = new URL(request.url);

    // API路由处理
    if (url.pathname.startsWith('/api')) {
      return handleApiRequest(request, env);
    }

    // 静态资源处理
    return staticFileHandler.fetch(request);
  }
};
# 4. 站长必备
站点各种测试工具,ping速度、dns解析速度
# 自定义域名
注意用github page最好是绑定自己的域名(免费域名注册 (opens new window)),默认是二级域名,比如我的 lyhistory.github.io,我绑定了自己的 lyhistory.com,绑定方法很简单, 在你的域名供应商处加一个cname,具体看这里 https://help.github.com/en/github/working-with-github-pages/configuring-a-custom-domain-for-your-github-pages-site
# DNS解析服务
然后为了加速,我选择了cloudflare做dns解析,方法:
1.注册cloudflare,添加网站,然后根据提示去你的域名供应商处更改默认的dns为cloudflare提供的两个dns即可; 1 (opens new window)
2.SSL mode 在 SSL/TLS页面,选择SSL mode: Full but not Full (Strict):
3.至于加速的原理,还需要研究下.
# CDN加速
【视频教程】双域名白嫖Cloudflare优选IP,最优CDN给自己网站加速,尽情享受CF免费服务 (opens new window),主要原理:cloudflare for Saas 自定义主机回退源+CloudFlare公共优选Cname域名地址
# Troubleshooting
?# github pags=>setting, yml invalid Your site is having problems building: You have an error on line 16 of your _config.yml file https://help.github.com/en/articles/page-build-failed-config-file-error
?# failed load jekyll-include-cache Configuration file: D:/workspace/lyhistory.github.io/_config.yml Dependency Error: Yikes! It looks like you don't have jekyll-include-cache or one of its dependencies installed. In order to use Jekyll as currently configured, you'll need to install this gem. The full error message from Ruby is: 'cannot load such file -- jekyll-include-cache' If you run into trouble, you can find helpful resources at https://jekyllrb.com/help/! Note: The theme uses the jekyll-include-cache plugin which will need to be installed in your Gemfile and added to the plugins array of _config.yml. Otherwise you'll throw Unknown tag 'include_cached' errors at build. {: .notice--warning} https://github.com/mmistakes/minimal-mistakes/blob/2784b3ad431f9e0e9f262d1a06d23f389c93d95c/docs/_docs/03-installation.md
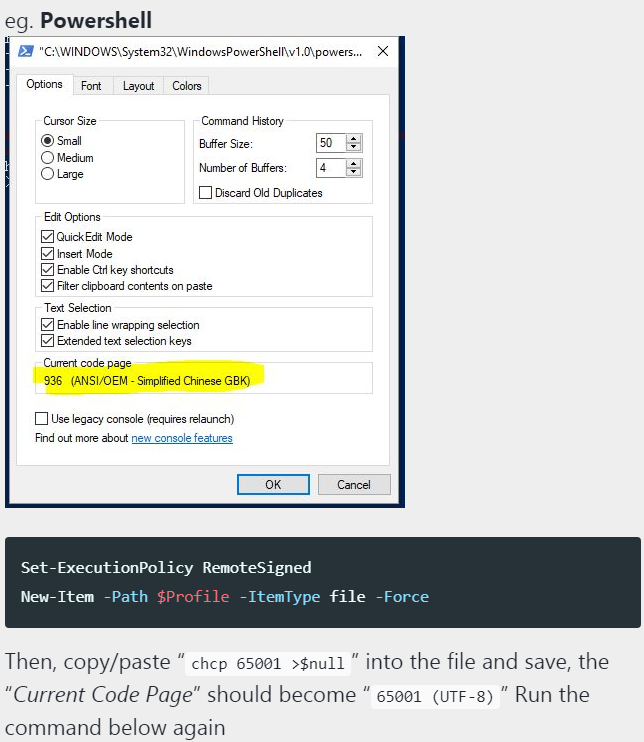
?# Conversion error: Jekyll::Converters::Scss encountered an error while converting 'assets/css/main.scss': Invalid GBK character "\xE2" on line 54 Fixed with powershell,https://williamwang.info/setup-jekyll-on-windows/
# to explore
http://archive.is/ http://archive.org/
http://www.restapitutorial.com/
solr - search engine bootstrap - Ace Responsive BootStrap 3 Dashboard / Admin Template https://github.com/bopoda/ace AngularJS - BlurAdmin - https://akveo.github.io/blur-admin/articles/001-getting-started/
Serverless https://www.serverlessops.io/blog/serverless-contact-form-for-static-websites