# 基础概念
镜像 image VS 固件 firmware
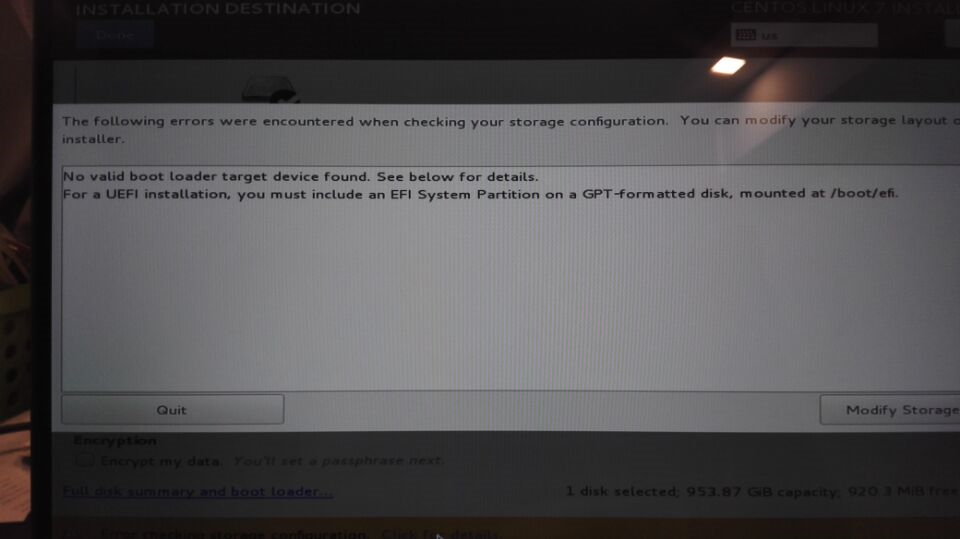
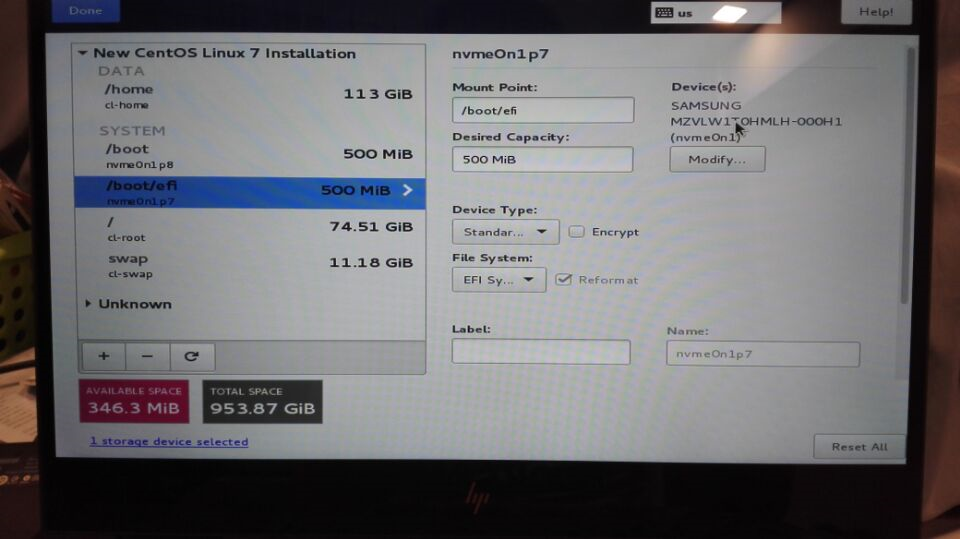
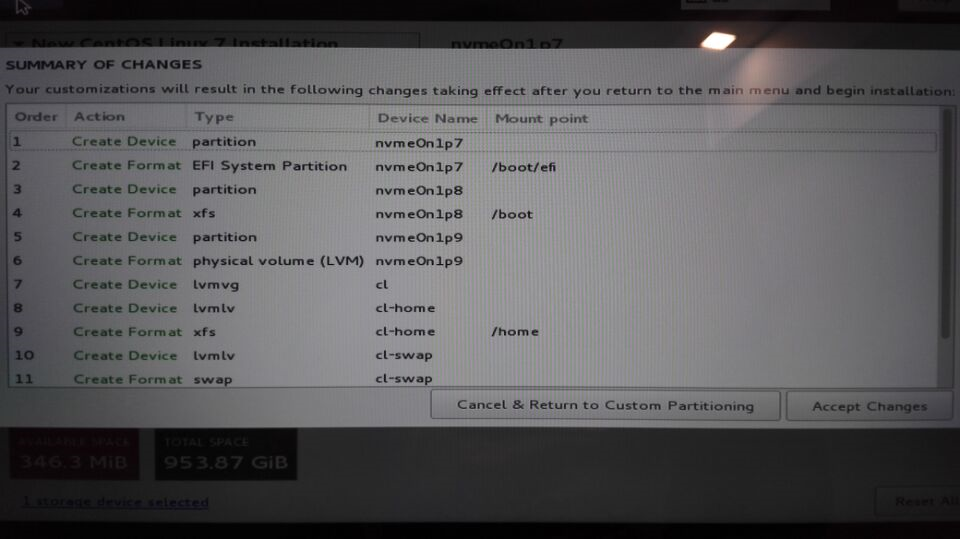
知识: mbr gpt Fat32 NTFS LVM EFI WINDOWS BOOT MANAGER 坑: U盘和移动硬盘启动 Win10 MBR 引导启动 Linux可能对ntfs支持不好,所以建议fat32格式化 安装位置(不要覆盖另外一个系统,不要装到了U盘上,除非是安装到raspberry pi的存储卡上) 分区 swap / /home /boot /boot/efi
# Firmware, bootloader, software/OS Image, Drivers
- Firmware: a small footprint software usually found in embedded devices. For instance, the micro-code of a hard-drive or a washing machine.
- Bootloader: part of the firmware usually ran during the boot sequence which allows to load a new firmware to update it from SPI, USB, CAN...
- Driver: low level reusable set of functions used to run peripherals or work with APIs making some abstraction of the hardware. For instance, sending a function that will handle sending a character through a UART by enabling the module, setting I/Os, baudrate, parity, and then finally sending the character and handling errors.
- Software: Firmware is a type of software that directly communicates and controls the hardware on your device. Software usually has a user interface that makes it easy for the user to interact with, while firmware is generally not meant to be interacted with by the user.
Firmware is often stored in a physical device's flash ROM. While ROM is "read-only memory," flash ROM is a sort of flash memory that can be wiped and overwritten. Firmware updates are usually accessible on a manufacturer's website under the "Support" or "Downloads" sections.
Traditionally, firmware is CPU code that resides on a unmodifiable ROM that is necessary for a hardware device to boot and load an operating system or a binary (software) of choice. Sometimes no choice of a binary is given and one attached to the boot-portion firmware is used.
All CPUs have the classical problem in that, since they fetch instructions from memory, some sort of pre-programmed memory must exist at a fixed address when the CPU starts, so that it can do something automatically on startup. Firmware exists for this purpose. Some firmware also has code that later programs can use for services. BIOS firmware exposes many functions that DOS used for basic input and output (hence why BIOS stands for Basic Input Output System).
The distinction is not totally clear. Some (most) WLAN cards require firmware to be loaded before they will start functioning. However, usually there is a tiny firmware on the device whose job is to do nothing but accept a main "firmware" over the USB bus when the device is started by the operating system, and hand over control when it is loaded. Most people would say all of it is firmware.
Since EEPROMs and flash memory became more common, firmware usually no longer resides in an unwriteable ROM but in flash memory and can be modified. The distinction between firmware and software is blurry today with the advent of flash memory. However, one thing hasn't changed over the years and that is CPUs are still CPUs and require some code, or firmware, to be visible at startup to, well, start up.
CPUs are in more devices than ever before so developing and allowing firmware to be updated in the case of bugs is a big deal now and many hardware devices with a CPU have firmware update interfaces, sometimes undocumented.
A firmware can be used to load an OS. It can contain a boot loader or code that loads a boot loader. It is possible to store an OS image in the same location as firmware and let the boot-time code of firmware load the OS (cell phones do this). PC BIOSes as a rule do not include boot loaders. U-boot (not for PCs) is an example of a "filesystem-aware" firmware that does directly load an operating system.
Firmwares usually do not have all the features of a full operating system because of the principle that simpler is more reliable. The simplest firmwares simply initialize a minimum of hardware, load a sector or block off of a storage device and throw execution to it. This is simple to program and therefore easy to verify as bug free. Bugs in boot time firmware particularly can spell disaster for a device.
# BIOS bootloader
BIOS(Basic Input Output System) is very first step when you press power button on your CPU. BIOS is a small firmware stored in ROM of mother board which is manufacturer dependent code. The function of BIOS is, it initializes some of the hardware on computer, checKs integrity and finally it initializes first level boot loader !
Boot loader is a program which is called by BIOS and once again initializes boot related hardware and finally boot loader is the one who exactly Knows(memory location) where the Kernel image is stored in secondary memory. It loads Kernel image from secondary storage to RAM.
# OS VS Kernel
Both operating system and Kernel are types of system software. The basic difference between the two is that an operating system is a system software that acts as the interface between the users and the machine, while a kernel is a part of the operating system that converts user commands into machine language.
# example: ESP32启动流程
1、 第一阶段bootloader(ROM中)加载第二阶段bootloader(位于FLASH 0X1000)
2、 第二阶段的boot loader加载分区表和MAIN APP应用程序(其实就是freertos了)
main APP包含RAM段和Flash段
① 去0X8000加载分区表 ,配置两个CPU(PRO CPU和APP CPU)的MMU,但只使能PRO cpu的flash,一旦被加载,就会跳到main APP的入口
3、执行main APP,此时,第二个CPU和RTOS调度器都会运行
入口调用 componments/esp32/cpu_start.c中的call_start_cpu0函数,
此函数会调用 call_start_cpu1.执行后PRO CPU执行start_cpu0,APP CPU执行start_cpu1
最终会调用app_main函数
# example: Arduino 启动流程
arduino有没有BIOS之类的固件程序? 没有,这是PC专利
arduino应该是有bootloader的吧,这个引导程序放在什么地方呢。系统启动时引导程序是怎么加载到内存的呢?
位于FLASH末端,AVR是哈弗结构,没有加载的概念,直接运行
上电后cpu的程序计数器指向的位置在flash还是ram呢? 指向RESET中断向量,默认是程序地址空间的0x0,设置了bootloader后是末尾的某个地址
采用arduino IDE开发程序后,通过USB上传程序完成后,这时候程序放在什么位置?
从flash0地址开始
此刻arduino的存储器处于什么状态,比如bootloader,程序等在存储器中的布局是什么样的?
建议看下哈弗处理器构架的背景知识,bootloader和程序的关系看AVR手册,bootloader位于flash高地址
Everyone that uses Arduino can tell you how easy it is to get projects going once they have an Arduino board in hand. Just load up the blink code and press upload. In a matter of seconds, your Arduino LED is blinking ever so confidently. But do you stop and wonder how Arduino receives the blink code? Enter Arduino bootloader. Every Arduino has a bootloader, a small program that is always stored on the Arduino to update the code in the Arduino. It only runs once per reset. It looks for new code to be loaded to the Arduino before starting the existing code.
The bootloader works like this:
On the PC side, to trigger a reset on the RESET pin, the PC (avrdude.exe or GNU/Linux equivalent) opens the serial port to Arduino when your press upload and the code is ready to upload. This causes the Data Transmit Ready (DTR) line of the USB/TTL chip to go LOW. The Arduino board has a capacitor charging circuit that uses this LOW (charging the capacitor) signal to momentarily pull down the RESET line of the ATMEGA328P chip before returning it to HIGH (capacitor charging completes). So Arduino resets each time its serial port is opened.
Upon reset, Arduino enters the bootloader.
The bootloader looks at the source that caused the reset. There are several sources that can cause a reset. If the reset was caused by the RESET pin, then it waits for one second for the PC to send in commands. When it receives valid commands, it will start accepting new Arduino code in HEX format and erase the existing code to load new one. If it doesn’t receive valid commands, it times out after one second and triggers a Watch Dog Timer (WDT) reset.
Once the bootloader runs again it will look at the source of the reset. Once it determines that it was the WDT reset, it immediately jumps to the first line of the actual code. This way if you power up Arduino, it will be able to immediately run your code, instead of waiting in the bootloader to time out 1 second. It’s pretty smart!
The optiboot bootloader is the most recent bootloader used by Arduino UNO, nano, and other boards based on ATMEGA328P and 1284P. It accepts commands or uploads code at 115,200, unlike the previous bootloader that accepts commands or uploads code at 57,600. A number of people have modified this standard bootloader to fit their own needs, such as slower upload speed for a bare-bone system with no crystals and runs at say 100KHz on internal RC oscillator to preserve battery. Others have made Ethernet upload possible. I’ve personally made a bootloader that will refuse to upload code unless a certain EEPROM byte is set to a certain value. This way if the device is a data logger and to be used by a student, the teacher won’t be worried that the student would get “smart” and erase the code. But when the teacher wants to change the code he/she can enter a password in the existing data logger program and unlock the device for upload again.
If you want to deploy a project, such as an artistic installation or a data logger, you can make a bare-bone system without the whole Arduino UNO board. Then you will need an ATMEGA328P chip with preloaded bootloader like this one, and some extra components.
Anyway, if your code doesn’t need to be changed any further, you can decide to get rid of the bootloader altogether. On an Arduino UNO, this will free up 512 bytes of FLASH and the end user of your device won’t have the danger of erasing the code. To load code without a bootloader, you can use Nick Gammon’s HEX uploader. All you need is another Arduino UNO and an SD card (shield format is preferred) and some jumper wires.
# example: The boot sequence of the Raspberry Pi is basically this:
Stage 1 boot is in the on-chip ROM. Loads Stage 2 in the L2 cache Stage 2 is bootcode.bin. Enables SDRAM and loads Stage 3 Stage 3 is loader.bin. It knows about the .elf format and loads start.elf start.elf loads kernel.img. It then also reads config.txt, cmdline.txt and bcm2835.dtb If the dtb file exists, it is loaded at 0×100 & kernel @ 0×8000 If disable_commandline_tags is set it loads kernel @ 0×0 Otherwise it loads kernel @ 0×8000 and put ATAGS at 0×100 kernel.img is then run on the ARM.
# example: android boot process
1st Stage is Boot ROM and Boot Loader 2nd Stage is Kernel 3rd Stage is Init 4th Stage is Zygote and DVM 5th Stage is SystemServer and Managers
# example: linux boot process
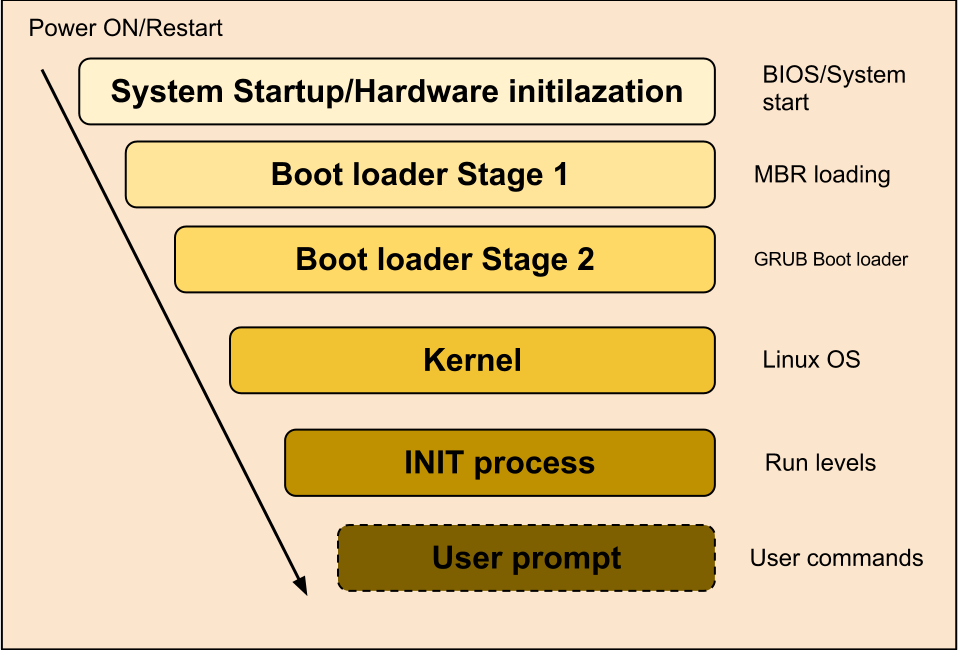 1.BIOS(Basic Input/Output System)
2.MBR(Master Boot Record)
3.LILO or GRUB
LILO:-LInux LOader
GRUB:-GRand Unified Bootloader
4.Kernel
5.init
6.Run Levels
1.BIOS:
i.When we power on BIOS performs a Power-On Self-Test (POST) for all of the different hardware components in the system to make sure everything is working properly
ii.Also it checks for whether the computer is being started from an off position (cold boot) or from a restart (warm boot) is
stored at this location.
iii.Retrieves information from CMOS (Complementary Metal-Oxide Semiconductor) a battery operated memory chip on the motherboard that stores time, date, and critical system information.
iv.Once BIOS sees everything is fine it will begin searching for an operating system Boot Sector on a valid master boot sector
on all available drives like hard disks,CD-ROM drive etc.
v.Once BIOS finds a valid MBR it will give the instructions to boot and executes the first 512-byte boot sector that is the first
sector (“Sector 0″) of a partitioned data storage device such as hard disk or CD-ROM etc .
2.MBR
i. Normally we use multi-level boot loader.Here MBR means I am referencing to DOS MBR.
ii.Afer BIOS executes a valid DOS MBR,the DOS MBR will search for a valid primary partition marked as bootable on the hard disk.
iii.If MBR finds a valid bootable primary partition then it executes the first 512-bytes of that partition which is second level MBR.
iv. In linux we have two types of the above mentioned second level MBR known as LILO and GRUB
3.LILO
i.LILO is a linux boot loader which is too big to fit into single sector of 512-bytes.
Page on ii.so it is divided into two parts :an installer and a runtime module.
iii.The installer module places the runtime module on MBR.The runtime module has the info about all operating systems installed.
iv.When the runtime module is executed it selects the operating system to load and transfers the control to kernel.
v.LILO does not understand filesystems and boot images to be loaded and treats them as raw disk offsets
GRUB
i.GRUB MBR consists of 446 bytes of primary bootloader code and 64 bytes of the partition table.
ii.GRUB locates all the operating systems installed and gives a GUI to select the operating system need to be loaded.
iii.Once user selects the operating system GRUB will pass control to the karnel of that operating system.
see below what is the difference between LILO and GRUB
4.Kernel
i.Once GRUB or LILO transfers the control to Kernel,the Kernels does the following tasks
1.BIOS(Basic Input/Output System)
2.MBR(Master Boot Record)
3.LILO or GRUB
LILO:-LInux LOader
GRUB:-GRand Unified Bootloader
4.Kernel
5.init
6.Run Levels
1.BIOS:
i.When we power on BIOS performs a Power-On Self-Test (POST) for all of the different hardware components in the system to make sure everything is working properly
ii.Also it checks for whether the computer is being started from an off position (cold boot) or from a restart (warm boot) is
stored at this location.
iii.Retrieves information from CMOS (Complementary Metal-Oxide Semiconductor) a battery operated memory chip on the motherboard that stores time, date, and critical system information.
iv.Once BIOS sees everything is fine it will begin searching for an operating system Boot Sector on a valid master boot sector
on all available drives like hard disks,CD-ROM drive etc.
v.Once BIOS finds a valid MBR it will give the instructions to boot and executes the first 512-byte boot sector that is the first
sector (“Sector 0″) of a partitioned data storage device such as hard disk or CD-ROM etc .
2.MBR
i. Normally we use multi-level boot loader.Here MBR means I am referencing to DOS MBR.
ii.Afer BIOS executes a valid DOS MBR,the DOS MBR will search for a valid primary partition marked as bootable on the hard disk.
iii.If MBR finds a valid bootable primary partition then it executes the first 512-bytes of that partition which is second level MBR.
iv. In linux we have two types of the above mentioned second level MBR known as LILO and GRUB
3.LILO
i.LILO is a linux boot loader which is too big to fit into single sector of 512-bytes.
Page on ii.so it is divided into two parts :an installer and a runtime module.
iii.The installer module places the runtime module on MBR.The runtime module has the info about all operating systems installed.
iv.When the runtime module is executed it selects the operating system to load and transfers the control to kernel.
v.LILO does not understand filesystems and boot images to be loaded and treats them as raw disk offsets
GRUB
i.GRUB MBR consists of 446 bytes of primary bootloader code and 64 bytes of the partition table.
ii.GRUB locates all the operating systems installed and gives a GUI to select the operating system need to be loaded.
iii.Once user selects the operating system GRUB will pass control to the karnel of that operating system.
see below what is the difference between LILO and GRUB
4.Kernel
i.Once GRUB or LILO transfers the control to Kernel,the Kernels does the following tasks
Intitialises devices and loads initrd module mounts root filesystem 5.Init i.The kernel, once it is loaded, finds init in sbin(/sbin/init) and executes it. ii.Hence the first process which is started in linux is init process. iii.This init process reads /etc/inittab file and sets the path, starts swapping, checks the file systems, and so on. Page on iv.it runs all the boot scripts(/etc/rc.d/,/etc/rc.boot/) v.starts the system on specified run level in the file /etc/inittab 6.Runlevel i.There are 7 run levels in which the linux OS runs and different run levels serves for different purpose.The descriptions are given below.
0 – halt 1 – Single user mode 2 – Multiuser, without NFS (The same as 3, if you don’t have networking) 3 – Full multiuser mode 4 – unused 5 – X11 6 – Reboot ii.We can set in which runlevel we want to run our operating system by defining it on /etc/inittab file.
Note : Rightly Pointed by Rod Nussbaumer ,there isn't a single Linux boot process. Linux can be loaded into CPU memory many different ways, depending on the architecture. This is just one of numerous ways that Linux can boot on a PC architecture. This answer is not wrong, but far from complete or comprehensive. It would take a book to describe all of the ways of booting Linux on a large subset of all of the possible architectures. Technically, Linux is 'booted' as soon as the init process (the first user space program) has started. How the init process proceeds is very much a system-specific thing as well. There are some standard configurations, and this answer describes one of them.
# U盘启动
市面上很多一键u盘启动制作工具都有病毒,比如某某菜某某桃等,不小心电脑就成为别人的肉鸡,还是选用开源透明的工具比较靠谱: https://github.com/pbatard/rufus
# sdcard启动
Win32DiskImager
# win10安装linux双系统
准备
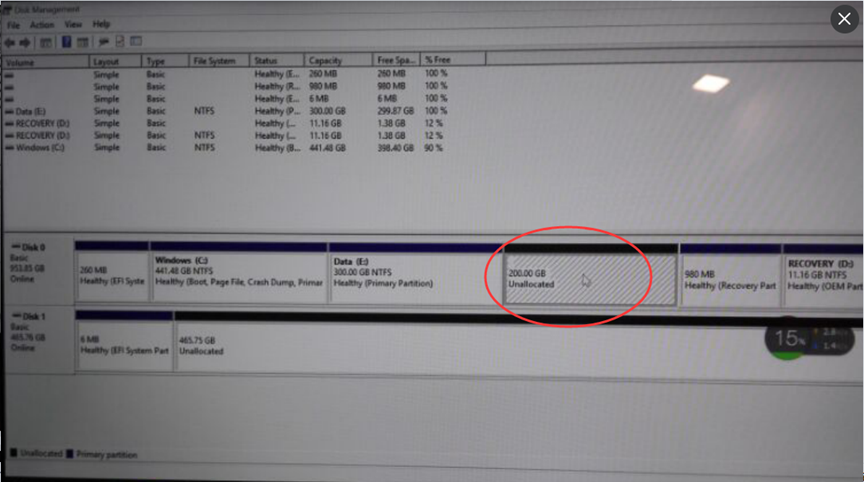
1.win10 shrink 系统盘,分出unlocated空余的磁盘空间,不用创建分区,不需要分配盘符
2.用win32DiskImage 把 ISO 文件写入 U盘 / 移动硬盘
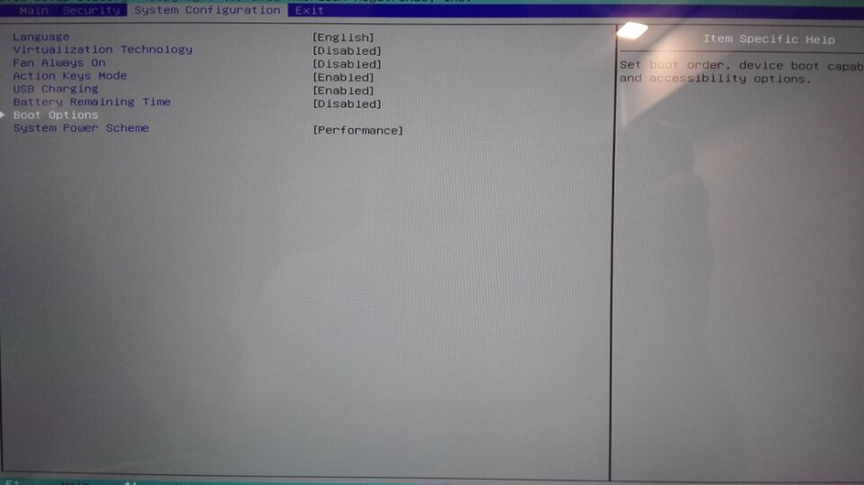
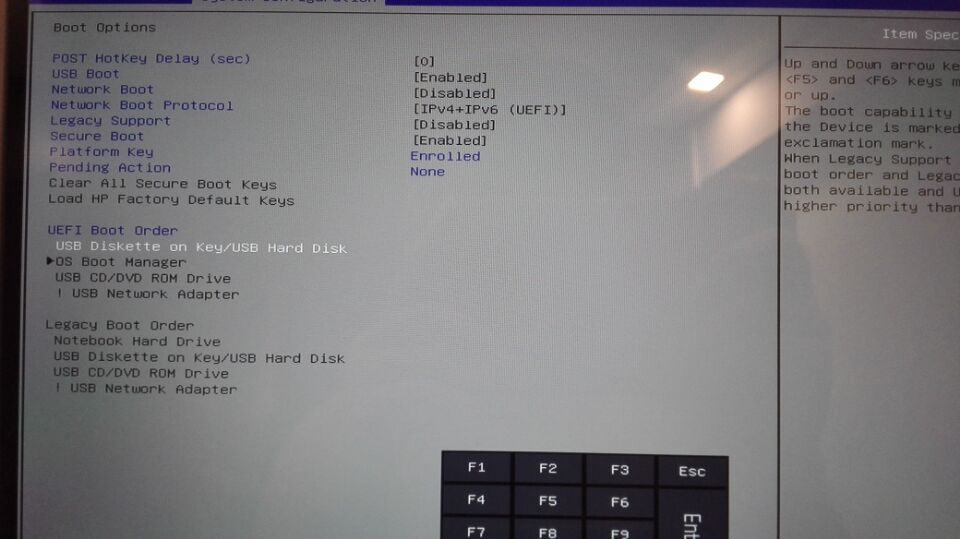
- F10进入BIOS(hp laptop)修改 boot option,把USB 选项打开并且放在第一项
安装:
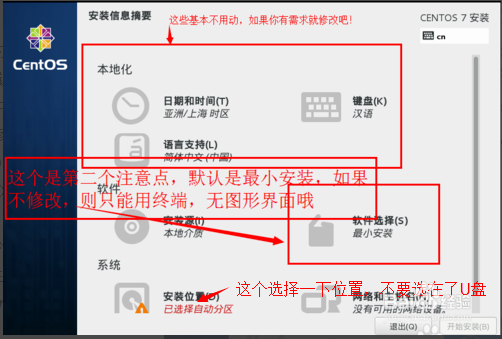
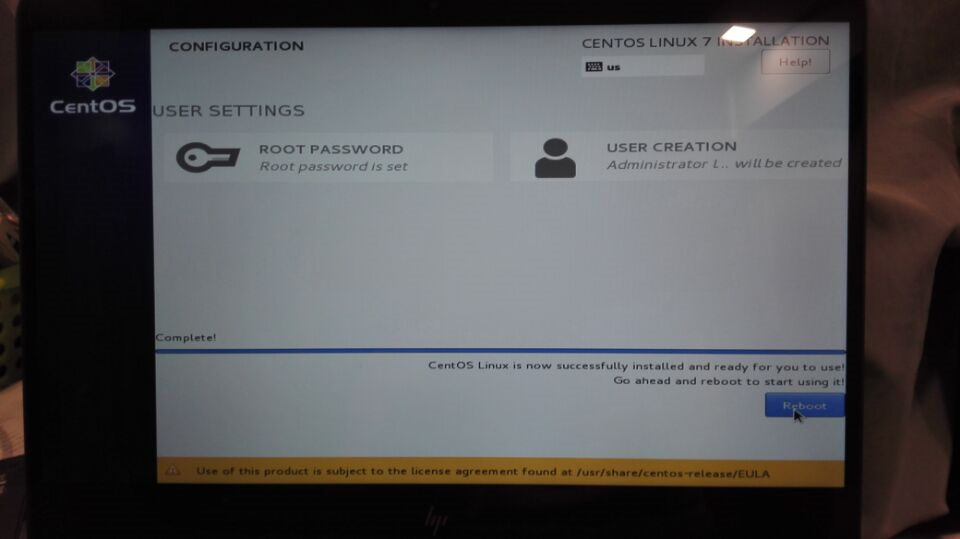
重启:注意拔掉移动硬盘或U盘,否则再次进入安装页面,如果忘记,可以拔掉,手动输入reboot重启 完成后,最后改回bios的boot顺序,我的情况是把OS boot manager放在第一位 最后 由于之前U盘/移动硬盘被写入了iso,所以他们是有mbr引导区的,意味着不能被windows默认的disk manager格式化了,所以这里用了EaseUS partition manager home edition,wipe data and format
参考: BIOS HP SPECTRE F10 / ESC+F10 win10 shrink format? fat32 ntfs
usb installer - win32 image https://wiki.centos.org/HowTos/InstallFromUSBkey https://syaifulnizamyahya.wordpress.com/2015/05/27/how-to-create-centos-7-bootable-usb-drive-in-windows/
https://jingyan.baidu.com/article/148a1921dd2ee64d70c3b16a.html https://jingyan.baidu.com/article/20b68a88b2077f796cec621b.html http://www.jianshu.com/p/b43b4ec976a4
http://cache.baiducontent.com/c?m=9d78d513d9861af34fece47d0f01d6160e2482744cd7c7637ac3e34a84652b10103aa5e666351174d6d13b275fa0131aacb22173441e3df2de8d9f4aaafdc82d388850652c01c70a53954ef0d6187e9d3d9058eaaa1be7a7f03093add9d4c854248b094325de&p=c033d716d9c114e812bd9b7d0d1592&newp=882a9645d58259fc57efd3277f4a9e231610db2151d6d301298ffe0cc4241a1a1a3aecbf2122150ed0ce7e6d0aa44f5cedf630733d0434f1f689df08d2ecce7e6e90&user=baidu&fm=sc&query=win10%B0%B2%D7%B0centos7&qid=e9cc01290005cac0&p1=1
https://www.youtube.com/watch?v=4zKjJ0MKL50
http://www.cnblogs.com/xiaozhupo/p/5333854.html
http://www.cnblogs.com/LeisureLak/p/6215520.html
写入多个iso https://fossbytes.com/how-to-put-multiple-iso-files-in-one-bootable-usb-disk-create-multiboot-usb-disk/
找不到引导区 http://blog.csdn.net/ergouge/article/details/49836913