1.Virtualbox network mode
https://www.virtualbox.org/manual/ch06.html
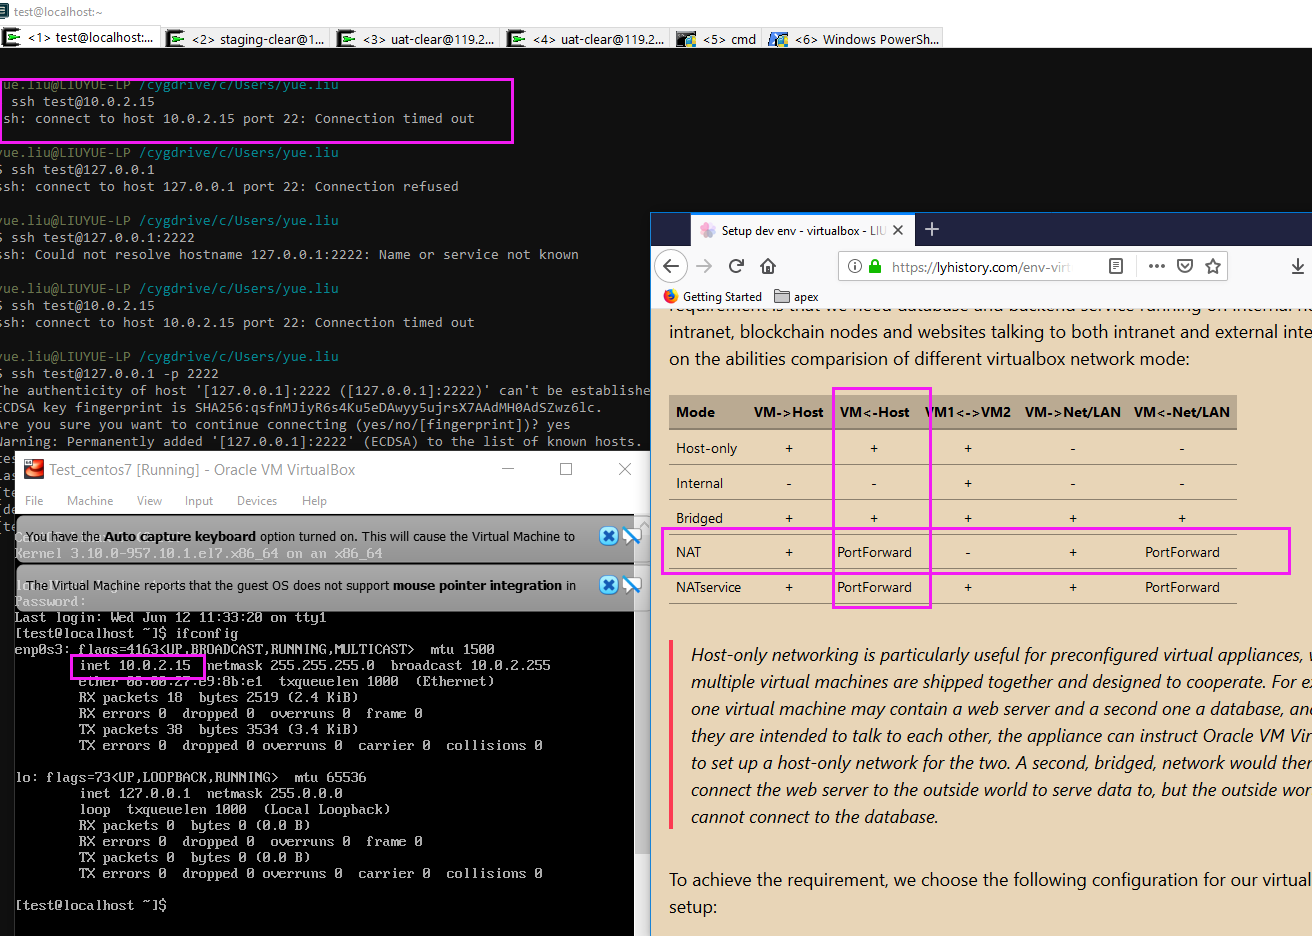
| Mode | VM->Host | VM<-Host | VM1<->VM2 | VM->Net/LAN | VM<-Net/LAN |
|---|---|---|---|---|---|
| Host-only | + | + | + | - | - |
| Internal | - | - | + | - | - |
| Bridged | + | + | + | + | + |
| NAT | + | PortForward | - | + | PortForward |
| NATservice | + | PortForward | + | + | PortForward |
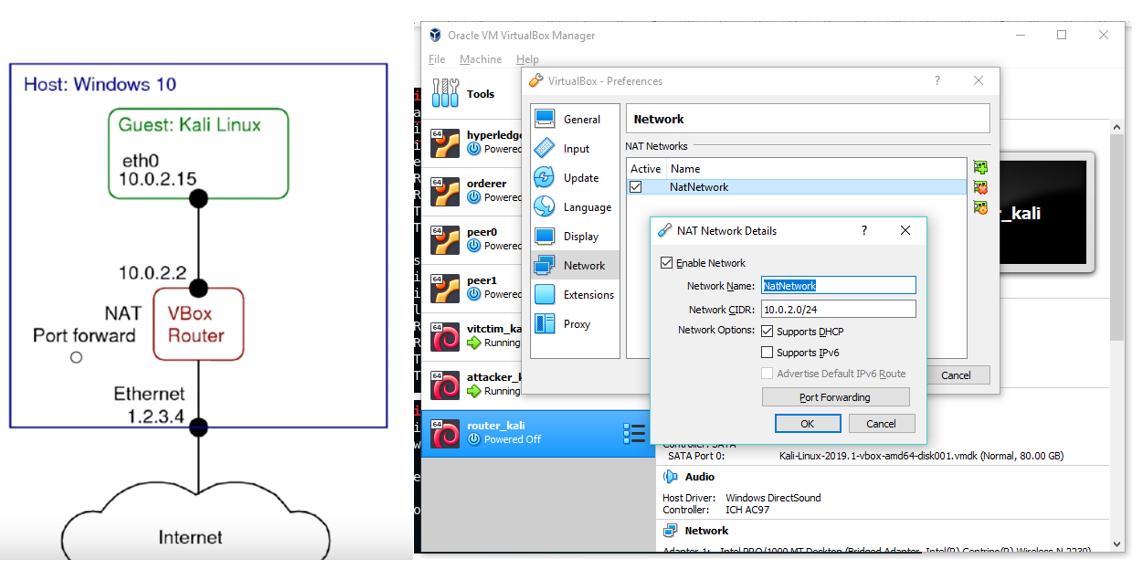
1.1 NAT Network.
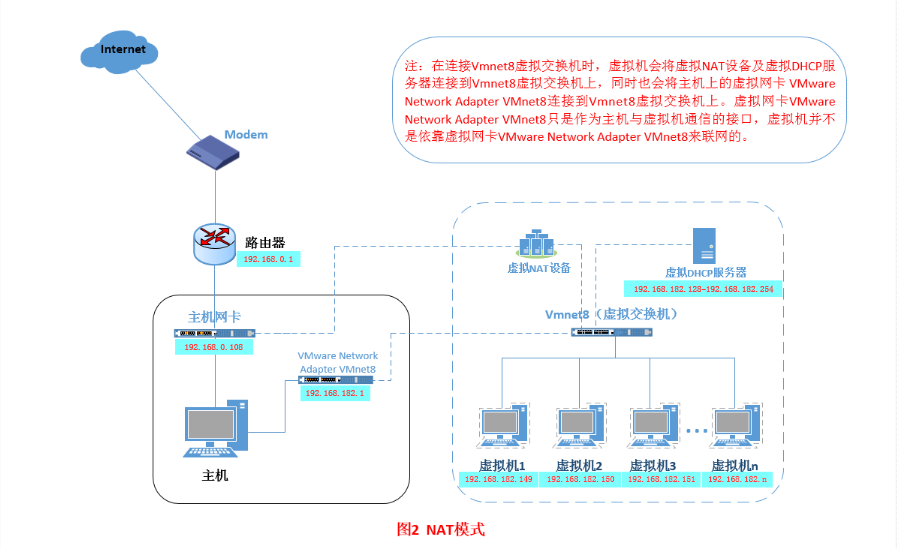
A NAT network is a type of internal network that allows outbound connections. See Section 6.4, “Network Address Translation Service”.
有虚拟路由,所以guest可以直接通过10.0.2.2:
netstat -aon | findstr ‘PORT’ tasklist | findstr ‘PID’ tasklist /fi “pid eq 4444”
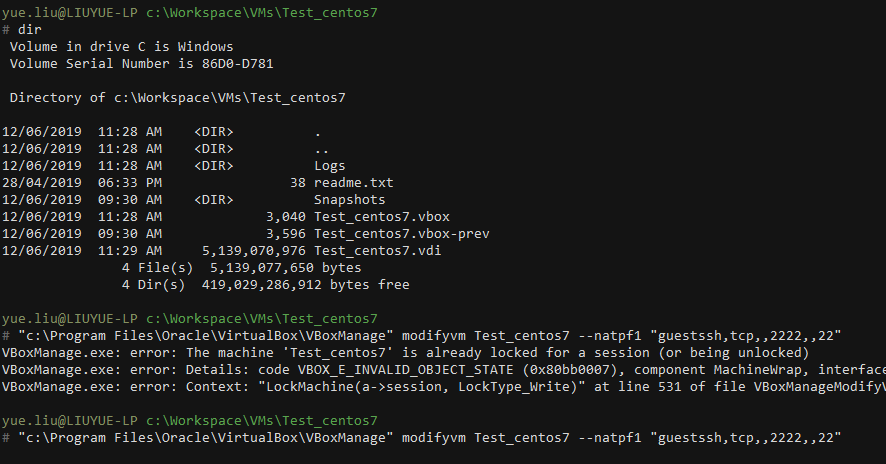
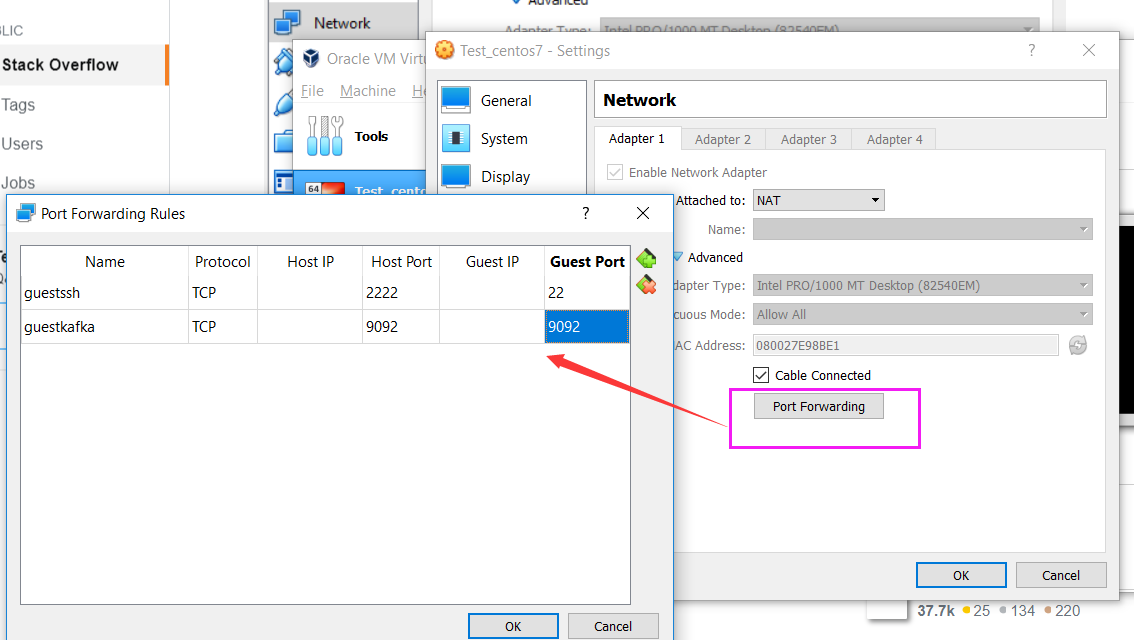
“c:\Program Files\Oracle\VirtualBox\VBoxManage” modifyvm Test_centos7 –natpf1 “guestssh,tcp,,2222,,22”
But failed on the second rule??? “c:\Program Files\Oracle\VirtualBox\VBoxManage” modifyvm Test_centos7 –natpf2 “guestkafka,tcp,,9092,,9092”, work around: add in VB Network settings
?#No network access for NAT, change dns settings, for centos:
vim /etc/sysconfig/network-scripts/ifcfg-enp0s3
	DNS1=8.8.8.8
	ONBOOT=yes
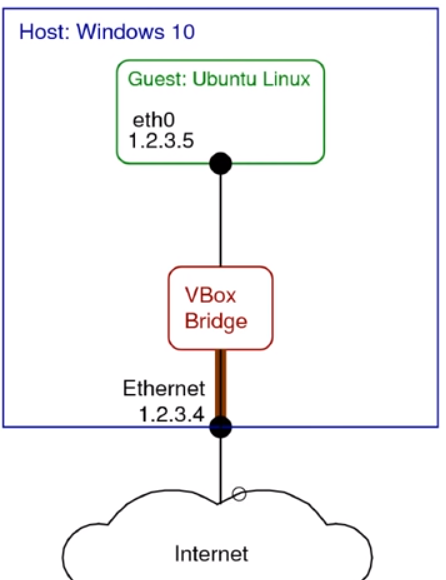
1.2 Bridged networking.
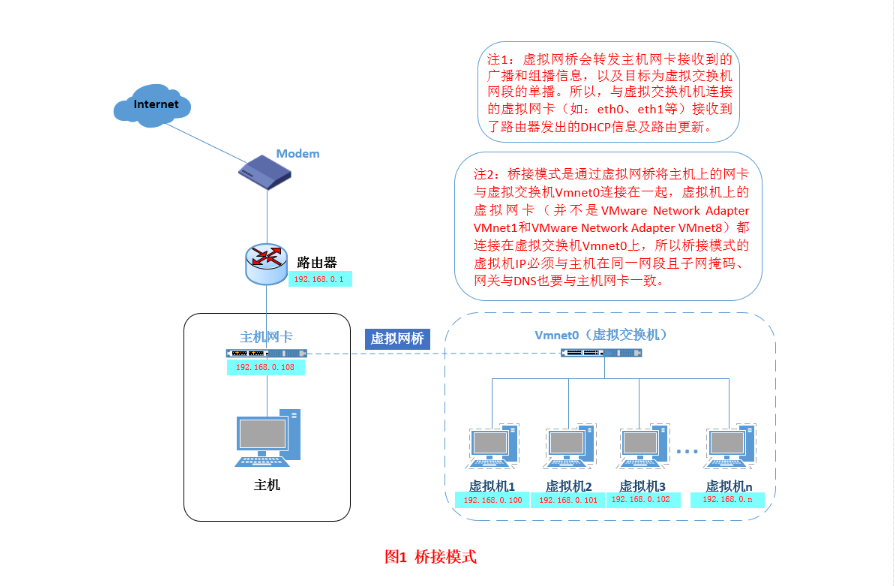
This is for more advanced networking needs, such as network simulations and running servers in a guest. When enabled, Oracle VM VirtualBox connects to one of your installed network cards and exchanges network packets directly, circumventing your host operating system’s network stack.
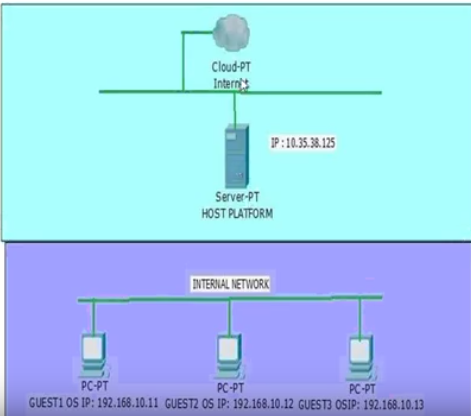
1.3 Internal networking.
This can be used to create a different kind of software-based network which is visible to selected virtual machines, but not to applications running on the host or to the outside world.
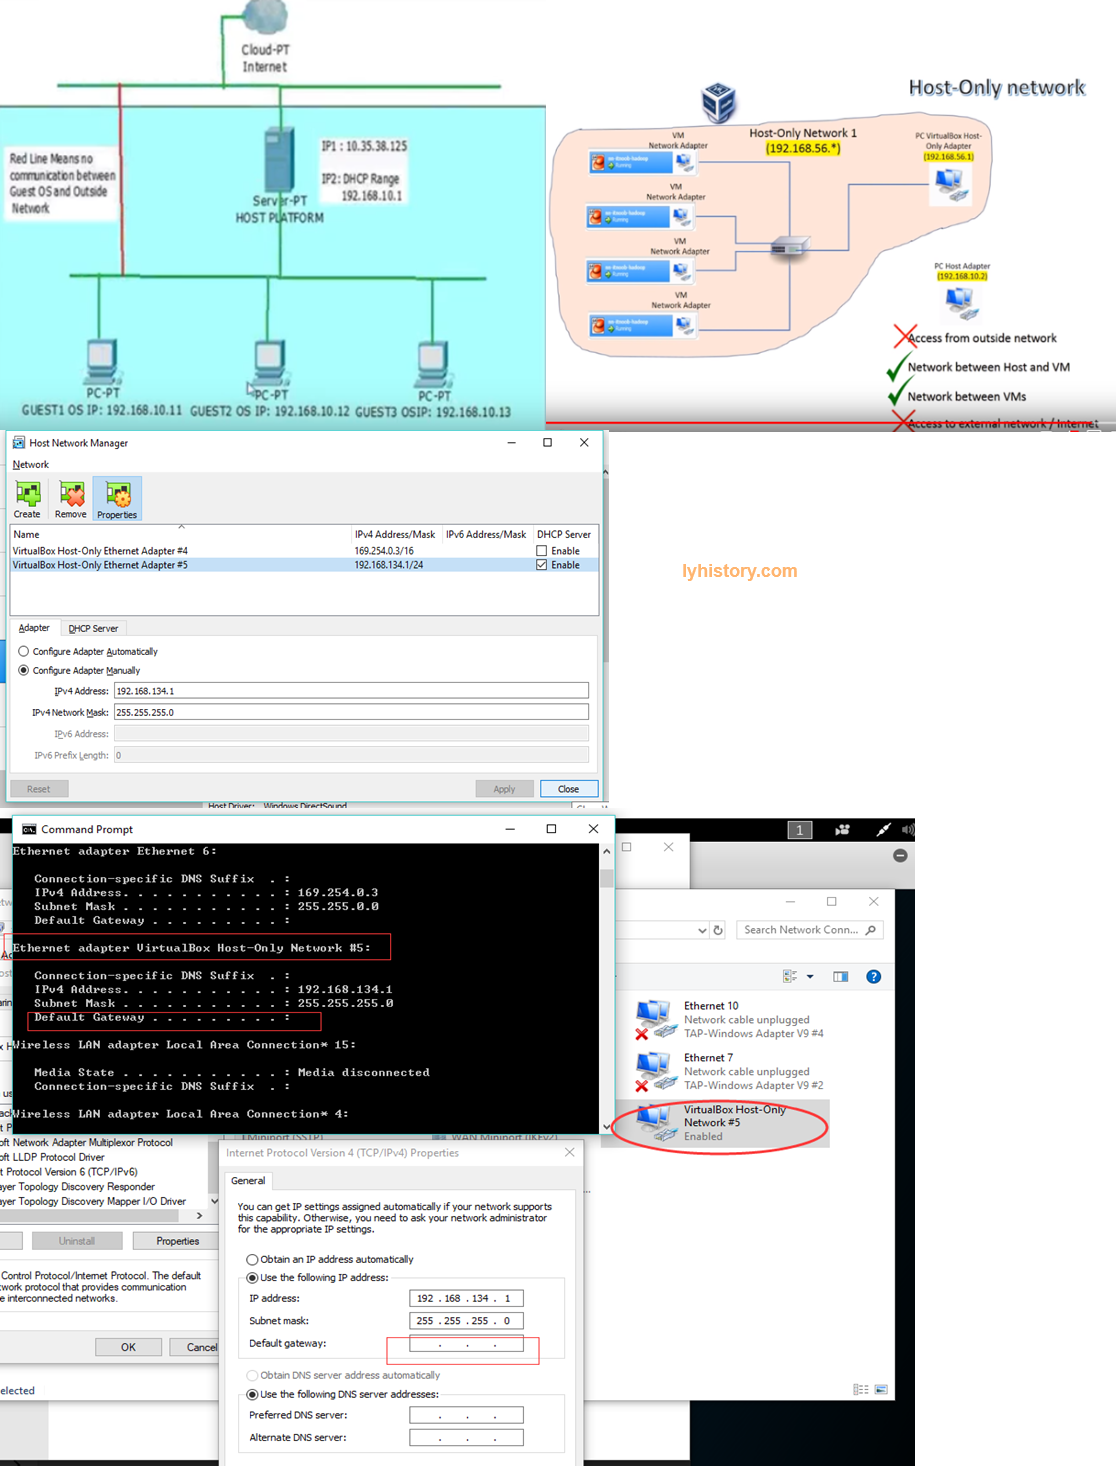
1.4 Host-only networking.
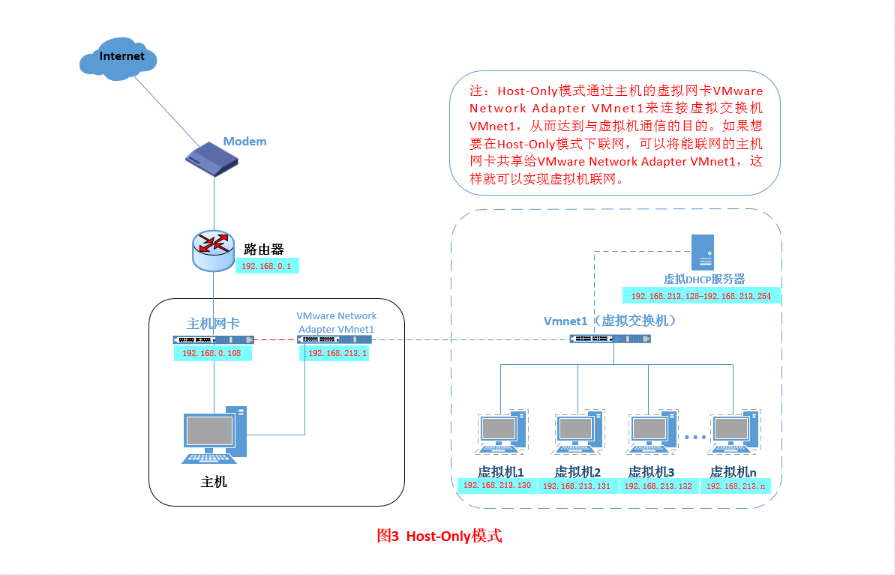 This can be used to create a network containing the host and a set of virtual machines, without the need for the host’s physical network interface. Instead, a virtual network interface, similar to a loopback interface, is created on the host, providing connectivity among virtual machines and the host.
?#host-only模式下客户机vm无法访问位于host宿主机上面的web服务,比如192.168.207.1:8080
原因:不像在NAT和bridge模式下有virtual route虚拟路由,host only是直接连接的,所以宿主机访问主机如同访问外网(没有经过虚拟路由),所以会受到宿主机上面的一些权限限制,比如
可以看到下图,10.0.2.2就是NAT模式的虚拟路由,所以可以直接通过这个路由访问宿主机host的服务

Ping不通:如果宿主机是win10,文件与打印机共享开启
Port telnet不通:如果宿主机是win10,Turn Windows Defender Firewall off
Video::NAT, Bridged and Internal Networking https://www.youtube.com/watch?v=iEj42l4otNY https://www.youtube.com/watch?v=cDF4X7RmV4Q https://www.youtube.com/watch?v=VWKZqa2RjpA
2 Build local Lab network
2.1 Linux configuration
Golden trace rule: https://forums.kali.org/showthread.php?20846-Troubleshooting-Internet-Network-Access
Networkmanager configuration https://wiki.debian.org/NetworkConfiguration Kali network configuration The default network configuration relies on DHCP to obtain an IP address, DNS server, and gateway https://kali.training/topic/configuring-the-network/ http://www.solutionsatexperts.com/ip-address-configuration-in-kali-linux/
How to configure Network Adapter in Kali Linux using Command Line Interface https://www.youtube.com/watch?v=JL2_fnzCZbE Allow-hotplug ?
Restart network after change config https://www.cyberciti.biz/faq/linux-restart-network-interface/ reload /etc/resolv.conf https://askubuntu.com/questions/224966/how-do-i-get-resolvconf-to-regenerate-resolv-conf-after-i-change-etc-network-in
常用命令:
Ifconfig
Ip route show
ip a show eth0
Route -n
Ip addr
Ip route

cat /etc/network/interfaces

echo "iface eth0 inet dhcp" >> /etc/network/interfaces
/etc/init.d/networking restart

ifdown eth0
ifup eth0
dhclient eth0
Or manually::
Ifconfig eth0 192.168.1.1 netmask 255.255.255.0 up
	route add default gw 192.168.0.1 eth0
	ip route add default via 192.168.0.1 dev eth0

sudo service network-manager restart
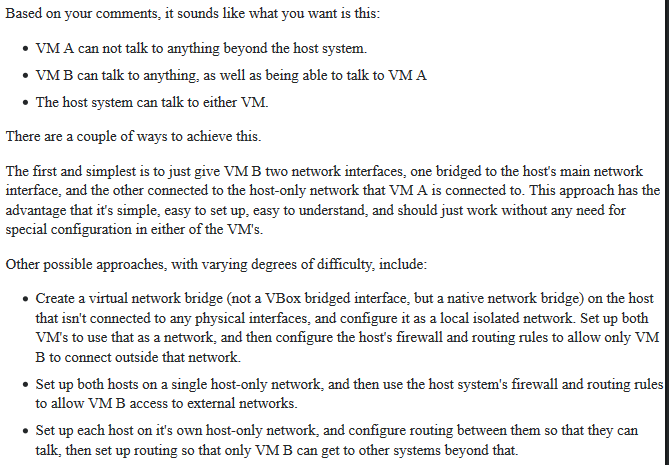
2.2 基于network类型构建复杂的环境
https://www.youtube.com/watch?v=AiWRmMzwwJM https://sandilands.info/sgordon/building-internal-network-virtualbox https://blog.pythian.com/test-lab-using-virtualbox-nat-networking/ https://vorkbaard.nl/set-up-a-testlab-in-virtualbox-with-a-virtual-lan/ ‘Bridged’ and ‘Host Only’ network settings in Virtualbox https://superuser.com/questions/1352678/bridged-and-host-only-network-settings-in-virtualbox-advice-please
https://askubuntu.com/questions/113604/how-to-run-virtualbox-on-bridged-and-host-only-networks http://christophermaier.name/2010/09/01/host-only-networking-with-virtualbox/
VirtualBox: two network interfaces (NAT and host-only ones) https://unix.stackexchange.com/questions/37122/virtualbox-two-network-interfaces-nat-and-host-only-ones-in-a-debian-guest-on Images https://developer.microsoft.com/en-us/microsoft-edge/tools/vms
虚拟机 宿主机 VPN
宿主机利用在虚拟机中建立的VPN加密隧道连接内网 虚拟机共享主机VPN连接
https://askubuntu.com/questions/419327/how-can-i-make-virtualbox-guests-share-the-hosts-vpn-connection
Troubleshooting
bridged mode not assign ip address and route
- 方法一: dhclient eth0 https://unix.stackexchange.com/questions/174573/dhcp-kali-linux Havne’t try this manual method::ip route add default via ip-of-router-on-local-network dev enp0s3 https://superuser.com/questions/1075988/virtualbox-bridged-network-is-unreachable
less /var/logs/messages
Apr  1 03:05:04 kali NetworkManager[431]: <info>  [1554102304.0124] device (eth0): carrier: link connected
...............
Apr  1 03:05:05 kali NetworkManager[431]: <info>  [1554102305.3947] manager: NetworkManager state is now CONNECTED_LOCAL
Apr  1 03:05:05 kali NetworkManager[431]: <info>  [1554102305.4044] device (eth1): Activation: successful, device activated.
Apr  1 03:05:05 kali NetworkManager[431]: <info>  [1554102305.4072] manager: startup complete
dhclient eth0
Apr  1 03:09:49 kali NetworkManager[431]: <info>  [1554102589.2543] keyfile: add connection /run/NetworkManager/system-connections/eth0.nmconnection (effc3b34-06a5-49dd-886b-d21223855eac,"eth0")
Apr  1 03:09:49 kali NetworkManager[431]: <info>  [1554102589.2623] device (eth0): Activation: starting connection 'eth0' (effc3b34-06a5-49dd-886b-d21223855eac)
.........
Apr  1 03:09:49 kali NetworkManager[431]: <info>  [1554102589.3036] manager: NetworkManager state is now CONNECTED_GLOBAL
-
方法二 设置静态ip(注意ip不要冲突了,不然有各种异常出现)
``` 宿主机查看当前网络: Wireless LAN adapter Wi-Fi:
Connection-specific DNS Suffix . : Description . . . . . . . . . . . : Intel(R) Dual Band Wireless-AC 8265 Physical Address. . . . . . . . . : 00-28-F8-22-E9-5D DHCP Enabled. . . . . . . . . . . : Yes Autoconfiguration Enabled . . . . : Yes Link-local IPv6 Address . . . . . : fe80::61e4:8e32:fb58:74a4%26(Preferred) IPv4 Address. . . . . . . . . . . : 192.168.0.141(Preferred) Subnet Mask . . . . . . . . . . . : 255.255.255.0 Lease Obtained. . . . . . . . . . : Tuesday, 17 November 2020 10:59:55 AM Lease Expires . . . . . . . . . . : Tuesday, 24 November 2020 10:59:54 AM Default Gateway . . . . . . . . . : 192.168.0.1 DHCP Server . . . . . . . . . . . : 192.168.0.1 DHCPv6 IAID . . . . . . . . . . . : 134228216 DHCPv6 Client DUID. . . . . . . . : 00-01-00-01-21-C8-05-55-00-28-F8-22-E9-5D DNS Servers . . . . . . . . . . . : 172.17.5.36 172.17.5.4 NetBIOS over Tcpip. . . . . . . . : Enabled
— for ubuntu:
—————————————————————————-
默认会出现类似下面的结果,其中 ipv4对应的是enp0s3:avahi的169的地址,
lyhistory@lyhistory-VirtualBox:~$ ifconfig
enp0s3: flags=4163<UP,BROADCAST,RUNNING,MULTICAST> mtu 1500
inet6 2404:e801:2001:3955:357e:c623:5742:484a prefixlen 64 scopeid 0x0
enp0s3:avahi: flags=4163<UP,BROADCAST,RUNNING,MULTICAST> mtu 1500 inet 169.254.7.153 netmask 255.255.0.0 broadcast 169.254.255.255 ether 08:00:27:64:46:ce txqueuelen 1000 (Ethernet)
lo: flags=73<UP,LOOPBACK,RUNNING> mtu 65536
inet 127.0.0.1 netmask 255.0.0.0
inet6 ::1 prefixlen 128 scopeid 0x10
根据«Linux.md/网络»部分的原理,ubuntu 17以上版本都是UI的network manager来控制的,所以直接打开控制面板来设置静态IP和DNS即可
address 192.168.0.109
netmask 255.255.255.0
gateway 192.168.0.1
DNS: 8.8.8.8
设置完等一会即可
—————————————————————————-
— for 其他debain:
—————————————————————————-
配置静态ip
/etc/network/interfaces:
#auto eth0
#iface eth0 inet dhcp
auto eth0
iface eth0 inet static
address 192.168.0.109
netmask 255.255.255.0
gateway 192.168.0.1
sudo ifdown eth0 sudo ifup eth0 or sudo /etc/init.d/networking restart
如果还是无法上网则增加DNS配置: 不推荐下面的做法(重启后失效) /etc/resolv.conf nameserver 8.8.8.8
sudo systemctl restart systemd-resolved.service
解决后看下当前路由情况: route -n
#Verify new IP settings: ip a s eth0 #Verify new routing settings: ip r #Verify DNS servers settings: cat /etc/resolv.conf #Verify the internet connectivity: ping -c 4 google.com
root@kali:/home/lyhistory# ip -4 addr 1: lo: <LOOPBACK,UP,LOWER_UP> mtu 65536 qdisc noqueue state UNKNOWN group default qlen 1000 inet 127.0.0.1/8 scope host lo valid_lft forever preferred_lft forever 2: eth0: <BROADCAST,MULTICAST,UP,LOWER_UP> mtu 1500 qdisc pfifo_fast state UP group default qlen 1000 inet 192.168.0.109/24 brd 192.168.0.255 scope global eth0 valid_lft forever preferred_lft forever
root@kali:/home/lyhistory# ip route default via 192.168.0.1 dev eth0 onlink 192.168.0.0/24 dev eth0 proto kernel scope link src 192.168.0.109 —————————————————————————- — for centos —————————————————————————- vim /etc/sysconfig/network-scripts/ifcfg-eth0 HWADDR=00:08:A2:0A:BA:B8 TYPE=Ethernet #BOOTPROTO=dhcp BOOTPROTO=none # Server IP # IPADDR=192.168.0.110 # Subnet # PREFIX=24 # Set default gateway IP # GATEWAY=192.168.0.1 # Set dns servers # DNS1=8.8.8.8 DEFROUTE=yes IPV4_FAILURE_FATAL=no # Disable ipv6 # IPV6INIT=no NAME=eth0 # This is system specific and can be created using ‘uuidgen eth0’ command # UUID=41171a6f-bce1-44de-8a6e-cf5e782f8bd6 DEVICE=eth0 ONBOOT=yes
systemctl restart network
```
Can access internet but cannot ping
Firewall setting Outbound port https://askubuntu.com/questions/608194/have-internet-connection-but-cant-ping-external-sites https://networkengineering.stackexchange.com/questions/37896/ping-port-number
eth0 not found or not configured simply restart vm
https://askubuntu.com/questions/1060980/eth0-not-configured-but-it-was-working-earlier