回目录 《树莓派raspberry》
# 1. 快速入门 Setup (opens new window)
# sdcard VS SSD
# sdcard选择
容量越大,存储卡寿命越长
这是很多人不知道的冷知识。无论是 SD 卡还是 SSD,都有“擦写寿命”(比如 TL C颗粒)。
大容量的存储卡内部可使用的冗余空间(Over-provisioning)更多,主控芯片能做更好的磨损均衡。同样是日常使用,128GB 卡的寿命和稳定性通常会明显好于 64GB。
读写:
- Class 10 (C10):老大哥,底线担当。只要带这个标,就意味着最低写入速度绝对不低于 10MB/s。这是当今主流存储卡的及格线,日常存照片、装树莓派系统完全够用。
- U3:实力派,速度进阶。它是 UHS-I(高速总线)时代的标准,要求最低写入速度达到 30MB/s。拍 4K 视频、高速连拍 raw 格式照片必须用它。
- V30 等(补充彩蛋):视频专家。看到带个 V字母的(如 V30, V60),那是专门为视频拍摄定的标准。V30 就代表最低 30MB/s 的视频录制保障。
随机读取:
- A1 (Application Performance Class 1):入门应用级。官方要求:随机读取至少 1500 IOPS,随机写入至少 500 IOPS。(人话:应付日常系统运行、挂个轻量级服务毫无压力。)
- A2 (Application Performance Class 2):狂暴应用级。官方要求:随机读取飙升至 4000 IOPS,随机写入达到 2000 IOPS。(人话:专治各种不服!海量小文件瞬间响应,跑 Kali Linux 这种需要频繁读写的系统简直是丝滑。)
# SSD 选择及配置
树莓派5(NVMe SSD)和树莓派4B(USB外接SSD),若是 NVMe,需配合硬盘盒或扩展板接入电脑
SSD 尤其是 NVMe 硬盘的功耗不小,建议使用官方正规的大功率适配器(如 5V/5A),以免硬盘因供电不足而掉盘
树莓派 5 原生支持 PCIe 接口,发挥 NVMe 满血性能的步骤如下:
连线与使能:将 NVMe 硬盘通过扩展板(如 M.2 HAT+)插到树莓派 5 上。如果是全新安装,先用一张带系统的 SD 卡引导进入系统。
更新引导固件 (EEPROM):打开终端,输入 sudo raspi-config,进入 Advanced Options-> Bootloader Version,将其改为 Latest,保存退出并更新系统。
开启 PCIe 接口:编辑引导配置文件 sudo nano /boot/firmware/config.txt,在文件末尾添加 dtparam=pciex1(若想开启 PCIe 3.0 满速,可再加一行 dtparam=pciex1_gen=3)。保存后重启。
修改启动顺序:再次打开终端,输入 sudo rpi-eeprom-config --edit。找到 BOOT_ORDER这一行,将其修改为 BOOT_ORDER=0xf416(意思是优先尝试从 NVMe 硬盘启动)。
大功告成:关机电,拔掉 SD 卡,再次上电,系统就会从 SSD 疾速启动了!
树莓派 4B 没有 PCIe 接口,但支持从 USB 3.0 外接 SSD 启动,速度同样秒杀 SD 卡:
更新引导固件:同样先用 SD 卡引导进入系统,打开终端输入 sudo raspi-config,将 Bootloader(引导加载程序)更新到最新版本。
修改启动顺序:输入 sudo rpi-eeprom-config --edit,将 BOOT_ORDER的值修改为包含 USB 启动的优先级(例如 0xf14或 0xf41,具体可根据你的需求调整,核心是让 USB 排在前面)。
大功告成:将做好的 SSD 插入树莓派 4B 的蓝色 USB 3.0 接口,拔掉 SD 卡,重新上电即可。
# format micro sdcard
sandisk extreme plus
Then format Sdcard with ‘SD Card Formatter’ (opens new window)
if your sdcard more than 32G, windows disk manager may not be able to format it correctly, I am not sure abt mac and other os, use sdcard formatter instead
# burn image 烧录镜像
方法二:使用三方软件如 Win32DiskImage ,然后自行下载image write image into the sdcard with ‘Win32DiskImage’ (opens new window)
树莓派支持多种镜像:
- 默认是官方的 Raspberry Pi OS (opens new window)
- kali linux
- (ubuntu mate for raspberry)[https://ubuntu-mate.org/raspberry-pi/]
- multiple boot with berryboot (predefined os: rasbian/ubuntu mate,core/kali,etc.
# 备份工具
sdcard copier
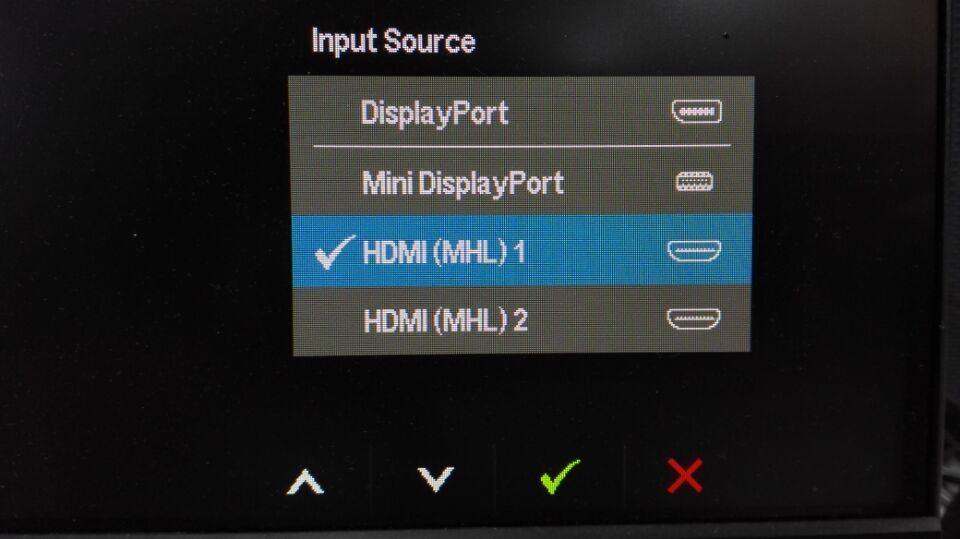
# 如果有显示器:可以连接显示器
Connect to monitor(change monitor setting)
# 如果没有显示器:可以用headless无头模式 headless install
插上microsd,目录boot下创建wpa_supplicant.conf:
ctrl_interface=DIR=/var/run/wpa_supplicant GROUP=netdev
update_config=1
country=<Insert 2 letter ISO 3166-1 country code here>

network={
        scan_ssid=1
        ssid="<Name of your wireless LAN>"
        psk="<Password for your wireless LAN>"
        proto=RSN
        key_mgmt=WPA-PSK
        pairwise=CCMP
        auth_alg=OPEN
}
注意:wifi5G连不到多半是因为country code没有设置
而ssh开启很简单,创建一个ssh文件就ok
touch ssh
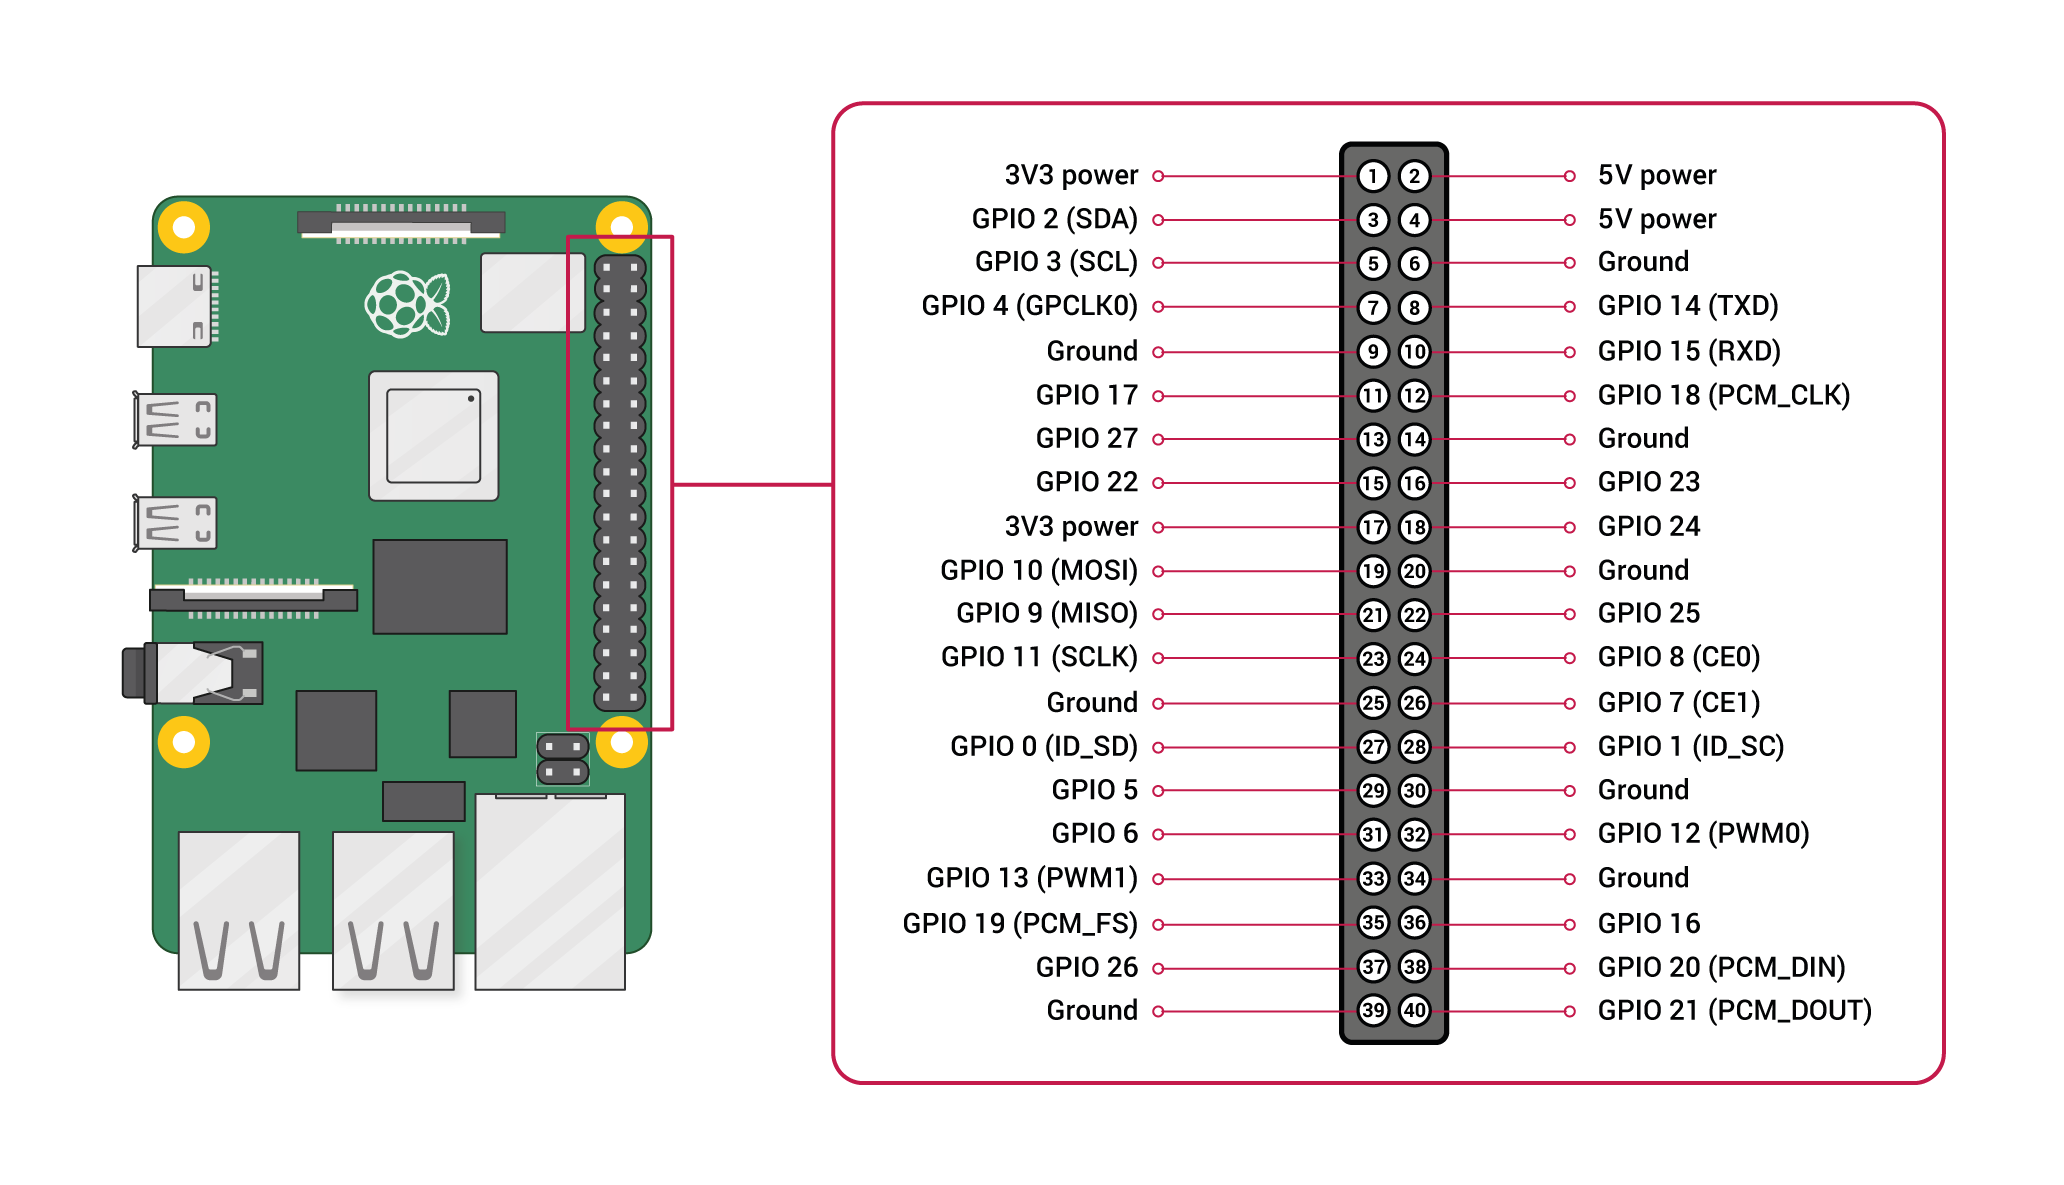
# 如果无头模式不行可以使用TTL串口连笔记本
用三根细线把树莓派的 GPIO 引脚 ↔ 另一台电脑(你的主力机)连起来,让树莓派像一台"老式路由器/交换机"那样,从串口直接吐出 Linux 终端,不用 HDMI、不用网线、不用 WiFi,通电就能登进去敲命令。
USB-TTL 转接板(也叫 CH340 / CP2102 / FT232 小板) ⚠️ 关键:树莓派 GPIO 是 3.3V 电平,别买成纯 RS232(DB9 那种大头的),那个 12V 会直接烧 GPIO。 USB-TTL 小板是对的,RS232 转接头是错的。
LINUX:
ls /dev/ttyUSB*     # 插上小板后一般会出 /dev/ttyUSB0(CH340)或 /dev/tty.usbserial-*(Mac)
screen /dev/ttyUSB0 115200 8N1
# 或 mac: screen /dev/tty.usbserial-xxxxx 115200
Windows: PuTTY:Connection type 选 Serial,Serial line 填 COM3(设备管理器里看),Speed 115200 或 Windows Terminal + putty -serial COM3 -sercfg 115200,8,n,1,N 波特率 115200,数据位 8,停止位 1,无校验,无流控。
# 启动 boot
For headless install only: Using ip scanner (opens new window) or router admin to find out the ip for ssh connect
Default login: pi/raspberry
Once login, Enable SSH/VNC/wifi/CAMERA….
# Extend sdcard to full use
- Method 1 "sudo raspi-config" then selecting "Advanced Options" then "Expand Filesystem".
- Method 2 使用fdisk、resize2fs命令扩展
Note:
- if you find there are some unallocated spaces, then your sdcard may has been corrupted due to some improper operations, then you definitely need to delete the partition and repartition it.
- remember partition it as primary not logic, and better choose FAT32 format
测速:安装之后可以使用 raspbian自带的Raspberry Pi Diagnostic
高级配置:延长sd卡的寿命 (opens new window)
# Set hostname
If you are using the raspian distribution from raspberrypi.org, raspberrypi.local is the default hostname. sudo nano /etc/hosts sudo nano /etc/hostname
# Remote Access
- ssh Enter sudo raspi-config in a terminal window Select Interfacing Options Navigate to and select SSH Choose Yes Select Ok
- rasp connect (opens new window)
- VNC sudo apt update sudo apt install realvnc-vnc-server realvnc-vnc-viewer sudo raspi-config Navigate to Interfacing Options. Scroll down and select VNC › Yes.
Remote Access (opens new window)
# Configuration
enable bluetooth
bluetoothctl
agent on
default agent
# 最佳实践:备份镜像
sd卡会随时损坏!所以备份很重要! Win32DiskImage
launch the Win32 Disk Imager tool with administrator privileges Select the location to save your backup files. ... Click on the Read option to start the backup process.
# firmware config
enable/disable the onboard WiFi/bluetooth from the firmware on the Pi3 / Pi4: /boot/config.txt: dtoverlay=enable-wifi dtoverlay=enable-bt or dtoverlay=disable-wifi dtoverlay=disable-bt
# Handy tools
tools for raspbery pi:
- virtual keyboard: sudo apt-get install matchbox
- CanaKit Raspberry Pi 3 B+ (B Plus) with 2.5A Power Supply (UL Listed) https://www.amazon.com.au/CanaKit-Raspberry-Power-Supply-Listed/dp/B07BC6WH7V/?tag=wnbau-22
- Rii Mini Wireless 2.4GHz Keyboard Black MWK01 (X1) K01 https://www.amazon.com.au/Rii-Wireless-Keyboard-Touchpad-Control/dp/B00I5SW8MC/?tag=wnbau-22&th=1
tools for desktop users:
- RealVNC
- Raspberry Pi Imager (opens new window)
- ‘SD Card Formatter’ (opens new window)
- ‘Win32DiskImage’ (opens new window)
tools for android phone user all you need are here:
- AndFTP supporting FTP, FTPS, SCP, and SFTP
- RPiREF this app has a full reference of all pins and headers.
- Fing network scanning tool
- ConnectBot/JuicySSH
- Hacker's Keyboard
- AndroidVNC remote connection to the GUI
# 2. 常用命令 Common Used commands
Config
sudo raspi-config
Checking Raspberry Pi Revision Number & Board Version
$ pinout
$ cat /proc/cpuinfo
$ cat /proc/device-tree/model
# 3. 高级模式 Advanced Setup
# Connect to Mobile via USB only(otg)
Edit /etc/network/interfaces and append these two lines:
allow-hotplug usb0
iface usb0 inet dhcp
on Android, I enable USB tethering
plug in Pi.
install ping&net app, find the ip address assigned to the Pi
install ssh client - juicy ssh
# Connect to laptop via USB only(Gadget Mode)
Note: this only works on Zero and A boards, not RPi 3, which is B.
SD card mount on your computer:
append to config.txt: dtoverlay=dwc2
touch ssh
edit the file called cmdline.txt. Look for rootwait, and add modules-load=dwc2,g_ether immediately after.
Note the formatting of cmdline.txt is very strict. Commands are separated by spaces, and newlines are not allowed.
Now you can eject the SD card, and insert it into the the Pi. Using a USB cable, connect to the Raspberry Pi from your computer.
After the Pi boots up (this will take a while initially), the Pi should appear as a USB Ethernet device, and you can SSH into it using:
# laptop
 https://pimylifeup.com/pi-top-review/
https://3dprint.com/45158/pi-top-version-3/
pi-top install hands on
http://makezine.com/2015/11/16/hands-on-with-pi-top-the-raspberry-pi-powered-laptop/
run standard raspbian on pi-top
https://www.raspberrypi.org/forums/viewtopic.php?f=29&t=149151&p=990308
https://github.com/rricharz/pi-top-install
https://pimylifeup.com/pi-top-review/
https://3dprint.com/45158/pi-top-version-3/
pi-top install hands on
http://makezine.com/2015/11/16/hands-on-with-pi-top-the-raspberry-pi-powered-laptop/
run standard raspbian on pi-top
https://www.raspberrypi.org/forums/viewtopic.php?f=29&t=149151&p=990308
https://github.com/rricharz/pi-top-install
# Cooling system
yes, you need, http://raspberrypi.stackexchange.com/questions/22928/does-the-raspberry-pi-need-a-cooling-system, https://www.zhihu.com/question/20767376 heat sink https://www.youtube.com/watch?v=1AYGnw6MwFM https://www.youtube.com/watch?v=1AYGnw6MwFM water cooling https://www.youtube.com/watch?v=RggpIEYh9VU
# 4. Developing
# 4.1 Read analog 数模转换
https://www.raspberrypi.org/forums/viewtopic.php?f=37&t=137207 https://learn.adafruit.com/reading-a-analog-in-and-controlling-audio-volume-with-the-raspberry-pi/overview
https://www.labno3.com/2021/02/23/raspberry-pi-adc-analog-to-digital-converter-2/
DA转换例子:连接老式 analog 电视(A cathode-ray tube (CRT) TV)
- Option 1: Analog Converter Chip
- analogzero
- Option 2: Raspberry Pi's GPIO expansion board
- Gertboard 带AD或DA转换
- Option 3: 直接连接自带AD/DA的 Arduino
# 4.2 模块
# Camera
picamera sudo apt-get install python3 sudo apt-get install python3-pip pip3 install picamera
树莓派摄像头安装 https://www.rs-online.com/designspark/chi-pi-cam-setup-tutorial https://linux.cn/article-3650-1.html 非官方 ./mjpg_streamer -i './input_raspicam.so' -o './output_http.so -w ./www'
Time lapse film https://projects.raspberrypi.org/en/projects/cress-egg-heads https://projects.raspberrypi.org/en/projects/cress-egg-heads/10
sudo apt-get install ffmpeg
#avconv -r 10 -i image%04d.jpg -r 10 -vcodec libx264 -crf 20 -g 15 timelapse.mp4
ffmpeg -r 10 -i image%04d.jpg -c:v libx264 -vf fps=25 -pix_fmt yuv420p out.mp4
https://stackoverflow.com/questions/24961127/how-to-create-a-video-from-images-with-ffmpeg
Image viewer https://raspberrypi.stackexchange.com/questions/1391/can-anyone-recommend-a-simple-image-viewer
sudo apt-get install feh
feh -d -S filename ./
# 5. Use Cases
# Kid Edu
# Home Automation
home assistant os (opens new window)
手动连接wifi:
ha network info wlan0
ha network update wlan0 --ipv4-method auto --ipv6-method auto \
  --wifi-auth wpa-psk --wifi-mode infrastructure \
  --wifi-ssid "你家SSID" --wifi-psk "你家密码"

login
ip addr
8123 Home Assistant Core(主程序)日常 web UI,onboarding / 仪表盘 / 配置全在这 4357 HAOS Supervisor / Observer 容器 纯状态页,看 supervisor、core、DNS、Multicast 各组件是绿是红,不依赖 core 起来
然后我突然想到自己还有一个树莓派内置wifi坏了,但是我有一个玩 Aircrack-ng 时候买的USB 网卡,但是担心插上去之后识别不了已经绑定的wlan0,有可能识别是wlan1,所以尝试改造已有wifi连接(成功)
vi /etc/NetworkManager/system-connections/Supervisor\ wlan0.nmconnection

注释掉树莓派内置 WiFi 模块的专属硬件路径地址。Netwo:
#[match]
#path=platform-3f300000.mmcnr;
另外据说还有这种方式
HAOS 开发者文档 给了一条官方路:在 SD 卡 boot 分区(FAT,/boot或 /boot/firmware,Windows/Mac/Linux 都能直接读)建目录:
CONFIG/network/
里面放一个 .nmconnection文件(Unix LF 换行,别 CRLF),比如叫 usb-wifi:
[connection]
id=usb-wifi
uuid=d55162b4-6152-4310-9312-8f4c54d86afa //UUID 随便找个在线生成器来一个 UUID v4 就行
type=wifi

[wifi]
mode=infrastructure
ssid=你的SSID
# 故意不写 interface-name,任意 wlan 都能匹配

[wifi-security]
auth-alg=open
key-mgmt=wpa-psk
psk=你的密码

[ipv4]
method=auto

[ipv6]
addr-gen-mode=stable-privacy
method=auto
# SDR
SDR 收发器 vs USB WiFi 网卡
| 维度 | Alfa (AWUS036 系列) | HackRF One |
|---|---|---|
| 本质 | USB WiFi 网卡 | SDR 收发器 |
| 频率 | 仅 2.4G / 5G WiFi 信道 | 1 MHz – 6 GHz(短波到 5G 全包) |
| 协议 | 只认 802.11 | 任意(WiFi/Zigbee/BLE/ADS-B/遥控/GSM…) |
| 收发 | 收(STA)+ 发(managed,只能发 802.11 帧) | 半双工收发,发任意调制 |
| 监听 | monitor mode(WiFi 帧) | 原始 IQ,所有信号都能录 |
| 注入 | packet injection(Deauth/FakeAuth 那套) | 自己造波形,重放/干扰/spoofing |
| 接口 | 走 NetworkManager / cfg80211 | 走 libusb + GNU Radio / hackrf_transfer |
| 价格 | ¥300–900 | ¥2000–3000 |
| 典型用途 | 蹭网审计、WPA 握手抓包、rogue AP | 协议研究、非 WiFi 射频、GPS 欺骗、重放 |
互不冲突:Alfa 走 cfg80211归 NetworkManager 管(monitor 时 ip link set wlan1 down && iw dev wlan1 set type monitor切),HackRF 走 libhackrf归 GNU Radio 管,两套 USB 各自 DMA 不抢。
玩法清单 - 配合 GNU Radio / SDR# / CubicSDR / Universal Radio Hacker 这些软件:
- 频谱扫频:看周围有哪些信号在飞(WiFi、4G、蓝牙、遥控、对讲机)
- 协议分析/重放:Zigbee、BLE、汽车遥控 433/315MHz 抓包 + 重放(⚠️合法边界自己把握)
- ADS-B 飞机追踪:1090MHz 解航班,地图可视化
- FM/AM/短波听电台——但这是杀鸡用牛刀,RTL-SDR 就够了
- GSM/LTE 实验:配合 osmocom 搭迷你基站(实验室环境,别上公网频段)
- GPS spoofing:用 HackRF 发假 GPS 信号盖过真的,安卓机定位会被骗(论文级玩法,法拉第笼里玩)
- PortaPack 加成:HackRF 上扣一块 PortaPack(屏 + 电池 + 旋钮),脱离电脑独立跑,扫频/发信/录音全触摸屏搞定,挂树上都能用
# Ground Station
SatNOGS = Satellite NOetworked Ground Station,希腊 Libre Space Foundation 搞的开源分布式 LEO 卫星地面站网络,2014 年 NASA Space App Challenge 黑客松起的头,后来拿了 Hackaday Prize 一等奖。简单说就是:把"卫星地面站"做成开源套件 + 全球协作网络,个人花几百刀就能搭一个,数据全员共享。
SatNOGS Network 全球调度 Web 平台,你在这预约观测、看别人站的回传 SatNOGS Client 跑在你树莓派上的 Agent,从 Network 拉任务 → 调 SDR 收 → 数据回传 SatNOGS DB 众包卫星发射机数据库(频率、调制、TLE),API 开放 SatNOGS Ground Station 硬件本体:天线 + rotator 转台 + LNA + SDR,连到 Client
SatNOGS (opens new window) SatNOGS Setup with hackrf (opens new window)
玩法分层(从"凑齐能跑"到"硬核") 🟢 入门:不动 rotator 也能玩 固定 VHF/UHF 小天线(70cm/2m 段 Yagi 或 helical,SatNOGS 官方有设计),Pi + RTL-SDR 摆阳台 Client 没 rotator 也能跑——系统靠 TLE 算 AOS/LOS(卫星进出可视范围),多普勒校正自动调 SDR 中心频 收 NOAA 15/18/19 的 APT 云图、Meteor-M 2 的 LRPT 云图,虽然这些不是 SatNOGS 主推(它是 CubeSat 遥测为主),但 Pi + RTL-SDR 这套硬件顺手就能收 🟡 中级:挂 SatNOGS Network 赚观测 去 network.satnogs.org 注册 → 建站拿 API token → sudo satnogs-setup填 SATNOGS_API_TOKEN / STATION_ID / LAT,LON,ELEV / SDR 设备 你的站会出现在世界地图上,别人(或你自己)可以预约你这站的过境观测 典型产出:CubeSat 遥测帧(解码后能看到电压/温度/姿态)、信标、科研实验下行,全部公开可查 国内站少,你挂一个对亚太区覆盖贡献挺大 🔴 进阶:3D 打印 rotator + LNA + 上高频 SatNOGS V3 rotator 设计开源,两个 NEMA14 + Arduino Micro 控,8 小时能打完 加 LNA(低噪放)放天线端,70cm/2m 段 Yagi 或 helical 官方有图纸 上 HackRF(1 MHz–6 GHz)就能追更高频段,或者玩 ISS SSTV/APRS 中继 有火腿执照还能双向(SatNOGS 官方设计目前是接收为主,但硬件链路上收发 SDR 都支持) ⚫ 硬核向 自己改 Client 的解调插件(SatNOGS 默认解遥测帧,有些 CubeSat 用非常规调制得自己写 GNUradio flowgraph 挂进去) 多站协同:同一颗星过境时你+AOS/LOS 前后衔接的两站同时收,丢包率骤降 应急场景:LEO 卫星有时候承担灾害区中继,地面站网络能补常规通信塌了的窟窿——Libre Space Foundation 本身就有这个愿景
# 3D print
# Router
RaspAP OS
# Game
# Scratch+Minecraft and RetroPie(retro gaming emulator) on 1GB Pi 3B Raspberry Pi OS Desktop
recommend: scratch
Minetest not work
Minecraft Pi (Modded) worked (opens new window)
wget -qO- https://raw.githubusercontent.com/Botspot/pi-apps/master/install | bash

Once it installs, a new Pi-Apps icon will appear on your desktop. Open it.Navigate to the Games category.Select Minecraft Pi (Modded) and click Install.


sudo apt install -y git dialog xmlstarlet
git clone --depth=1 https://github.com/RetroPie/RetroPie-Setup.git
cd RetroPie-Setup
sudo ./retropie_setup.sh

A blue terminal interface window will appear.
Highlight Basic Install with your keyboard arrows and hit Enter.
Click Yes to verify the script sequence.
Sit back and let the compiler install the files onto your standard clean image (takes about 30–45 minutes).Exit out of the manager screen and launch the dashboard layout using: emulationstation
how to add classic Nintendo, Sega, or GameBoy game files to the system: RetroPie/ └── roms/ ├── nes/ ← NES 红白机游戏扔这 ├── snes/ ← SNES 超任游戏扔这 ├── arcade/ ← 街机(MAME/FBNeo)扔这 ├── neogeo/ ← 拳皇、合金弹头扔这(要 BIOS) ├── psx/ ← PS1 扔这(要 BIOS) └── ...其他平台
rom下载
- romsfun (opens new window)
- Gamulator
- nesyouxixiazai.com.cn
标签:
- (World) 世界版,美版基础上锁区放宽,通常 ≈ USA
- (Rev A)/ (Rev B) 修订版,原版有 bug 后出的修正 ROM
- [!] 业内评的"最佳 dump",优先下带这个的
- [b] bad dump(损坏/不完整),避开
- (Proto) 原型版/早期测试版
- (Hack) 民间改版(比如马里奥画风替换、难度改)
Super Mario Bros Tetris(NES/GB) — 俄罗斯方块 Chip 'n Dale(松鼠大作战,NES) Pac-Man(NES 版或 Arcade) Donkey Kong Country(SNES) Kirby(星之卡比,NES/SNES)
scp *.nes [email protected]:/home/pi/RetroPie/roms/nes/
坑 1:NeoGeo(拳皇)要单独放 BIOS
你前面说过想玩拳皇,NeoGeo 不是光扔 neogeo/kof98.zip就行的:
要去下个 neogeo.zip(BIOS),扔 ~/RetroPie/roms/neogeo/同时也扔一份到 ~/RetroPie/BIOS/
然后 kof98.zip扔 neogeo/
不然进游戏黑屏或卡 LOADING
坑 2:PS1 (psx/) 也要 BIOS
scph1001.bin扔 ~/RetroPie/BIOS/,游戏扔 psx/,PS1 游戏常是 .cue+.bin一对,别只拷 bin 漏 cue。
# VPN Server / Anonymously with a DIY Raspberry Pi VPN/TOR Router
https://medium.com/@rasmurtech/step-by-step-guide-to-configuring-a-raspberry-pi-as-a-tor-router-and-installing-the-tor-browser-dd0df49a9e8a
https://makezine.com/projects/browse-anonymously-with-a-diy-raspberry-pi-vpntor-router/ How to Make a Raspberry Pi VPN Server https://www.electromaker.io/tutorial/blog/raspberry-pi-vpn-server
# Auto Watering system
Arduino, solenoid valve with a power supply, breadboard, electronic water sensor, rain bird sprinkler head, and a relay. http://blogs.sourceallies.com/2014/06/automated-plant-watering-system/ http://makezine.com/2015/04/13/video-walkthrough-automatic-garden-watering-data-logging-arduino/
https://www.hackster.io/ben-eagan/raspberry-pi-automated-plant-watering-with-website-8af2dc http://nuke666.cn/2018/04/14/auto-water-flowers/
比较器模块 土壤湿度探头 继电器模块 黑胶布
https://www.raspberrypi.org/forums/viewtopic.php?t=169666
# Cluster
https://www.youtube.com/watch?v=i_r3z1jYHAc https://www.youtube.com/watch?v=KJKhRLKXr-Q
# Ethereum Node
http://ethembedded.com/?page_id=171 Build a RespNode http://raspnode.com/diyEthereumGeth.html#homenet 中文安装全记录: http://blog.csdn.net/iracer/article/details/51620051
# 黑客基站 Kali
run kali on raspberry
# 树莓派 太阳能板 + nxtcoin pos +移动硬盘
https://www.nxter.org/how-to-set-up-a-nxt-node-on-a-raspberry-pi-2/
# Raspberry Pi Recovery Kit
https://doscher.com/work/recovery-kit
# 挖矿
images for miner: http://cryptomining-blog.com/tag/raspberry-pi-mining/ http://www.digital-coins.net/wordpress/index.php/2014/12/20/setup-your-raspberry-pi-as-mining-device-controller/
# Private Tracker魔力值
基于这个开源项目 https://github.com/linuxserver/docker-qbittorrent
# 创建用于存储下载资源的文件夹(推荐将外接硬盘挂载到这个位置,有效提升提升树莓派的存储上限)
mkdir /opt/sda1
# 创建文件夹
mkdir /opt/server-qbittorrent
cd /opt/server-qbittorrent
# 创建用于存储配置的文件夹
mkdir /opt/server-qbittorrent/appdata
# 创建配置文件
touch /opt/server-qbittorrent/docker-compose.yml

---
version: "2.1"
services:
  qbittorrent:
    image: lscr.io/linuxserver/qbittorrent:latest
    container_name: qbittorrent
    environment:
      - PUID=1000
      - PGID=1000
      - TZ=Etc/UTC
      - WEBUI_PORT=8080
    volumes:
      - /opt/server-qbittorrent/appdata/config:/config
      - /opt/sda1/pt/downloads:/downloads
    ports:
      - 8080:8080
      - 6881:6881
      - 6881:6881/udp
    restart: unless-stopped

cd /opt/server-qbittorrent/
sudo docker-compose up -d

在树莓派frpc.ini文件添加端口映射,将树莓派的8080端口映射到服务器8081端口实例配置
[qbit-8080]
type = tcp
local_ip = 127.0.0.1
local_port = 8080
remote_port = 8081
最后记得重启树莓派的frpc服务,服务器放行8081端口,公网可以通过Web访问,开始愉快做种,赚魔力值吧。
# Troubleshooting
# 硬件问题
# wifi模块
mmc1: error -110 whilst initialising SDIO card 找不到网卡 解决办法,外插一个usb网卡
# 声音
如果屏幕支持声音可以输出到 hdmi
# 显示器触摸屏
是否需要额外供电
# 关于显示器无法显示:
/boot/config.txt 都是sdcard上config文件的配置问题,比如我买的pi top,用了pi top的distro就可以显示,而自己烧录的raspbian就无法显示, 然后我只是文件compare了一下config,改成跟pi top的distro一样就ok了
# Network access
A. wifi connected, no internet access B. cannot connect to wifi C. static ip address
check points:
ethnet wlan ifconfig wconfig /etc/network/intefaces /etc/wpa_suppliant/wpa_suppliant.conf /etc/resolv.conf sudo ifdown wlan0 sudo ifup wlan0
2.4G working but not 5G set country code
sudo vi /etc/wpa_supplicant/wpa_supplicant.conf
country=SG
....
https://www.raspberrypi.org/documentation/configuration/wireless/wireless-cli.md dns flush: sudo apt-get nscd sudo /etc/init.d/nscd restart http://raspberrypi.stackexchange.com/questions/4275/dns-resolution-failure https://www.raspberrypi.org/forums/viewtopic.php?f=91&t=31238 http://askubuntu.com/questions/572152/i-cant-access-the-internet-through-my-raspberry-pi-when-connected-through-ssh https://www.raspberrypi.org/forums/viewtopic.php?t=23344 https://www.raspberrypi.org/forums/viewtopic.php?f=91&t=98903 How to Set Up WiFi on the Raspberry Pi www.circuitbasics.com/raspberry-pi-wifi-installing-wifi-dongle/ http://weworkweplay.com/play/automatically-connect-a-raspberry-pi-to-a-wifi-network/ raspberrypihq.com/how-to-add-wifi-to-the-raspberry-pi/ wifi country code http://raspberrypi.stackexchange.com/questions/44183/wifi-country-code-resetting https://www.raspberrypi.org/forums/viewtopic.php?f=28&t=81021
# Screen Display/Monitor & Resolution
if your monitor supports multiple ports, config the correct one
7 Inch 1024600 HDMI LCD Display with Touch Screen https://www.elecrow.com/wiki/index.php?title=7_Inch_1024600_HDMI_LCD_Display_with_Touch_Screen
http://hackaday.com/2014/11/02/using-cell-phone-screens-with-any-hdmi-interface/ https://howtoraspberrypi.com/raspberry-pi-hdmi-not-working/
VGA Adapter: RGB IN DVI-D DVI-I It turns out that a typical digital monitor only accepts DVI-D connectors. A standard DVI-I connector (left) may be converted to a DVI-D (right) by removing the 4 additional pins surround the big pin. This extraction is easily done using a long-nose plier.
https://www.youtube.com/watch?v=FWSHrTHKg0w#t=156.177646
# keyboard & mouse
laggy wifi mouse
vim /boot/cmdline.txt
usbhid.mousepoll=8
You can change the number to anything from 0-8. The lower the number the smoother the mouse movement will be, but the higher the load on the CPU.

for readonly:
 LibreELEC mounts /flash as read-only, so you need to look which device and partition it is and remount it as writeable:
eg: df -h (to see mounted partitions), then:
mount -o remount,rw /dev/mmcblk0p8 /flash
keyboard issue, e.g quotes key https://www.raspberrypi.org/forums/viewtopic.php?f=28&t=24751
# Power supply
5V 2.1A if power brownout you will see a lighting bolt on top right corner. Don't use usb connected your computer, it may burn your motherboard, be carefully when use phone power supply, USB connectors normally imply 5V (but note that some cheap USB connected chargers [not "power supplies"] may be unregulated, and when lightly loaded may output more than 5Volt, even 6Volt or more), generally all micro USB cables should be adhering to the USB standards and output at around 5V, but we specifically mention the 5V to make sure people are checking the voltage levels put out by their charger before blindly plugging it in.So once we're sure people make sure it's a 5V PSU, since they're already looking down there, check for how many mA (or Amps) it puts out. The Model B needs ~700mA (0.7A) to run. As such it will not run off your computer's USB port as that only provides 500mA. --https://www.raspberrypi.org/forums/viewtopic.php?f=5&t=4812 http://raspberrypi.stackexchange.com/questions/26705/will-any-external-battery-power-a-raspberry-pi http://raspi-ups.appspot.com/en/index.jsp power supply switch https://www.pi-supply.com/product/pi-supply-raspberry-pi-power-switch/?v=79cba1185463 https://www.youtube.com/watch?v=YpAYDcW_Jx0
# Raspbian related issue:
VNC raspbian cannot currently show the desktop Enable boot to desktop(lite version by default boot to console) sudo apt-get install lxsession https://www.raspberrypi.org/forums/viewtopic.php?t=216737#p1486094
Raspbian buster lite no wireless interfaces found https://www.raspberrypi.org/documentation/configuration/wireless/wireless-cli.md ip link show https://raspberrypi.stackexchange.com/questions/89704/rpi3-model-b-no-wireless-interface-found
InRelease' changed its 'Suite' value from 'testing' to 'stable' apt-get --allow-releaseinfo-change update HOW TO FIX INRELEASE’ CHANGED ITS ‘SUITE’ VALUE FROM ‘STABLE’ TO ‘OLDSTABLE’ sudo nano /etc/apt/sources.list.d/raspi.list deb https://archive.raspberrypi.org/debian/ bullseye main
# Ubuntu related issue:
?#pro01: ubuntu welcome to emergency mode Using a VNC client that requests the wrong amount of colors, will crash the application (displaying an “emergency recovery shell” on screen). http://www.berryterminal.com/doku.php/berryboot/headless_installation http://raspberrypi.stackexchange.com/questions/37558/how-to-troubleshoot-a-headless-pi-that-boots-into-emergency-mode https://ubuntu-mate.community/t/getting-emergency-mode-screen-on-boot-up-every-time/2626/3 https://ubuntu-mate.community/t/getting-emergency-mode-screen-on-boot-up-every-time/2626/5 https://www.raspberrypi.org/forums/viewtopic.php?f=56&t=124149
# ref:
SSH the Pi from computer with a USB cable only (opens new window)