# 前置知识
# Why Spring Boot(简化了什么)
official documents (opens new window)
自动配置、起步依赖、Actuator、命令行界面(CLI) 是Spring Boot最重要的4大核心特性
Servlet->EJB->Struts->SpringMVC->SpringBoot
# 核心特性概览
- 起步依赖(Starter)
- 自动配置(一句话概述)
- 内嵌服务器
- 外部化配置
- Actuator & DevTools
# SpringApplication启动流程
Spring Boot应用启动流程:
┌─────────────────────────────────────────────────┐
│               1. JVM启动阶段                    │
├─────────────────────────────────────────────────┤
│ 加载JVM → 类加载器初始化 → 字节码验证            │
└───────────────────────┬─────────────────────────┘
                        ↓
┌─────────────────────────────────────────────────┐
│          2. SpringApplication.run()             │
├─────────────────────────────────────────────────┤
│ 设置无头模式 → 启动监听器 → 发布启动事件          │
└───────────────────────┬─────────────────────────┘
                        ↓
┌─────────────────────────────────────────────────┐
│          3. 环境准备阶段                        │
├─────────────────────────────────────────────────┤
│ 创建应用参数 → 准备环境 → 加载配置 → 打印Banner  │
└───────────────────────┬─────────────────────────┘
                        ↓
┌─────────────────────────────────────────────────┐
│          4. 应用上下文创建                      │
├─────────────────────────────────────────────────┤
│ 创建空容器实例 → 初始化异常报告器                 │
└───────────────────────┬─────────────────────────┘
                        ↓
┌─────────────────────────────────────────────────┐
│          5. 上下文预处理                        │
├─────────────────────────────────────────────────┤
│ 设置环境 → 执行ApplicationContextInitializer     │
│ → 加载Bean定义源                                │
└───────────────────────┬─────────────────────────┘
                        ↓
┌─────────────────────────────────────────────────┐
│          6. ApplicationContext.refresh()        │
├─────────────────────────────────────────────────┤
│ 这是Spring容器的核心启动方法,包含所有子阶段       │
└───────────────────────┬─────────────────────────┘
                        ↓
┌─────────────────────────────────────────────────┐
│          7. 嵌套子阶段(按顺序执行)             │
├─────────────────────────────────────────────────┤
│ 7.1 prepareRefresh()                            │
│ 7.2 obtainFreshBeanFactory()                    │
│ 7.3 prepareBeanFactory()                        │
│ 7.4 postProcessBeanFactory()                    │
│ 7.5 invokeBeanFactoryPostProcessors() ← 重要!  │
│     ├── 扫描@Component注解类                    │
│     ├── 创建BeanDefinition                     │
│     ├── 注册到BeanFactory                      │
│     └── 处理@AutoConfiguration                 │
│ 7.6 registerBeanPostProcessors()                │
│ 7.7 initMessageSource()                         │
│ 7.8 initApplicationEventMulticaster()           │
│ 7.9 onRefresh() ← 启动内嵌服务器!              │
│ 7.10 registerListeners()                        │
│ 7.11 finishBeanFactoryInitialization() ← 重要! │
│     ├── 实例化所有非懒加载单例Bean               │
│     ├── 注入依赖                               │
│     └── 调用生命周期回调                        │
│ 7.12 finishRefresh()                            │
└───────────────────────┬─────────────────────────┘
                        ↓
┌─────────────────────────────────────────────────┐
│          8. 启动收尾阶段                        │
├─────────────────────────────────────────────────┤
│ 后处理 → 发布启动事件 → 执行Runner → 发布就绪事件│
└─────────────────────────────────────────────────┘
# JVM启动和类加载
// 阶段1:JVM层面的准备工作
public class JVMStartupPhase {
    public void execute() {
        // 1. 加载JVM核心库
        loadJVMCoreLibraries();          // rt.jar, charsets.jar等

        // 2. 初始化类加载器层次结构
        initializeClassLoaders();        // Bootstrap → Extension → Application

        // 3. 加载SpringApplication主类
        Class<?> mainClass = Class.forName("com.example.MyApplication");

        // 4. 验证字节码安全性
        verifyBytecode(mainClass);       // 检查魔数、版本、指令合法性

        // 5. 准备静态变量和常量池
        prepareStaticFields();          // 初始化静态常量

        // 6. 调用main方法入口
        Method mainMethod = mainClass.getMethod("main", String[].class);
        mainMethod.invoke(null, (Object) args);
    }
}

// SpringBootApplication.java
@SpringBootApplication
public class MyApplication {
    public static void main(String[] args) {
        // 阶段1: JVM启动
        SpringApplication.run(MyApplication.class, args);
    }
}

1. 加载SpringApplication类到方法区
2. 加载@SpringBootApplication注解元数据
3. 验证字节码,准备静态变量
4. 初始化Spring核心类(BeanFactory、ApplicationContext等)
# 初始化SpringApplication对象
SpringBoot整个启动流程分为两个步骤:初始化一个SpringApplication对象、执行该对象的run方法。看下SpringApplication的初始化流程,SpringApplication的构造方法:
public SpringApplication(ResourceLoader resourceLoader, Class<?>... primarySources) {
	this.resourceLoader = resourceLoader;
	Assert.notNull(primarySources, "PrimarySources must not be null");
	this.primarySources = new LinkedHashSet<>(Arrays.asList(primarySources));
	this.webApplicationType = WebApplicationType.deduceFromClasspath();
	setInitializers((Collection) getSpringFactoriesInstances(ApplicationContextInitializer.class));
	setListeners((Collection) getSpringFactoriesInstances(ApplicationListener.class));
	this.mainApplicationClass = deduceMainApplicationClass();
}
初始化流程中最重要的就是通过 SpringFactoriesLoader 找到 spring.factories 文件中配置的 ApplicationContextInitializer 和 ApplicationListener 两个接口的实现类名称,以便后期构造相应的实例。 ApplicationContextInitializer 的主要目的是在 ConfigurableApplicationContext 做 refresh之前,对ConfigurableApplicationContext实例做进一步的设置或处理。ConfigurableApplicationContext继承自 ApplicationContext ,其主要提供了对 ApplicationContext 进行设置的能力。
Spring Boot提供两种方式来添加自定义监听器:
通过 SpringApplication.addListeners()或者 SpringApplication.setListeners()两个方法来添加一个或者多个自定义监听器
既然SpringApplication的初始化流程中已经从 spring.factories中获取到 ApplicationListener的实现类,那么我们直接在自己的jar包的 META-INF/spring.factories文件中新增配置即可:
# 执行该对象的run方法
Spring Boot应用的整个启动流程都封装在 SpringApplication.run 方法中,其整个流程真的是太长太长了,但本质上就是在Spring容器启动的基础上做了大量的扩展,按照这个思路来看看源码
Spring Boot启动调用栈(层次化视图):
┌─────────────────────────────────────────────────┐
│           SpringApplication.run()               │
├─────────────────────────────────────────────────┤
│ 1. 启动准备                                      │
│    ├── configureHeadlessProperty()              │
│    ├── getRunListeners()                        │
│    └── listeners.starting() ← 发布启动事件       │
│                                                │
│ 2. 环境准备                                      │
│    ├── new DefaultApplicationArguments(args)    │
│    ├── prepareEnvironment() ← 核心!            │
│    │   └── 加载所有配置源                        │
│    │       ├── application.properties          │
│    │       ├── application.yml                 │
│    │       ├── 环境变量                         │
│    │       └── 命令行参数                       │
│    ├── configureIgnoreBeanInfo()               │
│    └── printBanner()                           │
│                                                │
│ 3. 应用上下文创建                                │
│    └── createApplicationContext()               │
│        ├── Web应用: AnnotationConfigServletWebServerApplicationContext│
│        └── 普通应用: AnnotationConfigApplicationContext│
│                                                │
│ 4. 异常报告器初始化                              │
│    └── getSpringFactoriesInstances()            │
│                                                │
│ 5. 上下文预处理                                  │
│    └── prepareContext()                         │
│        ├── 设置环境environment                 │
│        ├── 执行ApplicationContextInitializer    │
│        ├── 发布ApplicationPreparedEvent        │
│        └── 加载Bean定义源                      │
│                                                │
│ 6. 容器刷新 ← 真正核心!                        │
│    └── refreshContext() → context.refresh()     │
│        ├── 6.1 prepareRefresh()                │
│        ├── 6.2 obtainFreshBeanFactory()        │
│        ├── 6.3 prepareBeanFactory()            │
│        ├── 6.4 postProcessBeanFactory()        │
│        ├── 6.5 invokeBeanFactoryPostProcessors() ← 重要!│
│        │   ├── 处理@Configuration类            │
│        │   ├── 扫描@Component注解类            │
│        │   ├── 解析@PropertySource            │
│        │   └── 加载@AutoConfiguration         │
│        ├── 6.6 registerBeanPostProcessors()     │
│        ├── 6.7 initMessageSource()             │
│        ├── 6.8 initApplicationEventMulticaster()│
│        ├── 6.9 onRefresh() ← 重要!            │
│        │   └── 创建并启动内嵌服务器             │
│        ├── 6.10 registerListeners()            │
│        ├── 6.11 finishBeanFactoryInitialization() ← 重要!│
│        │   └── 实例化所有非懒加载单例Bean        │
│        │       ├── 创建Bean实例               │
│        │       ├── 依赖注入                   │
│        │       └── 初始化回调                 │
│        └── 6.12 finishRefresh()                │
│                                                │
│ 7. 启动收尾                                      │
│    ├── afterRefresh()                          │
│    ├── listeners.started() ← 发布启动完成事件    │
│    ├── callRunners() ← 执行ApplicationRunner   │
│    └── listeners.running() ← 发布应用就绪事件    │
└─────────────────────────────────────────────────┘
核心代码
/**
	 * Run the Spring application, creating and refreshing a new
	 * {@link ApplicationContext}.
	 * @param args the application arguments (usually passed from a Java main method)
	 * @return a running {@link ApplicationContext}
	 */
	public ConfigurableApplicationContext run(String... args) {
		// ============ 阶段0: 启动准备 ============
		StopWatch stopWatch = new StopWatch();
		stopWatch.start();
		ConfigurableApplicationContext context = null;
		Collection<SpringBootExceptionReporter> exceptionReporters = new ArrayList<>();
		// 1. 设置无头模式(确保在服务器环境运行)
		configureHeadlessProperty();
		// 2. 获取并启动所有SpringApplicationRunListener
		SpringApplicationRunListeners listeners = getRunListeners(args);
		listeners.starting(); // 发布ApplicationStartingEvent
		try {
			// ============ 阶段1: 环境准备 ============
			// 3. 创建应用参数封装
			ApplicationArguments applicationArguments = new DefaultApplicationArguments(args);
			// 4. 准备环境(⚠️ 这是真正的第一步核心操作!)
			ConfigurableEnvironment environment = prepareEnvironment(listeners, applicationArguments);
			// ✅ 这里加载所有配置:application.properties → application.yml → 环境变量 → 命令行参数

			// 5. 配置忽略的Bean信息(AOP相关)
			configureIgnoreBeanInfo(environment);
			// 6. 打印Banner(应用启动logo)
			Banner printedBanner = printBanner(environment);

			// ============ 阶段2: 上下文创建 ============
			// 7. 创建应用上下文(根据应用类型)
			context = createApplicationContext();
			// Web应用: AnnotationConfigServletWebServerApplicationContext
			// 普通应用: AnnotationConfigApplicationContext

			// 8. 初始化异常报告器
			exceptionReporters = getSpringFactoriesInstances(SpringBootExceptionReporter.class,
					new Class[] { ConfigurableApplicationContext.class }, context);

			// ============ 阶段3: 上下文预处理 ============
			// 9. 准备上下文(⚠️ 关键预处理)
			prepareContext(context, environment, listeners, applicationArguments, printedBanner);
			// ✅ 这里包含:设置环境、执行ApplicationContextInitializer、加载Bean定义等

			// ============ 阶段4: 容器刷新 ============
			// 10. 刷新上下文(⚠️ 最核心的阶段!)
			refreshContext(context);
			// ✅ 这里执行完整的ApplicationContext.refresh(),包含:
			//    - BeanFactory准备
			//    - 执行BeanFactoryPostProcessor(包括组件扫描)
			//    - 注册BeanPostProcessor
			//    - 初始化MessageSource
			//    - 初始化事件广播器
			//    - onRefresh() → 创建内嵌Web服务器
			//    - 注册监听器
			//    - 实例化所有非懒加载单例Bean
			//    - 完成刷新

			// 11. 后刷新处理(空方法,可扩展)
			afterRefresh(context, applicationArguments);

			// ============ 阶段5: 启动完成 ============
			stopWatch.stop();
			if (this.logStartupInfo) {
				new StartupInfoLogger(this.mainApplicationClass).logStarted(getApplicationLog(), stopWatch);
			}

			// 12. 发布应用启动完成事件
			listeners.started(context); // 发布ApplicationStartedEvent

			// 13. 执行所有Runner(ApplicationRunner/CommandLineRunner)
			callRunners(context, applicationArguments);
		}
		catch (Throwable ex) {
			handleRunFailure(context, ex, exceptionReporters, listeners);
			throw new IllegalStateException(ex);
		}

		try {
			// 14. 发布应用就绪事件
			listeners.running(context);
		}
		catch (Throwable ex) {
			handleRunFailure(context, ex, exceptionReporters, null);
			throw new IllegalStateException(ex);
		}
		return context;
	}
# 获取并启动所有SpringApplicationRunListener
通过 SpringFactoriesLoader 查找并加载所有的 SpringApplicationRunListeners,通过调用starting()方法通知所有的SpringApplicationRunListener:应用开始启动了。SpringApplicationRunListener 其本质上就是一个事件发布者,它在SpringBoot应用启动的不同时间点发布不同应用事件类型(ApplicationEvent),如果有哪些事件监听者(ApplicationListener)对这些事件感兴趣,则可以接收并且处理。前面的初始化流程中,SpringApplication 加载了一系列 ApplicationListener。发布事件的代码已经在SpringApplicationRunListeners中实现了。 SpringApplicationRunListener只有一个实现类: EventPublishingRunListener。此处的代码只会返回一个 SpringApplicationRunListeners ,注意后面多了一个s字母,看下源码就会发现该类就是包含了一个SpringApplicationRunListener的List。操作SpringApplicationRunListeners ,在内部会遍历每一个SpringApplicationRunListener,调用每一个SpringApplicationRunListener的实现类的starting方法
# 准备环境
创建并配置当前应用将要使用的 Environment,Environment用于描述应用程序当前的运行环境,其抽象了两个方面的内容:配置文件(profile)和属性(properties),开发经验丰富的同学对这两个东西一定不会陌生:不同的环境(eg:生产环境、预发布环境)可以使用不同的配置文件,而属性则可以从配置文件、环境变量、命令行参数等来源获取。因此,当Environment准备好后,在整个应用的任何时候,都可以从Environment中获取资源。
总结起来,主要完成以下几件事:

- 判断Environment是否存在,不存在就创建(如果是web项目就创建 StandardServletEnvironment,否则创建 StandardEnvironment)

- 配置Environment:配置profile以及properties

- 调用SpringApplicationRunListener的 environmentPrepared()方法,通知事件监听者:应用的Environment已经准备好
# 打印Banner图案
# 创建应用上下文
根据不同的ApplicationType创建不同的Context,具体的类型回顾初始化中App类型的介绍
# 准备上下文
初始化ApplicationContext,主要完成以下工作:
- 将准备好的Environment设置给ApplicationContext

- 遍历调用所有的ApplicationContextInitializer的 initialize()方法来对已经创建好的ApplicationContext进行进一步的处理

- 调用SpringApplicationRunListener的 contextPrepared()方法,通知所有的监听者:ApplicationContext已经准备完毕

- 将所有的bean加载到容器中

- 调用SpringApplicationRunListener的 contextLoaded()方法,通知所有的监听者:ApplicationContext已经装载完毕
# 容器刷新
refresh完成配置类的解析、各种BeanFactoryPostProcessor和BeanPostProcessor的注册、国际化配置的初始化、web内置容器的构造等等。
以上就是Spring Boot的整个启动流程,其核心就是在Spring容器初始化并启动的基础上加入各种扩展点,这些扩展点包括:
- ApplicationContextInitializer
- ApplicationListener
- 自动配置自定义 org.springframework.boot.env.EnvironmentPostProcessor: Allows for customization of the application's {@link Environment} prior to the application context being refreshed.
- 各种BeanFactoryPostProcessor等等 org.springframework.beans.factory.config.BeanFactoryPostProcessor: 允许我们在容器实例化相应对象之前,对注册到容器的BeanDefinition所保存的信息做一些额外的操作,比如修改bean定义的某些属性或者增加其他信息等。
# 实例分析启动流程
// 1. 主启动类
@SpringBootApplication
public class SimpleApplication {
    public static void main(String[] args) {
        SpringApplication.run(SimpleApplication.class, args);
    }
}

// 2. 一个简单的RestController
@RestController
public class HelloController {
    @GetMapping("/hello")
    public String hello() {
        return "Hello World!";
    }
}

// 3. 配置文件application.properties
server.port=8080
spring.application.name=simple-demo
# 阶段1: JVM启动(底层准备)
java -jar simple-app.jar
加载JVM核心库
初始化类加载器层次结构
加载SimpleApplication.class到内存
验证字节码安全性
调用main方法入口
# 阶段2: SpringApplication.run() 初始化
SpringApplication.run(SimpleApplication.class, args);
// 内部创建SpringApplication实例
SpringApplication app = new SpringApplication(SimpleApplication.class);
app.run(args);

// 2.1 配置无头模式(确保在服务器环境运行)
configureHeadlessProperty(); // java.awt.headless=true

// 2.2 获取并启动监听器
SpringApplicationRunListeners listeners = getRunListeners(args);
listeners.starting(); // 发布ApplicationStartingEvent

// 2.3 创建应用参数封装
ApplicationArguments appArgs = new DefaultApplicationArguments(args);
// 解析命令行参数:--server.port=9090 等
# 发布启动事件 ⭐扩展点1: 启动事件监听
listeners.starting(); // 发布ApplicationStartingEvent
开发者扩展方式:
// 方式1: 实现ApplicationListener
@Component
public class MyStartingListener implements ApplicationListener<ApplicationStartingEvent> {
    @Override
    public void onApplicationEvent(ApplicationStartingEvent event) {
        System.out.println("应用开始启动...");
        // 场景:记录启动日志、初始化监控指标
    }
}

// 方式2: 使用@EventListener注解
@Component
public class EventListenerService {
    @EventListener
    public void handleStartingEvent(ApplicationStartingEvent event) {
        // 场景:验证环境配置、检查依赖服务
        checkRequiredProperties();
    }

    private void checkRequiredProperties() {
        // 检查必需配置是否存在
        if (System.getProperty("required.config") == null) {
            throw new IllegalStateException("缺少必需配置");
        }
    }
}
常见场景:
启动日志记录:记录应用启动时间和参数
环境验证:检查必需的环境变量和配置
资源预加载:提前加载常用资源
监控指标初始化:设置应用监控
完整事件顺序:
ApplicationStartingEvent- 最早,环境还未准备
ApplicationEnvironmentPreparedEvent- 环境已准备,上下文未创建
ApplicationContextInitializedEvent- 上下文已创建,Initializer已执行
ApplicationPreparedEvent- 上下文已准备,refresh()未调用
ApplicationStartedEvent- refresh()已完成,Runner未执行
ApplicationReadyEvent- 完全就绪,Runner已执行
# 阶段3: 环境准备(加载配置)
// 3.1 加载所有配置源(按优先级)
ConfigurableEnvironment environment = prepareEnvironment(listeners, appArgs);
// 1.  application.properties → server.port=8080
// 2.  application.yml (不存在)
// 3.  环境变量 (SPRING_APPLICATION_JSON等)
// 4.  命令行参数 (--server.port=9090)
// 5.  默认属性
=>
// SpringApplication.java
private ConfigurableEnvironment prepareEnvironment(...) {
    // 1. 创建环境对象(根据应用类型)
    ConfigurableEnvironment environment = createEnvironment();
    // Web应用: StandardServletEnvironment
    // 普通应用: StandardEnvironment

    // 2. 配置PropertySource(配置源加载在这里发生!)
    configurePropertySources(environment, args);

    // 3. 配置Profile
    configureProfiles(environment, args);

    return environment;
}

// configurePropertySources内部的加载顺序:
public void configurePropertySources(ConfigurableEnvironment environment, String[] args) {
    // 配置源优先级(从高到低):
    // 1. 命令行参数 (--server.port=8080)
    environment.getPropertySources().addFirst(new SimpleCommandLinePropertySource(args));

    // 2. ServletConfig参数 (Web应用)
    // 3. ServletContext参数 (Web应用)
    // 4. JNDI属性
    // 5. 系统环境变量
    // 6. 系统属性
    // 7. 随机值属性
    // 8. 应用配置文件 ← 主要配置来源!
    //    - application.properties
    //    - application.yml
    //    - application-{profile}.properties
    // 9. 默认属性
}
# 加载配置源 ⭐扩展点2: 自定义PropertySource
开发者扩展方式:
@Component
public class CustomPropertySourceConfig {
    @PostConstruct
    public void addCustomPropertySource() {
        // 添加自定义配置源
        MapPropertySource customSource = new MapPropertySource("custom",
            Collections.singletonMap("custom.property", "value"));
        environment.getPropertySources().addFirst(customSource);
    }
}

// 或者实现EnvironmentPostProcessor
public class CustomEnvironmentPostProcessor implements EnvironmentPostProcessor {
    @Override
    public void postProcessEnvironment(ConfigurableEnvironment env,
                                     SpringApplication application) {
        // 修改或添加配置源
        env.getPropertySources().addFirst(...);

        // 开发者在这里操作PropertySources
        MutablePropertySources propertySources = environment.getPropertySources();
        // 添加自定义配置源或修改现有配置
        Map<String, Object> customProperties = new HashMap<>();
        customProperties.put("custom.property", "value");
        propertySources.addFirst(new MapPropertySource("custom", customProperties));
    }
}
常见场景:
数据库配置加密:解密加密的数据库密码
外部配置集成:从外部配置中心加载配置
环境特定配置:根据运行环境动态调整配置
# printBanner
// 3.2 配置忽略的Bean信息(AOP相关)
configureIgnoreBeanInfo(environment);

// 3.3 打印Banner
// 控制台输出Spring logo和版本信息
  .   ____          _            __ _ _
 /\\ / ___'_ __ _ _(_)_ __  __ _ \ \ \ \
( ( )\___ | '_ | '_| | '_ \/ _` | \ \ \ \
 \\/  ___)| |_)| | | | | || (_| |  ) ) ) )
  '  |____| .__|_| |_|_| |_\__, | / / / /
 =========|_|==============|___/=/_/_/_/
=>
// configureIgnoreBeanInfo的实际作用:
protected void configureIgnoreBeanInfo(ConfigurableEnvironment environment) {
    // 设置系统属性,告诉Spring跳过某些Bean的元数据解析
    // 这可以显著提高启动性能,特别是当有大量Bean时

    String ignore = environment.getProperty("spring.aop.ignore", "true");
    if ("true".equals(ignore)) {
        // 设置系统属性,优化AOP处理
        System.setProperty("spring.aop.auto", "false");

        // 对于某些已知的基础设施Bean,跳过AOP代理创建
        // 比如:BeanFactoryPostProcessor, BeanPostProcessor等
        // 这些Bean不需要AOP代理,跳过检查可以提高性能
    }
}
开发者扩展方式:
// 自定义Banner
public class CustomBanner implements Banner {
    @Override
    public void printBanner(Environment environment,
                           Class<?> sourceClass, PrintStream out) {
        out.println("=== 我的应用 ===");
        out.println("版本: " + environment.getProperty("app.version"));
    }
}

// 在application.properties中指定
spring.banner.location=classpath:my-banner.txt
# 阶段4: 应用上下文创建
context = createApplicationContext();
// 对于AnnotationConfigApplicationContext:
// 在构造器中就创建了DefaultListableBeanFactory
// 但此时是空的,只有基础设施
=>
// 检测到有spring-web依赖,创建Web容器
return new AnnotationConfigServletWebServerApplicationContext();

// 此时还是空容器,没有任何Bean
# 阶段5: 上下文预处理
prepareContext(context, environment, listeners, appArgs, printedBanner);
=>
// 5.1 设置环境到上下文
context.setEnvironment(environment);

// 5.2 执行ApplicationContextInitializer(如果有)
applyInitializers(context);

// 发布ApplicationContextInitializedEvent
listeners.contextInitialized(context);

// 注册特定的单例Bean
ConfigurableListableBeanFactory beanFactory = context.getBeanFactory();
// 这里注册的是已经实例化的对象,不是BeanDefinition
beanFactory.registerSingleton("springApplicationArguments", applicationArguments);
if (printedBanner != null) {
    beanFactory.registerSingleton("springBootBanner", printedBanner);
}

if (beanFactory instanceof DefaultListableBeanFactory) {
    ((DefaultListableBeanFactory) beanFactory)
        .setAllowBeanDefinitionOverriding(this.allowBeanDefinitionOverriding);
}

// 设置懒初始化(Spring Boot 2.2+)
if (this.lazyInitialization) {
    context.addBeanFactoryPostProcessor(new LazyInitializationBeanFactoryPostProcessor());
}

// 加载源(不是register(SimpleApplication.class))
// 将SimpleApplication.class转换为BeanDefinition存入BeanFactory
// 但此时只是蓝图,还没有实例化
Set<Object> sources = getAllSources(); // 获取所有配置源,包括主类SimpleApplication
// load方法会处理配置类
load(context, sources.toArray(new Object[0]));
// BeanDefinitionLoader.load() 方法会:
// 1. 如果source是Class且有@Configuration注解,注册为配置类
// 2. 处理@ComponentScan,扫描指定包下的@Component类
// 3. 处理@Import、@ImportResource等注解
// 4. 为SimpleApplication创建BeanDefinition并注册到BeanFactory

// 简单说:load()将SimpleApplication.class转换为BeanDefinition并注册
// SimpleApplication.class → 作为配置类注册 → 解析注解 → 扫描包 → 注册其他Bean
// 所以不是注册SimpleApplication本身,而是:
// 注册SimpleApplication为配置类(BeanDefinition)
// 解析其上的注解(@ComponentScan, @EnableAutoConfiguration)
// 执行组件扫描找到其他Bean
// 处理自动配置加载spring.factories中的配置

// 5.4 发布ApplicationPreparedEvent
listeners.contextPrepared(context);
# 执行ApplicationContextInitializer ⭐扩展点3: 上下文初始化器
applyInitializers(context);
=>
// 执行所有ApplicationContextInitializer
for (ApplicationContextInitializer initializer : initializers) {
    initializer.initialize(context);
}
开发者扩展方式:
// 方式1: 实现ApplicationContextInitializer
public class MyContextInitializer implements ApplicationContextInitializer<ConfigurableApplicationContext> {
    @Override
    public void initialize(ConfigurableApplicationContext context) {
        // 场景1: 早期Bean注册,实际用例:需要在其他组件的配置阶段就提供服务的基础设施Bean。
        context.getBeanFactory().registerSingleton("earlyService", new EarlyService());
        // 这个Bean现在可以在任何BeanFactoryPostProcessor中使用
        // 比如在自定义的BeanFactoryPostProcessor中:
        // ConfigService config = beanFactory.getBean("configService");

        // 场景2: 环境验证
        Environment env = context.getEnvironment();
        if (!env.containsProperty("db.url")) {
            throw new IllegalStateException("数据库配置缺失");
        }

        // 场景3: 动态配置
        if (env.acceptsProfiles("cloud")) {
            System.setProperty("server.port", "8081");
        }
    }
}

// 注册方式1: spring.factories
// META-INF/spring.factories:
org.springframework.context.ApplicationContextInitializer=com.example.MyContextInitializer

// 注册方式2: 启动类设置
new SpringApplicationBuilder(MyApp.class)
    .initializers(new MyContextInitializer())
    .run(args);
常见场景:
早期Bean注册:在容器刷新前注册单例Bean
环境验证:检查必需配置是否就绪
动态配置:根据环境动态修改配置
自定义BeanFactory设置:修改BeanFactory配置
# beanFactory.registerSingleton
注意: beanFactory.registerSingleton("springApplicationArguments", applicationArguments);
# 启动Spring Boot应用时传入命令行参数
java -jar myapp.jar --debug --server.port=9090 --spring.profiles.active=dev inputfile.txt

在Spring Boot中,这些参数被封装为:
ApplicationArguments applicationArguments = new DefaultApplicationArguments(args);

选项参数(Option Arguments):以--开头

--debug→ 选项名:"debug",值:空列表

--server.port=9090→ 选项名:"server.port",值:["9090"]

--spring.profiles.active=dev→ 选项名:"spring.profiles.active",值:["dev"]

非选项参数(Non-option Arguments):不以--开头

inputfile.txt→ 非选项参数


// 方式1:注入使用
@Component
public class MyComponent {
    @Autowired
    private ApplicationArguments args;

    public void checkArgs() {
        // 检查是否有debug选项
        if (args.containsOption("debug")) {
            System.out.println("Debug模式已启用");
        }

        // 获取server.port的值
        List<String> portValues = args.getOptionValues("server.port");
        if (!portValues.isEmpty()) {
            String port = portValues.get(0);
            System.out.println("端口号: " + port);
        }

        // 获取非选项参数
        List<String> nonOptionArgs = args.getNonOptionArgs();
        System.out.println("非选项参数: " + nonOptionArgs);
    }
}

// 方式2:在BeanFactoryPostProcessor中使用
@Component
public class MyBeanFactoryPostProcessor implements BeanFactoryPostProcessor {
    @Override
    public void postProcessBeanFactory(ConfigurableListableBeanFactory beanFactory) {
        ApplicationArguments args = beanFactory.getBean("springApplicationArguments", ApplicationArguments.class);

        if (args.containsOption("dev")) {
            // 开发环境特殊配置
            enableDevelopmentFeatures();
        }
    }
}
# 为什么需要类型判断 beanFactory instanceof DefaultListableBeanFactory
// 在prepareContext方法中:
if (beanFactory instanceof DefaultListableBeanFactory) {
    // 只有DefaultListableBeanFactory才有这个方法
    ((DefaultListableBeanFactory) beanFactory)
        .setAllowBeanDefinitionOverriding(this.allowBeanDefinitionOverriding);
        // true:允许同名Bean定义覆盖(后注册的覆盖先注册的)
        // false:不允许覆盖,遇到同名Bean定义时抛出异常
}
核心原因:Spring的设计支持多种BeanFactory实现, 虽然Spring Boot默认使用DefaultListableBeanFactory,但框架设计上支持多种实现:
// Spring支持的不同BeanFactory实现:
public interface ConfigurableListableBeanFactory
    extends ListableBeanFactory, ConfigurableBeanFactory, AutowireCapableBeanFactory {
    // 基础接口
}

// 主要实现类:
public class DefaultListableBeanFactory extends AbstractAutowireCapableBeanFactory
    implements ConfigurableListableBeanFactory, BeanDefinitionRegistry, Serializable {
    // Spring默认使用的实现
}

// 其他可能的实现(理论上):
public class CustomBeanFactory implements ConfigurableListableBeanFactory {
    // 用户自定义的BeanFactory实现
}
实际应用场景:
// 场景1:Spring Boot测试中可能使用不同的BeanFactory
@SpringBootTest
@TestPropertySource(properties = "spring.main.allow-bean-definition-overriding=true")
public class MyTest {
    // 测试环境可能使用特殊的BeanFactory配置
}

// 场景2:自定义BeanFactory(虽然少见,但框架设计上支持)
@Configuration
public class CustomBeanFactoryConfig {
    @Bean
    public ConfigurableListableBeanFactory customBeanFactory() {
        return new CustomBeanFactoryImplementation(); // 用户自定义实现
    }
}
# 发布准备事件 ⭐扩展点4: 准备事件监听
listeners.contextPrepared(context); // ApplicationPreparedEvent
开发者扩展方式:
@Component
public class PreparedEventListener implements ApplicationListener<ApplicationPreparedEvent> {
    @Override
    public void onApplicationEvent(ApplicationPreparedEvent event) {
        ConfigurableApplicationContext context = event.getApplicationContext();
        ConfigurableListableBeanFactory beanFactory = context.getBeanFactory();

        // 场景1: Bean定义分析(在实例化前)
        String[] beanNames = beanFactory.getBeanDefinitionNames();
        log.info("已注册Bean定义数量: {}", beanNames.length);

        // 场景2: 条件配置验证
        if (!beanFactory.containsBeanDefinition("requiredBean")) {
            throw new IllegalStateException("必需Bean未配置");
        }

        // 场景3: 动态注册配置(基于现有Bean定义)
        if (beanFactory.containsBeanDefinition("dataSource")) {
            // 根据现有配置决定是否注册额外组件
            registerAdditionalComponents(beanFactory);
        }

        // 场景4: 性能监控设置
        setupPerformanceMonitoring(beanFactory);

        // 预加载缓存
        preloadCacheData();
    }
}
# 阶段6: 容器刷新(核心!)
refreshContext(context); // → 调用context.refresh()
=>
AbstractApplicationContext:

public void refresh() {
    // 7.1 prepareRefresh() - 设置上下文激活状态、初始化属性源等
    prepareRefresh();

    // 7.2 obtainFreshBeanFactory() - 获取或刷新BeanFactory
    // 对于AnnotationConfigApplicationContext,这里会创建DefaultListableBeanFactory
    // 但此时是空的,还没有Bean定义
    ConfigurableListableBeanFactory beanFactory = obtainFreshBeanFactory();

    // 7.3 prepareBeanFactory() - 配置BeanFactory的基础设施
    // 设置类加载器、表达式解析器、属性编辑器
    // 注册环境Bean等基础配置:environment、systemProperties、systemEnvironment
    prepareBeanFactory(beanFactory);
    // 此时BeanFactory中已有:
    // - 几个registerSingleton的单例Bean
    // - 一些BeanDefinition(来自load())
    // 但基础设施(如环境Bean、解析器等)还需要配置


    // 7.4 postProcessBeanFactory() - 空方法,子类可重写
    postProcessBeanFactory(beanFactory);
    // Web应用在这里注册Servlet相关的Scope
}
# 6.1-6.4: 准备阶段
prepareRefresh();
obtainFreshBeanFactory();
prepareBeanFactory(beanFactory);
postProcessBeanFactory(beanFactory);
=>
// BeanFactory基础设施设置过程:
prepareBeanFactory(beanFactory)
│
├── 设置类加载器
│   └── beanFactory.setBeanClassLoader()
│
├── 设置表达式解析器
│   └── beanFactory.setBeanExpressionResolver()
│       └── StandardBeanExpressionResolver ← 支持SPEL表达式
│
├── 添加属性编辑器注册器
│   └── beanFactory.addPropertyEditorRegistrar()
│       └── ResourceEditorRegistrar ← 注册资源编辑器
│
├── 添加ApplicationContextAware处理器
│   └── beanFactory.addBeanPostProcessor()
│       └── ApplicationContextAwareProcessor ← 处理Aware接口
│
├── 设置忽略的依赖接口
│   └── beanFactory.ignoreDependencyInterface()
│       └── 避免某些接口的自动注入
│
├── 注册可解析的依赖
│   └── beanFactory.registerResolvableDependency()
│       └── 注册BeanFactory、ResourceLoader等
│
└── 添加其他后处理器
    └── beanFactory.addBeanPostProcessor()
        └── ApplicationListenerDetector ← 检测应用监听器
Spring基础设施组件对比总结表
| 组件 | 在BeanFactory中的角色 | 主要功能 | 典型使用场景 | 关联注解/表达式 | 配置时机 |
|---|---|---|---|---|---|
| EmbeddedValueResolver(嵌入式值解析器) | 解析字符串中的占位符和SpEL表达式 | 将包含${...}和#{...}的字符串解析为实际值 | @Value注解处理配置文件占位符解析SpEL表达式求值 | @Value("${server.port}")@Value("#{T(java.lang.Math).random() * 100.0}")@Value("#{systemProperties['user.home']}") | prepareBeanFactory()阶段 |
| PropertyEditor(属性编辑器) | 传统类型转换机制 | 将字符串转换为目标类型(如String→Date) | XML配置中的类型转换@Value注解的简单类型转换表单数据绑定 | @Value("2023-01-01") → Date对象XML配置中的属性转换 | prepareBeanFactory()阶段注册 |
| ExpressionParser(表达式解析器) | SpEL表达式求值引擎 | 解析和执行Spring表达式语言 | @Value中的复杂表达式安全导航操作符条件表达式 | @Value("#{user?.address?.city}")@Value("#{environment.acceptsProfiles('dev') ? 'dev' : 'prod'}")@Value("#{users.}") | prepareBeanFactory()阶段配置 |
| ScopeManager(作用域管理器) | 管理Bean的生命周期范围 | 控制Bean的创建、缓存和销毁策略 | 单例vs原型作用域Request/Session作用域自定义作用域 | @Scope("prototype")@Scope("request")@Scope("session") | BeanFactory初始化阶段 |
| ConversionService(类型转换服务) | 现代统一类型转换API | 提供类型安全的转换机制,支持泛型和集合 | 配置属性转换表单数据绑定自定义类型转换 | @Value("${some.list}") List@Value("${some.map}") Map自定义类型转换 | BeanFactory后处理阶段 |
| Conditional系统(条件化配置) | 基于条件的Bean创建 | 根据条件决定是否创建Bean | 环境特定配置特性开关控制类路径检测 | @Profile("cloud")@ConditionalOnProperty("feature.enabled")@ConditionalOnClass("com.example.Service") | Bean定义加载阶段 |
# 6.5: 执行BeanFactoryPostProcessor ⭐扩展点5: Bean工厂后处理
invokeBeanFactoryPostProcessors();
=>
// 6.5.1 处理@SpringBootApplication
// → 包含@ComponentScan,扫描com.example包

// 6.5.2 找到HelloController(有@RestController注解)
// @RestController包含@Component,所以被扫描到

// 6.5.3 创建BeanDefinition(Bean蓝图)
BeanDefinition controllerDef = new RootBeanDefinition(HelloController.class);
controllerDef.setScope(SCOPE_SINGLETON);

// 6.5.4 注册到BeanFactory
beanFactory.registerBeanDefinition("helloController", controllerDef);

// 6.5.5 处理自动配置(@EnableAutoConfiguration)
// 自动配置内嵌服务器、JSON转换器等
为什么需要 BeanFactoryPostProcessor(后处理)
核心答案:动态性和条件化。有些配置无法在编写代码时确定,需要在运行时根据环境决定.
处理对象:BeanDefinition(Bean蓝图)
开发者扩展方式:
// 方式1: 实现BeanFactoryPostProcessor
@Component
public class MyBeanFactoryPostProcessor implements BeanFactoryPostProcessor {
    @Override
    public void postProcessBeanFactory(ConfigurableListableBeanFactory beanFactory) {
        Environment env = beanFactory.getBean(Environment.class);

        // 场景1: 根据环境动态修改配置
        if (env.acceptsProfiles("cloud")) {
            BeanDefinition dbDef = beanFactory.getBeanDefinition("dataSource");
            // 云环境使用连接池配置
            dbDef.getPropertyValues().add("url", env.getProperty("CLOUD_DB_URL"));
        }

        // 场景2: 条件注册Bean
        if (isFeatureEnabled(env)) {
            GenericBeanDefinition featureBean = new GenericBeanDefinition();
            featureBean.setBeanClass(FeatureService.class);
            ((DefaultListableBeanFactory) beanFactory)
                .registerBeanDefinition("featureService", featureBean);
        }

        // 场景3: 属性解密
        BeanDefinition[] beanDefs = beanFactory.getBeanDefinitions();
        for (BeanDefinition beanDef : beanDefs) {
            decryptPropertyValues(beanDef); // 解密加密的属性值
        }
    }
}
常见场景:
Bean定义修改:改变作用域、懒加载设置等
条件注册:根据条件动态注册Bean
AOP代理设置:为特定Bean设置代理
属性加密解密:处理加密的配置属性
# 6.6: 注册BeanPostProcessor ⭐扩展点6: Bean后处理
// 注册AutowiredAnnotationBeanPostProcessor
// 用于后续处理@Autowired注入
registerBeanPostProcessors(beanFactory);
处理对象:Bean实例(实际对象)
开发者扩展方式:
@Component
public class MyBeanPostProcessor implements BeanPostProcessor {

    // Bean初始化前调用
    @Override
    public Object postProcessBeforeInitialization(Object bean, String beanName) {
        // 场景1: 监控统计
        if (bean instanceof RestController) {
            monitorBeanCreation(beanName, bean.getClass());
        }

        // 场景2: 自定义注解处理
        if (bean.getClass().isAnnotationPresent(MyAnnotation.class)) {
            processCustomAnnotation(bean);
        }

        return bean;
    }

    // Bean初始化后调用
    @Override
    public Object postProcessAfterInitialization(Object bean, String beanName) {
        // 场景1: AOP代理创建 这个不是正常的场景而是springboot源码spring-boot-starter-aop的实现,纯粹是举例
        if (bean instanceof MyService) {
            return createProxy(bean); // 返回代理对象
        }

        // 场景2: 缓存包装
        if (bean instanceof Repository) {
            return new CachingRepositoryWrapper((Repository) bean);
        }

        return bean;
    }
}
常见场景:
AOP代理:为Bean创建动态代理
监控统计:记录Bean创建和调用统计
缓存包装:为数据访问层添加缓存
自定义注解处理:处理业务自定义注解
# 6.7-6.8: 消息源和事件广播器
initMessageSource();
initApplicationEventMulticaster();
# 6.9: 子类特定刷新 ⭐扩展点7: 内嵌服务器自定义
onRefresh(); // ServletWebServerApplicationContext.onRefresh()
=>
// 6.9.1 创建内嵌Tomcat服务器
Tomcat tomcat = new Tomcat();
tomcat.setPort(8080); // 从配置读取

// 6.9.2 创建DispatcherServlet(Spring MVC核心)
DispatcherServlet dispatcherServlet = new DispatcherServlet(context);

// 6.9.3 注册Servlet映射
context.addServlet("dispatcher", dispatcherServlet).addMapping("/");

// 6.9.4 启动Tomcat(但还没开始监听端口)
tomcat.start();
开发者扩展方式:
// 自定义内嵌服务器配置
@Configuration
public class ServerConfig {

    @Bean
    public ServletWebServerFactory servletContainer() {
        TomcatServletWebServerFactory tomcat = new TomcatServletWebServerFactory();
        tomcat.setPort(8080);
        tomcat.addConnectorCustomizers(connector -> {
            // 自定义连接器配置
            connector.setProperty("maxThreads", "200");
        });
        return tomcat;
    }

    @Bean
    public DispatcherServlet dispatcherServlet() {
        return new DispatcherServlet();
    }
}
# 6.10: 注册监听器
registerListeners();
# 6.11: 完成BeanFactory初始化 ⭐扩展点8: Bean生命周期回调
finishBeanFactoryInitialization();
=>
// 6.11.1 实例化HelloController
HelloController controller = new HelloController(); // 调用构造方法

// 6.11.2 依赖注入(本例没有依赖,跳过)

// 6.11.3 初始化回调
// 调用@PostConstruct方法(本例没有)

// 6.11.4 注册到单例池
singletonObjects.put("helloController", controller);
开发者扩展方式:
@Component
public class MyService implements InitializingBean, DisposableBean {

    // InitializingBean - 初始化回调
    @Override
    public void afterPropertiesSet() throws Exception {
        // 场景:资源初始化
        initializeResources();
        loadReferenceData();
    }

    // DisposableBean - 销毁回调
    @Override
    public void destroy() throws Exception {
        // 场景:资源清理
        cleanupResources();
        closeConnections();
    }

    // 或使用注解方式
    @PostConstruct
    public void init() {
        // 初始化逻辑
    }

    @PreDestroy
    public void cleanup() {
        // 清理逻辑
    }
}
# 6.12: 完成刷新 ⭐扩展点9: 上下文刷新事件
// 发布ContextRefreshedEvent事件
// 完成容器初始化
finishRefresh();
开发者扩展方式:
@Component
public class ContextRefreshedListener implements ApplicationListener<ContextRefreshedEvent> {
    @Override
    public void onApplicationEvent(ContextRefreshedEvent event) {
        // 场景:容器刷新完成后执行初始化
        ApplicationContext context = event.getApplicationContext();

        // 验证所有必需Bean是否就绪
        validateRequiredBeans(context);

        // 启动后台任务
        startBackgroundJobs();
    }
}
# 阶段7: 启动收尾
// 7.1 后处理(空方法,可扩展)
afterRefresh(context, applicationArguments);

// 7.2 发布启动完成事件 ⭐扩展点10: 启动完成事件
listeners.started(context); // ApplicationStartedEvent

// 7.3 执行Runner(如果有ApplicationRunner/CommandLineRunner)⭐扩展点11: 启动Runner
callRunners(context, appArgs);

// 7.4 发布应用就绪事件 ⭐扩展点12: 应用就绪事件
listeners.running(context); // ApplicationReadyEvent

// 7.5 Tomcat开始监听端口(真正接受请求)
// 控制台输出: Tomcat started on port(s): 8080 (http)
Runner扩展方式:
@Component
public class MyApplicationRunner implements ApplicationRunner {
    @Override
    public void run(ApplicationArguments args) throws Exception {
        // 场景1: 数据初始化
        if (args.containsOption("init-data")) {
            initializeSampleData();
        }

        // 场景2: 连接检查
        checkExternalServices();

        // 场景3: 缓存预热
        warmUpCaches();
    }
}

@Component
public class MyCommandLineRunner implements CommandLineRunner {
    @Override
    public void run(String... args) throws Exception {
        // 处理命令行参数
        for (String arg : args) {
            if (arg.equals("--debug")) {
                enableDebugMode();
            }
        }
    }
}
# 时序状态和最终状态
时间点 T0: 创建BeanFactory(空)
// 刚创建时的BeanFactory内容:
BeanFactory状态:
├── singletonObjects: {}                    // 空单例池
├── beanDefinitionMap: {}                  // 空Bean定义映射
├── embeddedValueResolvers: []              // 空值解析器
└── 基本基础设施:
    ├── 类加载器
    ├── 类型转换服务
    └── 基本属性编辑器
时间点 T1: registerSingleton("springApplicationArguments") → 添加具体对象
// 添加具体对象后的状态:
BeanFactory状态:
├── singletonObjects:
│   └── "springApplicationArguments" → ApplicationArguments实例
├── beanDefinitionMap: {}                  // 仍然无Bean定义
├── embeddedValueResolvers: []
└── 基本基础设施
时间点 T2: load() → 注册BeanDefinition(蓝图)
// load()处理SimpleApplication.class后的状态:
BeanFactory状态:
├── singletonObjects:
│   └── "springApplicationArguments" → ApplicationArguments实例
├── beanDefinitionMap:
│   ├── "simpleApplication" → BeanDefinition(SimpleApplication.class)
│   ├── "helloController" → BeanDefinition(HelloController.class)   // 扫描到的
│   ├── "userService" → BeanDefinition(UserService.class)           // 扫描到的
│   └── 其他自动配置的BeanDefinition...
├── embeddedValueResolvers: []
└── 基本基础设施
时间点 T3: prepareBeanFactory() → 配置BeanFactory基础设施
// 配置基础设施后的状态:
BeanFactory状态:
├── singletonObjects:
│   ├── "springApplicationArguments" → ApplicationArguments实例
│   └── "environment" → Environment实例              // 新添加的环境Bean
├── beanDefinitionMap:
│   ├── "simpleApplication" → BeanDefinition
│   ├── "helloController" → BeanDefinition
│   └── ...
├── embeddedValueResolvers: [默认值解析器]           // 新增
└── 增强的基础设施:
    ├── 完整的属性编辑器
    ├── 表达式解析器
    ├── 作用域管理器
    └── 类型转换服务
时间点 T4: invokeBeanFactoryPostProcessors() → 处理所有BeanDefinition
// 处理后处理器后的状态(可能的变化):
BeanFactory状态:
├── singletonObjects:
│   ├── "springApplicationArguments" → ApplicationArguments实例
│   └── "environment" → Environment实例
├── beanDefinitionMap:
│   ├── "simpleApplication" → BeanDefinition(可能被修改)
│   ├── "helloController" → BeanDefinition(可能被修改)
│   ├── "userService" → BeanDefinition(可能被修改)
│   ├── "newDynamicBean" → BeanDefinition(可能新增) // 动态注册的
│   └── ...
├── embeddedValueResolvers: [默认值解析器]
└── 基础设施
时间点 T5: finishBeanFactoryInitialization() → 实例化所有单例Bean
// 实例化所有单例Bean后的状态:
BeanFactory状态:
├── singletonObjects:
│   ├── "springApplicationArguments" → ApplicationArguments实例
│   ├── "environment" → Environment实例
│   ├── "simpleApplication" → SimpleApplication实例(已实例化)
│   ├── "helloController" → HelloController实例(已实例化+依赖注入)
│   ├── "userService" → UserService实例(已实例化+依赖注入)
│   └── 所有其他单例Bean...
├── beanDefinitionMap:
│   ├── "simpleApplication" → BeanDefinition
│   ├── "helloController" → BeanDefinition
│   └── ...(定义仍然保留)
├── embeddedValueResolvers: [默认值解析器]
└── 基础设施
应用启动完成后的状态:
├── BeanFactory中有:
│   └── helloController : HelloController实例
├── Web服务器:
│   └── Tomcat运行在8080端口
├── URL映射:
│   └── /hello → HelloController.hello()方法
└── 可以处理请求:
    GET http://localhost:8080/hello → "Hello World!"
# Bean的时序状态细节
# 创建-注入-回调
更深一步观察bean的整个生命周期:
// Spring容器启动入口
SpringApplication.run()
└── AbstractApplicationContext.refresh()
    └── finishBeanFactoryInitialization(beanFactory)
        └── DefaultListableBeanFactory.preInstantiateSingletons()
            └── 遍历所有Bean定义,对每个Bean执行:
                getBean(beanName) → doGetBean() → createBean() → doCreateBean()
                    ├── createBeanInstance()    // 阶段1: 实例化(构造器注入)
                    ├── populateBean()          // 阶段2: 依赖注入  (字段/setter注入)
                    └── initializeBean()        // 阶段3: 初始化生命周期回调)

// 单个Bean的详细创建过程:
doCreateBean(beanName, mbd, args)
│
├── 1. createBeanInstance()     ← 实例化阶段(构造器注入在这里完成)
│   │
│   ├── 1.1 确定实例化策略
│   │   ├── determineConstructorsFromBeanPostProcessors()  // 通过后处理器选择构造器
│   │   └── 根据配置选择三种路径之一:
│   │
│   ├── 1.2 构造器注入路径 (autowireConstructor) ← 主要注入方式
│   │   ├── determineConstructor()              // 确定使用哪个构造器
│   │   ├── resolveConstructorArguments()      // 解析构造器参数(核心依赖解析!)
│   │   │   └── resolveDependency()             // 解析单个依赖
│   │   │       └── getBean()                  // 可能递归获取依赖Bean
│   │   └── constructor.newInstance(args)      // 使用参数创建实例
│   │
│   ├── 1.3 默认构造器路径 (instantiateBean)
│   │   ├── getInstantiationStrategy()          // 获取实例化策略
│   │   └── instantiate()                       // 反射创建空实例
│   │
│   └── 1.4 工厂方法路径 (instantiateUsingFactoryMethod)
│       ├── determineFactoryMethod()            // 确定工厂方法
│       ├── resolveArguments()                  // 解析方法参数
│       └── method.invoke()                     // 调用工厂方法
│
├── 2. populateBean()          ← 依赖注入阶段(字段/setter注入在这里完成)
│   │
│   ├── 2.1 自动注入基础支持
│   │   ├── autowireByName()                    // 按名称自动注入
│   │   └── autowireByType()                    // 按类型自动注入
│   │
│   ├── 2.2 注解驱动注入(核心!)
│   │   └── postProcessProperties()            // 调用InstantiationAwareBeanPostProcessor
│   │       └── AutowiredAnnotationBeanPostProcessor工作流程:
│   │           ├── findAutowiringMetadata()    // 查找@Autowired、@Value、@Inject注解
│   │           ├── resolveDependency()          // 解析依赖
│   │           ├── Field.set(bean, value)      // 字段反射注入
│   │           └── Method.invoke(bean, args)   // setter方法调用注入
│   │
│   └── 2.3 应用属性值
│       └── applyPropertyValues()              // 最终设置属性值
│
└── 3. initializeBean()         ← 初始化阶段(方法注入在这里完成 这里说的"方法注入"不是依赖注入,而是指初始化方法的调用)
    │
    ├── 3.1 Aware接口回调
    │   └── invokeAwareMethods()
    │       ├── setBeanName()                   // BeanNameAware
    │       ├── setBeanFactory()                // BeanFactoryAware
    │       └── setApplicationContext()         // ApplicationContextAware
    │
    ├── 3.2 前置初始化处理
    │   └── applyBeanPostProcessorsBeforeInitialization()
    │       └── CommonAnnotationBeanPostProcessor处理:
    │           └── postProcessBeforeInitialization() // 调用@PostConstruct方法
    │
    ├── 3.3 初始化方法调用
    │   └── invokeInitMethods()
    │       ├── afterPropertiesSet()            // InitializingBean接口
    │       └── initMethod.invoke()             // 自定义init方法
    │
    └── 3.4 后置初始化处理
        └── applyBeanPostProcessorsAfterInitialization()
            └── AbstractAutoProxyCreator处理:
                └── postProcessAfterInitialization() // AOP代理在这里创建
# 增强实例
// 1. 主启动类(不变)
@SpringBootApplication
public class SimpleApplication {
    public static void main(String[] args) {
        SpringApplication.run(SimpleApplication.class, args);
    }
}

// 2. 增强的RestController,添加各种初始化方法
@RestController
public class HelloController implements InitializingBean, ApplicationContextAware {

    private ApplicationContext applicationContext;
    private String startupTime;

    // 构造器注入(阶段1)
    public HelloController() {
        System.out.println("1. 构造器调用 - HelloController实例创建");
        // environment.getProperty("spring.application.name"); // ❌ 这里不能调用 environment,可以用下面方法:
        /**
        public HelloController(Environment environment) {
            this.environment = environment;
            this.appName = environment.getProperty("spring.application.name");

            System.out.println("构造器中使用配置: " + appName); // ✅ 安全
        }**/

        // ❌ 输出: applicationContext = null
        // ❌ 不能在这里使用applicationContext!
        // 跟environment不同,不建议构造器注入ApplicationContext    public HelloController(ApplicationContext applicationContext) ⚠️ 技术上可用,但有风险!	有循环依赖风险,比如:
        //❌ 危险操作1: 获取其他Bean可能触发循环依赖        SomeService service = context.getBean(SomeService.class);
        // ❌ 危险操作2: 如果SomeService也依赖HelloController,会导致栈溢出    service.initialize();
        // ❌ 危险操作3: Bean可能还未完全初始化 SomeBean bean = context.getBean(SomeBean.class);
    }


    // 字段注入(阶段2)
    @Autowired
    private Environment environment;

    // Setter注入(阶段2)
    private MessageService messageService;

    @Autowired
    public void setMessageService(MessageService messageService) {
        System.out.println("2. Setter注入 - MessageService注入");
        this.messageService = messageService;

        // ❌ 不安全操作:
        // - 调用messageService的方法(可能其他依赖还未注入)
        // - 访问其他@Autowired字段(可能还未注入)
    }

    // ApplicationContextAware接口(阶段3-1)
    @Override
    public void setApplicationContext(ApplicationContext applicationContext) throws BeansException {
        System.out.println("3. Aware接口 - ApplicationContext设置");
        this.applicationContext = applicationContext;
    }

    // @PostConstruct方法(阶段3-2)
    @PostConstruct
    public void init() {
        System.out.println("4. @PostConstruct - 自定义初始化");
        this.startupTime = LocalDateTime.now().format(DateTimeFormatter.ISO_LOCAL_DATE_TIME);

        // 此时所有依赖都已注入完成
        String appName = environment.getProperty("spring.application.name"); // 可以安全调用 environment
        System.out.println("应用名称: " + appName);

        // ✅ 这里可以安全使用 context
        // 1. 获取Bean
        MyService service = context.getBean(MessageService.class);

        // 2. 发布应用事件
        context.publishEvent(new CustomEvent(this, "事件数据"));

        // 3. 获取环境信息(Environment是ApplicationContext的一部分)
        Environment env = context.getEnvironment();
        String configValue = env.getProperty("some.config");

        // 4. 国际化消息
        String message = context.getMessage("hello.message", null, Locale.CHINA);

        // 5. 资源访问
        Resource resource = context.getResource("classpath:config/file.txt");
    }

    // InitializingBean接口(阶段3-3)
    @Override
    public void afterPropertiesSet() throws Exception {
        System.out.println("5. InitializingBean - 属性设置后初始化");
        // 可以执行额外的初始化逻辑
    }

    // 业务方法
    @GetMapping("/hello")
    public String hello() {
        return messageService.getMessage() + " at " + startupTime;
    }
}

// 3. 简单的Service类,用于演示依赖
@Service
public class MessageService {

    public MessageService() {
        System.out.println("1. MessageService构造器调用");
    }

    @PostConstruct
    public void init() {
        System.out.println("4. MessageService @PostConstruct");
    }

    public String getMessage() {
        return "Hello World from Spring Boot!";
    }
}

// 4. 配置文件application.properties
server.port=8080
spring.application.name=simple-demo
# Bean时序状态
// HelloController的完整创建过程:
doCreateBean("helloController")
│
├── 阶段1: createBeanInstance()     ← 实例化
│   └── 调用HelloController构造器
│       ✅ 状态: Bean实例已创建,但所有字段为null
│       📝 控制台输出: "1. 构造器调用 - HelloController实例创建"
│
├── 阶段2: populateBean()          ← 依赖注入
│   ├── 注入@Autowired字段: Environment environment
│   ├── 调用setter方法: setMessageService(messageService实例)
│       ✅ 状态: 依赖已注入,但未初始化
│       📝 控制台输出: "2. Setter注入 - MessageService注入"
│   └── MessageService的创建过程(递归):
│       doCreateBean("messageService")
│       ├── createBeanInstance() → "1. MessageService构造器调用"
│       ├── populateBean()        // 无依赖需要注入
│       └── initializeBean()     → "4. MessageService @PostConstruct"
│
└── 阶段3: initializeBean()         ← 初始化
    ├── 3.1 invokeAwareMethods()
    │   └── 调用setApplicationContext()
    │       ✅ 状态: ApplicationContext已设置
    │       📝 控制台输出: "3. Aware接口 - ApplicationContext设置"
    │
    ├── 3.2 applyBeanPostProcessorsBeforeInitialization()
    │   └── CommonAnnotationBeanPostProcessor处理@PostConstruct
    │       └── 调用init()方法
    │           ✅ 状态: 自定义初始化完成,Bean已就绪
    │           📝 控制台输出: "4. @PostConstruct - 自定义初始化"
    │
    ├── 3.3 invokeInitMethods()
    │   ├── 调用afterPropertiesSet() (InitializingBean接口)
    │       📝 控制台输出: "5. InitializingBean - 属性设置后初始化"
    │   └── 如果有自定义init-method,也会在这里调用
    │
    └── 3.4 applyBeanPostProcessorsAfterInitialization()
        └── 可能创建AOP代理(本例不需要)
            ✅ 最终状态: Bean完全初始化完成,可正常使用
# 扩展点场景
# 具体业务场景1:加密配置解密服务
// 在ApplicationContextInitializer中早期注册解密服务
public class DecryptionInitializer implements ApplicationContextInitializer {
    @Override
    public void initialize(ConfigurableApplicationContext context) {
        // 早期注册解密服务
        context.getBeanFactory().registerSingleton("configDecryptor", new ConfigDecryptor());

        // 现在其他BeanFactoryPostProcessor可以使用这个解密服务
        // 例如:解密数据库密码、API密钥等敏感配置
    }
}

// 在BeanFactoryPostProcessor中使用早期注册的Bean
@Component
public class DecryptionPostProcessor implements BeanFactoryPostProcessor {
    @Override
    public void postProcessBeanFactory(ConfigurableListableBeanFactory beanFactory) {
        // 获取早期注册的解密服务
        ConfigDecryptor decryptor = beanFactory.getBean("configDecryptor", ConfigDecryptor.class);

        // 解密所有加密属性
        BeanDefinition definition = beanFactory.getBeanDefinition("dataSource");
        String encryptedPassword = (String) definition.getPropertyValues().get("password");
        String decryptedPassword = decryptor.decrypt(encryptedPassword);
        definition.getPropertyValues().add("password", decryptedPassword);
    }
}
# 具体业务场景2:环境检测服务
// 早期注册环境检测服务
public class EnvironmentDetectorInitializer implements ApplicationContextInitializer {
    @Override
    public void initialize(ConfigurableApplicationContext context) {
        EnvironmentDetector detector = new EnvironmentDetector();
        context.getBeanFactory().registerSingleton("envDetector", detector);

        // 根据环境动态设置配置
        if (detector.isCloudEnvironment()) {
            System.setProperty("server.port", "8081");
            System.setProperty("spring.profiles.active", "cloud");
        }
    }
}
# 具体业务场景3:功能开关服务
// 早期注册功能开关服务,用于控制后续Bean的注册
public class FeatureToggleInitializer implements ApplicationContextInitializer {
    @Override
    public void initialize(ConfigurableApplicationContext context) {
        FeatureToggle toggle = new FeatureToggle();
        context.getBeanFactory().registerSingleton("featureToggle", toggle);

        // 其他BeanFactoryPostProcessor可以查询功能开关状态
        // 决定是否注册某些Bean
    }
}
# 自动配置原理(深入)
- @EnableAutoConfiguration 与 SpringFactoriesLoader
- 条件注解体系
- 自动配置的触发时机
- 排除与覆盖自动配置
- Spring Boot 2.7+ 的变化(.imports 文件)
@SpringBootApplication开启组件扫描和自动配置, 而 SpringApplication.run则负责启动引导应用程序。 @SpringBootApplication是一个复合 Annotation,它将三个注解组合在一起:
@SpringBootConfiguration就是 @Configuration,它是Spring框架的注解,标明该类是一个 JavaConfig配置类; allow to register extra beans in the context or import additional configuration classes;
@ComponentScan启用组件扫描;enable @Component scan on the package where the application is located;
@EnableAutoConfiguration注解: 表示开启Spring Boot自动配置功能,Spring Boot会根据应用的依赖、自定义的bean、classpath下有没有某个类 等等因素来猜测你需要的bean,然后注册到IOC容器中; enable Spring Boot’s auto-configuration mechanism (opens new window)
Notes:
You should only ever add one @SpringBootApplication or @EnableAutoConfiguration annotation. We generally recommend that you add one or the other to your primary @Configuration class only. https://docs.spring.io/spring-boot/docs/current/reference/htmlsingle/#using-boot-auto-configuration
开始讲解原理,先看EnableAutoConfiguration:
@Target(value=TYPE)
 @Retention(value=RUNTIME)
 @Documented
 @Inherited
 @AutoConfigurationPackage
 @Import(value=AutoConfigurationImportSelector.class)
public @interface EnableAutoConfiguration
重点是@Import(EnableAutoConfigurationImportSelector.class),这里它将把 EnableAutoConfigurationImportSelector作为bean注入到容器中,
@Override
	public String[] selectImports(AnnotationMetadata metadata) {
		try {
			AnnotationAttributes attributes = getAttributes(metadata);
			List<String> configurations = getCandidateConfigurations(metadata,
					attributes);
			configurations = removeDuplicates(configurations);
			Set<String> exclusions = getExclusions(metadata, attributes);
			configurations.removeAll(exclusions);
			configurations = sort(configurations);
			recordWithConditionEvaluationReport(configurations, exclusions);
			return configurations.toArray(new String[configurations.size()]);
		}
		catch (IOException ex) {
			throw new IllegalStateException(ex);
		}
	}
EnableAutoConfigurationImportSelector.selectImports()是何时执行的?其实这个方法会在容器启动过程中执行: AbstractApplicationContext.refresh(), 这个EnableAutoConfigurationImportSelector类会扫描所有的jar包,将所有符合条件的@Configuration配置类注入的容器中,何为符合条件,看看 META-INF/spring.factories的文件内容:
https://github.com/spring-projects/spring-boot/blob/master/spring-boot-project/spring-boot-autoconfigure/src/main/resources/META-INF/spring.factories
.....
org.springframework.boot.autoconfigure.jdbc.DataSourceAutoConfiguration,\
.....
然后举例看 DataSourceAutoConfiguration:
https://github.com/spring-projects/spring-boot/blob/master/spring-boot-project/spring-boot-autoconfigure/src/main/java/org/springframework/boot/autoconfigure/jdbc/DataSourceAutoConfiguration.java
@Configuration(proxyBeanMethods = false)
@ConditionalOnClass({ DataSource.class, EmbeddedDatabaseType.class })
@ConditionalOnMissingBean(type = "io.r2dbc.spi.ConnectionFactory")
@EnableConfigurationProperties(DataSourceProperties.class)
@Import({ DataSourcePoolMetadataProvidersConfiguration.class, DataSourceInitializationConfiguration.class })
public class DataSourceAutoConfiguration {
@ConditionalOnClass({DataSource.class,EmbeddedDatabaseType.class}):当Classpath中存在DataSource或者EmbeddedDatabaseType类时才启用这个配置,否则这个配置将被忽略。 注意上面的DataSourceProperties, @EnableConfigurationProperties(DataSourceProperties.class):将DataSource的默认配置类注入到IOC容器中,DataSourceproperties定义为:
@ConfigurationProperties(prefix = "spring.datasource")
public class DataSourceProperties implements BeanClassLoaderAware, InitializingBean {
	private ClassLoader classLoader;
	/**
	 * Name of the datasource. Default to "testdb" when using an embedded database.
	 */
	private String name;
	/**
	 * Whether to generate a random datasource name.
	 */
	private boolean generateUniqueName = true;
	/**
	 * Fully qualified name of the connection pool implementation to use. By default, it
	 * is auto-detected from the classpath.
	 */
	private Class<? extends DataSource> type;

	/**
	 * Fully qualified name of the JDBC driver. Auto-detected based on the URL by default.
	 */
	private String driverClassName;

	/**
	 * JDBC URL of the database.
	 */
	private String url;

	/**
	 * Login username of the database.
	 */
	private String username;

	/**
	 * Login password of the database.
	 */
	private String password;
很清晰对应配置spring.datasource,然后是连接池配置:
@Import({ Registrar.class, DataSourcePoolMetadataProvidersConfiguration.class }):导入其他额外的配置,就以DataSourcePoolMetadataProvidersConfiguration为例吧, DataSourcePoolMetadataProvidersConfiguration是数据库连接池提供者的一个配置类,即Classpath中存在 org.apache.tomcat.jdbc.pool.DataSource.class,则使用tomcat-jdbc连接池,如果Classpath中存在 HikariDataSource.class则使用Hikari连接池。
# 外部化配置
- 配置文件格式与加载顺序
- Profile 切换
- @ConfigurationProperties vs @Value
- 配置源优先级(命令行 > 环境变量 > 配置文件 > defaults)
1、开发者工具 `Devtools` 全局配置参数;

2、单元测试上的 `@TestPropertySource` 注解指定的参数;

3、单元测试上的 `@SpringBootTest` 注解指定的参数;

4、命令行指定的参数,如 `java -jar springboot.jar --name="Java技术栈"`;

5、命令行中的 `SPRING_APPLICATION_JSONJSON` 指定参数, 如 `java -Dspring.application.json='{"name":"Java技术栈"}' -jar springboot.jar`

6、`ServletConfig` 初始化参数;

7、`ServletContext` 初始化参数;

8、JNDI参数(如 `java:comp/env/spring.application.json`);

9、Java系统参数(来源:`System.getProperties()`);

10、操作系统环境变量参数;

11、`RandomValuePropertySource` 随机数,仅匹配:`ramdom.*`;

12、JAR包外面的配置文件参数(`application-{profile}.properties(YAML)`)

13、JAR包里面的配置文件参数(`application-{profile}.properties(YAML)`)

14、JAR包外面的配置文件参数(`application.properties(YAML)`)

15、JAR包里面的配置文件参数(`application.properties(YAML)`)

16、`@Configuration`配置文件上 `@PropertySource` 注解加载的参数;

17、默认参数(通过 `SpringApplication.setDefaultProperties` 指定);
# 生产级特性
- Actuator 端点
- DevTools 热部署原理
# Spring Boot应用监控与调优方案
生产环境监控:使用APM工具(如SkyWalking、Pinpoint)
开发阶段:集成Spring Boot DevTools进行热加载监控
整体监控架构
┌─────────────────┐    ┌─────────────────┐    ┌─────────────────┐
│   应用层监控      │    │   JVM层监控      │    │   系统层监控      │
│                 │    │                 │    │                 │
│ • 启动时间监控    │    │ • 内存使用       │    │ • CPU使用率      │
│ • Bean加载监控   │    │ • GC统计        │    │ • 磁盘IO         │
│ • 请求响应监控    │    │ • 线程状态       │    │ • 网络流量       │
└─────────┬───────┘    └─────────┬───────┘    └─────────┬───────┘
          │                      │                      │
          └──────────────────────┼──────────────────────┘
                                 │
                    ┌─────────────▼─────────────┐
                    │     监控数据收集层          │
                    │                           │
                    │ • Micrometer              │
                    │ • Spring Boot Actuator    │
                    │ • 自定义监控组件           │
                    └─────────────┬─────────────┘
                                 │
                    ┌─────────────▼─────────────┐
                    │     数据存储与可视化        │
                    │                           │
                    │ • Prometheus + Grafana    │
                    │ • ELK Stack               │
                    │ • 时序数据库              │
                    └───────────────────────────┘
# 依赖配置
<!-- Spring Boot Actuator -->
<dependency>
    <groupId>org.springframework.boot</groupId>
    <artifactId>spring-boot-starter-actuator</artifactId>
</dependency>

<!-- Micrometer Prometheus -->
<dependency>
    <groupId>io.micrometer</groupId>
    <artifactId>micrometer-registry-prometheus</artifactId>
</dependency>

<!-- 性能监控 -->
<dependency>
    <groupId>org.springframework.boot</groupId>
    <artifactId>spring-boot-starter-aop</artifactId>
</dependency>

<!-- 日志监控 -->
<dependency>
    <groupId>net.logstash.logback</groupId>
    <artifactId>logstash-logback-encoder</artifactId>
    <version>7.2</version>
</dependency>
# 启动过程专项监控
@Component
public class StartupMonitor {
    private static final Logger logger = LoggerFactory.getLogger(StartupMonitor.class);

    private long appStartTime;
    private Map<String, Long> phaseTimestamps = new ConcurrentHashMap<>();

    @EventListener
    public void handleApplicationStarting(ApplicationStartingEvent event) {
        appStartTime = System.currentTimeMillis();
        phaseTimestamps.put("starting", appStartTime);
        logger.info("应用开始启动: {}", appStartTime);
    }

    @EventListener
    public void handleEnvironmentPrepared(ApplicationEnvironmentPreparedEvent event) {
        long time = System.currentTimeMillis();
        phaseTimestamps.put("environmentPrepared", time);
        logger.info("环境准备完成, 耗时: {}ms", time - appStartTime);

        // 记录环境配置信息
        Environment env = event.getEnvironment();
        logger.info("Active Profiles: {}", Arrays.toString(env.getActiveProfiles()));
        logger.info("Config Locations: {}", env.getProperty("spring.config.location", "default"));
    }

    @EventListener
    public void handleContextPrepared(ApplicationPreparedEvent event) {
        long time = System.currentTimeMillis();
        phaseTimestamps.put("contextPrepared", time);
        logger.info("上下文准备完成, 总耗时: {}ms", time - appStartTime);

        // 记录Bean定义数量
        ConfigurableListableBeanFactory beanFactory = event.getApplicationContext().getBeanFactory();
        int beanDefinitionCount = beanFactory.getBeanDefinitionCount();
        logger.info("Bean定义数量: {}", beanDefinitionCount);
    }

    @EventListener
    public void handleContextRefreshed(ContextRefreshedEvent event) {
        long time = System.currentTimeMillis();
        phaseTimestamps.put("contextRefreshed", time);

        ApplicationContext context = event.getApplicationContext();
        String[] beanNames = context.getBeanDefinitionNames();

        logger.info("容器刷新完成, Bean实例化数量: {}, 总耗时: {}ms",
                   beanNames.length, time - appStartTime);

        // 分析Bean依赖关系
        analyzeBeanDependencies(context, beanNames);

        // 识别慢加载Bean
        identifySlowLoadingBeans();

        // 记录启动性能指标
        recordStartupMetrics();
    }

    @EventListener
    public void handleApplicationReady(ApplicationReadyEvent event) {
        long totalTime = System.currentTimeMillis() - appStartTime;
        logger.info("应用启动完成, 总耗时: {}ms", totalTime);

        // 发布启动性能报告
        publishStartupReport(totalTime);
    }

    private void analyzeBeanDependencies(ApplicationContext context, String[] beanNames) {
        logger.info("=== Bean依赖分析 ===");

        for (String beanName : beanNames) {
            if (beanName.contains("Service") || beanName.contains("Controller")) {
                BeanDefinition bd = ((DefaultListableBeanFactory)
                    context.getAutowireCapableBeanFactory()).getBeanDefinition(beanName);

                if (bd.hasAttribute("dependsOn")) {
                    String[] dependsOn = (String[]) bd.getAttribute("dependsOn");
                    logger.info("Bean {} 依赖: {}", beanName, Arrays.toString(dependsOn));
                }
            }
        }
    }

    private void identifySlowLoadingBeans() {
        logger.info("=== 慢加载Bean识别 ===");

        phaseTimestamps.entrySet().stream()
            .filter(entry -> entry.getValue().getMaxTime() > 500) // 超过500ms
            .sorted((e1, e2) -> Long.compare(e2.getValue().getMaxTime(),
                    e1.getValue().getMaxTime()))
            .forEach(entry -> {
                logger.warn("慢加载Bean: {}, 最大耗时: {}ms",
                    entry.getKey(), entry.getValue().getMaxTime());
            });
    }

    private void recordStartupMetrics() {
        // 记录到Micrometer指标
        Metrics.gauge("application.startup.duration",
            System.currentTimeMillis() - appStartTime);
        Metrics.gauge("application.beans.count",
            phaseTimestamps.size());
    }

    private void publishStartupReport(long totalTime) {
        logger.info("=== Spring Boot启动性能报告 ===");
        logger.info("总启动时间: {}ms", totalTime);

        phaseTimestamps.entrySet().stream()
            .sorted(Map.Entry.comparingByValue())
            .forEach(entry -> {
                logger.info("阶段 {}: {}ms", entry.getKey(), entry.getValue() - appStartTime);
            });
    }
}
# Bean加载性能监控
@Component
public class BeanLoadingMonitor implements BeanPostProcessor {
    private final Map<String, Long> beanCreationStartTimes = new ConcurrentHashMap<>();
    private final Map<String, BeanMetrics> beanMetrics = new ConcurrentHashMap<>();

    @Override
    public Object postProcessBeforeInitialization(Object bean, String beanName) {
        beanCreationStartTimes.put(beanName, System.currentTimeMillis());
        return bean;
    }

    @Override
    public Object postProcessAfterInitialization(Object bean, String beanName) {
        Long startTime = beanCreationStartTimes.remove(beanName);
        if (startTime != null) {
            long duration = System.currentTimeMillis() - startTime;
            BeanMetrics metrics = beanMetrics.computeIfAbsent(beanName,
                k -> new BeanMetrics(bean.getClass().getSimpleName()));
            metrics.recordCreation(duration);

            if (duration > 100) { // 超过100ms记录警告
                logger.warn("Bean [{}] 初始化耗时较长: {}ms", beanName, duration);
            }
        }
        return bean;
    }

    @EventListener
    public void handleApplicationReady(ApplicationReadyEvent event) {
        // 启动完成后输出Bean加载性能报告
        logger.info("=== Bean加载性能报告 ===");
        beanMetrics.entrySet().stream()
            .sorted((e1, e2) -> Long.compare(e2.getValue().getMaxTime(), e1.getValue().getMaxTime()))
            .limit(10) // 只显示最慢的10个Bean
            .forEach(entry -> {
                BeanMetrics metrics = entry.getValue();
                logger.info("Bean [{}]: 最大耗时={}ms, 平均耗时={}ms",
                    entry.getKey(), metrics.getMaxTime(), metrics.getAverageTime());
            });
    }

    static class BeanMetrics {
        private final String className;
        private long totalTime;
        private long maxTime;
        private int count;

        BeanMetrics(String className) {
            this.className = className;
        }

        void recordCreation(long duration) {
            totalTime += duration;
            maxTime = Math.max(maxTime, duration);
            count++;
        }

        long getAverageTime() {
            return count > 0 ? totalTime / count : 0;
        }

        long getMaxTime() {
            return maxTime;
        }
    }
}
# 配置类加载监控
@Component
public class ConfigurationLoadMonitor implements BeanFactoryPostProcessor {

    @Override
    public void postProcessBeanFactory(ConfigurableListableBeanFactory beanFactory) throws BeansException {
        if (beanFactory instanceof DefaultListableBeanFactory) {
            DefaultListableBeanFactory dlbf = (DefaultListableBeanFactory) beanFactory;

            // 监控配置类解析
            dlbf.addBeanPostProcessor(new BeanPostProcessor() {
                @Override
                public Object postProcessBeforeInitialization(Object bean, String beanName) {
                    if (beanName != null && beanName.endsWith("Configuration")) {
                        logger.debug("配置类加载: {}", beanName);
                    }
                    return bean;
                }
            });
        }
    }
}
# JVM级别监控配置
# application-monitor.yml
management:
  endpoints:
    web:
      exposure:
        include: health,info,metrics,prometheus,startup
  endpoint:
    metrics:
      enabled: true
    prometheus:
      enabled: true
  metrics:
    export:
      prometheus:
        enabled: true
    enable:
      jvm: true
      system: true
      logback: true
  tracing:
    sampling:
      probability: 1.0

# JVM监控配置
server:
  port: 8080
spring:
  application:
    name: my-monitored-app
# 自定义健康检查与指标
@Component
public class ApplicationHealthIndicator implements HealthIndicator {

    @Override
    public Health health() {
        // 检查应用健康状态
        boolean isHealthy = checkApplicationHealth();

        if (isHealthy) {
            return Health.up()
                .withDetail("启动时间", ManagementFactory.getRuntimeMXBean().getUptime() + "ms")
                .withDetail("内存使用", getMemoryUsage())
                .build();
        } else {
            return Health.down()
                .withDetail("错误原因", "应用运行异常")
                .build();
        }
    }

    private String getMemoryUsage() {
        Runtime runtime = Runtime.getRuntime();
        long usedMemory = runtime.totalMemory() - runtime.freeMemory();
        long maxMemory = runtime.maxMemory();
        return String.format("%.2fMB/%.2fMB",
            usedMemory / 1024.0 / 1024.0, maxMemory / 1024.0 / 1024.0);
    }
}

@Component
public class CustomMetrics {
    private final MeterRegistry meterRegistry;
    private final Counter beanCreationCounter;
    private final Timer startupTimer;

    public CustomMetrics(MeterRegistry meterRegistry) {
        this.meterRegistry = meterRegistry;
        this.beanCreationCounter = Counter.builder("application.beans.created")
            .description("应用创建的Bean数量")
            .register(meterRegistry);

        this.startupTimer = Timer.builder("application.startup.time")
            .description("应用启动时间")
            .register(meterRegistry);
    }

    public void recordBeanCreation() {
        beanCreationCounter.increment();
    }

    public void recordStartupTime(long duration) {
        startupTimer.record(duration, TimeUnit.MILLISECONDS);
    }
}
# 日志监控配置
<!-- logback-spring.xml -->
<configuration>
    <appender name="JSON" class="ch.qos.logback.core.ConsoleAppender">
        <encoder class="net.logstash.logback.encoder.LogstashEncoder">
            <customFields>{"application":"${spring.application.name}"}</customFields>
        </encoder>
    </appender>

    <appender name="METRICS" class="ch.qos.logback.core.rolling.RollingFileAppender">
        <file>logs/metrics.log</file>
        <encoder>
            <pattern>%d{yyyy-MM-dd HH:mm:ss} - %msg%n</pattern>
        </encoder>
        <rollingPolicy class="ch.qos.logback.core.rolling.TimeBasedRollingPolicy">
            <fileNamePattern>logs/metrics.%d{yyyy-MM-dd}.log</fileNamePattern>
        </rollingPolicy>
    </appender>

    <logger name="com.example.monitor" level="DEBUG" additivity="false">
        <appender-ref ref="METRICS" />
        <appender-ref ref="JSON" />
    </logger>

    <root level="INFO">
        <appender-ref ref="JSON" />
    </root>
</configuration>
# Grafana监控面板配置
{
  "title": "Spring Boot应用监控",
  "panels": [
    {
      "title": "启动时间监控",
      "targets": [
        {
          "expr": "application_startup_time_seconds",
          "legendFormat": "启动耗时"
        }
      ],
      "type": "stat"
    },
    {
      "title": "Bean加载性能",
      "targets": [
        {
          "expr": "rate(application_beans_created_total[5m])",
          "legendFormat": "Bean创建速率"
        }
      ],
      "type": "graph"
    },
    {
      "title": "JVM内存使用",
      "targets": [
        {
          "expr": "jvm_memory_used_bytes{area=\"heap\"}",
          "legendFormat": "堆内存"
        }
      ],
      "type": "graph"
    }
  ]
}
# 使用springboot开发应用
Spring boot web default web server: Asp.net default is IIS Express, how about spring boot web? Tomcat vs. Jetty vs. Undertow: Comparison of Spring Boot Embedded Servlet Containers https://examples.javacodegeeks.com/enterprise-java/spring/tomcat-vs-jetty-vs-undertow-comparison-of-spring-boot-embedded-servlet-containers/
# 3.1 Plugins
** spring-boot-maven-plugin
<build>
		<plugins>
			<plugin>
				<groupId>org.springframework.boot</groupId>
				<artifactId>spring-boot-maven-plugin</artifactId>
				<version>${spring-boot-maven-plugin.version}</version>
				<executions>
					<execution>
						<goals>
							<goal>repackage</goal>
						</goals>
					</execution>
				</executions>
			</plugin>
		</plugins>
	</build>
这个plugin很重要,其中的repackage是把java程序打包成为executable程序,否则就只是普通的jar包(纠正:实际测试即使没用这个plugin,pom parent继承了org.springframework.boot,一样可以生成可执行程序,原因见后面关于这个包的解释),不能直接执行,比如hello world,需要javac之后生成的class,用java *.class才能执行,而且如果java程序比较负责,依赖了外部的包,还要给出classpath或libpath,极其麻烦,maven本身就是包管理器,最基本的职责就是mvn package打成普通的jar包,然后mvn install到本地.m2 repository,然后mvn deploy到远程的repository,当需要运行的时候就是用前面提到的java命令执行,当然也可以直接用mvn执行,好处是mvn会自动去.m2下面找到依赖的包, mvn exec:java -Dexec.mainClass="com.example.Main" -Dexec.args="arg0 arg1",可以看到mvn实际也就是调用java命令 首先使用这个plugin的情况下,正常的mvn clean package,生成XXX-0.0.1-SNAPSHOT.jar和XXX-0.0.1-SNAPSHOT.jar.origninal: 可以重命名一下orignial为jar,反编译对比下:
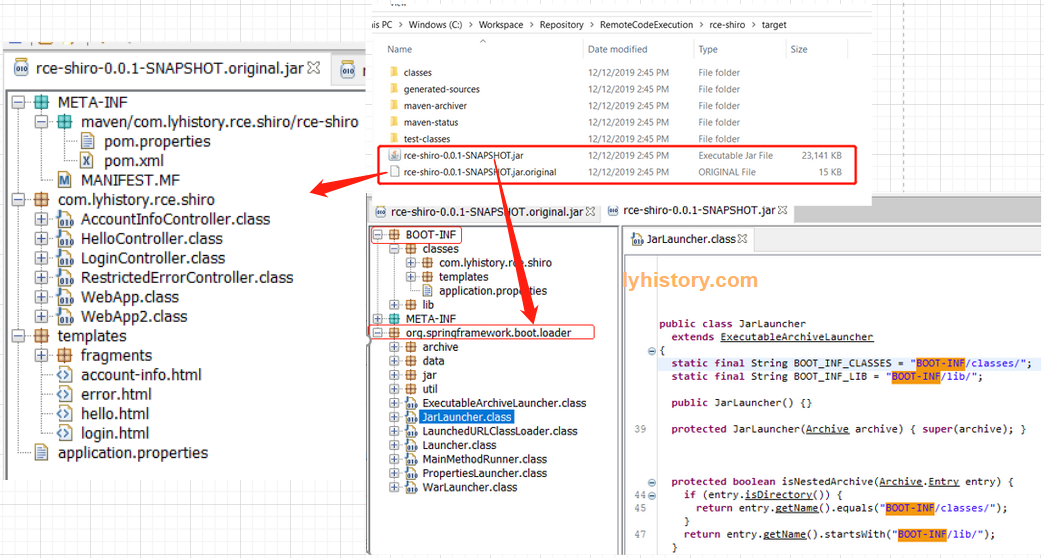
对比可以看到,普通的jar包里面的东西被再次包入了BOOT-INF,然后增加了一个org.springframework.boot.loader的启动包 执行方法: project里:mvn spring-boot:run 打成包后:java -server -jar XXXX.jar --spring.config.location=/config/
这里居然还有个比较傻逼的比较 https://www.baeldung.com/spring-boot-run-maven-vs-executable-jar 有点意思,还有人这么较真
然后我好奇测试了下mvn最原始的打包plugin,看打成一个fat jar会如何
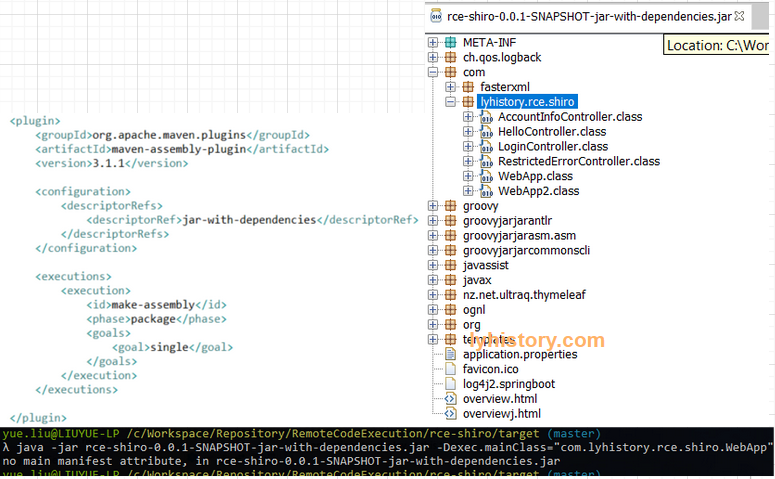 无法运行,估计是缺少springboot的上下文,spring boot的程序自然真正的入口应该是spring boot那个loader,加了annotation的那个所谓的入口main实际只是为spring boot loader准备的入口;
** maven-enforcer-plugin 这个是用来检查依赖问题的 mvn enforcer:enforce
# 3.2 Dependencies
Parent org.springframework.boot https://www.baeldung.com/spring-boot-dependency-management-custom-parent
继承两种方式: 直接写在parent里面; 写在dependencymanagement里面
<dependencyManagement>
     <dependencies>
        <dependency>
            <groupId>org.springframework.boot</groupId>
            <artifactId>spring-boot-dependencies</artifactId>
            <version>1.5.6.RELEASE</version>
            <type>pom</type>
            <scope>import</scope>
        </dependency>
    </dependencies>
</dependencyManagement>
如果没有继承org.springframework.boot,如果有多个入口方法,在pom中指定:
<build>
		<plugins>
			<plugin>
				<groupId>org.springframework.boot</groupId>
				<artifactId>spring-boot-maven-plugin</artifactId>
				<configuration>
					<mainClass>com.lyhistory.rce.shiro.WebApp</mainClass>
				</configuration>
				<executions>
					<execution>
						<goals>
							<goal>repackage</goal>
						</goals>
					</execution>
				</executions>
			</plugin>
如果继承org.springframework.boot,如果有多个入口方法,就多一种方式,在pom中指定:
<parent>
   	 <groupId>org.springframework.boot</groupId>
   	 <artifactId>spring-boot-starter-parent</artifactId>
   	 <version>1.5.9.RELEASE</version>
   	 <relativePath /> <!-- lookup parent from repository -->
</parent>

<properties>
  <start-class>com.xx.xx</start-class>
</properties>
# 3.3 Integration
# 3.3.1 redis
@Autowired Private RedisTemplate redisTemplate; https://github.com/spring-projects/spring-boot/issues/7238
一文搞定 Spring Data Redis 详解及实战 https://cloud.tencent.com/developer/article/1349818 SpringBoot下Redis相关配置是如何被初始化的 https://my.oschina.net/u/3866531/blog/1858069
Which type of injection?? 深度解析SpringBoot2.x整合Spring-Data-Redis https://www.itcodemonkey.com/article/13627.html
# 3.3.2 Shiro
# more
Thymeleaf https://www.baeldung.com/thymeleaf-in-spring-mvc
# 4.0 项目技巧
# include
application.yml
application-datasource.yml
spring:
  profiles:
    #split into multiple profile files
    include: datasource
# multiple env: dev prod
application.properties
spring.profiles.active:@spring.profiles.active@
application-dev.yml
application-prod.yml
mvn spring-boot:run -Dspring.profiles.active=dev
mvn clean install -Dspring.profiles.active=dev
~pom.xml(不需要)~
<profiles>
        <profile>
            <id>dev</id>
            <properties>
                <myActiveProfile>dev</myActiveProfile>
            </properties>
        </profile>
        <profile>
            <id>prod</id>
            <properties>
                <myActiveProfile>prod</myActiveProfile>
            </properties>
        </profile>
    </profiles>
# 4.1 业务开发
# 4.1.1 使用starter
# POM depenedency
spring boot官方提供了很多现成的starter,可以直接引用其depdendency使用比如 starters (opens new window)
spring-boot-starter | Core starter, including auto-configuration support, logging and YAML |
|---|---|
| spring-boot-starter-web | Starter for building web, including RESTful, applications using Spring MVC. Uses Tomcat as the default embedded container |
| spring-boot-starter-jdbc | Starter for using JDBC with the HikariCP connection pool |
但是问题是引用时需要加版本号,很多starter之间以及跟其他的dependency之间可能有版本依赖冲突, 所以官方推荐使用parent方式或者import方式引入某个版本的spring-boot-starter-parent,因为这个parent里面已经定义好了各个版本号, 所以在引用比如spring-boot-starter-web的时候就不需要添加版本号了
<!-- Inherit defaults from Spring Boot -->
<parent>
    <groupId>org.springframework.boot</groupId>
    <artifactId>spring-boot-starter-parent</artifactId>
    <version>2.2.6.RELEASE</version>
</parent>

<dependencyManagement>
	<dependencies>
		<dependency>
			<groupId>org.springframework.boot</groupId>
			<artifactId>spring-boot-starter-web</artifactId>
		</dependency>
	</dependencies>
</dependencyManagement>

<!--The spring-boot-starter-parent POM includes <executions> configuration to bind the repackage goal.-->
<build>
    <plugins>
        <plugin>
            <groupId>org.springframework.boot</groupId>
            <artifactId>spring-boot-maven-plugin</artifactId>
        </plugin>
    </plugins>
</build>

<!-- Dependence Override
full list: https://github.com/spring-projects/spring-boot/blob/v2.2.6.RELEASE/spring-boot-project/spring-boot-dependencies/pom.xml
-->
<properties>
    <spring-data-releasetrain.version>Fowler-SR2</spring-data-releasetrain.version>
</properties>
# Configuration
默认是 application.properties,也可以使用yaml
都在这里:
https://docs.spring.io/spring-boot/docs/current/reference/html/appendix-application-properties.html
另外一种稍微硬核的通过查阅代码获取的方式:
所有的配置都可以在 spring-boot-autoconfigure里面找到,比如
org.springframework.boot.autoconfigure.data.redis/RedisProperties
@ConfigurationProperties(prefix = "spring.redis")
public class RedisProperties {

	/**
	 * Database index used by the connection factory.
	 */
	private int database = 0;

	/**
	 * Connection URL. Overrides host, port, and password. User is ignored. Example:
	 * redis://user:[email protected]:6379
	 */
	private String url;

	/**
	 * Redis server host.
	 */
	private String host = "localhost";

	/**
	 * Login password of the redis server.
	 */
	private String password;

	/**
	 * Redis server port.
	 */
	private int port = 6379;

	/**
	 * Whether to enable SSL support.
	 */
	private boolean ssl;

	/**
	 * Connection timeout.
	 */
	private Duration timeout;

	private Sentinel sentinel;

	private Cluster cluster;

	private final Jedis jedis = new Jedis();

	private final Lettuce lettuce = new Lettuce();

	public int getDatabase() {
		return this.database;
	}

	public void setDatabase(int database) {
		this.database = database;
	}

	public String getUrl() {
		return this.url;
	}

	public void setUrl(String url) {
		this.url = url;
	}

	public String getHost() {
		return this.host;
	}

	public void setHost(String host) {
		this.host = host;
	}

	public String getPassword() {
		return this.password;
	}

	public void setPassword(String password) {
		this.password = password;
	}

	public int getPort() {
		return this.port;
	}

	public void setPort(int port) {
		this.port = port;
	}

	public boolean isSsl() {
		return this.ssl;
	}

	public void setSsl(boolean ssl) {
		this.ssl = ssl;
	}

	public void setTimeout(Duration timeout) {
		this.timeout = timeout;
	}

	public Duration getTimeout() {
		return this.timeout;
	}

	public Sentinel getSentinel() {
		return this.sentinel;
	}

	public void setSentinel(Sentinel sentinel) {
		this.sentinel = sentinel;
	}

	public Cluster getCluster() {
		return this.cluster;
	}

	public void setCluster(Cluster cluster) {
		this.cluster = cluster;
	}

	public Jedis getJedis() {
		return this.jedis;
	}

	public Lettuce getLettuce() {
		return this.lettuce;
	}

	/**
	 * Pool properties.
	 */
	public static class Pool {

		/**
		 * Maximum number of "idle" connections in the pool. Use a negative value to
		 * indicate an unlimited number of idle connections.
		 */
		private int maxIdle = 8;

		/**
		 * Target for the minimum number of idle connections to maintain in the pool. This
		 * setting only has an effect if it is positive.
		 */
		private int minIdle = 0;

		/**
		 * Maximum number of connections that can be allocated by the pool at a given
		 * time. Use a negative value for no limit.
		 */
		private int maxActive = 8;

		/**
		 * Maximum amount of time a connection allocation should block before throwing an
		 * exception when the pool is exhausted. Use a negative value to block
		 * indefinitely.
		 */
		private Duration maxWait = Duration.ofMillis(-1);

		public int getMaxIdle() {
			return this.maxIdle;
		}

		public void setMaxIdle(int maxIdle) {
			this.maxIdle = maxIdle;
		}

		public int getMinIdle() {
			return this.minIdle;
		}

		public void setMinIdle(int minIdle) {
			this.minIdle = minIdle;
		}

		public int getMaxActive() {
			return this.maxActive;
		}

		public void setMaxActive(int maxActive) {
			this.maxActive = maxActive;
		}

		public Duration getMaxWait() {
			return this.maxWait;
		}

		public void setMaxWait(Duration maxWait) {
			this.maxWait = maxWait;
		}

	}

	/**
	 * Cluster properties.
	 */
	public static class Cluster {

		/**
		 * Comma-separated list of "host:port" pairs to bootstrap from. This represents an
		 * "initial" list of cluster nodes and is required to have at least one entry.
		 */
		private List<String> nodes;

		/**
		 * Maximum number of redirects to follow when executing commands across the
		 * cluster.
		 */
		private Integer maxRedirects;

		public List<String> getNodes() {
			return this.nodes;
		}

		public void setNodes(List<String> nodes) {
			this.nodes = nodes;
		}

		public Integer getMaxRedirects() {
			return this.maxRedirects;
		}

		public void setMaxRedirects(Integer maxRedirects) {
			this.maxRedirects = maxRedirects;
		}

	}
    ..........
        /**
	 * Lettuce client properties.
	 */
	public static class Lettuce {

		/**
		 * Shutdown timeout.
		 */
		private Duration shutdownTimeout = Duration.ofMillis(100);

		/**
		 * Lettuce pool configuration.
		 */
		private Pool pool;

		public Duration getShutdownTimeout() {
			return this.shutdownTimeout;
		}

		public void setShutdownTimeout(Duration shutdownTimeout) {
			this.shutdownTimeout = shutdownTimeout;
		}

		public Pool getPool() {
			return this.pool;
		}

		public void setPool(Pool pool) {
			this.pool = pool;
		}

	}

}
可以看到前缀是 spring.redis ,具体配置举例:
其中最简单的string类型
spring.redis.host=x.x.x.48
spring.redis.port=6379
复杂类型如private Cluster cluster,很简单,进去看Cluster的成员即可,只是注意maxRedirects在application.properties写作:
spring.redis.cluster.nodes=x.x.x.48:6379,x.x.x.48:6380,x.x.x.48:6381,x.x.x.49:6379,x.x.x.49:6380,x.x.x.49:6381,x.x.x.50:6379,x.x.x.50:6380,x.x.x.50:6381
spring.redis.cluster.max-redirects=3
使用yaml
spring:
  #Redis缓存配置(RedisProperties)
  redis:
#    database: 0
#    host: localhost
#    port: 6380
#    password:
    #timeout: 6000
    #redis cluster
    cluster:
      nodes: 1.1.1.1:6379,1.1.1.1:6380,1.1.1.1:6381
      maxRedirects: 3
    lettuce:
      pool:
        max-active: 200
        max-wait: 3000
        max-idle: -1
        min-idle: 10
# 案例分析:
某次项目使用 spring-boot-starter版本为2.0.5
    <parent>
        <groupId>org.springframework.boot</groupId>
        <artifactId>spring-boot-starter-parent</artifactId>
        <version>2.0.5.RELEASE</version>
        <relativePath />
    </parent>
使用其 spring-boot-starter-data-redis 遇到RedisExcpetion 后来没能重现,不过也能重现出类似的WARN级别信息:
l.c.c.t.ClusterTopologyRefresh^[[m : Unable to connect to xxxx:6379
java.util.concurrent.CompletionException: io.netty.channel.ConnectTimeoutException: connection timed out: /xxxx:6379
经过查阅,client端的RedisConnectionFactory需要增加 ClusterTopologyRefreshOptions 这个option,
    @Autowired
    private RedisProperties redisProperties;

    @Value("${redis.maxRedirects:3}")
    private int maxRedirects;

    @Value("${redis.refreshTime:5}")
    private int refreshTime;

    @Bean
    public LettuceConnectionFactory redisConnectionFactory() {

        RedisClusterConfiguration redisClusterConfiguration = new RedisClusterConfiguration(redisProperties.getCluster().getNodes());

        redisClusterConfiguration.setMaxRedirects(maxRedirects);

        / / Support adaptive cluster topology refresh and static refresh source
        ClusterTopologyRefreshOptions clusterTopologyRefreshOptions =  ClusterTopologyRefreshOptions.builder()
                .enablePeriodicRefresh()
                .enableAllAdaptiveRefreshTriggers()
                .refreshPeriod(Duration.ofSeconds(refreshTime))
                .build();

        ClusterClientOptions clusterClientOptions = ClusterClientOptions.builder()
                .topologyRefreshOptions(clusterTopologyRefreshOptions).build();

                 / / From the priority, read and write separation, read from the possible inconsistency, the final consistency CP
        LettuceClientConfiguration lettuceClientConfiguration = LettuceClientConfiguration.builder()
                .readFrom(ReadFrom.SLAVE_PREFERRED)
                .clientOptions(clusterClientOptions).build();

        return new LettuceConnectionFactory(redisClusterConfiguration, lettuceClientConfiguration);
    }
而实际上为什么这个不提供配置呢,查阅了前面说的官方配置:
https://docs.spring.io/spring-boot/docs/current/reference/html/appendix-application-properties.html
发现实际有这个选项
spring.redis.lettuce.cluster.refresh.dynamic-refresh-sources
spring.redis.lettuce.cluster.refresh.period
而进一步看到第一个config是在spring boot 2.4.0引入的
https://github.com/spring-projects/spring-boot/wiki/Spring-Boot-2.4.0-Configuration-Changelog
而第二个period是2.3.0
https://github.com/spring-projects/spring-boot/wiki/Spring-Boot-2.3.0-Configuration-Changelog
直接搜源码 ClusterTopologyRefreshOptions 确认下:
https://github.com/spring-projects/spring-boot/blob/47516b50c39bd6ea924a1f6720ce6d4a71088651/spring-boot-project/spring-boot-autoconfigure/src/main/java/org/springframework/boot/autoconfigure/data/redis/LettuceConnectionConfiguration.java
点击blame,找到这行
			if (refreshProperties.getPeriod() != null) {
				refreshBuilder.enablePeriodicRefresh(refreshProperties.getPeriod());
			}
点击左侧对应的提交:
https://github.com/spring-projects/spring-boot/commit/dfac3a282b98bd480c5acf778dbfbce994051dad
可以看到这次提交的comment:Add configuration to enable Redis Cluster topology refresh
然后从左上角可以看到是从 v2.3.0.M4 (opens new window) 最开始引入的,之后是 v2.3.0.RC1,v2.3.0.RELEASE,直到最新的v2.5.0-RC1
REFERENCE:
https://github.com/javastacks/spring-boot-best-practice https://github.com/YunaiV/SpringBoot-Labs
给你一份超详细 Spring Boot 知识清单 (opens new window)
About AutoConfig (opens new window) Gradually Replacing Auto-configuration Disabling Specific Auto-configuration Classes (exclude={DataSourceAutoConfiguration.class})
spring boot 中的 Parent POM 和 Starter 的作用什么 https://cloud.tencent.com/developer/article/1362790
EnvironmentPostProcessor BeanPostProcessor
# 4.1.2 springboot mvc
so by default, tomcat will create some temp folder under /tmp and use it later on
spring.servlet.multipart.location (opens new window)
https://stackoverflow.com/questions/50523407/the-temporary-upload-location-tmp-tomcat-4296537502689403143-5000-work-tomcat/50523578
# 4.2 框架开发(starter)
ConfigurationProperties和EnableConfigurationProperties是一对, 前者定义对应配置文件的属性,后者是激活读取; 同样, Configuration或AutoConfiguration跟EnableAutoConfiguration是一对, 前者相当于component就是定义为bean,而后者是激活这个自动配置/装配(具体参考springboot源码分析一文),
https://docs.spring.io/spring-boot/docs/1.3.8.RELEASE/reference/html/using-boot-auto-configuration.html
Create a Custom Auto-Configuration with Spring Boot
https://www.baeldung.com/spring-boot-custom-auto-configuration
创建一个starter hello-spring-boot-starter
写一个服务类
public class HelloService {

  private String msg;

  public String sayHello() {
    return "hello " + msg;
  }

  public String getMsg() {
    return msg;
  }

  public void setMsg(String msg) {
    this.msg = msg;
  }
}
@ConfigurationProperties(prefix = "hello") //获取属性值
public class HelloProperties {

  private static final String MSG = "world";

  private String msg = MSG ;

  public String getMsg() {
    return msg;
  }

  public void setMsg(String msg) {
    this.msg = msg;
  }

}
@Configuration
//为带有@ConfigurationProperties注解的Bean提供有效的支持。
// 这个注解可以提供一种方便的方式来将带有@ConfigurationProperties注解的类注入为Spring容器的Bean。
@EnableConfigurationProperties(HelloProperties.class)//开启属性注入,通过@autowired注入
@ConditionalOnClass(Hello.class)//判断这个类是否在classpath中存在,如果存在,才会实例化一个Bean
// The Hello bean will be created if the hello.enable property exists and has a value other than false
// or the property doesn't exist at all.
@ConditionalOnProperty(prefix="hello", value="enabled", matchIfMissing = true)
public class HelloAutoConfiguration {

  @Autowired
  private HelloProperties helloProperties;

  @Bean
  @ConditionalOnMissingBean(Hello.class)//容器中如果没有Hello这个类,那么自动配置这个Hello
  public HelloService hello() {
    HelloService hello = new HelloService();
    hello.setMsg(helloProperties.getMsg());
    return hello;
  }

}

application.properties
\#可以不配置
hello.enabled=true

hello.msg=charmingfst

\#以debug模式运行
debug=true

\src\main\resources\META-INF\spring.factories
org.springframework.boot.autoconfigure.EnableAutoConfiguration=\
com.chm.test.HelloAutoConfiguration

https://blog.csdn.net/zxc123e/article/details/80222967
# 4.3 AOP切面编程
Aspect(切面)横切关注点的模块化 @Aspect注解的类
Join Point(连接点)程序执行过程中的点 方法调用、异常抛出
Pointcut(切点)匹配连接点的表达式 execution(* UserService.*(..))
Advice(通知)在连接点执行的动作 @Before, @After, @Around
Target(目标)被代理的对象 UserService实例
Proxy(代理)AOP创建的包装对象 CGLIB或JDK动态代理
Weaving(织入)将切面应用到目标对象的过程 编译期、类加载期、运行期
# 什么是AOP
传统OOP的问题:
// 业务类中混杂着横切关注点
public class UserService {
    public void createUser(User user) {
        // 事务开始
        Transaction tx = beginTransaction();
        try {
            // 权限检查
            checkPermission();

            // 日志记录
            log.info("创建用户: {}", user.getName());

            // 业务逻辑
            userDao.save(user);

            // 事务提交
            tx.commit();
        } catch (Exception e) {
            // 事务回滚
            tx.rollback();
            // 错误日志
            log.error("创建用户失败", e);
            throw e;
        }
    }
}
AOP解决方案:
// 纯净的业务逻辑
public class UserService {
    public void createUser(User user) {
        userDao.save(user); // 只关注业务逻辑
    }
}

// 横切关注点通过AOP处理
@Aspect
@Component
public class TransactionAspect {
    @Around("execution(* UserService.*(..))")
    public Object manageTransaction(ProceedingJoinPoint pjp) {
        // 事务管理逻辑在这里统一处理
    }
}
# Spring AOP实现机制-spring-boot-starter-aop
<dependency>
    <groupId>org.springframework.boot</groupId>
    <artifactId>spring-boot-starter-aop</artifactId>
</dependency>

// 对于每个Bean:
1. Bean正常实例化、依赖注入、初始化
2. AnnotationAwareAspectJAutoProxyCreator.postProcessAfterInitialization()被调用
3. 检查Bean是否需要AOP代理
4. 如果需要,创建JDK动态代理或CGLIB代理
5. 返回代理对象(替代原始Bean)

// Spring框架真实的AOP代理创建类结构:
Object
└── BeanPostProcessor (接口)
    └── InstantiationAwareBeanPostProcessor (接口)
        └── SmartInstantiationAwareBeanPostProcessor (接口)
            └── AbstractAutoProxyCreator (抽象类) ← 核心实现
                └── AspectJAwareAdvisorAutoProxyCreator (抽象类)
                    └── AnnotationAwareAspectJAutoProxyCreator (具体类) ← 实际工作的类!
这是Spring AOP的核心引擎
// 真实的Spring源码(简化版)
public abstract class AbstractAutoProxyCreator extends ProxyProcessorSupport
    implements SmartInstantiationAwareBeanPostProcessor {

    // 核心方法:在Bean初始化后创建代理
    @Override
    public Object postProcessAfterInitialization(@Nullable Object bean, String beanName) {
        if (bean != null) {
            Object cacheKey = getCacheKey(bean.getClass(), beanName);

            // 检查是否已经处理过(避免循环)
            if (!this.earlyProxyReferences.contains(cacheKey)) {
                // 包装Bean(如果需要代理)
                return wrapIfNecessary(bean, beanName, cacheKey);
            }
        }
        return bean;
    }

    // 核心方法:决定是否创建代理
    protected Object wrapIfNecessary(Object bean, String beanName, Object cacheKey) {
        // 1. 检查是否应该跳过代理
        if (isInfrastructureClass(bean.getClass()) || shouldSkip(bean, beanName)) {
            return bean;
        }

        // 2. 获取适用的Advisors(切面逻辑)
        Object[] specificInterceptors = getAdvicesAndAdvisorsForBean(bean.getClass(), beanName, null);

        // 3. 如果需要代理,创建代理对象
        if (specificInterceptors != DO_NOT_PROXY) {
            this.advisedBeans.put(cacheKey, Boolean.TRUE);
            return createProxy(bean.getClass(), beanName, specificInterceptors, new SingletonTargetSource(bean));
        }

        return bean;
    }
}
这是Spring Boot默认使用的具体实现
// 真实的Spring Boot AOP处理器
public class AnnotationAwareAspectJAutoProxyCreator extends AspectJAwareAdvisorAutoProxyCreator {

    // 重写方法:支持@AspectJ注解风格的切面
    @Override
    protected List<Advisor> findCandidateAdvisors() {
        // 调用父类方法查找基于配置的Advisor
        List<Advisor> advisors = super.findCandidateAdvisors();

        // 添加基于@Aspect注解的Advisor
        if (this.aspectJAdvisorsBuilder != null) {
            advisors.addAll(this.aspectJAdvisorsBuilder.buildAspectJAdvisors());
        }
        return advisors;
    }

    // 重写方法:支持JDK动态代理和CGLIB代理
    @Override
    protected boolean shouldProxyTargetClass(ConfigurableListableBeanFactory beanFactory, String beanName) {
        // 检查@EnableAspectJAutoProxy配置
        return (this.beanFactory != null &&
                this.beanFactory.getBeanDefinition(beanName).isProxyTargetClass());
    }
}
# 示例1:性能监控AOP
@Aspect
@Component
public class PerformanceMonitoringAspect {
    private static final Logger logger = LoggerFactory.getLogger(PerformanceMonitoringAspect.class);

    // 监控Service层方法性能
    @Around("execution(* com.example.service.*.*(..))")
    public Object monitorPerformance(ProceedingJoinPoint joinPoint) throws Throwable {
        String methodName = joinPoint.getSignature().getName();
        String className = joinPoint.getTarget().getClass().getSimpleName();

        long startTime = System.currentTimeMillis();
        try {
            // 执行原始方法
            Object result = joinPoint.proceed();
            long executionTime = System.currentTimeMillis() - startTime;

            // 记录性能指标
            if (executionTime > 100) { // 超过100ms记录警告
                logger.warn("方法执行缓慢: {}.{}, 耗时: {}ms",
                    className, methodName, executionTime);
            }

            // 记录到监控系统
            Metrics.timer("service.method.duration")
                .tag("class", className)
                .tag("method", methodName)
                .record(executionTime, TimeUnit.MILLISECONDS);

            return result;

        } catch (Exception e) {
            long executionTime = System.currentTimeMillis() - startTime;
            logger.error("方法执行异常: {}.{}, 耗时: {}ms",
                className, methodName, executionTime, e);
            throw e;
        }
    }
}
# 示例2:事务管理AOP
@Aspect
@Component
public class TransactionAspect {

    @Autowired
    private PlatformTransactionManager transactionManager;

    // 为所有@Transactional方法添加事务管理
    @Around("@annotation(transactional)")
    public Object manageTransaction(ProceedingJoinPoint joinPoint,
                                   Transactional transactional) throws Throwable {

        TransactionDefinition definition = new DefaultTransactionDefinition();
        TransactionStatus status = transactionManager.getTransaction(definition);

        try {
            logger.debug("开始事务: {}", joinPoint.getSignature());

            // 执行业务方法
            Object result = joinPoint.proceed();

            // 提交事务
            transactionManager.commit(status);
            logger.debug("提交事务: {}", joinPoint.getSignature());

            return result;

        } catch (Exception e) {
            // 回滚事务
            transactionManager.rollback(status);
            logger.debug("回滚事务: {}, 原因: {}", joinPoint.getSignature(), e.getMessage());
            throw e;
        }
    }

    // 使用示例
    @Service
    public class UserService {
        @Transactional
        public void createUser(User user) {
            // 业务逻辑,自动享有事务管理
            userRepository.save(user);
            userAuditRepository.logCreation(user);
        }
    }
}
# 示例3:缓存AOP
@Aspect
@Component
public class CacheAspect {

    @Autowired
    private CacheManager cacheManager;

    // 方法缓存
    @Around("@annotation(cacheable)")
    public Object handleCacheable(ProceedingJoinPoint joinPoint,
                                Cacheable cacheable) throws Throwable {

        String cacheName = cacheable.value();
        String key = generateCacheKey(joinPoint);

        Cache cache = cacheManager.getCache(cacheName);
        ValueWrapper cachedValue = cache.get(key);

        if (cachedValue != null) {
            logger.debug("缓存命中: {}.{}",
                joinPoint.getTarget().getClass().getSimpleName(),
                joinPoint.getSignature().getName());
            return cachedValue.get();
        }

        // 缓存未命中,执行方法
        Object result = joinPoint.proceed();

        // 缓存结果
        cache.put(key, result);
        logger.debug("缓存设置: {}.{}",
            joinPoint.getTarget().getClass().getSimpleName(),
            joinPoint.getSignature().getName());

        return result;
    }

    // 缓存失效
    @After("@annotation(cacheEvict)")
    public void handleCacheEvict(JoinPoint joinPoint, CacheEvict cacheEvict) {
        String cacheName = cacheEvict.value();
        Cache cache = cacheManager.getCache(cacheName);

        if (cacheEvict.allEntries()) {
            cache.clear(); // 清空整个缓存
        } else {
            String key = generateCacheKey(joinPoint);
            cache.evict(key); // 清除特定key
        }
    }

    private String generateCacheKey(ProceedingJoinPoint joinPoint) {
        // 基于方法签名和参数生成缓存key
        return joinPoint.getSignature().toShortString() +
               Arrays.toString(joinPoint.getArgs());
    }
}
# 示例4:安全权限AOP
@Aspect
@Component
public class SecurityAspect {

    @Autowired
    private AuthenticationService authService;

    // 方法级权限控制
    @Around("@annotation(requiresPermission)")
    public Object checkPermission(ProceedingJoinPoint joinPoint,
                                RequiresPermission requiresPermission) throws Throwable {

        String permission = requiresPermission.value();
        User currentUser = authService.getCurrentUser();

        if (!authService.hasPermission(currentUser, permission)) {
            throw new AccessDeniedException(
                "用户 " + currentUser.getUsername() + " 没有权限: " + permission);
        }

        logger.info("权限检查通过: {} 执行 {}.{}",
            currentUser.getUsername(),
            joinPoint.getTarget().getClass().getSimpleName(),
            joinPoint.getSignature().getName());

        return joinPoint.proceed();
    }

    // 参数级权限控制
    @Before("execution(* delete*(..)) && args(id,..)")
    public void checkDeletePermission(JoinPoint joinPoint, Long id) {
        User currentUser = authService.getCurrentUser();
        if (!authService.canDelete(currentUser, id)) {
            throw new AccessDeniedException("无权删除资源: " + id);
        }
    }
}
# 示例5:日志记录AOP
@Aspect
@Component
public class LoggingAspect {

    // 方法调用日志
    @Before("execution(* com.example.controller.*.*(..))")
    public void logMethodEntry(JoinPoint joinPoint) {
        logger.info("→ 进入方法: {}.{}",
            joinPoint.getTarget().getClass().getSimpleName(),
            joinPoint.getSignature().getName());

        if (logger.isDebugEnabled()) {
            logger.debug("方法参数: {}", Arrays.toString(joinPoint.getArgs()));
        }
    }

    // 方法退出日志
    @AfterReturning(pointcut = "execution(* com.example.controller.*.*(..))",
                   returning = "result")
    public void logMethodExit(JoinPoint joinPoint, Object result) {
        logger.info("← 退出方法: {}.{}",
            joinPoint.getTarget().getClass().getSimpleName(),
            joinPoint.getSignature().getName());

        if (logger.isDebugEnabled() && result != null) {
            logger.debug("方法返回值: {}", result.toString());
        }
    }

    // 异常日志
    @AfterThrowing(pointcut = "execution(* com.example..*.*(..))",
                  throwing = "ex")
    public void logException(JoinPoint joinPoint, Exception ex) {
        logger.error("✗ 方法执行异常: {}.{}",
            joinPoint.getTarget().getClass().getSimpleName(),
            joinPoint.getSignature().getName(), ex);
    }
}
# AOP最佳实践
- 切点表达式优化
@Aspect
@Component
public class OptimizedPointcutAspect {

    // 不好的写法:过于宽泛
    // @Around("execution(* com.example..*(..))")

    // 好的写法:精确匹配
    @Around("execution(* com.example.service.*Service.*(..))")
    public Object serviceLayerMonitoring(ProceedingJoinPoint pjp) throws Throwable {
        // 只监控Service层
        return pjp.proceed();
    }

    // 使用注解驱动更精确
    @Around("@annotation(com.example.annotation.Monitored)")
    public Object monitoredMethods(ProceedingJoinPoint pjp) throws Throwable {
        // 只监控有@Monitored注解的方法
        return pjp.proceed();
    }
}
- 性能考虑
@Aspect
@Component
public class PerformanceOptimizedAspect {

    // 避免在切面中执行耗时操作
    @Around("execution(* com.example..*(..))")
    public Object optimizedAdvice(ProceedingJoinPoint pjp) throws Throwable {
        // 不好的做法:每次都生成复杂日志
        // String detailedLog = createDetailedLog(pjp); // 耗时操作

        // 好的做法:延迟计算
        if (logger.isDebugEnabled()) {
            logger.debug("执行方法: {}", pjp.getSignature());
        }

        return pjp.proceed();
    }
}
# 5. Spring Boot启动优化
启动性能监控和分析
使用Spring Boot Actuator监控启动时间
# application.yml
management:
  endpoints:
    web:
      exposure:
        include: startup
  endpoint:
    startup:
      enabled: true

spring:
  application:
    name: myapp

// 启动时间监控端点
@RestController
public class StartupMetricsController {

    @Autowired
    private ApplicationStartup startup;

    @GetMapping("/startup-metrics")
    public StartupMetrics getStartupMetrics() {
        return startup.getMetrics();
    }
}

// 启动时间分析结果示例
public class StartupAnalysis {
    public void analyzeStartupTime() {
        System.out.println("启动阶段耗时分析:");
        System.out.println("JVM启动: 0.8秒");
        System.out.println("组件扫描: 4.2秒 (51%) ← 优化重点!");
        System.out.println("Bean实例化: 2.1秒 (26%)");
        System.out.println("自动配置: 1.1秒 (13%)");
        System.out.println("服务器启动: 0.3秒 (4%)");
        System.out.println("总启动时间: 8.5秒");
    }
}
使用JVM参数优化启动性能
# 优化启动速度的JVM参数
java -jar myapp.jar \
  -Xms512m -Xmx512m \          # 固定堆大小,避免动态调整
  -XX:+UseG1GC \               # 使用G1垃圾回收器
  -XX:MaxGCPauseMillis=200 \   # 控制GC停顿时间
  -noverify \                  # 关闭字节码验证(开发环境)
  -Dspring.jmx.enabled=false \ # 关闭JMX监控
  -Dspring.main.lazy-initialization=true \ # 启用懒加载
  -Dspring.context.index.enabled=true      # 启用类路径索引
案例1:减少组件扫描范围
优化前(扫描整个包路径):
@SpringBootApplication
@ComponentScan("com.example")  // 扫描整个项目包
public class MyApplication {
    // 启动时间: 8.2秒(扫描2000个类)
}

优化后(精确扫描必要包):
@SpringBootApplication
@ComponentScan({
    "com.example.controller",
    "com.example.service",
    "com.example.config"
    // 不扫描: com.example.entity, com.example.dto等
})
public class MyApplication {
    // 启动时间: 3.1秒(只扫描500个类)
}
案例2:使用懒加载优化
优化前(所有Bean立即加载):
@Service
public class HeavyService {
    // 启动时立即初始化,耗时2秒
    public HeavyService() {
        loadLargeDataSet();  // 耗时的初始化操作
    }
}
优化后(按需懒加载):
@Service
@Lazy  // 添加懒加载注解
public class HeavyService {
    // 第一次使用时才初始化
    public HeavyService() {
        loadLargeDataSet();
    }
}

@RestController
public class MyController {
    @Autowired
    private HeavyService heavyService;  // 启动时不初始化

    @GetMapping("/data")
    public Data getData() {
        // 第一次调用时才初始化HeavyService
        return heavyService.processData();
    }
}
案例3:排除不必要的自动配置
优化前(加载所有自动配置):
@SpringBootApplication  // 默认加载100+个自动配置
public class MyApplication {
    // 启动时间: 6.5秒
}

优化后(排除不需要的配置):
@SpringBootApplication(exclude = {
    DataSourceAutoConfiguration.class,      // 不使用数据库
    SecurityAutoConfiguration.class,        // 不需要安全配置
    MailSenderAutoConfiguration.class,     // 不需要邮件发送
    CacheAutoConfiguration.class           // 不使用缓存
})
public class MyApplication {
    // 启动时间: 3.8秒
}
案例4:类路径索引优化
优化前(类路径扫描):
// Maven依赖包含大量不需要的jar
<dependencies>
    <dependency>
        <groupId>org.springframework.boot</groupId>
        <artifactId>spring-boot-starter-data-jpa</artifactId> <!-- 不用数据库 -->
    </dependency>
    <dependency>
        <groupId>org.springframework.boot</groupId>
        <artifactId>spring-boot-starter-security</artifactId> <!-- 不用安全 -->
    </dependency>
</dependencies>

优化后(精简依赖):
// 只引入必要的starter
<dependencies>
    <dependency>
        <groupId>org.springframework.boot</groupId>
        <artifactId>spring-boot-starter-web</artifactId>
    </dependency>
    <!-- 移除不必要的starter -->
</dependencies>

// 添加类路径索引(Spring 5.2+)
spring:
  context:
    index:
      enabled: true  # 启用编译时类路径索引
案例5:使用Spring Fu进行函数式配置
传统配置方式:
@Configuration
public class TraditionalConfig {
    @Bean
    public MyService myService() {
        return new MyService();  // 反射创建,性能一般
    }
}

函数式配置(Spring Fu):
public class FunctionalConfig {
    public static void main(String[] args) {
        var app = new SpringApplication(Application.class)
            .run(args);

        // 函数式注册Bean,避免反射开销
        app.addInitializer((context) -> {
            context.registerBean(MyService.class,
                () -> new MyService());  // 直接lambda创建
        });
    }
}
案例6:编译时处理优化
使用Micronaut或Quarkus的编译时处理:
// Quarkus示例:编译时处理依赖注入
@ApplicationScoped
public class MyService {
    @Inject
    MyRepository repository;  // 编译时生成注入代码,避免运行时反射
}
# 6. Troubleshooting
# BeanDefinitionOverrideException
https://www.baeldung.com/spring-boot-bean-definition-override-exception
# BeanCurrentlyInCreationException/circular reference
Caused by: org.springframework.beans.factory.BeanCurrentlyInCreationException: Error creating bean with name 'AAAA': Bean with name 'AAAA' has been injected into other beans [BBBB] in its raw version as part of a circular reference, but has eventually been wrapped. This means that said other beans do not use the final version of the bean. This is often the result of over-eager type matching - consider using 'getBeanNamesForType' with the 'allowEagerInit' flag turned off, for example.
解决:加@Lazy
# nohup: ignoring input no main manifest attribute
执行
nohup java -server -jar test.jar > `date +\%F`_funding-rate-datasource_`date +\%H.%M.%S`.log 2>&1
log中内容为:
nohup: ignoring input no main manifest attribute
解决方法,pom增加:
<build>
        <finalName>funding-rate-datasource</finalName>
        <plugins>
            <plugin>
                <groupId>org.apache.maven.plugins</groupId>
                <artifactId>maven-source-plugin</artifactId>
                <configuration>
                    <attach>true</attach>
                </configuration>
                <executions>
                    <execution>
                        <phase>compile</phase>
                        <goals>
                            <goal>jar</goal>
                        </goals>
                    </execution>
                </executions>
            </plugin>
            <!-- package -->
            <plugin>
                <groupId>org.springframework.boot</groupId>
                <artifactId>spring-boot-maven-plugin</artifactId>
                <configuration>
                    <fork>true</fork>
                </configuration>
            </plugin>
            <!-- deploy -->
            <plugin>
                <groupId>org.apache.maven.plugins</groupId>
                <artifactId>maven-deploy-plugin</artifactId>
                <configuration>
                    <skip>true</skip>
                </configuration>
            </plugin>
        </plugins>
    </build>
ref:
@bean方法调用的特殊性:
https://www.racecoder.com/archives/787/
https://stackoverflow.com/questions/27990060/calling-a-bean-annotated-method-in-spring-java-configuration
Spring Boot 2.0 :深入分析Spring Boot原理 (opens new window)
spring boot之自动装配(spring-boot-autoconfigure) https://blog.csdn.net/wangjie5540/article/details/99542777
原创 | 我被面试官给虐懵了,竟然是因为我不懂Spring中的@Configuration https://juejin.im/post/5d005860f265da1b7f297630
https://blog.csdn.net/yiifaa/java/article/details/74852425 https://www.huaweicloud.com/articles/b59be8ffdcfbd1f8a1fe28bffe848d20.html https://www.cnblogs.com/wuchanming/p/5426746.html https://stackoverflow.com/questions/39890849/what-exactly-is-field-injection-and-how-to-avoid-it
https://medium.com/@ilyailin7777/all-dependency-injection-types-spring-336da7baf51b
SpringBoot常见异步编程 https://mp.weixin.qq.com/s/Z-GE_qBtnSgLQTVr9bQYcQ