回目录 《java实用基础》
Java vs C++ 核心区别(对象 & 引用)
✅ Java 只有值传递,没有引用传递。
✅ Java 的“引用”本身,也是按值传递的。
| 对比点 | Java | C++ |
|---|---|---|
| 对象存储位置 | 只能在堆 | 栈或堆 |
| 访问对象方式 | 引用(不能运算) | 指针 / 引用 |
| 是否有指针 | ❌ 没有 | ✅ 有 |
| 是否支持指针运算 | ❌ 不支持 | ✅ 支持 |
| 传参本质 | 值传递(引用的值) | 值传递 / 指针传递 |
| 内存释放 | GC 自动回收 | 手动 delete |
| 空值表示 | null | nullptr |
Java 代码示例(引用类型)
class Person {
String name;
Person(String name) { this.name = name; }
}
public class Test {
static void swap(Person x, Person y) {
Person temp = x;
x = y;
y = temp;
}
public static void main(String[] args) {
Person a = new Person("A");
Person b = new Person("B");
swap(a, b);
System.out.println(a.name); // A
System.out.println(b.name); // B
}
}
❌ 交换失败
原因:x、y只是引用的副本
x是 a的拷贝
改 x不会影响 a
但通过 x可以改对象内容
👉 “传的是遥控器,不是电视”
栈(main) 栈(方法) 堆
a ─────┐ x ─────┘ ┌──► Object
b ─────┴──► y ────────┘
---
C++ 版本(真正的引用传递)
#include <iostream>
using namespace std;
class Person {
public:
string name;
Person(string n) : name(n) {}
};
void swap(Person*& x, Person*& y) {
Person* temp = x;
x = y;
y = temp;
}
int main() {
Person* a = new Person("A");
Person* b = new Person("B");
swap(a, b);
cout << a->name << endl; // B
cout << b->name << endl; // A
}
✅ 交换成功,显式操作内存
a ───────────► Object
↑
x(别名,不是拷贝)
x就是 a本身
改 x等于改 a
---
一句话总结
> **Java:对象 = 引用类型,引用 ≈ 不能乱用的指针**
> **C++:对象可以是值,也可以是指针,完全由你控制**
Java:
你复印了一把钥匙给别人
→ 别人能用钥匙开门(改对象)
→ 但不能把你手里的钥匙换成别的
C++ 引用:
你把门禁卡直接给别人
→ 他刷的就是你的卡
为什么 Java 开发者容易在这里晕?因为 Java 抹平了这个概念:
Java 里没有“栈对象”。Person a;如果不 new,a 就是个空引用(null),连地址都没有。
Java 的 ==永远比较的是“地址值”(对于对象)。
C++ 里,如果你写 Person a;,a就是对象本身。如果你写 Person* a;,a才是指针。
面试时的“必杀”追问
你可以接着问候选人:
“既然 Person* a是在栈上,那么当这个函数执行结束,栈帧弹出时,会发生什么?”
菜鸟: “对象被销毁了。”(错!只销毁了指针变量,对象还在堆里 -> 内存泄漏)
高手: “栈上的指针变量 a消失了,但堆上的 Person 对象还在。如果没有其他指针指向它,这块内存就泄露了,除非之前调用过 delete。”
| 特性 | MyObject obj1; (C++) | MyObject* obj1 = new MyObject(); (C++) | MyObject obj1 = new MyObject(); (Java) |
|---|---|---|---|
| 存储位置 | 栈 (Stack) | 堆 (Heap) | 堆 (Heap) |
| 变量本质 | 对象实体 | 指针 (地址) | 引用 (地址) |
| 构造调用 | 自动调用 | 自动调用 | 自动调用 |
| 销毁时机 | 函数结束自动销毁 | 必须手动 delete | GC 随机回收 |
| 适用场景 | 局部变量、小型对象 | 大对象、需长期存在的对象 | 所有对象 |
| 名称 | 别名 | 决定时机 | 示例 | 关键特征 |
|---|---|---|---|---|
| 静态类型 (Static Type) | 编译期类型 声明类型 | 编译期 | Animal aList<String> list | 写在代码里的类型 |
| 动态类型 (Dynamic Type) | 运行期类型 实际类型 | 运行期 | new Dog()ArrayList<String>() | 实际创建的对象类型 |
| 静态绑定 | 早期绑定 | 编译期 | 重载方法static方法private方法 | 编译器直接确定 |
| 动态绑定 | 晚期绑定 | 运行期 | 重写方法@Override | JVM 运行时确定 |
| 静态语言 | 强类型语言 | — | Java, C++, Go | 类型检查在编译期 |
| 动态语言 | 弱类型语言 | — | Python, JavaScript | 类型检查在运行期 |
# 1. JAVA Dev Tools
# 1.1 Tools
- Decompiler
Reverse class to view code http://java-decompiler.github.io/ 分析JVM JVisualVM https://www.cnblogs.com/xifengxiaoma/p/9402497.html Java ServiceabilityAgent(HSDB)使用和分析 https://liuzhengyang.github.io/2017/05/27/serviceabilityagent/
- Linux tools
strace -ff -o prefix
- JDK Tools refer<buildingblock/java_jdk>
JAVA_HOME/bin/
# 1.2 IDE
IDEA和eclipse各有优缺点,比如eclipse可以在同一个ide实例中操作多个project,而idea只能一个实例开一个project; 但是IDEA有智能的依赖查询、依赖冲突解决、依赖调试能力,eclipse就稍微麻烦,只能手动操作,举例: 我在查询一个AutoWired的依赖时,找到了这接口,然后直接找其引用reference是找不到的,可能是因为在不同的jar包中, 最后是在右键“Open type Hierarchy”找到,而在IDEA中,直接左侧会显示一个i的小图标,点击即可显示“is implemented in”;
Eclipse/STS Project Explorer-> Projects Presentation (select hierarchy)
VSCODE: extension: spring tool suite + extension pack for java Note: install jdk(Adoptium's Temurin version:jdk21tls (opens new window) ) following instructions in welcome page (self installed openjdk may not work!) ctrl+shift+p: java: config classpath
?#The type java.lang.invoke.StringConcatFactory cannot be resolved. It is indirectly referenced from required .class filesJava SOLUTION: clean cache(click to expand the problem and then click fix) ?# VS Code terminal doesn't recognize PATH variables SOLUTION: restart vscode to pick up the env variables updates, if still not work, then print %PATH% to investigate
# 1.2.1 Code Style
统一代码以及配置文件的缩进,以eclipse为例:
1.代码缩进
Window->Preferences->Java->Code Style->Formatter:
Edit Tab Policy: Space only
2.配置xml缩进比如pom
Window->Preferences->XML->XML Files->Editor:
Indent with spaces, Indentation size 4
# 1.2.2 Folder structure
**About resources folder Missing resources: manually create resources folder in src/main, and then Manve->update project src/main/resources https://stackoverflow.com/questions/18875635/cant-access-files-from-src-main-resources-via-a-test-case
New Maven project -> Tick "Create a simple project(skip archetype selection) [auto create resource folder] https://stackoverflow.com/questions/49351806/eclipse-adds-an-exclusion-pattern-of-to-src-main-resources-how-to-read-a-res
**Missing src/test/java manual add in file system, then in java build path, remove first, then Add Folder
# 1.2.3 Compiler
**default compiler & project build path & runtime/debug JRE& compiler compliance Set project compiler compliance settings to 1.7 Set project JRE build path entry to 'JavaSE-1.7' https://docs.infor.com/help_m3_coreit_13.4/index.jsp?topic=%2Fcom.lawson.help.administration%2Fcom.lawson.help.makag-w_10.1.2%2FL157071229479555.html
java->Compiler/Installed JREs
run config-> maven build->maven debug-> jre
show jdk version that maven dependent on: mvn -version
# 1.2.4 Debug
基本debug技巧:
1).调试依赖比如maven dependencies的时候,注意在eclipse里面设置断点有可能不生效,因为debugger view下会有很多空行,技巧是多设置一些断点,调试起来之后再在debugger view下设置断点 2).比如pom.xml在eclipse里面可以查看Dependency hierarchy view,可以比较清晰的看到所有依赖的层级关系 3).右键 quick outline 4).右键 Open type Hierarchy,可以显示依赖中的接口实现 5).选中class名字,然后Ctrl+shift+T,或者从菜单Navigate->Open Type,可以显示这个class是在哪个jar包中,及其物理位置;
runnable jar right click Main.java=>export Runnable JAR file=>Launch configuration(select Main)
Remote Debug(attach jar):
https://stackoverflow.com/questions/6855520/attach-debugger-to-application-using-eclipse/23297651 Debug Configurations: Remote Java Application->Connect: Remote Host & Port & Remote Java Application->Source: Add Source code (& dependencies sourcecode if needed) then Start jar and expose port: java -Xdebug -Xrunjdwp:transport=dt_socket,address=127.0.0.1:8008,server=y,suspend=y -jar target\test.jar
For remote debug war hosting in remote tomcat: vim /etc/tomcat/tomcat.conf JAVA_OPTS or CATALINA_OPTS="-Xdebug -Xrunjdwp:transport=dt_socket,address=10001,server=y,suspend=n" Failed using port 8000
For mvn project another way can be found in Maven->debug below
Debug into jar without sourcecode using decompiler:
My original post https://stackoverflow.com/questions/58534925/eclipse-not-decompile-rt-jar-when-debugging-but-idea-does/58535553#58535553
手动方式:
可以先手动decompile出来,然后再添加
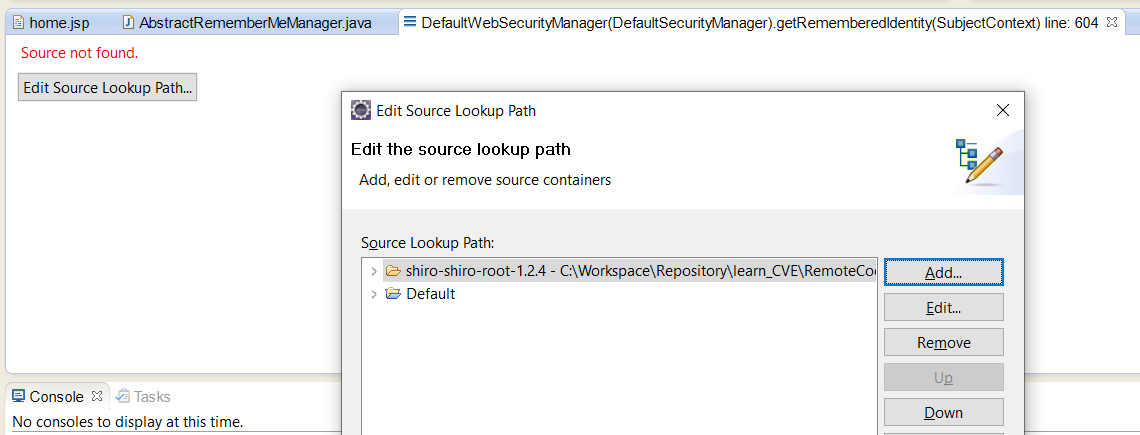 自动方式:
For eclipse install:
Enhanced Class Decompiler https://ecd-plugin.github.io/ecd/ or jd plugin http://java-decompiler.github.io/
Haven’t try another one Bytecode Visualizer https://www.crowdstrike.com/blog/native-java-bytecode-debugging-without-source-code/
For intellj idea, it’s auto;
自动方式:
For eclipse install:
Enhanced Class Decompiler https://ecd-plugin.github.io/ecd/ or jd plugin http://java-decompiler.github.io/
Haven’t try another one Bytecode Visualizer https://www.crowdstrike.com/blog/native-java-bytecode-debugging-without-source-code/
For intellj idea, it’s auto;
Run and Debug external jar without sourcecode
RUN external jar in eclipse: Program-> create -> Locatoin:jdk/java.exe Argument:-jar XXX.jar
DEBUG: But how to debug ? can try woring with jdb.exe https://docs.oracle.com/javase/7/docs/technotes/tools/windows/jdb.html https://stackoverflow.com/questions/19843096/how-to-debug-a-java-application-without-access-to-the-source-code/58555431#58555431
run jar with: java -jar -agentlib:jdwp=transport=dt_shmem,address=jdbconn,server=y,suspend=n C:\Workspace\EclipseWorkspace\test.jar then debug in eclipse: Program-> create -> Locatoin:jdk/jdb.exe Argument:-attach jdbconn
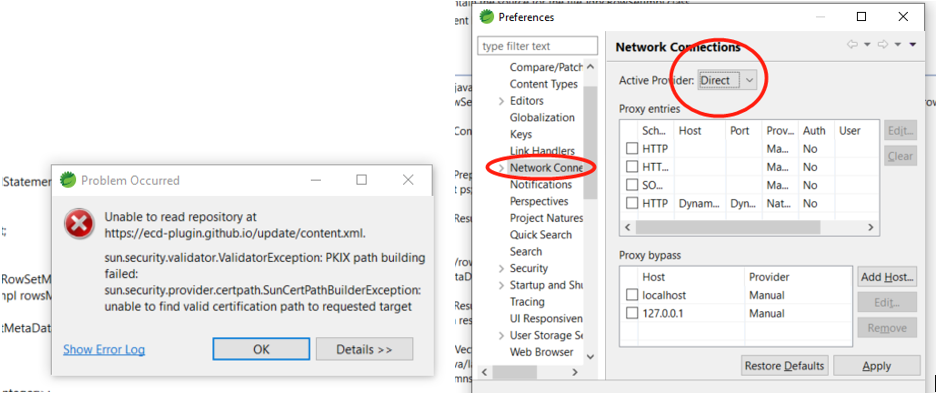
# 1.2.5 其他
Install new software/ marketpalce 如果报错
# 2.JAVA Language
https://github.com/lyhistory/java-learn?organization=lyhistory&organization=lyhistory https://github.com/lyhistory/learn_coding
Java HashMap doesn't use MD5 for calculating hash codes primarily because MD5 (Message Digest Algorithm 5) is not suitable for generating hash codes in the context of a HashMap. Here are the key reasons why:
Size of Output: MD5 produces a 128-bit hash value (16 bytes). In contrast, Java HashMap uses a 32-bit integer to store hash codes (int). Storing a 128-bit hash value for each key would be inefficient in terms of memory usage and processing overhead.
Performance: MD5 is designed for cryptographic purposes, where collision resistance and security are critical. It involves more computational overhead compared to simpler hash functions designed for rapid computation of non-cryptographic hash codes, which is what HashMap requires.
Collision Handling: While MD5 is designed to minimize collisions in cryptographic contexts, HashMap uses hash codes to distribute keys across buckets in a hash table. The hash function used by HashMap should ideally distribute hash codes evenly across the available buckets to minimize collisions specific to the data structure's needs.
Hash Distribution: Java's HashMap relies on the distribution of hash codes to evenly distribute entries across buckets in the hash table. MD5's distribution might not be optimal for this purpose, potentially leading to clustering of hash collisions in specific buckets rather than distributing them evenly.
Instead of MD5, Java HashMap uses a combination of shifting and bitwise XOR operations to compute the hash code for keys. This approach is designed to provide a good distribution of hash codes across the range of possible int values and is optimized for performance and memory efficiency within the context of a hash table implementation.
In summary, while MD5 is a robust cryptographic hash function, it is not suitable for the specific requirements of a HashMap in terms of size, performance, collision handling, and distribution of hash codes across buckets in a hash table.
# 2.1 Misconception
Java always passes arguments by value, NOT by reference. https://stackoverflow.com/questions/40480/is-java-pass-by-reference-or-pass-by-value/12429953#12429953
JAVA版本:J2SE vs J2ME vs J2EE https://www.geeksforgeeks.org/j2se-vs-j2me-vs-j2ee-whats-the-difference/
# 内部类 外部类
在java内部类里,我们是能直接访问外部类的变量的。如下面例子所述:
public class OutterClass{
  private String outterStr;

  class InnerClass{
    public void innerMethod(){
      System.out.printf(outterStr);
    }
  }
}
外部类OutterClass 的属性能够被InnerClass直接使用,从java语法上说,InnerClass在OutterClass的类里,outterStr这个外部类属性对InnerClass是可见的,所以InnerClass内部类能够被OutterClass直接使用,是没问题的。但是在虚拟机编译成字节码的时候,OutterClass这个外部类和InnerClass这个内部类是分别被编译成两个字节码文件的。也就是单从编译后的文件来看,OutterClass和InnerClass是两个独立的类,那么InnerClass是如何直接访问OutterClass属性的?如果直接访问,岂不是破坏了权限控制的原则?
答案就在于虚拟机在生成InnerClass字节码和OutterClass字节码文件的时候做了一点手脚。
将InnerClass字节码文件进行反编译之后,它的java代码不再是我们之前看到的那样,而是类似于:
class InnerClass{
  private OutterClass outterClass;
  InnerClass(OutterClass outterClass){
    this.outterClass = outterClass;
  }
}
也就是说,虚拟机会在InnerClass的构造函数中在增加一个外部类对象的参数,将这个对象赋值给自己的成员变量。接下来InnerClass如何访问外部类的对象呢?答案在于OutterClass反编译后的文件。
public class OutterClass{
  private String outterStr;
  public String getOutterStr$1(){
    return outterStr;
  }
}
也就是说虚拟机专门在OutterClass这个类里增加一个outterStr成员的方法,以方便InnerClass去获取这个变量。也就是说,InnerClass类变成了如下面貌:
class InnerClass{
  private OutterClass outterClass;
  InnerClass(OutterClass outterClass){
    this.outterClass = outterClass;
  }
  public void innerMethod(){
    System.out.printf(outterClass.getOutterStr$1());
  }
}
于是即便是两个独立的字节码文件,InnerClass访问OutterClass的成员也变得顺理成章了。 由此我们也可以从中感受到虚拟机开发人员设计的巧妙,既不违反顶层语言的语法规则,又不违反自己中间代码的原则。
# POJO VS Java Beans (opens new window)**
POJO: Plain-Old-Java-Object Java Beans: The only difference between both the classes is Java make java beans objects serialized so that the state of a bean class could be preserved in case required. So due to this a Java Bean class must either implements Serializable or Externalizable interface.
List: Design Note – There is no setter method for a List property. The getter returns the List by reference. An item can be added to the List returned by the getter method using an appropriate method defined on java.util.List. Rationale for this design in JAXB 1.0 was to enable the implementation to wrapper the list and be able to perform checks as content was added or removed from the List.
DateTime: SimpleDateFormat https://dzone.com/articles/java-simpledateformat-guide 1384171247000+0800 https://blog.csdn.net/mingtianhaiyouwo/article/details/51336576 http://tutorials.jenkov.com/java-date-time/index.html#java-7-date-time-api
localdate calendar https://stackoverflow.com/questions/21242110/convert-java-util-date-to-java-time-localdate https://beginnersbook.com/2017/10/java-8-calculate-days-between-two-dates/ https://www.mkyong.com/java/java-how-to-add-days-to-current-date/
Number scale precision https://www.baeldung.com/java-round-decimal-number
SortedDictionary treemap https://stackoverflow.com/questions/4621464/whats-the-equivalent-to-a-net-sorteddictionary-in-java
java parameter default value https://stackoverflow.com/questions/997482/does-java-support-default-parameter-values
Java8 lambda expression, functional programming https://rodrigouchoa.wordpress.com/2014/09/10/java-8-lambda-expressions-tutorial/
Stream Distinct https://howtodoinjava.com/java8/java-stream-distinct-examples/ https://stackoverflow.com/questions/42578210/filter-stream-with-values-from-another-stream
Map<String, Test> anotherDataMap = dataMap.entrySet().stream().filter(entry -> entry.getValue().getType() == "1")
.collect(Collectors.toMap(
		e->{return String.format("%s_ddd", e.getValue().getFoo()));},
		e->{
			Test test = new Test();
			test.setFoo(e.getValue().getFoo())
			return test;
		}));
future https://www.baeldung.com/java-future
Java serialization algorithm https://www.javaworld.com/article/2072752/the-java-serialization-algorithm-revealed.html
java开发之线程(守护线程daemon和用户线程User Thread) https://blog.csdn.net/mine_song/article/details/72651388
父线程捕获子线程异常需要利用executorservice
# JAXB
xjc -XautoNameResolution -p com.lyhistory.test test.xsd
Xjc is a tool of JDK JAXB2: Xsd to class Failed with maven plugin generation, work around by using external xjc tool JAXB Architecture https://docs.oracle.com/cd/E19316-01/819-3669/bnazf/index.html
Marshalling https://www.javatpoint.com/jaxb-marshalling-example
https://github.com/highsource/jaxb2-basics/wiki/Using-JAXB2-Basics-Plugins http://websystique.com/java/jaxb/jaxb-codegeneration-maven-example/
?# issues: package org.jvnet.jaxb2_commons.lang does not exist https://stackoverflow.com/questions/16833340/jaxb-equals-and-hashcode-gives-error
?# issues: https://github.com/highsource/jaxb2-basics/issues/7 Solved by using external tools generation
GENERATED USING EXTERNAL TOOLS: jaxb-ri-2.3.1 https://javaee.github.io/jaxb-v2/ https://docs.oracle.com/javase/8/docs/technotes/tools/unix/xjc.html https://thoughts-on-java.org/generate-your-jaxb-classes-in-second/
?#There's no ObjectFactory with an @XmlElementDecl JAXBContext jaxbContextForSpan = JAXBContext.newInstance("com.lyhistory.test");
https://stackoverflow.com/questions/12074317/theres-no-objectfactory-with-an-xmlelementdecl
?#customize boolean to 0 1 Customizing JAXB Bindings https://docs.oracle.com/javase/tutorial/jaxb/intro/custom.html
xjc -XautoNameResolution -p com.lyhistory.test -extension -b jaxb-bindings.xjb
# exceptions
# 2.3 JAVA ADVANCE
java魔术手法: demo參考 (opens new window) cglib增强类+代理 元注解
# 2.3.1 Concurrency handling
method 1:Multi-thread
There is a new computeIfAbsent API introduced in Java 8. The javadocs for ConcurrentHashMap's impelementation of it state:
The entire method invocation is performed atomically, so the function is applied at most once per key. Some attempted update operations on this map by other threads may be blocked while computation is in progress, so the computation should be short and simple, and must not attempt to update any other mappings of this map. Conditional thread safe https://www.ibm.com/developerworks/java/library/j-jtp07233/index.html
Forkjoinpool
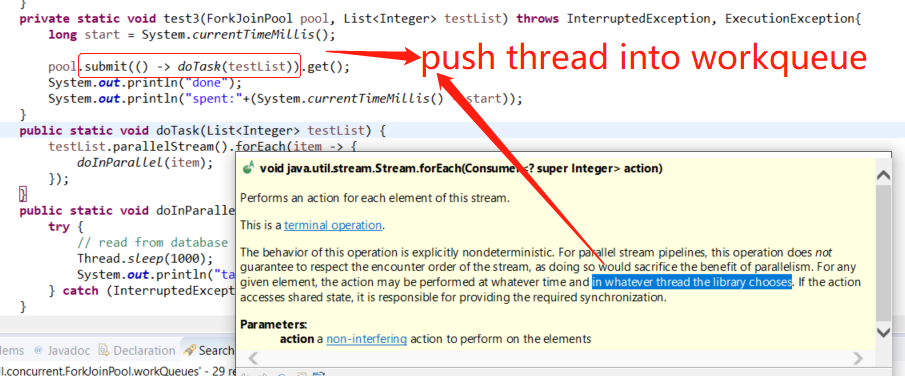
ParallelStream的实现原理——ForkJoin线程池框架 http://tangxiaolin.com/learn/show?id=402881d2651d1bdf01651e51d8f80001 Java 并发编程笔记:如何使用 ForkJoinPool 以及原理 http://blog.dyngr.com/blog/2016/09/15/java-forkjoinpool-internals/ http://blog.nigol.cz/java-8-dont-be-afraid-of-streams.html https://www.cnblogs.com/shijiaqi1066/p/4631466.html
聊聊并发(八)——Fork/Join 框架介绍 https://www.infoq.cn/article/fork-join-introduction/ 分析jdk-1.8-ForkJoinPool实现原理 https://www.jianshu.com/p/44b09f52a225 https://blog.csdn.net/dweizhao/article/details/73480025
method 2: Single thread queue - Disruptor
# 2.3.2 JNI
Interface Definition Language IDL https://www.ejbtutorial.com/corba/interface-definition-language-idl-hello-world-tutorial-with-java-and-c
https://www.baeldung.com/jni https://www.jianshu.com/p/c708c2602db0 https://www3.ntu.edu.sg/home/ehchua/programming/java/JavaNativeInterface.html
采坑: 1)maven打包dll和so的时候会默认更改文件,所以加了pom过滤,我是直接用获取路径,动态添加路径到system path,再loadlibrary Can't load this .dll (machine code=0xbd) on a AMD 64-bit platform
https://stackoverflow.com/questions/38244970/running-my-generated-jar-yields-cant-load-this-dll-machine-code-0xbd-on-a https://stackoverflow.com/questions/19500458/maven-resource-binary-changes-file-size-after-build/24282250#24282250 https://blog.csdn.net/azrael6619/article/details/83761225 https://stackoverflow.com/questions/1403788/java-lang-unsatisfiedlinkerror-no-dll-in-java-library-path https://www.imooc.com/article/14702
2)jni调用的时候有个大坑,native函数所在的class包名必须跟c++那边的包名一致,否则会报unsatifisfield错误 https://blog.csdn.net/xiaoyaoerxing/article/details/80461015 https://www.cnblogs.com/harrymore/p/10570284.html
3)java, c++联调debug https://www.cnblogs.com/yejg1212/archive/2013/06/07/3125392.html C++ ide attach javaw
# 2.3.3 others
Functional reference Functional Interfaces https://www.baeldung.com/java-8-functional-interfaces https://www.codementor.io/eh3rrera/using-java-8-method-reference-du10866vx https://www.theserverside.com/blog/Coffee-Talk-Java-News-Stories-and-Opinions/How-to-use-Javas-functional-Consumer-interface-example
1)同步锁信号 synchronized(this), wati, notify, notifyall
- 事件通信 Publish Events public interface ApplicationContext extends EnvironmentCapable, ListableBeanFactory, HierarchicalBeanFactory, MessageSource, ApplicationEventPublisher, ResourcePatternResolver {
注解方法@EventListener并且其所在类也必须是@Component注解,或者直接extends ApplicationEvent
# 3.JAVA framework
java有众多的框架,想要理清楚就要清楚其历史和基本框架,比如,
springmvc基于内置tomcat,内置tomcat基于servlet规范实现,servlet支持多种协议,但是通常tomcat只是支持http协议,servlet从3.0之前的BIO发展为之后的NIO支持,而tomcat8又引入了高性能的APR;
从JAVA 1.4起,JDK支持NIO(New IO, 采用os non blocking的工作方式), 使用JDK原生的API开发NIO比较复杂,需要理解Selector、Channel、ByteBuffer三大组件,所以有了mina,netty的封装,很多产品dubbo、spark、zookeeper、elasticSearch都使用netty作为底层通信IO框架支持;
重点参考我的另一篇笔记 IO发展历史 BIO-NIO-Netty详解
# 3.1 Reactive and Streaming Framework
(java8 stream is only for Collections, means that the input is fixed collections, not realtime stream, after processed, the input cannot be changed ) Reactive framework: Akka, Vert.x, Java 9 “Flow” API, spring flux
通常,我们写服务器处理模型的程序时,有以下几种模型:
(1)每收到一个请求,创建一个新的进程,来处理该请求; (2)每收到一个请求,创建一个新的线程,来处理该请求; (3)每收到一个请求,放入一个事件列表,让主进程通过非阻塞I/O方式来处理请求
上面的几种方式,各有千秋, 第(1)中方法,由于创建新的进程的开销比较大,所以,会导致服务器性能比较差,但实现比较简单。 第(2)种方式,由于要涉及到线程的同步,有可能会面临死锁等问题。 第(3)种方式,在写应用程序代码时,逻辑比前面两种都复杂。 综合考虑各方面因素,一般普遍认为第(3)种方式是大多数网络服务器采用的方式 https://blog.csdn.net/m0_37886429/article/details/78292300
Non-blocking React 对应于blocking servlet,举例餐厅比喻web应用,传统的blocking做法是,有个http pool(.net的http handler或java的servlet),pool就是一个工作组,工作组里的每个服务员都是处理线程,当一个客人即web request进来时,餐厅立马分配一个服务员给这个客户,全程服务,直到客人离开(http response或者websocket断开连接),整个过程中这个服务员是被独占的,所以是阻塞式;而假设换一种做法,类似于nodejs和netty的event loop单线程处理方式,餐厅只请一个服务员,第一个客人过来之后,服务员过来安排座位,记下菜单,然后发送给后厨,然后同时第二个客人来了,服务员立马过去做同样的事情,因为是非阻塞式的,在后厨做好饭,服务员端给第一个客人之前,服务员可以利用空余时间去服务其他客人,比如刚才的场景,或者其他服务员要加餐等等,这就是所谓的java响应式编程; 可能有人会疑惑具体什么机制让单线程可以处理并发,很多人之前还以为只有多线程才能产生并发,换个问题:单核时代是如何实现的并发,并发是个宏观的概念,单核微观上同一个时刻只可能处理一个task,只是其他线程在排队等待,然后分片迅速切换,所以nodejs的单线程也是一样的办法,进行排队;再进一步上升到架构角度看,架构中采用message queue的方式也是一种排队处理的扩展方式,下游可以增加多个消费者; 这里多引入一个问题,如果是多线程,还可以通过增加线程池中服务员的数量来扩展,既然是单线程,那么怎么扩展scale呢?
一种方法就是nodejs的新feature cluster node.js scalability problems and how to solve them https://softwareontheroad.com/nodejs-scalability-issues/#resources Good practices for high-performance and scalable Node.js applications https://medium.com/iquii/good-practices-for-high-performance-and-scalable-node-js-applications-part-1-3-bb06b6204197
用nodejs的朋友都有了解,node是单线程的,也就是说跑在8核CPU上,只能使用一个核的算力。 单线程一直是node的一个诟病,但随着0.6版本中引入cluster之后,这个情况则得到了改变,开发人员可以依靠cluster很轻松的将自己的Node服务器扩展为多线程服务器了。 另一种从微服务层面找到瓶颈,https://blog.risingstack.com/nodejs-microservices-scaling-case-study/
先上一张大图:
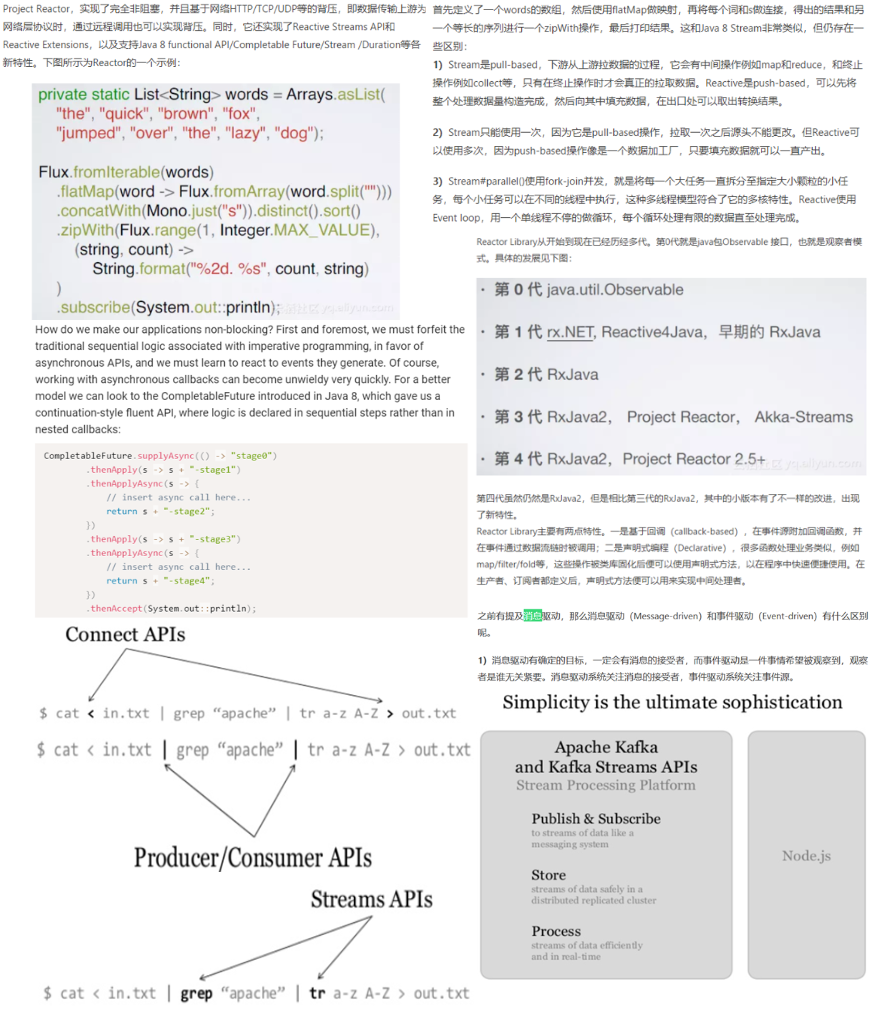
图开始是对比Java reactive API VS java8 stream,图片下部分是印证下面的内容:
Streaming framework: apache spark,storm,kafka stream等,感觉reactive响应式编程也是处理stream,有什么分别呢,reactive基本是request response的模式,而streaming最终是要做collection reduce合并计算的
People tend to confuse between streaming frameworks and reactive programmings frameworks, because they both deal with high throughput of real-time events. The different is with what they do after consuming the events: Reactive systems are used to provide a quick action for each event. Streaming systems are used to collect the data from the events and store it in files or databases after aggregations and other calculations.
pipeline,method chaining,fluent Interface 我们可以看到从synchronous到asynchronous转换比较明显就是用callback,但是如果步骤过多就会出现类似这样的嵌套写法 process1().done( callback() ) 然后callback().done( anothercallback());为了解决这个问题就出现了fluent interface,即 process1().done( callback() ) 然后callback().done( anothercallback());为了解决这个问题就出现了fluent interface,即 process1().then(process2())
Streaming里面也是很多这种写法 他们的背后实现方法是什么我暂时不知道,也许是pub sub的观察着模式,比如前面的reactive响应式编程的发展路线:
前面提到非阻塞式基本都是采用nodejs的event loop单线程思想,而event loop就是基于观察者模式: https://medium.com/@brianjleeofcl/what-they-probably-didnt-teach-you-pt-1-node-js-event-emitters-observer-pattern-7dd02b67c061 当然现在第四代的Reactor Library未必是用观察者模式,因为观察者模式是事件驱动,而响应式编程是消息驱动(比如抓获的异常也是消息)
从更高的角度来看,这些都可以称作是pipeline,比如有这么一篇文章《Kafka streams - From pub/sub to a complete stream processing platform》,kafka api and unix analogy cat < in.txt | grep “apache” | tr a-z A-Z > out.txt
# 3.2 RPC / RMI / JMS / WebService(Rest/SOAP)
# 3.2.1 Overview
总体来说,WebService通常是采用HTTP通信,而其他则通常是采用TCP通信,性能上当然是TCP更佳,不过TCP是面向流的,需要处理拆包粘包等底层问题,具体可以参考network网络基础
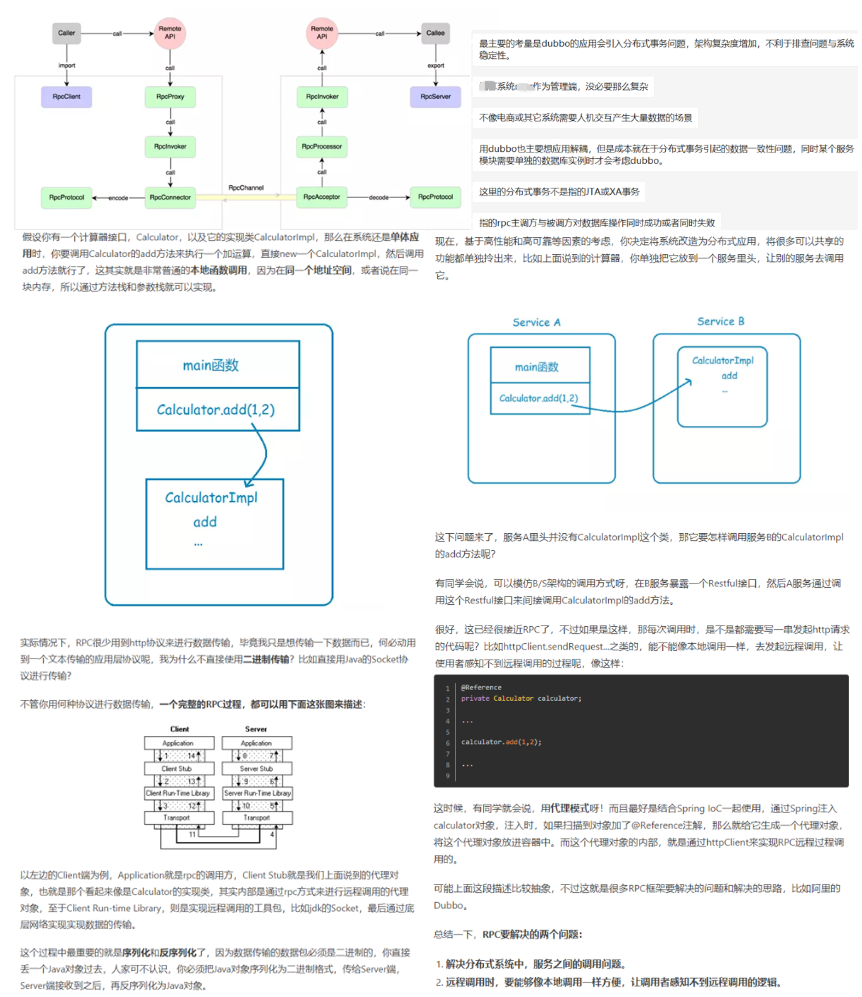
Nowadays we use general purpose applications or libraries to communicate with each other. For example, we often use an HTTP client library to retrieve information from a web server and to invoke a remote procedure call via web services. However, a general purpose protocol or its implementation sometimes does not scale very well. It is like how we don't use a general purpose HTTP server to exchange huge files, e-mail messages, and near-realtime messages such as financial information and multiplayer game data. What's required is a highly optimized protocol implementation that is dedicated to a special purpose. For example, you might want to implement an HTTP server that is optimized for AJAX-based chat application, media streaming, or large file transfer. You could even want to design and implement a whole new protocol that is precisely tailored to your need. Another inevitable case is when you have to deal with a legacy proprietary protocol to ensure the interoperability with an old system. What matters in this case is how quickly we can implement that protocol while not sacrificing the stability and performance of the resulting application. https://netty.io/wiki/user-guide-for-4.x.html RPC is a protocol defined in https://tools.ietf.org/html/rfc1831 , netty is one of the non-blocking io implementation of RPC, and also sometimes refer as an architecture style (getUserById?id=1) when comparing with rest style(get /cat/1) RMI is a protocol and also a low-level RPC implementation, “normally for server to server communication or inter micro services communication, service A invoke methods on service B just as its own function call”; dubbo is an advanced implementation on top of RMI and other protocols, is for distributed services;
WebServices is also a specific implementation of RPC using HTTP protocol, it is also called RPC-Style web service, and one more style is Restful style web service. Compare: RMI is more performance better than web service, because RMI using tcp while web service using http; https://www.jianshu.com/p/5b90a4e70783
RPC vs Restful, RPC vs RMI, Rest vs Restful:
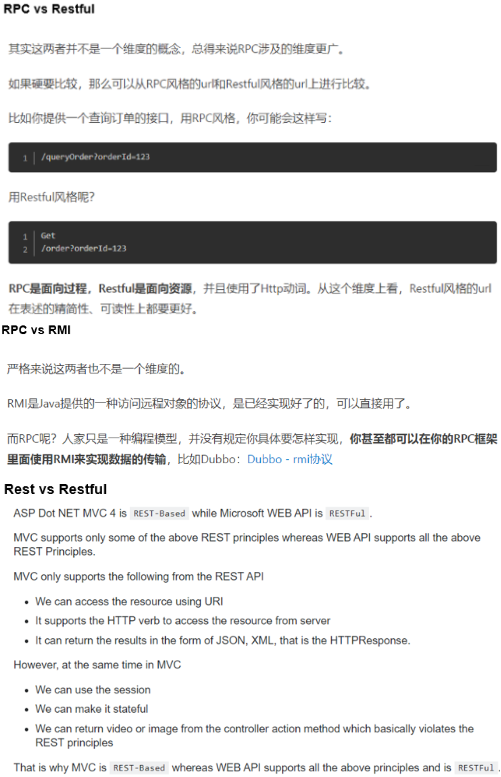
rest vs soap https://www.soapui.org/learn/api/soap-vs-rest-api.html
# 3.2.2 RPC
RPC框架有很多,比较知名的如阿里的Dubbo、google的gRPC、Go语言的rpcx、Apache的thrift。当然了,还有Spring Cloud,不过对于Spring Cloud来说,RPC只是它的一个功能模块,还有netty(zookeeper使用netty),alipay基于netty的SOFA RPC 技术点: ● 元注解定义 ● 网络IO,BIO[NIO](https://www.javatpoint.com/java-nio-vs-input-output)\AIO,Socket编程,HTTP通信,一个就行。 ● 动态代理,JDK或者Cglib的动态代理。 ● 反射 ● 序列化、反序列化,JDK序列化,JSON、Hessian、Kryo、ProtoBuffer、ProtoStuff、Fst知道一个就行。 ● 网络通信 ● 编解码 ● 服务发现和注册 ● 心跳与链路检测
基于Netty实现 https://github.com/lyhistory/learn_coding/tree/master/java/Components/netty-demo https://netty.io/wiki/user-guide-for-4.x.html https://github.com/luxiaoxun/NettyRpc/tree/b811cabebcf20a2551f4ffa746de68ba1e7ebafb https://juejin.im/post/5c6d7640f265da2de80f5e9c#heading-4
SofaBolt (opens new window)是基于netty进一步封装,更容易使用;
然后SOFA RPC这个微服务中间件采用了SofaBolt基础组件,蚂蚁通信框架实践 (opens new window)
流程 ● Server端启动进行服务注册到zookeeper; ● Client端启动获取zookeeper的服务注册信息,定期更新; ● Client以本地调用方式调用服务(使用接口,例如helloService.sayHi("world")); ● Client通过RpcProxy会使用对应的服务名生成动态代理相关类,而动态代理类会将请求的对象中的方法、参数等组装成能够进行网络传输的消息体RpcRequest; ● Client通过一些的负载均衡方式确定向某台Server发送编码(RpcEncoder)过后的请求(netty实现) ● Server收到请求进行解码(RpcDecoder),通过反射(cglib的FastMethod实现)会进行本地的服务执行 ● Server端writeAndFlush()将RpcResponse返回; ● Clinet将返回的结果会进行解码,得到最终结果。
# 3.2.3 RMI
RMI VS RPC: Java RMI (Remote Method Invocation)- 远程方法调用,能够让客户端像使用本地调用一样调用服务端 Java 虚拟机中的对象方法。RMI 是面向对象语言领域对 RPC (Remote Procedure Call)的完善,用户无需依靠 IDL 的帮助来完成分布式调用,而是通过依赖接口这种更简单自然的方式。 RPC and RMI are the mechanisms which enable a client to invoke the procedure or method from the server through establishing communication between client and server. The common difference between RPC and RMI is that RPC only supports procedural programming whereas RMI supports object-oriented programming.
Getting Started Using Java™ RMI https://docs.oracle.com/javase/7/docs/technotes/guides/rmi/hello/hello-world.html
第一步 全手动本地发布
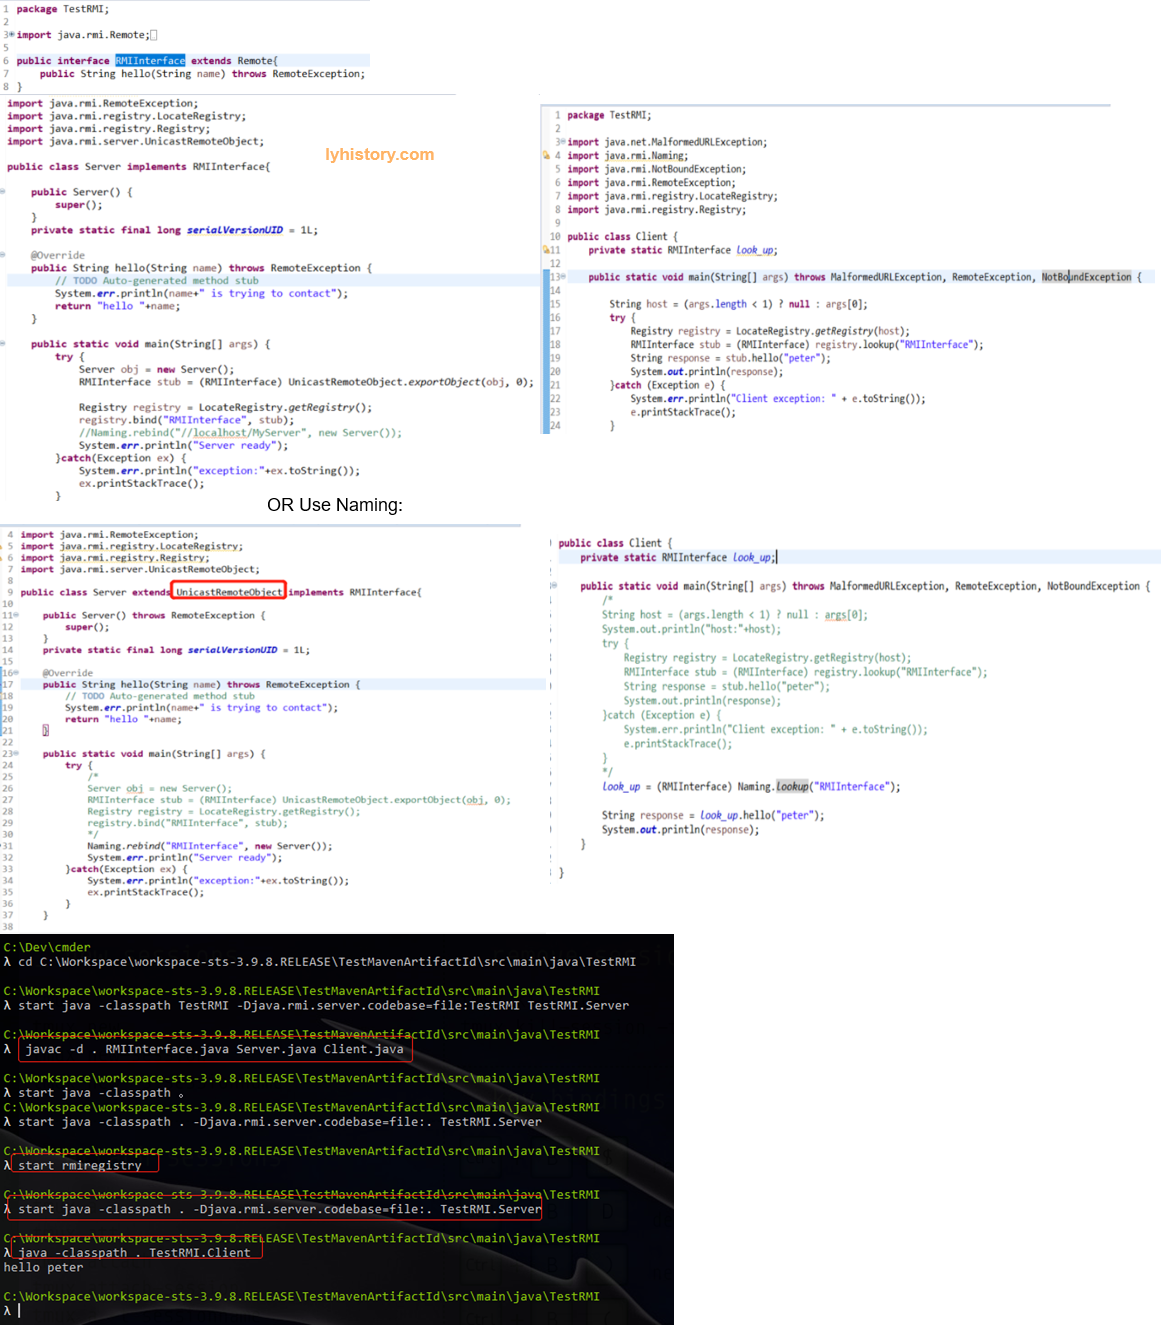
Difference between classes java.rmi.registry.Registry and java.rmi.Naming https://stackoverflow.com/questions/3630329/difference-between-classes-java-rmi-registry-registry-and-java-rmi-naming 需要手动编译interface server 到当前目录下面,然后手动运行时需要指定classpath,需要手动启动rmiregistry
第二步 通过JNDI尝试远程发布并自动启动rmiregistry
RMI VS WebService
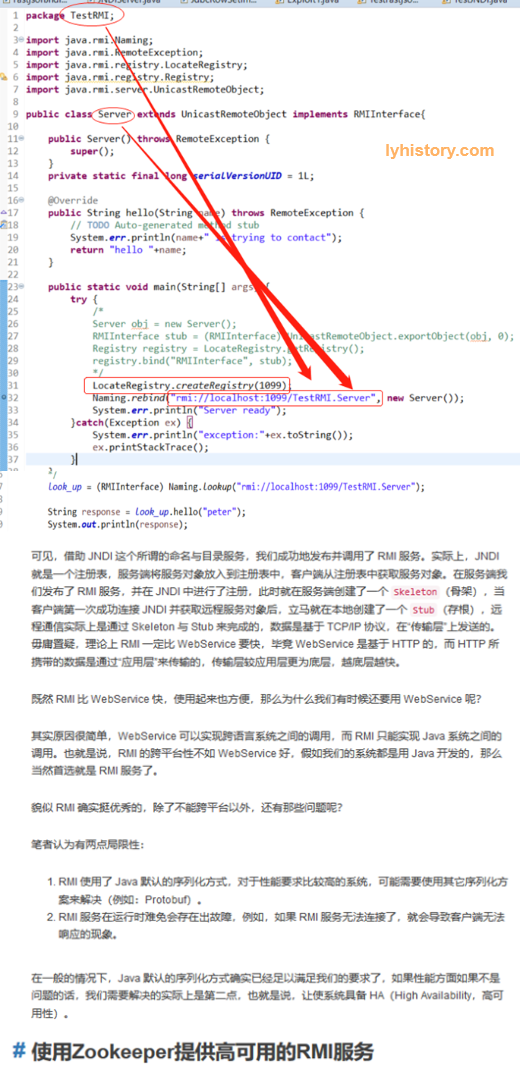
第三步 基于zookeeper发布 https://my.oschina.net/huangyong/blog/345164 http://wanglizhi.github.io/2016/06/12/RMI/
注意:我们首先需要使用 ZooKeeper 的客户端工具创建一个持久性 ZNode,名为“/registry”,该节点是不存放任何数据的,可使用如下命令: create /registry null
# 3.2.4 Dubbo
RMI比较原始 Dependency http://jm.taobao.org/2018/06/13/%E5%BA%94%E7%94%A8/
https://github.com/apache/dubbo/blob/master/dubbo-dependencies-bom/pom.xml Admin ui https://github.com/apache/dubbo-admin https://dubbo.apache.org/en-us/docs/admin/introduction.html
Dubbo with multicast Multicast Dubbo 支持多种协议,采用的协议在网络层级不同,performance https://dubbo.apache.org/en-us/docs/user/perf-test.html
# 3.3.JNA
Native access https://github.com/java-native-access/jna
外挂钩子
# 4.Package Management
# 4.1 Gradle
todo Refer to Project:alpha-wallet
# 4.2 MAVEN
# 4.2.1 Install
eclipse maven path: Preferences->Maven->Installations
manual: http://maven.apache.org/download.cgi https://www.mkyong.com/maven/how-to-install-maven-in-windows/ https://maven.apache.org/guides/getting-started/maven-in-five-minutes.html
MAVEN_HOME:C:\dev\maven\apache-maven-3.6.1\bin
JAVA_HOME:C:\Java\jdk1.6.0
PATH=...%MAVEN_HOME/bin;%JAVA_HOME%/bin
自定义startup script: mvn.bat/mvn.cmd
@REM ==== START VALIDATION ====
set JAVA_HOME=C:\PROGRA~1\Java\jdk1.6.0_45
if not "%JAVA_HOME%" == "" goto OkJHome

echo.
echo ERROR: JAVA_HOME not found in your environment.
echo Please set the JAVA_HOME variable in your environment to match the
echo location of your Java installation
echo.
goto error

:OkJHome
if exist "%JAVA_HOME%\bin\java.exe" goto chkMHome
auto: choco install maven
特殊情况下比如研究测试旧版本的漏洞,需要降级maven和对应的jdk,可以利用Maven toolchain https://maven.apache.org/guides/mini/guide-using-toolchains.html 在.m2/resposity下面建立toolchains.xml
<?xml version="1.0" encoding="UTF8"?>
<toolchains>
  <toolchain>
    <type>jdk</type>
    <provides>
      <version>1.6</version>
      <vendor>sun</vendor>
    </provides>
    <configuration>
       <jdkHome>C:\Program Files\Java\jdk1.6.0_45</jdkHome>
    </configuration>
  </toolchain>
</toolchains>
Generate project mvn archetype:generate https://kafka.apache.org/22/documentation/streams/tutorial https://stackoverflow.com/questions/31720328/maven-not-downloading-dependencies-in-eclipse https://stackoverflow.com/questions/19655184/no-compiler-is-provided-in-this-environment-perhaps-you-are-running-on-a-jre-ra
Build a Java app with Maven https://jenkins.io/doc/tutorials/build-a-java-app-with-maven/
# 4.2.2 POM / Dependency Mechanism
- Do not attempt to import a POM that is defined in a submodule of the current POM. Attempting to do that will result in the build failing since it won't be able to locate the POM.
- Never declare the POM importing a POM as the parent (or grandparent, etc) of the target POM. There is no way to resolve the circularity and an exception will be thrown.
- When referring to artifacts whose POMs have transitive dependencies, the project needs to specify versions of those artifacts as managed dependencies. Not doing so results in a build failure since the artifact may not have a version specified. (This should be considered a best practice in any case as it keeps the versions of artifacts from changing from one build to the next).
# maven profiles VS spring/springboot profiles
Maven profiles would provide a build-time solution, while SpringFramework profiles would provide a runtime alternative. I think this is the first question one may ask himself: if he wants to have a single package that can be deployed in different environments, or if he wants the build tool to provide different packages according to the destination environment.
实际情况更复杂,比如 maven profiles可以用来激活 spring profiles
Spring and Springboot profiles tutorial (opens new window)
Springboot profiles (opens new window)
Maven profiles tutorial (opens new window)
# Dependency mediation/Transitive Dependencies
  A
  ├── B
  │   └── C
  │       └── D 2.0
  └── E
      └── D 1.0
In text, dependencies for A, B, and C are defined as A -> B -> C -> D 2.0 and A -> E -> D 1.0, then D 1.0 will be used when building A because the path from A to D through E is shorter. You could explicitly add a dependency to D 2.0 in A to force the use of D 2.0, as shown here:
  A
  ├── B
  │   └── C
  │       └── D 2.0
  ├── E
  │   └── D 1.0
  │
  └── D 2.0
Suggestion: 最好指定需要的依赖,而不是使用隐式引用,原因:
Although transitive dependencies can implicitly include desired dependencies, it is a good practice to explicitly specify the dependencies your source code uses directly. This best practice proves its value especially when the dependencies of your project change their dependencies.
For example, assume that your project A specifies a dependency on another project B, and project B specifies a dependency on project C. If you are directly using components in project C, and you don't specify project C in your project A, it may cause build failure when project B suddenly updates/removes its dependency on project C.
Another reason to directly specify dependencies is that it provides better documentation for your project: one can learn more information by just reading the POM file in your project, or by executing mvn dependency:tree -Dverbose
# Excluded dependencies
If project X depends on project Y, and project Y depends on project Z, the owner of project X can explicitly exclude project Z as a dependency, using the "exclusion" element.
If project Y depends on project Z, the owner of project Y can mark project Z as an optional dependency, using the "optional" element. When project X depends on project Y, X will depend only on Y and not on Y's optional dependency Z. The owner of project X may then explicitly add a dependency on Z, at her option. (It may be helpful to think of optional dependencies as "excluded by default.")
# Dependency Scope
compile/provided/runtime/test/system/import
# Dependency Management
The dependency management section is a mechanism for centralizing dependency information
Project A:
    <project>
      ...
      <dependencies>
        <dependency>
          <groupId>group-a</groupId>
          <artifactId>artifact-a</artifactId>
          <version>1.0</version>
          <exclusions>
            <exclusion>
              <groupId>group-c</groupId>
              <artifactId>excluded-artifact</artifactId>
            </exclusion>
          </exclusions>
        </dependency>
        <dependency>
          <groupId>group-a</groupId>
          <artifactId>artifact-b</artifactId>
          <version>1.0</version>
          <type>bar</type>
          <scope>runtime</scope>
        </dependency>
      </dependencies>
    </project>
Project B:
    <project>
      ...
      <dependencies>
        <dependency>
          <groupId>group-c</groupId>
          <artifactId>artifact-b</artifactId>
          <version>1.0</version>
          <type>war</type>
          <scope>runtime</scope>
        </dependency>
        <dependency>
          <groupId>group-a</groupId>
          <artifactId>artifact-b</artifactId>
          <version>1.0</version>
          <type>bar</type>
          <scope>runtime</scope>
        </dependency>
      </dependencies>
    </project>
=>
Parent:
    <project>
      ...
      <dependencyManagement>
        <dependencies>
          <dependency>
            <groupId>group-a</groupId>
            <artifactId>artifact-a</artifactId>
            <version>1.0</version>

            <exclusions>
              <exclusion>
                <groupId>group-c</groupId>
                <artifactId>excluded-artifact</artifactId>
              </exclusion>
            </exclusions>

          </dependency>

          <dependency>
            <groupId>group-c</groupId>
            <artifactId>artifact-b</artifactId>
            <version>1.0</version>
            <type>war</type>
            <scope>runtime</scope>
          </dependency>

          <dependency>
            <groupId>group-a</groupId>
            <artifactId>artifact-b</artifactId>
            <version>1.0</version>
            <type>bar</type>
            <scope>runtime</scope>
          </dependency>
        </dependencies>
      </dependencyManagement>
    </project>

Project A:
    <project>
      ...
      <dependencies>
        <dependency>
          <groupId>group-a</groupId>
          <artifactId>artifact-a</artifactId>
        </dependency>

        <dependency>
          <groupId>group-a</groupId>
          <artifactId>artifact-b</artifactId>
          <!-- This is not a jar dependency, so we must specify type. -->
          <type>bar</type>
        </dependency>
      </dependencies>
    </project>
Project B:
    <project>
      ...
      <dependencies>
        <dependency>
          <groupId>group-c</groupId>
          <artifactId>artifact-b</artifactId>
          <!-- This is not a jar dependency, so we must specify type. -->
          <type>war</type>
        </dependency>

        <dependency>
          <groupId>group-a</groupId>
          <artifactId>artifact-b</artifactId>
          <!-- This is not a jar dependency, so we must specify type. -->
          <type>bar</type>
        </dependency>
      </dependencies>
    </project>
Very important use of the dependency management section is to control the versions of artifacts used in transitive dependencies
Project A:
    <project>
     <modelVersion>4.0.0</modelVersion>
     <groupId>maven</groupId>
     <artifactId>A</artifactId>
     <packaging>pom</packaging>
     <name>A</name>
     <version>1.0</version>
     <dependencyManagement>
       <dependencies>
         <dependency>
           <groupId>test</groupId>
           <artifactId>a</artifactId>
           <version>1.2</version>
         </dependency>
         <dependency>
           <groupId>test</groupId>
           <artifactId>b</artifactId>
           <version>1.0</version>
           <scope>compile</scope>
         </dependency>
         <dependency>
           <groupId>test</groupId>
           <artifactId>c</artifactId>
           <version>1.0</version>
           <scope>compile</scope>
         </dependency>
         <dependency>
           <groupId>test</groupId>
           <artifactId>d</artifactId>
           <version>1.2</version>
         </dependency>
       </dependencies>
     </dependencyManagement>
    </project>

Project B:
    <project>
      <parent>
        <artifactId>A</artifactId>
        <groupId>maven</groupId>
        <version>1.0</version>
      </parent>
      <modelVersion>4.0.0</modelVersion>
      <groupId>maven</groupId>
      <artifactId>B</artifactId>
      <packaging>pom</packaging>
      <name>B</name>
      <version>1.0</version>

      <dependencyManagement>
        <dependencies>
          <dependency>
            <groupId>test</groupId>
            <artifactId>d</artifactId>
            <version>1.0</version>
          </dependency>
        </dependencies>
      </dependencyManagement>

      <dependencies>
        <dependency>
          <groupId>test</groupId>
          <artifactId>a</artifactId>
          <version>1.0</version>
          <scope>runtime</scope>
        </dependency>
        <dependency>
          <groupId>test</groupId>
          <artifactId>c</artifactId>
          <scope>runtime</scope>
        </dependency>
      </dependencies>
    </project>

When maven is run on project B, version 1.0 of artifacts a, b, c, and d will be used regardless of the version specified in their POM:
1. a and c both are declared as dependencies of the project so version 1.0 is used due to dependency mediation. Both also have runtime scope since it is directly specified.
2. b is defined in B's parent's dependency management section and since dependency management takes precedence over dependency mediation for transitive dependencies, version 1.0 will be selected should it be referenced in a or c's POM. b will also have compile scope.
3. Finally, since d is specified in B's dependency management section, should d be a dependency (or transitive dependency) of a or c, version 1.0 will be chosen - again because dependency management takes precedence over dependency mediation and also because the current POM's declaration takes precedence over its parent's declaration
projects can import managed dependencies from other projects
    <project>
      <modelVersion>4.0.0</modelVersion>
      <groupId>maven</groupId>
      <artifactId>B</artifactId>
      <packaging>pom</packaging>
      <name>B</name>
      <version>1.0</version>

      <dependencyManagement>
        <dependencies>
          <dependency>
            <groupId>maven</groupId>
            <artifactId>A</artifactId>
            <version>1.0</version>
            <type>pom</type>
            <scope>import</scope>
          </dependency>
          <dependency>
            <groupId>test</groupId>
            <artifactId>d</artifactId>
            <version>1.0</version>
          </dependency>
        </dependencies>
      </dependencyManagement>

      <dependencies>
        <dependency>
          <groupId>test</groupId>
          <artifactId>a</artifactId>
          <version>1.0</version>
          <scope>runtime</scope>
        </dependency>
        <dependency>
          <groupId>test</groupId>
          <artifactId>c</artifactId>
          <scope>runtime</scope>
        </dependency>
      </dependencies>
    </project>

Assuming A is the POM defined in the preceding example, the end result would be the same. All of A's managed dependencies would be incorporated into B except for d since it is defined in this POM.

Project X:
    <project>
     <modelVersion>4.0.0</modelVersion>
     <groupId>maven</groupId>
     <artifactId>X</artifactId>
     <packaging>pom</packaging>
     <name>X</name>
     <version>1.0</version>

     <dependencyManagement>
       <dependencies>
         <dependency>
           <groupId>test</groupId>
           <artifactId>a</artifactId>
           <version>1.1</version>
         </dependency>
         <dependency>
           <groupId>test</groupId>
           <artifactId>b</artifactId>
           <version>1.0</version>
           <scope>compile</scope>
         </dependency>
       </dependencies>
     </dependencyManagement>
    </project>
Project Y:
    <project>
     <modelVersion>4.0.0</modelVersion>
     <groupId>maven</groupId>
     <artifactId>Y</artifactId>
     <packaging>pom</packaging>
     <name>Y</name>
     <version>1.0</version>

     <dependencyManagement>
       <dependencies>
         <dependency>
           <groupId>test</groupId>
           <artifactId>a</artifactId>
           <version>1.2</version>
         </dependency>
         <dependency>
           <groupId>test</groupId>
           <artifactId>c</artifactId>
           <version>1.0</version>
           <scope>compile</scope>
         </dependency>
       </dependencies>
     </dependencyManagement>
    </project>
Project Z:
    <project>
      <modelVersion>4.0.0</modelVersion>
      <groupId>maven</groupId>
      <artifactId>Z</artifactId>
      <packaging>pom</packaging>
      <name>Z</name>
      <version>1.0</version>

      <dependencyManagement>
        <dependencies>
          <dependency>
            <groupId>maven</groupId>
            <artifactId>X</artifactId>
            <version>1.0</version>
            <type>pom</type>
            <scope>import</scope>
          </dependency>
          <dependency>
            <groupId>maven</groupId>
            <artifactId>Y</artifactId>
            <version>1.0</version>
            <type>pom</type>
            <scope>import</scope>
          </dependency>
        </dependencies>
      </dependencyManagement>
    </project>

In the example above Z imports the managed dependencies from both X and Y. However, both X and Y contain dependency a. Here, version 1.1 of a would be used since X is declared first and a is not declared in Z's dependencyManagement.

This process is recursive. For example, if X imports another POM, Q, when Z is processed it will simply appear that all of Q's managed dependencies are defined in X.
Bill of Materials (BOM) POMs
Imports are most effective when used for defining a "library" of related artifacts that are generally part of a multiproject build. It is fairly common for one project to use one or more artifacts from these libraries. However, it has sometimes been difficult to keep the versions in the project using the artifacts in synch with the versions distributed in the library. The pattern below illustrates how a "bill of materials" (BOM) can be created for use by other projects.
The root of the project is the BOM POM. It defines the versions of  all the artifacts that will be created in the library. Other projects  that wish to use the library should import this POM into the  dependencyManagement section of their POM.

<project xmlns="http://maven.apache.org/POM/4.0.0" xmlns:xsi="http://www.w3.org/2001/XMLSchema-instance"
        xsi:schemaLocation="http://maven.apache.org/POM/4.0.0 http://maven.apache.org/xsd/maven-4.0.0.xsd">
      <modelVersion>4.0.0</modelVersion>
      <groupId>com.test</groupId>
      <artifactId>bom</artifactId>
      <version>1.0.0</version>
      <packaging>pom</packaging>
      <properties>
        <project1Version>1.0.0</project1Version>
        <project2Version>1.0.0</project2Version>
      </properties>

      <dependencyManagement>
        <dependencies>
          <dependency>
            <groupId>com.test</groupId>
            <artifactId>project1</artifactId>
            <version>${project1Version}</version>
          </dependency>
          <dependency>
            <groupId>com.test</groupId>
            <artifactId>project2</artifactId>
            <version>${project2Version}</version>
          </dependency>
        </dependencies>
      </dependencyManagement>

      <modules>
        <module>parent</module>
      </modules>
    </project>

The parent subproject has the BOM POM as its parent. It is a normal multiproject pom.
    <project xmlns="http://maven.apache.org/POM/4.0.0" xmlns:xsi="http://www.w3.org/2001/XMLSchema-instance"
         xsi:schemaLocation="http://maven.apache.org/POM/4.0.0 http://maven.apache.org/xsd/maven-4.0.0.xsd">
      <modelVersion>4.0.0</modelVersion>
      <parent>
        <groupId>com.test</groupId>
        <version>1.0.0</version>
        <artifactId>bom</artifactId>
      </parent>

      <groupId>com.test</groupId>
      <artifactId>parent</artifactId>
      <version>1.0.0</version>
      <packaging>pom</packaging>

      <dependencyManagement>
        <dependencies>
          <dependency>
            <groupId>log4j</groupId>
            <artifactId>log4j</artifactId>
            <version>1.2.12</version>
          </dependency>
          <dependency>
            <groupId>commons-logging</groupId>
            <artifactId>commons-logging</artifactId>
            <version>1.1.1</version>
          </dependency>
        </dependencies>
      </dependencyManagement>
      <modules>
        <module>project1</module>
        <module>project2</module>
      </modules>
    </project>

Next are the actual project POMs.
    <project xmlns="http://maven.apache.org/POM/4.0.0" xmlns:xsi="http://www.w3.org/2001/XMLSchema-instance"
         xsi:schemaLocation="http://maven.apache.org/POM/4.0.0 http://maven.apache.org/xsd/maven-4.0.0.xsd">
      <modelVersion>4.0.0</modelVersion>
      <parent>
        <groupId>com.test</groupId>
        <version>1.0.0</version>
        <artifactId>parent</artifactId>
      </parent>
      <groupId>com.test</groupId>
      <artifactId>project1</artifactId>
      <version>${project1Version}</version>
      <packaging>jar</packaging>

      <dependencies>
        <dependency>
          <groupId>log4j</groupId>
          <artifactId>log4j</artifactId>
        </dependency>
      </dependencies>
    </project>

    <project xmlns="http://maven.apache.org/POM/4.0.0" xmlns:xsi="http://www.w3.org/2001/XMLSchema-instance"
         xsi:schemaLocation="http://maven.apache.org/POM/4.0.0 http://maven.apache.org/xsd/maven-4.0.0.xsd">
      <modelVersion>4.0.0</modelVersion>
      <parent>
        <groupId>com.test</groupId>
        <version>1.0.0</version>
        <artifactId>parent</artifactId>
      </parent>
      <groupId>com.test</groupId>
      <artifactId>project2</artifactId>
      <version>${project2Version}</version>
      <packaging>jar</packaging>

      <dependencies>
        <dependency>
          <groupId>commons-logging</groupId>
          <artifactId>commons-logging</artifactId>
        </dependency>
      </dependencies>
    </project>

The project that follows shows how the library can now be used in another project without having to specify the dependent project's versions.
    <project xmlns="http://maven.apache.org/POM/4.0.0" xmlns:xsi="http://www.w3.org/2001/XMLSchema-instance"
         xsi:schemaLocation="http://maven.apache.org/POM/4.0.0 http://maven.apache.org/xsd/maven-4.0.0.xsd">
      <modelVersion>4.0.0</modelVersion>
      <groupId>com.test</groupId>
      <artifactId>use</artifactId>
      <version>1.0.0</version>
      <packaging>jar</packaging>

      <dependencyManagement>
        <dependencies>
          <dependency>
            <groupId>com.test</groupId>
            <artifactId>bom</artifactId>
            <version>1.0.0</version>
            <type>pom</type>
            <scope>import</scope>
          </dependency>
        </dependencies>
      </dependencyManagement>
      <dependencies>
        <dependency>
          <groupId>com.test</groupId>
          <artifactId>project1</artifactId>
        </dependency>
        <dependency>
          <groupId>com.test</groupId>
          <artifactId>project2</artifactId>
        </dependency>
      </dependencies>
    </project>
sub Project不需要指定parent的版本号
https://stackoverflow.com/questions/10582054/maven-project-version-inheritance-do-i-have-to-specify-the-parent-version
Starting with Maven 3.5.0-beta-1 you can use the
${revision},${sha1}and/or${changelist}as placeholders for the version in your pom file. https://maven.apache.org/maven-ci-friendly.html
# 依赖冲突
  Project A: some-framework version 1.2.0-SNAPSHOT
  │			[
  │				sub moduels:
  │				some-framework-model ${project.version}
  │				......
  │			]
  ├── SubProject A-1: test-A
  │						└── Dependency: some-framework-model
  │
  └── Project B: some-project version 0.8.0-SNAPSHOT
      └── SubProejct B-1: some-project-service
      		└── Dependency: some-framework-model

注意到,
当我在 Project A的parent的pom里面的dependencyManagement里使用 ${project.version} 来声明 some-framework-model的版本,编译SubProject A-1: test-A的时候可以正确找到 some-framework-model 比如1.2.0-SNAPSHOT;
但是当编译Project B的时候就出现问题了,因为SubProejct B-1: some-project-service 并不是去找some-framework-model 1.2.0-SNAPSHOT 而是去找 some-framework-model 0.8.0-SNAPSHOT;
显然SubProejct B-1找错了,可能是maven的这个${project.version}被Project B继承下来,然后简单的替换成了0.8.0,而不是沿用Project A的版本1.2.0-SNAPSHOT
引入第三方jar资源 注意事项:
1、引入任何第三方jar之前,查看一下平台framework-parent.pom中是否已经包含(或间接依赖引入),存在时请不要再次引入; 2、如果引入的第三方jar与平台存在版本不一致的地方,请在此处做maven依赖引用剔除,剔除方法还是参见framework-parent.pom中的dependencyManagement部分; 3、在当前dependencyManagement依赖管理中定义jar版本信息必须在properties属性中统一明确定义,便于集中版本维护管理与问题排查; 4、在当前业务工程内的各业务子模块禁止出现版本(version)标签信息。
解决方法: mvn dependency:tree -Dverbose
- 将依赖的 scope 改成 provided
- 显示的 exclusive 掉相关依赖
- 对 class 进行 shade 操作
https://maven.apache.org/guides/introduction/introduction-to-the-pom.html https://maven.apache.org/guides/introduction/introduction-to-profiles.html m2 repository C:\Users\lyhistory.m2\repository
Project Inheritance vs Project Aggregation Project Interpolation and Variables Guide to creating assemblies https://maven.apache.org/guides/mini/guide-assemblies.html
https://search.maven.org/
?#.Failed to execute goal org.apache.maven.plugins:maven-surefire-plugin:2.12:test (default-test) on project. https://stackoverflow.com/questions/36427868/failed-to-execute-goal-org-apache-maven-pluginsmaven-surefire-plugin2-12test
?#.invalid LOC header (bad signature)/repo.maven.apache.org: Unknown host repo.maven.apache.org/Maven install error: Dependency could not be resolved
- Delete .m2\repository\org\apache\maven
- mvn dependency:resolve -X
自定义maven repository: e.g nexus repository
# 4.2.3 Lifecycle
https://maven.apache.org/plugins/index.html
Standard Lifecycle using core plugin: https://maven.apache.org/guides/introduction/introduction-to-the-lifecycle.html
- validate - validate the project is correct and all necessary information is available
- compile - compile the source code of the project
- test - test the compiled source code using a suitable unit testing framework. These tests should not require the code be packaged or deployed
- package - take the compiled code and package it in its distributable format, such as a JAR.
- verify - run any checks on results of integration tests to ensure quality criteria are met
- install - install the package into the local repository, for use as a dependency in other projects locally
- deploy - done in the build environment, copies the final package to the remote repository for sharing with other developers and projects.
Non-Standard Lifecycle, for example Tools:
- mvn version https://www.mojohaus.org/versions-maven-plugin/usage.html
- mvn release https://maven.apache.org/maven-release/maven-release-plugin/
# Config
项目pom配置plugin
maven & maven.plugins & dependencies
https://stackoverflow.com/questions/11881663/what-is-the-difference-in-maven-between-dependency-and-plugin-tags-in-pom-xml
spring-boot-maven-plugin vs maven-compiler-plugin
https://stackoverflow.com/questions/57687485/whats-the-difference-between-spring-boot-maven-plugin-and-maven-compiler-plu
<build>
		<plugins>
			<plugin>
				<groupId>org.springframework.boot</groupId>
				<artifactId>spring-boot-maven-plugin</artifactId>
			</plugin>
		</plugins>
	</build>

VS

<build>
        <plugins>
            <!-- JDK level -->
            <plugin>
                <groupId>org.apache.maven.plugins</groupId>
                <artifactId>maven-compiler-plugin</artifactId>
                <version>3.1</version>
                <configuration>
                    <source>1.8</source>
                    <target>1.8</target>
                    <encoding>UTF-8</encoding>
                </configuration>
            </plugin>

            <plugin>
                <groupId>org.apache.maven.plugins</groupId>
                <artifactId>maven-resources-plugin</artifactId>
                <configuration>
                    <nonFilteredFileExtensions>
                        <nonFilteredFileExtension>dll</nonFilteredFileExtension>
                        <nonFilteredFileExtension>so</nonFilteredFileExtension>
                    </nonFilteredFileExtensions>
                </configuration>
            </plugin>

            <!-- 更新: mvn versions:set -DnewVersion=1.0.4-SNAPSHOT versions:update-child-modules
                回滚: mvn versions:revert 提交: mvn versions:commit -->
            <plugin>
                <groupId>org.codehaus.mojo</groupId>
                <artifactId>versions-maven-plugin</artifactId>
                <version>2.7</version>
            </plugin>

        </plugins>

        <resources>
            <resource>
                <directory>src/main/resources</directory>
                <filtering>true</filtering>
                <excludes>
                    <exclude>application.properties</exclude>
                </excludes>
            </resource>
        </resources>

    </build>
项目pom配置repository
https://stackoverflow.com/questions/35317118/repository-tag-under-distributionmanagement-vs-repositories
- Repositories declared under the
distributionManagementelement will be used for deployment, i.e. when runningmvn deploy. - The
repositorieselement will be used for downloading dependencies of the project. The command is not necessarilymvn installbut any command that requires Maven to fetch artifacts from a repository.
<distributionManagement>
    <repository>
        <id>...</id>
        <name>...</name>
        <url>...</url>
    </repository>
</distributionManagement>

<repositories>
    <repository>
        <id>...</id>
        <name>...</name>
        <layout>default</layout>
        <url>...</url>
    </repository>
</repositories>
全局配置
%USER_HOME%/.m2/settings.xml:
https://stackoverflow.com/questions/32057282/maven-distributionmanagement-or-server-user-and-password-as-parameter
CI配置
https://docs.gitlab.com/ee/user/packages/maven_repository/#create-maven-packages-with-gitlab-cicd-by-using-maven
# Commands
mvn versions:set -DnewVersion=1.0.3-SNAPSHOT mvn versions:set -DgroupId=org.apache.maven.* -DartifactId=* -DoldVersion=2.* -DnewVersion=2.1.0-SNAPSHOT
mvn install command runs the install plugin used in the install phase to add artifact(s) to the local repository. The Install Plugin uses the information in the POM (groupId, artifactId, version) to determine the proper location of the artifact within the local repository.
The local repository is the local cache where all artifacts needed for the build are stored. By default, it is located in the user's home directory (~/.m2/repository) but the location can be configured in ~/.m2/settings.xml using the localRepository element
mvn deploy runs the deploy plugin which deploys an artifact to the remote repository
mvn release command runs the release plugin which is responsible for tagging the current code in the source control. In order to use the maven release plugin, you need to add the SCM section with a developerConnection which contains the URL of the source control management system pointing to the folder containing the pom.xml.
release:clean : performs clean-up after a release preparation.
release:prepare : prepare for a release in SCM.
release:rollback : rollback a previous release.
release:perform : perform a release from SCM. This is the command which actually does the release by downloading the tagged version from SCM e.g. SVN or CVS or Git
mvn clean build -Dmaven.test.skip=true
mvn clean install -DskipTests
mvn clean install -P<profileName>
mvn compile exec:java (for sprint-boot alternative: mvn spring-boot:run)

mvn -q -Dexec.executable="echo" -Dexec.args='${project.version}' --non-recursive org.codehaus.mojo:exec-maven-plugin:1.6.0:exec

--------------------------------------------------------------------------------
--- release
--------------------------------------------------------------------------------
Target Project:
<project xmlns="http://maven.apache.org/POM/4.0.0" xmlns:xsi="http://www.w3.org/2001/XMLSchema-instance" xsi:schemaLocation="http://maven.apache.org/POM/4.0.0 https://maven.apache.org/xsd/maven-4.0.0.xsd">
	<modelVersion>4.0.0</modelVersion>
	<groupId>com.lyhistory.redis</groupId>
	<artifactId>test-spring-redis</artifactId>
	<version>0.0.1-SNAPSHOT</version>
	...............
</project>

The standard Maven plugin used by a Release Process is the maven-release-plugin – the configuration for this plugin is minimal:
<plugin>
   <groupId>org.apache.maven.plugins</groupId>
   <artifactId>maven-release-plugin</artifactId>
   <version>2.4.2</version>
   <configuration>
      <tagNameFormat>v@{project.version}</tagNameFormat>
      <autoVersionSubmodules>true</autoVersionSubmodules>
      <releaseProfiles>releases</releaseProfiles>
   </configuration>
</plugin>

The Release process will interact with the Source Control of the project – this means we first need to define the <scm> element in our pom.xml:
<scm>
    <connection>scm:git:http://xxxxx/test.git</connection>
    <developerConnection>scm:git:http://xxxxx/test.git
    </developerConnection>
    <url>http://xxxxx/test</url>
    <tag>HEAD</tag>
</scm>
or using the git protocol:
<scm>
   <connection>scm:git:[email protected]:user/project.git</connection>
   <url>scm:git:[email protected]:user/project.git</url>
   <developerConnection>scm:git:[email protected]:user/project.git</developerConnection>
</scm>

mvn clean -DskipTests -Darguments=-DskipTests release:prepare -e -DreleaseVersion=1.0.3 -DdevelopmentVersion=1.0.4-SNAPSHOT -Dtag="20211008-1.0.3" -DscmDevelopmentCommitComment="prepare for next development iteration 1.0.4-SNAPSHOT"

In order for Maven to be able to release to a Nexus Repository Server, we need to define the repository information via the distributionManagement element:
<distributionManagement>
   <repository>
      <id>nexus-releases</id>
      <url>http://localhost:8081/nexus/content/repositories/releases</url>
   </repository>
</distributionManagement>

mvn release:rollback
mvn release:perform -e -Darguments="-Dmaven.javadoc.skip=true" -s ci_settings.xml


#?Cannot prepare the release because you have local modifications :[pom.xml:modified]
提交pom改动到git
#?Caused by: org.apache.maven.shared.release.ReleaseFailureException: You don't have a SNAPSHOT project in the reactor projects list
pom中version必须是SNAPSHOT后缀 <version>XXX-SNAPSHOT</version>
-DskipTests VS -Dmaven.test.skip=true
Maven -> Update Projects Maven package ethereumj-core maven package https://github.com/ethereum/ethereumj/issues/1018
https://gerardnico.com/maven/bin Unsupported major.minor version 52.0 https://blog.csdn.net/qq_36769100/article/details/78880341 打包 maven 生成可执行jar并使用shell脚本运行 https://blog.csdn.net/hg_harvey/article/details/79076939 Maven打包的三种方式 https://blog.csdn.net/daiyutage/article/details/53739452
Maven 发布deploy到remote/internal repository https://maven.apache.org/guides/introduction/introduction-to-repositories.html https://maven.apache.org/plugins/maven-deploy-plugin/usage.html
Dependencies show in file icon https://stackoverflow.com/questions/45291243/maven-dependency-jar-file-displayed-as-folder-icon/45291377 Set mvn version in eclipse: Preferences->Maven->Installations
?#issues: maven unknown lifecycle phase exec Don’t use powershell , use cmd instead!!!!!!!https://stackoverflow.com/questions/7576265/maven-exec-plugin-throws-exception-for-no-apparent-reason
# 4.2.4 Remote Debug
前面已经提到了很多debug方式包括远程调试,这里maven还有自己的特有方式: https://maven.apache.org/surefire/maven-surefire-plugin/examples/debugging.html
命令行执行: mvnDebug -DforkCount=0 test 然后在ECLIPSE: Debug Configuration->Remote Java Application->maven surfire->Connect(Remote IP&Port)&Source
Haven’t solve, why mvn -Dmaven.surefire.debug test not working? With , maybe because of using powershell, should try cmd instead https://www.cnblogs.com/sylvia-liu/articles/4685130.html
# 4.2.5 nexus maven-repositories
# Nexus server setup
Nexus Installing and Running (opens new window)
Repositories => Create Repository:
Maven public repo Repository ID: maven-central Repository Name: maven-central Provider: Maven2 Version Policy: Release Type: Proxy URL:http://xxxxx/repository/maven-central (xxxxx is your nexus repo ip:port or customized domainname) Remote Storage(Location of the remote repository being proxied, e.g. https://repo1.maven.org/maven2/): https://repo1.maven.org/maven2/
Custom snapshot repo Repository ID: maven-snapshots Repository Name: maven-snapshots Version Policy: Snapshot Type: hosted URL:http://xxxxx/repository/maven-snapshots (xxxxx is your nexus repo ip:port or customized domainname)
Custom release repo Repository ID: maven-snapshots Repository Name: maven-snapshots Version Policy: Snapshot Type: hosted URL:http://xxxxx/repository/maven-releases (xxxxx is your nexus repo ip:port or customized domainname)
# Maven Project config
https://www.baeldung.com/maven-deploy-nexus https://www.baeldung.com/maven-snapshot-release-repository
# deploy to "Custom snapshot/release repo"- mvn deploy
  <!-- Publish the versioned releases here -->
 <!-- 配置远程发布到私服,mvn deploy -->
    <distributionManagement>
        <repository>
            <id>nexus</id>
            <name>Nexus Release Repository</name>
            <url>http://XXXXX/repository/maven-releases/</url>
        </repository>
        <snapshotRepository>
            <id>nexus</id>
            <name>Nexus Snapshot Repository</name>
            <url>http://XXXXX/repository/maven-snapshots/</url>
        </snapshotRepository>
    </distributionManagement>
ci_settings.xml:
<settings>
  <servers>
    <server>
        <id>nexus-snapshots</id>
        <username>deployment</username>
        <password>the_pass_for_the_deployment_user</password>
    </server>
  </servers>
</settings>
SNAPSHOT: The snapshot repository is a repository used for incremental, unreleased artifact versions.
A snapshot version is a version that has not yet been released. The general idea is to have a snapshot version before the released version. It allows us to deploy the same transient version incrementally, without requiring projects to upgrade the artifact version they're consuming. Those projects can use the same version to get an updated snapshot version.
For instance, before releasing version 1.0.0, we can have its snapshot version. The snapshot version has a SNAPSHOT suffix after the version (for example, 1.0.0-SNAPSHOT).
<groupId>com.baeldung</groupId>
<artifactId>maven-snapshot-repository</artifactId>
<version>1.0.0-SNAPSHOT</version>
After the deployment, the actual artifact version will contain a timestamp value instead of the SNAPSHOT value. For instance, when we deploy 1.0.0-SNAPSHOT, the actual value will contain the current timestamp and the build number (for example, 1.0.0-20220709.063105-3).
The timestamp value is calculated during the artifact deployment. Maven generates the checksum and uploads the artifact’s files with the same timestamp.
The maven-metadata.xml file holds precise information about the snapshot version and its link to the latest timestamp value:
<metadata modelVersion="1.1.0">
    <groupId>com.baeldung</groupId>
    <artifactId>maven-snapshot-repository</artifactId>
    <version>1.0.0-SNAPSHOT</version>
    <versioning>
        <snapshot>
            <timestamp>20220709.063105</timestamp>
            <buildNumber>3</buildNumber>
        </snapshot>
        <lastUpdated>20220709063105</lastUpdated>
        <snapshotVersions>
            <snapshotVersion>
                <extension>jar</extension>
                <value>1.0.0-20220709.063105-3</value>
                <updated>20220709063105</updated>
            </snapshotVersion>
            <snapshotVersion>
                <extension>pom</extension>
                <value>1.0.0-20220709.063105-3</value>
                <updated>20220709063105</updated>
            </snapshotVersion>
        </snapshotVersions>
    </versioning>
</metadata>
Every time we deploy the project under the same snapshot version, Maven will generate the version containing the new timestamp value and the new build number.
RELEASE:
Once we remove the word SNAPSHOT from the project version, the release repository will be chosen automatically instead of the snapshot repository during the deployment.
Furthermore, if we want to redeploy the artifact under the same version, we may get an error: “Repository does not allow updating assets”. Once we deploy the released artifact version, we cannot change its content. Therefore, to resolve the problem, we’d need to simply release the next version.
<groupId>com.baeldung</groupId>
<artifactId>maven-release-repository</artifactId>
<version>1.0.0</version>
Note:
- 发布 SNAPSHOT 版本, 使用 mvn deploy -e -s ci_settings.xml
- 发布 RELEASE 版本, 可以使用 mvn deploy -e -s ci_settings.xml
或者
mvn release:prepare -e -DreleaseVersion=0.0.1-SNAPSHOT -DdevelopmentVersion=0.0.1-SNAPSHOT -Dtag="20230523-0.0.1-SNAPSHOT" -DscmDevelopmentCommitComment="prepare for next development iteration 0.0.1-SNAPSHOT"mvn release:perform -e -Darguments="-Dmaven.javadoc.skip=true -Dmaven.test.skip=true" -s ci_settings.xml
# download from "proxied maven-central and hosted snapshot/release"- mvn install
<!-- download artifacts from this repo -->
<repositories>
        <repository>
            <id>maven-repo</id>
            <url>http://xxxxx/repository/maven-central/</url>
        </repository>
        <repository>
            <id>nexus-snapshot</id>
            <url>http://xxxxx/repository/maven-snapshots/</url>
            <snapshots>
              <enabled>true</enabled>
            </snapshots>
            <releases>
                <enabled>false</enabled>
            </releases>
        </repository>
        <repository>
            <id>nexus-release</id>
            <url>http://xxxxx/repository/maven-releases/</url>
        </repository>
    </repositories>
SNAPSHOT:
Before downloading the snapshot artifact, Maven downloads its associated maven-metadata.xml file. That way, Maven can check if there's a newer version, based on the timestamp value and build number.
The retrieval of such an artifact can still use the SNAPSHOT version.
Snapshot versions are not enabled by default. We need to enable them manually:
<snapshots>
    <enabled>true</enabled>
</snapshots>
By enabling snapshots, we can define how often we'd like to check for a newer version of the SNAPSHOT artifacts. However, the default update policy is set to once per day. We can override this behavior by setting a different update policy:
<snapshots>
    <enabled>true</enabled>
    <updatePolicy>always</updatePolicy>
</snapshots>
There are four different values we can place inside the updatePolicy element:
always — check for a newer version every time daily (default value) — check for a newer version once a day interval:mm — check for a newer version based on an interval set in minutes never — never try to get a newer version (compared to the one we already have locally) Additionally, instead of defining the updatePolicy, we can force an update of all snapshot artifacts by passing the -U argument in the command:
mvn install -U
Furthermore, the dependency will not be re-downloaded if it has already been downloaded and the checksum is the same as the one we already have in our local repository. Next, we can add a snapshot version of an artifact to our project:
<dependencies>
    <dependency>
        <groupId>com.baeldung</groupId>
        <artifactId>maven-snapshot-repository</artifactId>
        <version>1.0.0-SNAPSHOT</version>
    </dependency>
</dependencies>
Using a snapshot version during the development phase can prevent having multiple versions of the artifact. We can use the same SNAPSHOT version whose build will contain the snapshot of our code at a given time.
RELEASE:
Maven defaults to looking for components from the Maven Central Repository. This repository uses a release version policy by default.
Release repositories will only resolve released artifacts. In other words, it should contain only published artifact versions whose content should not change in the future.
<dependencies>
    <dependency>
        <groupId>com.baeldung</groupId>
        <artifactId>maven-release-repository</artifactId>
        <version>1.0.0</version>
    </dependency>
</dependencies>
# 4.2.6 toolchain
apache-maven-3.6.1\bin..\conf\settings.xml .m2\settings.xml apache-maven-3.6.1\bin..\conf\toolchains.xml .m2\toolchains.xml
>mvn -X clean install
Apache Maven 3.6.1 (d66c9c0b3152b2e69ee9bac180bb8fcc8e6af555; 2019-04-05T03:00:29+08:00)
Maven home: C:\Dev\apache-maven-3.6.1\bin\..
Java version: 1.8.0_42, vendor: Oracle Corporation, runtime: C:\Program Files\Java\openjdk-8u42-b03-windows-i586-14_jul_2022\java-se-8u42-ri\jre
Default locale: en_SG, platform encoding: Cp1252
OS name: "windows 8.1", version: "6.3", arch: "x86", family: "windows"
[DEBUG] Created new class realm maven.api
[DEBUG] Importing foreign packages into class realm maven.api
[DEBUG]   Imported: javax.annotation.* < plexus.core
[DEBUG]   Imported: javax.annotation.security.* < plexus.core
[DEBUG]   Imported: javax.enterprise.inject.* < plexus.core
[DEBUG]   Imported: javax.enterprise.util.* < plexus.core
[DEBUG]   Imported: javax.inject.* < plexus.core
[DEBUG]   Imported: org.apache.maven.* < plexus.core
[DEBUG]   Imported: org.apache.maven.artifact < plexus.core
[DEBUG]   Imported: org.apache.maven.classrealm < plexus.core
.........................................................................
[DEBUG] Populating class realm maven.api
[INFO] Error stacktraces are turned on.
[DEBUG] Message scheme: color
[DEBUG] Message styles: debug info warning error success failure strong mojo project
[DEBUG] Reading global settings from C:\Dev\apache-maven-3.6.1\bin\..\conf\settings.xml
[DEBUG] Reading user settings from C:\Users\yue.liu\.m2\settings.xml
[DEBUG] Reading global toolchains from C:\Dev\apache-maven-3.6.1\bin\..\conf\toolchains.xml
[DEBUG] Reading user toolchains from C:\Users\yue.liu\.m2\toolchains.xml
[DEBUG] Using local repository at C:\Users\yue.liu\.m2\repository
[DEBUG] Using manager EnhancedLocalRepositoryManager with priority 10.0 for C:\Users\yue.liu\.m2\repository
[INFO] Scanning for projects...
[DEBUG] Extension realms for project ngs.apex.com:ngs-kafka-redis:jar:1.0-SNAPSHOT: (none)
[DEBUG] Looking up lifecycle mappings for packaging jar from ClassRealm[plexus.core, parent: null]
[DEBUG] === REACTOR BUILD PLAN ================================================
[DEBUG] Project: XXXXX
[DEBUG] Tasks:   [clean, install]
[DEBUG] Style:   Regular
# 5. JAVA Virtual Machine JVM
Refer: https://blog.csdn.net/wuxiaolongah/article/details/119333948?spm=1001.2101.3001.6650.6&utm_medium=distribute.pc_relevant.none-task-blog-2%7Edefault%7EOPENSEARCH%7ERate-6-119333948-blog-6333467.pc_relevant_multi_platform_whitelistv4&depth_1-utm_source=distribute.pc_relevant.none-task-blog-2%7Edefault%7EOPENSEARCH%7ERate-6-119333948-blog-6333467.pc_relevant_multi_platform_whitelistv4&utm_relevant_index=9 https://developer.aliyun.com/article/608529 案例分享:如何通过JVM crash 的日志和core dump定位和分析Instrument引起的JVM crash https://blog.csdn.net/raintungli/article/details/77790829 https://blog.csdn.net/qq_31865983/article/details/98480703
https://docs.oracle.com/en/java/javase/17/troubleshoot/troubleshooting-memory-leaks.html#GUID-19F6D28E-75A1-4480-9879-D0932B2F305B http://hengyunabc.github.io/spring-boot-application-start-analysis/ https://www.oschina.net/question/1263216_2267259 https://blog.csdn.net/arkblue/article/details/39718947 https://www.bilibili.com/read/cv1844967/
troubleshooting with hotspot vm https://docs.oracle.com/javase/8/docs/technotes/guides/troubleshoot/index.html https://enos.itcollege.ee/~jpoial/allalaadimised/reading/JVM_Troubleshooting_Guide.pdf https://www.javaadvent.com/2021/12/diagnosing_a_jvm_crash.html
https://www.javaadvent.com/2021/12/diagnosing_a_jvm_crash.html https://docs.oracle.com/cd/E13150_01/jrockit_jvm/jrockit/geninfo/diagnos/dumpfile.html
ref:
圣经《JAVA Performance》 (opens new window)
Java和Spring全面demo源码 (opens new window)
Java远程调试(Remote Debugging)的那些事 (opens new window)
Java外挂 https://www.codercto.com/a/18543.html https://github.com/vipshop/vjtools https://mp.weixin.qq.com/s/cwU2rLOuwock048rKBz3ew